
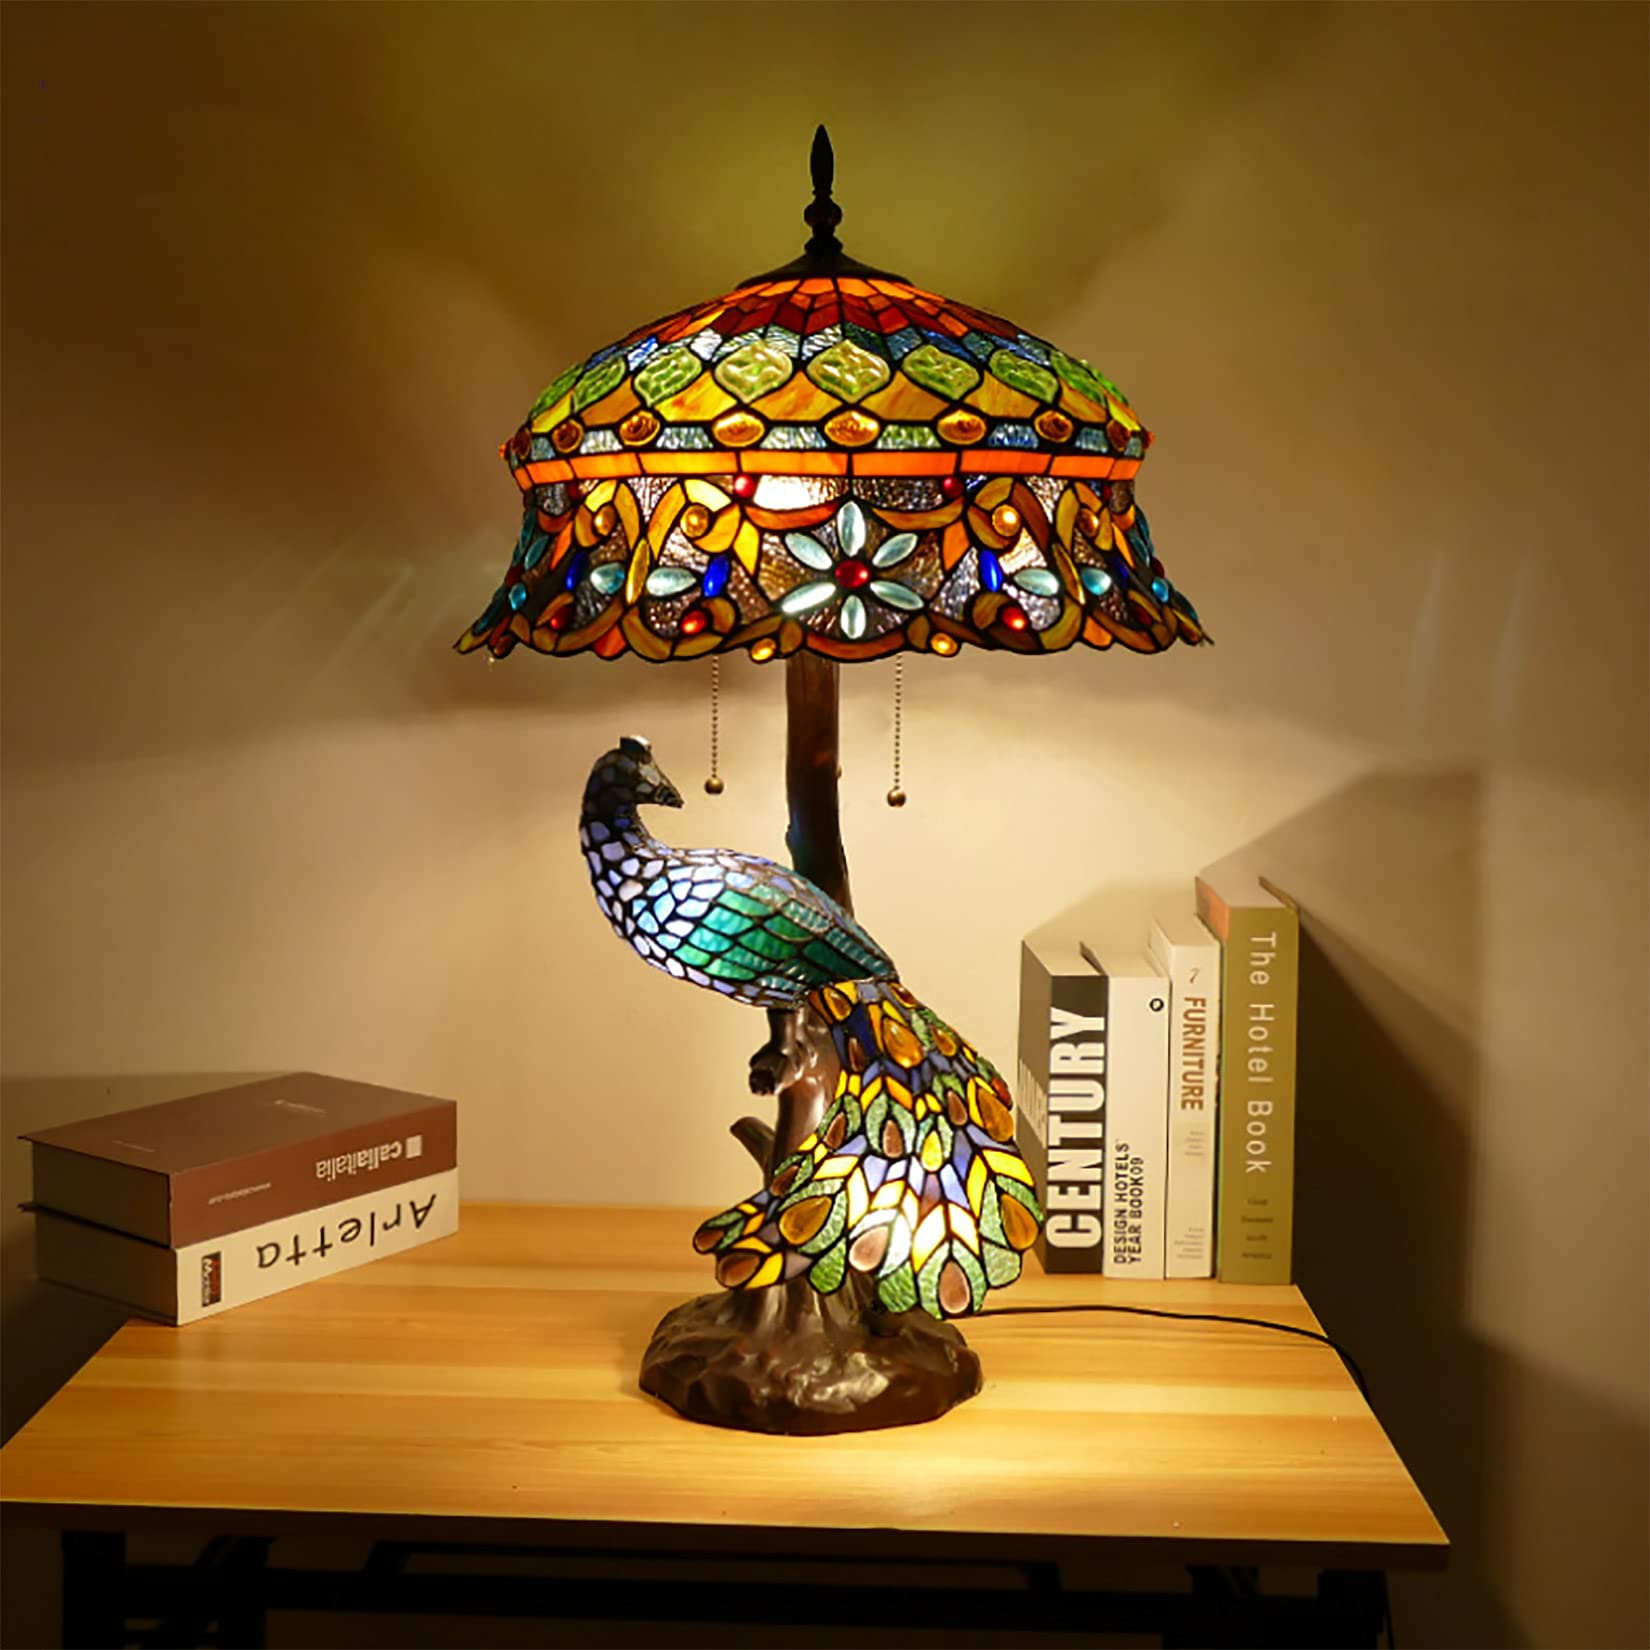
Choosing the Design
Choosing the right design for your stained glass lamp shade is an important step in creating a beautiful and customized piece. The design will determine the overall aesthetic and style of the lamp shade, so it’s crucial to choose something that suits your taste and complements your existing décor.
When selecting a design, consider the overall theme and vibe you want to achieve. Are you looking for something traditional, modern, or eclectic? Take inspiration from your surroundings, such as the patterns in your furniture, wallpaper, or artwork. This will help you create a cohesive look in your space.
Another factor to consider is the size and shape of your lamp. Do you have a small table lamp that requires a delicate and intricate design? Or perhaps you need a large lamp shade for a floor lamp that will serve as a statement piece in your room. Take measurements of your lamp and consider the scale of the design to ensure it fits proportionally.
Research and explore various designs to find inspiration. Look for patterns and images online, visit local stained glass studios, or visit museums that specialize in decorative arts. As you search, pay attention to the level of complexity of the design. If you’re a beginner, opt for a simpler design with fewer pieces and straight lines. As you gain more experience, you can challenge yourself with more intricate and detailed patterns.
Consider the colors you want to incorporate into your lamp. Stained glass offers a wide range of vibrant hues that can add personality and visual interest to your lamp shade. Think about the color scheme of your room and choose shades that complement or contrast with it. You can use a single color for a monochromatic look or embrace a variety of hues for a more dynamic and colorful piece.
Gathering Supplies
Before you begin creating your stained glass lamp shade, it’s crucial to gather all the necessary supplies. Having everything you need at hand will make the process smoother and more efficient. Here are the essential supplies you’ll need:
- Glass: Choose a variety of colored glass sheets in different textures and opacities. This will allow you to create depth and visual interest in your lamp shade. You can find stained glass at specialty stores or order online.
- Glass Cutter: A glass cutter is a specialized tool used to score and cut glass sheets. Look for a cutter with a comfortable grip and a sharp, replaceable blade. It’s a good idea to have spare blades on hand.
- Pattern Paper: Use pattern paper or tracing paper to create your lamp shade’s design. This will serve as a guide for cutting and assembling the glass pieces. You can find pattern paper at craft stores or use parchment paper as an alternative.
- Soldering Iron: A soldering iron is used to join the glass pieces together with solder. Look for a soldering iron specifically designed for stained glass projects. Make sure to have a variety of soldering iron tips for different tasks.
- Solder: Solder is a metal alloy used to create strong and durable bonds between the glass pieces. Use a solder with a good balance of lead and tin, specifically formulated for stained glass projects.
- Flux: Flux is a chemical compound that helps the solder flow smoothly and evenly. It also helps to clean the metal surface before soldering. Look for a flux formulated for use with stained glass.
- Flux Brush: A flux brush is used to apply flux to the solder lines. Choose a brush with natural bristles that can hold a sufficient amount of flux.
- Safety Equipment: Working with glass and solder requires taking safety precautions. Have safety goggles to protect your eyes from glass shards, and consider wearing gloves to protect your hands.
It’s important to gather all these supplies before you start your stained glass lamp shade project. This way, you can focus on the creative process without any interruptions. Additionally, having the right tools and materials will ensure the outcome is of high quality and visually appealing.
Preparing the Glass Pieces
Once you have gathered all the necessary supplies for your stained glass lamp shade, it’s time to prepare the glass pieces before you start cutting and assembling them. Properly preparing the glass will ensure that it is smooth, clean, and ready for the next steps of the process. Here’s how to prepare the glass pieces:
- Clean the Glass: Start by cleaning each glass sheet with a mild soap and water solution. Use a non-abrasive cloth or sponge to gently remove any dirt, dust, or fingerprints. Rinse the glass thoroughly and let it dry completely before proceeding.
- Apply Copper Foil (Optional): If you prefer a more decorative border around each glass piece, you can choose to apply copper foil to the edges. Copper foil will also provide structural integrity to the glass pieces. Carefully apply the copper foil to the edges and smooth it down using a burnisher or your fingers.
- Protect the Glass: To prevent the glass from getting scratched or damaged during cutting and handling, you can apply a thin layer of clear packing tape to one side of each glass sheet. This will act as a protective barrier and make it easier to handle the glass without leaving fingerprints or smudges.
- Transfer the Pattern: Place the pattern paper or tracing paper with your lamp shade design onto each glass sheet. Secure it in place with tape or small weights. Use a permanent marker to trace the design onto the glass, making clear and precise markings.
- Breakout the Glass: Now it’s time to carefully break out the individual glass pieces based on the traced pattern lines. Use a glass cutter to score along the lines, applying steady pressure. Once scored, hold the glass along the scored line and apply pressure with your fingers or a breaking tool to snap the glass along the score.
- Grind the Edges (Optional): If you want to achieve a smoother and more professional-looking finish on your glass pieces, you can use a glass grinder to grind down any rough or uneven edges. This step is especially useful if your glass pieces have irregular shapes or need to fit precisely together.
By properly preparing the glass pieces, you ensure that they are clean, smooth, and ready for the next steps of the stained glass lamp shade creation process. Take your time during this stage to ensure the glass is handled with care and attention to detail. With well-prepared glass, you’ll be ready to move on to the next steps of creating your beautiful stained glass lamp shade.
Creating a Pattern
Before you can start cutting the glass pieces for your stained glass lamp shade, it’s important to create a pattern that will serve as your guide. The pattern will outline the design and shape of each glass piece, ensuring that they fit together seamlessly. Here’s how to create a pattern:
- Gather Your Materials: To create a pattern, you will need pattern paper or tracing paper, a pencil, a ruler, and any reference materials such as photographs, drawings, or existing patterns.
- Measure and Plan: Measure the dimensions of your lamp shade frame or base. Determine how many glass pieces you will need and their sizes. Using a ruler, draw a rough outline of your lamp shade on the pattern paper, keeping the measurements in mind.
- Design and Sketch: Use your creativity to design the overall pattern of your lamp shade. Consider the style you want to achieve, whether it’s geometric, floral, abstract, or a combination of different elements. Sketch out the main shapes and lines that will make up your design, keeping in mind the placement of the glass pieces and how they will fit together.
- Refine and Detail: Once you have a rough sketch, take your time to refine the details of the pattern. Add intricate designs, curves, and any additional elements that will enhance the visual appeal of your lamp shade. Make sure to maintain a balance between simplicity and complexity, depending on your skill level and the effect you want to achieve.
- Test and Adjust: Before finalizing the pattern, it’s a good idea to test it by placing it over your lamp shade frame or base. This will give you a visual representation of how the final product will look. Make any necessary adjustments to ensure that the pattern fits perfectly within the dimensions of your lamp shade.
- Trace and Transfer: Once you are satisfied with your pattern, place the pattern paper or tracing paper on top of the glass sheets. Use a pencil to trace the pattern onto the glass, applying light pressure to create clear and visible lines.
Creating a pattern is an essential step in the stained glass lamp shade creation process. It allows you to visualize the final design and ensures that the glass pieces will fit together seamlessly. Take your time during this stage and let your creativity flow, resulting in a pattern that reflects your personal style and enhances the beauty of your stained glass lamp shade.
Cutting the Glass
Once you have created your pattern and transferred it onto the glass, it’s time to start cutting the glass pieces for your stained glass lamp shade. This step requires precision and careful handling to ensure clean, accurate cuts. Here’s how to cut the glass:
- Gather Your Tools: Make sure you have all the necessary tools for cutting the glass, including a glass cutter, safety goggles, a ruler or straight edge, and a cutting surface such as a self-healing mat or thick cardboard.
- Protect Yourself: Put on your safety goggles to protect your eyes from any glass shards or debris that may occur during the cutting process. Safety should always be a top priority.
- Align and Score: Place the glass sheet on your cutting surface with the pattern side facing up. Use a ruler or straight edge to align the glass cutter along the lines of your pattern. Apply gentle and consistent pressure as you score the glass, making a smooth and continuous line. Avoid stopping or going over the same line multiple times, as this can result in uneven or jagged cuts.
- Breakout the Glass: Once you have scored the glass, carefully pick up the sheet and hold it with both hands. Position your thumbs on either side of the scored line, and gently apply equal pressure to snap the glass along the score. Be cautious and use controlled pressure to ensure clean breaks.
- Shape and Smooth Edges: After breaking out the glass pieces, you may notice that they have rough or uneven edges. To shape and smooth the edges, use a glass grinder or a dedicated grinding tool. Hold the glass piece firmly and move it along the grinding surface in a circular motion, gradually reducing any rough areas and creating a smooth edge. Be careful not to grind too aggressively or to apply too much pressure, as it may cause the glass to crack.
- Repeat the Process: Repeat the cutting and breaking process for each glass piece, following the lines of the pattern carefully. Take your time and double-check your measurements and cuts to ensure accuracy and consistency.
Cutting the glass is a crucial step in creating your stained glass lamp shade. It requires patience, precision, and attention to detail. Remember to prioritize safety by wearing goggles and handling the glass with care. By using the right tools and following proper techniques, you’ll be able to achieve clean, well-cut glass pieces that will fit together seamlessly in your finished lamp shade.
Assembling the Pieces
Now that you have cut all the glass pieces for your stained glass lamp shade, it’s time to assemble them into the final design. This step requires careful precision and attention to detail to ensure that the pieces fit together seamlessly. Here’s how to assemble the pieces:
- Arrange the Pieces: Lay out all the cut glass pieces on your work surface, referring to your pattern as a guide. Take note of the orientation and placement of each piece to ensure they fit together correctly.
- Clean the Glass Edges: Use a soft cloth or brush to clean the edges of each glass piece to remove any debris or residue from cutting and grinding. This will promote better adhesion when you apply the solder.
- Apply Copper Foil (If Used): If you have chosen to use copper foil as a decorative border around each glass piece, now is the time to apply it. Carefully wrap the copper foil around the edges of each piece, pressing it firmly to ensure it adheres securely. Smooth down any rough or uneven areas with a burnisher or your finger.
- Fit the Pieces Together: Begin fitting the glass pieces together, following the lines of your pattern. Pay attention to the shape and size of each piece and how they intersect with one another. Ensure that the edges meet evenly and that there are no gaps between the pieces.
- Secure with Solder: Once you have arranged the pieces to your satisfaction, it’s time to secure them with solder. Heat your soldering iron to the appropriate temperature and apply flux along the copper foil edges and where the glass pieces join together. Place the tip of the soldering iron on the fluxed area and allow it to heat up.
- Apply Solder: With the soldering iron heated, touch the solder to the heated area. The solder will melt and flow along the copper foil and glass edges, creating a strong bond between the glass pieces. Continue adding solder until the seam is fully filled and smooth. Be careful not to overheat the glass or apply too much solder, as it can cause distortion or damage to the glass.
- Reinforce with Solder (Optional): For additional strength and stability, you can reinforce the inside seams with an extra layer of solder. This will provide further support and ensure that the glass pieces are securely held together.
Assembling the glass pieces is a crucial step in the creation of your stained glass lamp shade. Take your time and pay attention to the details to ensure a precise and cohesive final design. With patience and care, you’ll be able to create a beautifully assembled lamp shade that showcases your skills and creativity.
Applying the Solder
Applying solder is a crucial step in the stained glass lamp shade creation process. Soldering not only provides strength and stability to the assembled glass pieces, but it also adds a beautiful finish to the edges. Here’s how to apply solder to your stained glass lamp shade:
- Prepare Your Workstation: Set up a clean and well-ventilated workspace for soldering. Make sure your soldering iron is heated to the appropriate temperature for the type of solder you are using.
- Apply Flux: Apply flux along the solder seams and joints to ensure a smooth and even flow of solder. Flux will also help to clean and remove any oxidation on the metal surface.
- Hold the Soldering Iron: Hold the soldering iron like you would hold a pen or pencil. Maintain a comfortable grip and make sure your hand is steady to ensure precise control over the soldering process.
- Tin the Iron: Before applying solder to the glass, “tin” the soldering iron by melting a small amount of solder onto the tip. This will help improve heat transfer and make it easier to apply solder to the seams.
- Apply Solder: With the tinned iron, touch the solder to the fluxed area. Allow the solder to melt and flow smoothly along the seams and joints. Move the soldering iron slowly and evenly, applying a thin and even layer of solder. Be careful not to apply too much solder or to overheat the glass, as it can cause discoloration or distortion.
- Smooth and Blend: As you apply the solder, use a soldering iron tip or a heat-resistant tool to smooth and blend the molten solder. This will create a neat and professional-looking finish. Ensure that the solder is evenly distributed along the seams and that there are no gaps or inconsistencies.
- Clean the Soldered Area: After soldering each section, use a soft cloth or sponge to clean the soldered area. Wipe away any excess flux or solder residue to reveal the clean and shiny surface. This will enhance the overall appearance of your stained glass lamp shade.
Throughout the soldering process, it’s important to maintain a steady hand and work methodically. Take breaks if needed to avoid fatigue or mistakes. Remember that practice makes perfect, and with time and experience, your soldering skills will improve, resulting in beautifully soldered seams on your stained glass lamp shade.
Cleaning and Polishing
Once you have finished applying the solder to your stained glass lamp shade, it’s important to clean and polish it to enhance its appearance and bring out its beauty. Cleaning and polishing will remove any residue, flux, or fingerprints, leaving you with a clean and radiant finished piece. Follow these steps to properly clean and polish your stained glass lamp shade:
- Prepare a Cleaning Solution: Fill a bowl with warm water and add a small amount of mild dish soap or glass cleaner. Stir the solution to create a gentle cleaning mixture.
- Dip a Soft Cloth or Sponge: Take a soft cloth or sponge and dip it into the cleaning solution. Wring out any excess liquid to avoid dripping onto the stained glass.
- Gently Wipe the Surface: With the damp cloth or sponge, gently wipe the surface of the stained glass lamp shade. Pay attention to any areas with visible residue or fingerprints. Use light pressure to avoid damaging the delicate solder lines.
- Rinse with Clean Water: After cleaning the lamp shade, rinse it with clean water to remove any soapy residue. Do this carefully to ensure that water does not penetrate inside the lamp shade or damage any electrical components.
- Dry the Lamp Shade: Use a soft, lint-free cloth to carefully dry the lamp shade. Gently pat the surface, taking care not to smudge or disturb the soldered seams.
- Inspect for Irregularities: Once the lamp shade is dry, inspect it for any irregularities or imperfections. Check that the solder lines are smooth and well-blended. If you notice any rough edges or excess solder, you can use a fine-grade sandpaper or a small file to carefully smooth them out.
- Apply a Glass Polishing Compound: To give your stained glass lamp shade a final polish, you can apply a glass polishing compound. Follow the instructions on the product and use a soft cloth to gently buff the surface of the glass. This will enhance its shine and clarity.
By properly cleaning and polishing your stained glass lamp shade, you will bring out its true beauty and ensure that it shines brightly in your space. Take your time during this step to ensure that every inch of the lamp shade is thoroughly cleaned and polished, resulting in a stunning finished piece.
Adding the Finishing Touches
Now that you have completed the main construction of your stained glass lamp shade, it’s time to add the finishing touches that will elevate its appearance and functionality. These final details will truly make your lamp shade stand out and showcase your personal touch. Here are some ideas for adding the finishing touches to your stained glass lamp shade:
- Attach Metal Hardware: Depending on the design and style of your lamp shade, you may want to attach metal hardware such as decorative finials or caps to the top and bottom. These add a polished look and create a cohesive finish.
- Add Decorative Elements: Consider incorporating additional decorative elements to enhance the overall design. This could include glass beads, crystals, or small glass accents that you solder onto the lamp shade at strategic points.
- Apply Patina or Solder Finish: You can apply a patina or solder finish to the soldered seams of your lamp shade. This will add depth and dimension to the piece, giving it an antique or aged look. Choose a patina color that complements the colors of your stained glass.
- Wire and Install Lighting: If your stained glass lamp shade will be used for illuminating a space, it’s time to wire and install the lighting fixture. Follow the instructions provided with the lighting kit and consult a professional if needed for proper installation.
- Test and Adjust Lighting: Once the lamp shade is installed with the lighting fixture, test it to ensure that it functions properly. Adjust the positioning and intensity of the light source to achieve the desired ambiance and brightness in the room.
- Display and Enjoy: Finally, find the perfect spot to display your stained glass lamp shade. Whether it’s on a table, desk, or floor, choose a location where it can be admired and appreciated. Turn on the light, step back, and revel in the beauty of your handcrafted masterpiece.
Adding the finishing touches to your stained glass lamp shade is the final step in your creative journey. These details will add refinement, style, and personality to the piece. Take your time and consider different options to make the lamp shade uniquely yours. Once completed, step back and enjoy the beauty and ambiance that your stained glass lamp shade brings to your space.