
Tools and Materials Needed
Before you embark on making a lamp shade frame, it’s important to gather all the necessary tools and materials. Having everything at hand will make the process smoother and more efficient. Here’s a list of what you’ll need:
1. Wire cutters and pliers – These will come in handy for cutting and shaping the wires for the frame. Make sure you have a good quality pair that can handle the cutting and bending required.
2. Wire – Choose a wire that is sturdy yet easy to work with. You can opt for a metal wire like brass or steel, or a more flexible option like craft wire. The gauge of the wire will depend on the size and weight of the lampshade you want to create.
3. Measuring tape or ruler – Accurate measurements are crucial for a well-fitted lamp shade. Use a measuring tape or ruler to ensure that your frame is the right size.
4. Needle and thread – If you plan on wrapping your frame with fabric or paper, a sewing needle and thread will be necessary. They will help you secure the material tightly to the frame.
5. Fabric or paper – Choose a material that suits your aesthetic preference and complements your space. Fabric can add texture and warmth, while paper can provide a clean and modern look. Make sure the chosen material is durable enough to withstand the heat of a light bulb.
6. Adhesive – Depending on the material you choose, you may need adhesive to attach it to the frame. Fabric glue or a hot glue gun are popular options for securing fabric, while double-sided tape or glue strips can work well for paper.
7. Optional embellishments – If you want to add some decorative elements to your lamp shade, gather any embellishments you may want to incorporate. This can include beads, ribbons, lace, or trims.
Having these tools and materials ready will ensure a smooth and successful lamp shade frame-making process. Now that you’re equipped with what you need, it’s time to dive into the steps of creating your lamp shade frame.
Step 1: Gather Your Materials
Before you start making a lamp shade frame, it’s essential to gather all the materials you’ll need. Having everything prepared in advance will streamline the process and prevent unnecessary interruptions. Here’s how you can gather your materials:
1. Determine the size of your lamp shade:
– Measure the height and circumference of the lamp base.
– Consider the desired height and width of the lamp shade.
– Calculate the amount of wire and fabric or paper you’ll need based on your measurements.
2. Procure the necessary tools:
– Obtain wire cutters and pliers to help you manipulate the wire.
– Acquire a measuring tape or ruler for precise measurements.
– Ensure you have a needle and thread suitable for your chosen material.
– Get the appropriate adhesive or double-sided tape for securing the fabric or paper.
3. Select your wire:
– Decide on the type of wire you want to use for your frame.
– Consider the gauge of the wire based on the weight and size of your lamp shade.
– Purchase enough wire to create the desired shape and structure.
4. Choose your fabric or paper:
– Select a fabric that matches your desired aesthetic and complements your decor.
– Ensure the fabric is heat-resistant and suitable for lamp shades.
– If using paper, choose a durable and lightweight option that is easy to work with.
5. Optional embellishments:
– If you want to add decorative elements to your lamp shade, gather beads, ribbons, or trims.
– Consider the style and theme of your lamp shade when choosing embellishments.
Remember to check that you have all the materials on hand before you begin. This will save you time and allow you to focus on the creative process. Once you’ve gathered your materials, you’re ready to move on to the next step: measuring and cutting the wires for the frame.>
Step 2: Measure and Cut the Wires for the Frame
Now that you have gathered all the necessary materials, it’s time to measure and cut the wires for your lamp shade frame. This step is crucial as it sets the foundation for the shape and structure of your lamp shade. Here’s how to do it:
1. Measure the length of wire needed:
– Begin by measuring the circumference of the lamp base.
– Add a few inches to this measurement to allow for overlap and securing the frame.
– This will be the length of wire needed for the horizontal circle of the frame.
2. Cut the wire:
– Using your wire cutters, measure and cut a piece of wire according to the length determined in the previous step.
– Be sure to wear protective goggles and gloves when cutting the wire to prevent any accidents.
3. Create the top and bottom circles of the frame:
– Take the wire you just cut and form it into a circle, overlapping the ends.
– Use your pliers to twist the ends of the wire together, securely fastening the circle.
– This will be the top circle of the frame.
– Repeat this step to create the bottom circle as well.
4. Measure the height of the lamp shade:
– Determine the desired height of your lamp shade.
– Measure and cut four vertical wires to this height, ensuring they are all equal in length.
5. Attach the vertical wires to the top and bottom circles:
– Position the vertical wires evenly around the circumference of the top circle.
– Use your pliers to twist the ends of the vertical wires onto the top circle, securing them in place.
– Repeat this process for the bottom circle, ensuring that the vertical wires are straight and evenly spaced.
6. Adjust the shape:
– Check that the frame is sturdy and balanced.
– Use your hands or pliers to adjust the shape and alignment of the wires if needed.
– Make sure the frame is symmetrical and level.
With the wires measured and cut, and the circles and vertical wires secured, you have successfully completed the second step of creating your lamp shade frame. Next, we will move on to attaching the vertical wires with horizontal wires.
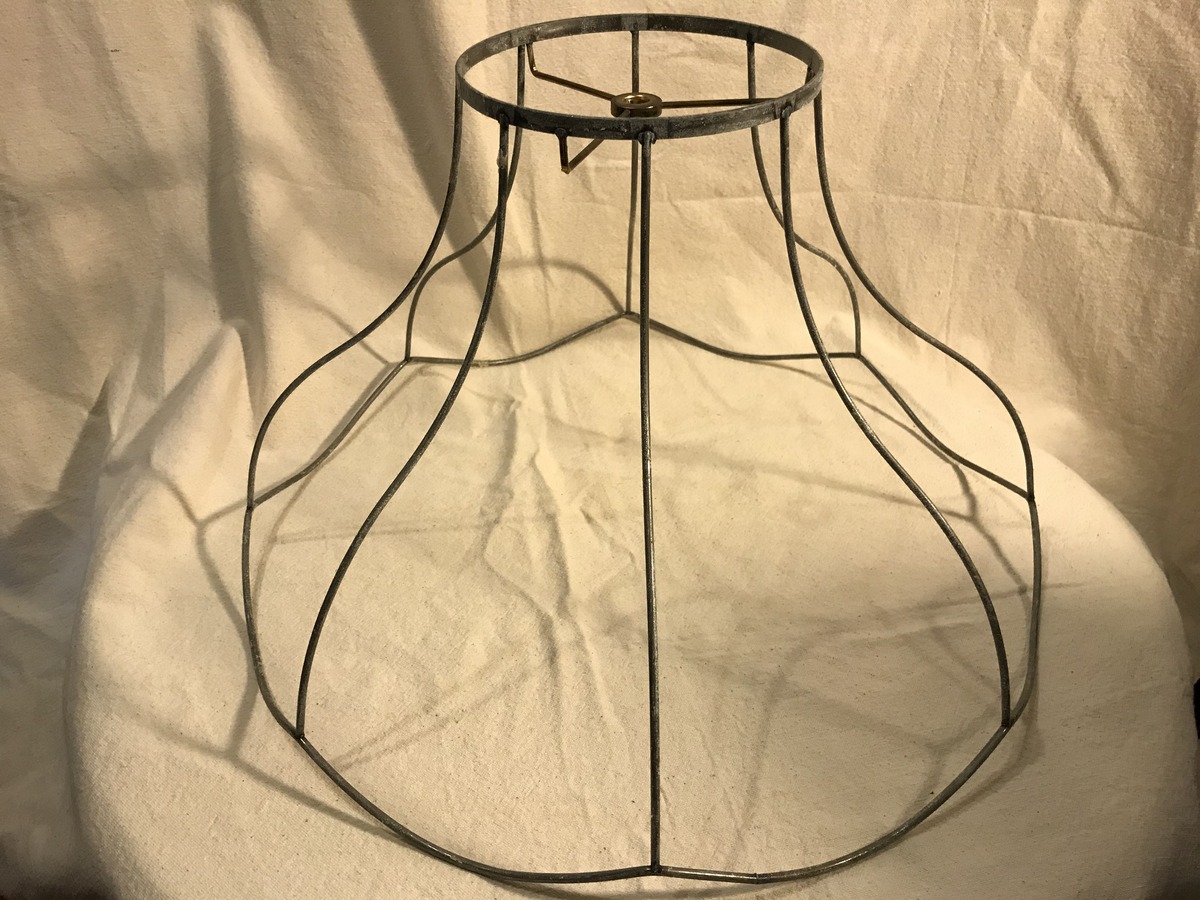
Step 3: Create the Top and Bottom Circles of the Frame
Now that you have measured and cut the wires, it’s time to create the top and bottom circles of your lamp shade frame. These circles form the foundation of the frame and provide structure and stability to the lamp shade. Here’s how to create the circles:
1. Take one end of the wire and bend it into a small loop:
– Use your pliers to create a loop on one end of the wire, ensuring it is tightly closed.
– This loop will prevent the vertical wires from sliding off the horizontal circles.
2. Determine the desired circumference of the lamp shade:
– Using your measuring tape or ruler, measure the circumference of the lamp base.
– Add a few inches to this measurement to allow for overlap and securing the frame.
3. Shape the wire into a circle:
– With the looped end in one hand, use your other hand to bend the wire into a circular shape, matching the desired circumference measurement.
– Ensure the ends of the wire overlap slightly, creating a secure connection.
4. Twist the overlapping ends of the wire:
– Using your pliers, twist the overlapping ends of the wire together.
– This will securely fasten the circle and maintain its shape.
5. Repeat the process for the bottom circle:
– Using the same measurements and techniques, create a second wire circle for the bottom of the lamp shade frame.
6. Check the circles for symmetry and alignment:
– Place the top and bottom circles side by side and compare their sizes.
– Adjust the circles if needed to ensure they are symmetrical and aligned.
Once you have created the top and bottom circles of the frame, you have reached an important milestone in the construction process. These circles will hold the shape of the lamp shade and provide a sturdy foundation for the rest of the frame. The next step is to attach the vertical wires to the top and bottom circles, which will be covered in the following section.
Step 4: Attach the Vertical Wires to the Top and Bottom Circles
With the top and bottom circles of your lamp shade frame created, the next step is to attach the vertical wires. These wires provide support and structure to the lamp shade, ensuring it maintains its shape. Here’s how to attach the vertical wires to the top and bottom circles:
1. Position the vertical wires evenly around the circumference of the top circle:
– Start by placing the vertical wires equidistant from each other around the top circle.
– Ensure that they are evenly spaced and aligned.
2. Secure the vertical wires to the top circle:
– Using your pliers, twist the ends of the vertical wires onto the top circle.
– Make sure to twist them tightly to ensure a secure connection.
– Repeat this process for each vertical wire.
3. Check the vertical wires for straightness and alignment:
– Once all the wires are attached to the top circle, check them for any bends or misalignment.
– Use your pliers to straighten the wires as needed, ensuring they are perpendicular to the top circle.
4. Repeat the process for the bottom circle:
– Take the vertical wires attached to the top circle and position them evenly around the circumference of the bottom circle.
– Twist the ends of the vertical wires onto the bottom circle, securing them in place.
– Check for straightness and alignment and adjust if necessary.
5. Ensure the vertical wires are straight and evenly spaced:
– Stand the lamp shade frame upright and inspect the vertical wires from all angles.
– Make any necessary adjustments to straighten them and ensure they are evenly spaced.
6. Double-check the stability and alignment of the entire frame:
– Gently shake the frame to test its stability.
– Ensure that the top and bottom circles are parallel and the vertical wires are securely attached.
By attaching the vertical wires to the top and bottom circles, you have created the basic structure of your lamp shade frame. The next step is to connect the vertical wires with horizontal wires, which will be covered in the following section.
Step 5: Connect the Vertical Wires with Horizontal Wires
Now that you have the vertical wires attached to the top and bottom circles of your lamp shade frame, it’s time to connect them with horizontal wires. These horizontal wires add stability and structure to the frame, ensuring that your lamp shade retains its shape. Here’s how to connect the vertical wires with horizontal wires:
1. Measure the length of the horizontal wires:
– Use your measuring tape or ruler to determine the distance between two adjacent vertical wires.
– Add a few inches to this measurement to allow for overlap.
2. Cut the horizontal wires:
– Using your wire cutters, measure and cut a piece of wire according to the length determined in the previous step.
– Repeat this process for each pair of adjacent vertical wires.
3. Position the horizontal wire between two vertical wires:
– Place the cut horizontal wire between two adjacent vertical wires, ensuring it is aligned with their height.
4. Twist the horizontal wire to secure it:
– Use your pliers to twist the ends of the horizontal wire around the vertical wires, securing them in place.
– Make sure to twist the wire tightly to create a strong connection.
– Repeat this process for each pair of adjacent vertical wires.
5. Continue connecting horizontal wires:
– Repeat steps 3 and 4 for each pair of adjacent vertical wires until all the horizontal wires are connected.
6. Adjust the wires if needed:
– Stand the lamp shade frame upright and check for any misalignment or crookedness in the wires.
– Gently adjust the wires using your pliers, ensuring they are parallel to the top and bottom circles.
7. Ensure the frame is stable and balanced:
– Test the stability of the frame by gently shaking it.
– Make any necessary adjustments to ensure it is sturdy and well-balanced.
By connecting the vertical wires with the horizontal wires, you have added strength and structure to your lamp shade frame. The next step is to strengthen and secure the frame to ensure its durability, which will be covered in the following section.
Step 6: Strengthen and Secure the Frame
Now that you have connected the vertical and horizontal wires of your lamp shade frame, it’s time to strengthen and secure the frame. This step is crucial to ensure the durability and stability of your lamp shade. Here’s how you can strengthen and secure the frame:
1. Reinforce the connections:
– Check each connection point where the vertical and horizontal wires meet.
– Use your pliers to tighten and secure any loose or weak connections.
2. Add additional support:
– If you want extra stability for your lamp shade, consider adding crosswires.
– Cut shorter lengths of wire and connect them diagonally between the vertical wires.
– Secure the crosswires using your pliers, creating an “X” shape between the vertical wires.
3. Twist the wire ends:
– Examine any loose wire ends that may pose a safety hazard.
– Use your pliers to twist the ends of the wires to prevent them from poking through the fabric or causing injury.
– Ensure the twisted ends are tucked away and not exposed.
4. Test the frame’s stability:
– Gently shake the frame to check its stability and make any additional adjustments if needed.
– Ensure that all connections are secure and the frame feels sturdy.
5. Make any final tweaks:
– Inspect the overall shape and alignment of the frame.
– Use your pliers to adjust any wires that may be misaligned or crooked.
– Aim for a balanced and symmetrical shape.
6. Apply a protective coating:
– If desired, you can apply a clear sealant or paint to the frame to add an extra layer of protection against rusting or corrosion.
– This step is especially important if you are using a metal wire for your frame.
By strengthening and securing the frame, you ensure that your lamp shade will be sturdy and long-lasting. Once you are satisfied with the frame’s stability and strength, you can proceed to the next step: wrapping the frame with fabric or paper. This will be covered in the following section.
Step 7: Wrap the Frame with Fabric or Paper
With the lamp shade frame strengthened and secured, it’s time to add the finishing touch by wrapping it with fabric or paper. This step will not only enhance the aesthetics of your lamp shade but also diffuse the light beautifully. Here’s how you can wrap the frame:
1. Choose your preferred fabric or paper:
– Select a fabric or paper that suits your style and complements your décor.
– Consider the texture, pattern, and color of the material to achieve the desired look.
2. Measure and cut the material:
– Measure the height and circumference of the frame to determine the size of the fabric or paper needed.
– Add a few inches to each measurement to allow for overlap and securing the material to the frame.
– Cut the fabric or paper accordingly, ensuring it will fully cover the frame.
3. Attach the fabric or paper to the frame:
– If using fabric, place the frame on top of the fabric with the wrong side facing up.
– Wrap the fabric around the frame, ensuring it is taut and smooth.
– Secure the fabric in place using a needle and thread, or fabric glue.
– If using paper, carefully wrap it around the frame, making sure the edges meet and align neatly.
4. Smooth out any wrinkles or creases:
– Smooth out any wrinkles or creases in the fabric or paper, ensuring a clean and polished appearance.
– Use your hands or a smooth, flat object to gently press out any imperfections.
5. Trim off any excess material:
– If there is any excess fabric or paper, trim it off neatly.
– Leave a small allowance to fold over and secure the material to the inside of the frame.
6. Secure the material to the frame:
– Use fabric glue or double-sided tape to secure the fabric or paper to the inside of the frame.
– Make sure the material is neatly folded over and tightly attached to the frame.
Wrapping the frame with fabric or paper adds the final touch, transforming it into a unique and personalized lamp shade. Once the material is securely attached, you can move on to the next step: adding the finishing touches to your lampshade. This will be covered in the following section.
Step 8: Attach the Fabric or Paper to the Frame
Now that you have wrapped the lamp shade frame with fabric or paper, it’s time to securely attach it to the frame. This step ensures that the material stays in place and gives your lamp shade a polished and finished look. Here’s how to attach the fabric or paper to the frame:
1. Assess the placement and alignment:
– Ensure that the fabric or paper is positioned evenly and smoothly around the frame.
– Check that any patterns or designs are aligned correctly for a cohesive appearance.
2. Secure with fabric glue or adhesive:
– If using fabric, apply a thin, even layer of fabric glue or adhesive to the inside of the frame.
– Press the fabric firmly against the glue to create a secure bond.
– Work in small sections, applying glue and pressing the fabric as you go.
3. Use double-sided tape or glue strips:
– If using paper or a thin material, double-sided tape or glue strips can be used to secure the material.
– Apply the tape or glue strips to the inside of the frame along the edges.
– Carefully press the material against the adhesive, smoothing out any wrinkles or bubbles.
4. Ensure a tight and smooth fit:
– As you attach the fabric or paper, pull it taut to avoid any loose or sagging sections.
– Smooth out any wrinkles or creases with your hands or a flat object.
5. Trim excess material:
– If there is any excess fabric or paper, trim it off neatly along the edges.
– Ensure that the edges are clean and even for a professional finish.
6. Check for any loose areas:
– Inspect the lamp shade to ensure that all sections are securely attached.
– Press down on any areas that may feel loose or need additional adhesion.
By attaching the fabric or paper to the frame, you are completing the final step in transforming the frame into a fully covered lamp shade. It’s important to ensure that the material is securely attached and properly aligned for a polished and finished look. Now, you can move on to adding the finishing touches to your lamp shade, which will be covered in the following step.
Step 9: Add Finishing Touches to the Lampshade
With the fabric or paper securely attached to the lampshade frame, it’s time to add the finishing touches. These final details will enhance the overall look and make your lampshade unique. Here’s how to add the finishing touches:
1. Consider embellishments:
– Depending on your personal style and the desired aesthetic, you can add decorative elements to your lampshade.
– Consider using beads, ribbons, lace, trims, or other embellishments that complement the fabric or paper.
2. Place trims or ribbons along the edges:
– If you want to add some decorative flair, glue or sew trims or ribbons along the top and bottom edges of the lampshade.
– Make sure to measure and cut the trims or ribbons to the appropriate length and secure them evenly.
3. Attach beads or charms:
– Use a needle and thread to attach beads or charms to the fabric, creating a dangling embellishment.
– Insert the needle through the fabric and bead/charm, then back through the fabric, creating a secure attachment.
4. Experiment with layering:
– If you have multiple fabrics or papers, consider layering them on the lampshade to create depth and visual interest.
– Cut different shapes or patterns and attach them strategically to achieve the desired layered effect.
5. Personalize with embroidery or appliques:
– Add a personal touch by embroidering or sewing appliques onto the fabric or paper.
– You can incorporate your initials, a favorite symbol, or a meaningful design to make the lampshade uniquely yours.
6. Enhance with paint or stencils:
– If using paper as your lampshade material, you can enhance its appearance with paint or stencils.
– Experiment with different colors or patterns to create a custom design that complements your décor.
7. Test the lampshade:
– Before finishing up, place the lampshade on a lamp to ensure that it fits properly and allows light to pass through.
– Make any necessary adjustments to the fabric or paper to ensure a snug fit.
These finishing touches will elevate your lampshade from functional to a true expression of your personal style. Take your time to explore different options and experiment until you achieve the desired look. Once you’re satisfied with your lampshade’s final touches, it’s time to move on to the last step: installing the lampshade on a lamp base.
Step 10: Install the Lampshade on a Lamp Base
After completing all the previous steps and adding the finishing touches to your lampshade, it’s time to install it onto a lamp base. This final step brings your lampshade to life and allows you to enjoy the warm glow of the light. Here’s how to install the lampshade:
1. Prepare the lamp base:
– Make sure the lamp base is clean and free from any dust or debris.
– Ensure that the lamp base is securely assembled and in proper working condition.
2. Determine the fitting type:
– Examine the lamp base to determine the fitting type it requires.
– Common fitting types include spider, Uno, and clip-on.
3. Attach a spider fitting:
– If your lamp base requires a spider fitting, place it on top of the socket and align the screw holes.
– Use the provided screws to securely attach the spider fitting to the lamp base.
4. Secure an Uno or clip-on fitting:
– For Uno or clip-on fittings, slide the fitting onto the bulb socket until it is snugly in place.
– Make sure the fitting is centered and secure.
5. Align the lampshade:
– Carefully place the lampshade onto the fitting, ensuring that the fitting’s arms or clips align with the shade’s frame.
– Gently adjust the lampshade’s position until it is straight and centered on the lamp base.
6. Test the lampshade:
– Once the lampshade is attached to the lamp base, plug in the lamp and turn it on to test the lighting effect.
– Ensure that the lampshade sits securely on the base and that the light shines through the fabric or paper evenly.
7. Make any necessary adjustments:
– If the lampshade is not sitting straight or if the light is not distributed evenly, make necessary adjustments.
– Rotate the lampshade or adjust the fitting to achieve the desired appearance and lighting effect.
With the lampshade successfully installed on the lamp base, take a step back and admire your handmade creation. Revel in the warm ambiance and unique character it brings to your space. Congratulations on completing the process of making a lampshade frame!