
Materials Needed
To make a jewelry organizer from a picture frame, you will need the following materials:
- A picture frame of your choice – preferably with a sturdy backing
- Scissors or a craft knife
- Strong adhesive or glue
- Mesh or corkboard
- Decorative hooks or clips
- Cup hooks
- Pliers
- Paint and paintbrush (optional)
- Picture hanger or stand
These materials can easily be found at your local craft store or online, and the best part is that you can customize them according to your personal taste and style.
The picture frame should be large enough to accommodate your jewelry collection and provide ample space for organizing your pieces. Choose a frame that matches your aesthetic preferences and fits well with the decor of your room.
When it comes to adhesive or glue, make sure to select a strong and durable option that can securely attach the hooks and mesh or corkboard to the frame. This will ensure that your jewelry organizer stays intact and withstands the weight of your accessories.
If you opt for a mesh or corkboard, consider the size and pattern that would work best for you. Mesh provides a sleek and modern look, while a corkboard allows you to easily insert and remove earrings.
The hooks or clips you choose should be sturdy enough to hold your necklaces and bracelets without slipping or breaking. Decorative hooks add a touch of elegance to your organizer, and you can select ones that complement the frame or reflect your personal style.
Cup hooks are ideal for hanging rings and stud earrings. Use pliers to screw them into the frame securely and make sure the hooks are evenly spaced for a clean and organized look.
If you want to add a personal touch to your jewelry organizer, consider painting or decorating the frame. Choose a color that complements your room’s color scheme or experiment with patterns and designs to make it truly unique.
Lastly, don’t forget the picture hanger or stand to ensure that your finished jewelry organizer can be easily displayed on a wall or placed on a vanity. This will allow you to show off your beautifully organized jewelry and keep it easily accessible.
With these materials in hand, you’re ready to embark on creating a functional and stylish jewelry organizer from a picture frame.
Step 1: Gather Your Supplies
Before you start creating your jewelry organizer from a picture frame, gather all the necessary supplies. This ensures that you have everything you need within reach, making the process smoother and more efficient.
First and foremost, locate a picture frame that suits your preferences. Look for one with a sturdy backing and enough space to accommodate your entire jewelry collection. Consider the size and style that best fits your needs and complements your room’s decor.
Next, gather scissors or a craft knife. These will come in handy when removing the backing and glass from the frame. Make sure they are sharp and suitable for cutting through the materials without causing any damage.
You will also need a strong adhesive or glue to attach the various components to the frame. Look for an adhesive that is specifically designed for craft projects and provides a secure bond. Make sure to read the instructions on the adhesive carefully and follow the recommended application methods.
In addition, you will need mesh or corkboard to create the earring holder. Mesh offers a sleek and modern look, while corkboard allows you to easily insert and remove earrings. Choose the material that best suits your style and preference.
Don’t forget to gather decorative hooks or clips for hanging your necklaces and bracelets. These hooks should be sturdy enough to hold your jewelry securely without slipping or breaking. Consider selecting hooks that match the overall aesthetic of your frame or reflect your personal style.
Cup hooks are essential for hanging rings and stud earrings. You will need pliers to screw the cup hooks securely into the frame. Ensure the hooks are evenly spaced and properly aligned for a neat and organized appearance.
If you wish to add a personalized touch to your organizer, gather paint and a paintbrush. This allows you to customize the frame by adding a pop of color or incorporating patterns and designs. Choose a paint color that complements your room’s color palette or reflects your personal taste.
Lastly, ensure you have a picture hanger or stand to display your finished jewelry organizer. A picture hanger will allow you to hang it on a wall, while a stand enables you to place it on a vanity or dresser. Choose the option that suits your space and preferences.
With all these supplies gathered, you are now ready to move on to the next step of creating your jewelry organizer from a picture frame.
Step 2: Remove the Backing and Glass from the Frame
Once you have gathered all your supplies, it’s time to start creating your jewelry organizer. The first step is to remove the backing and glass from the picture frame. This will provide you with an open space to work with and allow you to customize the frame to accommodate your jewelry.
Begin by laying the picture frame on a flat surface. Ensure that the frame is secure and won’t slip while you work. Take your scissors or craft knife and carefully remove any tabs, nails, or staples that are holding the backing and glass in place.
Once all the fasteners are removed, carefully lift the glass away from the frame. Be cautious not to apply too much pressure or twist the frame, as this may cause it to break. Set aside the glass in a safe location to avoid any accidents.
Next, remove the backing from the frame. This can typically be done by gently prying it away from the frame’s edges. Some frames may have clips or additional fasteners that need to be released before the backing can be removed. Use your scissors or craft knife to carefully navigate around these areas, ensuring that you don’t damage the frame.
If your frame has a paper matting, you may want to remove it as well, as it can limit the space available for organizing your jewelry. Carefully peel off the matting, taking care not to tear or damage it if you plan to reuse it for future projects.
With the backing, glass, and any matting removed, you now have an open frame ready to be transformed into a jewelry organizer. Take a moment to inspect the frame for any sharp edges or rough surfaces. If necessary, use sandpaper to smooth out any imperfections, ensuring that your jewelry will not snag or get damaged.
Removing the backing and glass from the frame allows you to have a blank canvas that you can customize according to your needs. Whether you want to paint it, add decorative elements, or attach various organizers, this step is crucial in creating a functional and visually appealing jewelry organizer.
With the backing and glass safely removed, you are now ready to move on to the next step and prepare the frame for the jewelry organizer.
Step 3: Prepare the Frame
Now that you have removed the backing and glass from the picture frame, it’s time to prepare the frame for your jewelry organizer. This step involves ensuring that the frame is clean, sturdy, and ready to be transformed into a functional and stylish storage solution for your jewelry.
Start by cleaning the frame thoroughly. Dust and debris can accumulate over time, so use a soft cloth or a brush to gently wipe away any dirt or particles. Additionally, you can use a mild cleaning solution to remove any stubborn stains or marks. Make sure to let the frame fully dry before proceeding to the next step.
Inspect the frame for any damages or loose parts. If there are any cracks, chips, or broken edges, consider repairing them using an appropriate adhesive or filler. This will help ensure that the frame is sturdy and durable, capable of withstanding the weight of your jewelry.
If you plan to paint or decorate the frame, this is the perfect time to do so. Lay a protective surface underneath the frame to catch any paint drips, and use a brush or spray paint to apply a smooth and even coat. Let the paint dry completely before moving on to the next step.
Consider adding additional decorative elements to the frame to enhance its aesthetic appeal. This could include attaching decorative embellishments, such as rhinestones, beads, or ribbon. Get creative and customize the frame to match your personal style and preferences.
Before proceeding, make sure that the frame is thoroughly dry and any added decorative elements are securely attached. Take a moment to examine the frame from different angles, ensuring that it looks visually appealing and matches your desired outcome.
With the frame cleaned, repaired (if necessary), and decorated to your liking, you are ready to move on to the next steps of creating your jewelry organizer. The preparation of the frame is a crucial part of the process, as it sets the foundation for a functional and visually appealing piece that will effectively organize and display your jewelry.
Now that the frame is prepared, you can continue to the next steps, which involve adding hooks or clips for hanging necklaces and bracelets, and inserting a mesh or corkboard for earrings. Let’s dive into the details and continue the creation of your stylish jewelry organizer.
Step 4: Add Hooks or Clips for Hanging Necklaces and Bracelets
With the frame prepared, it’s time to add hooks or clips to create designated spaces for hanging necklaces and bracelets on your jewelry organizer. This step will ensure that these accessories are displayed beautifully and remain tangle-free.
First, determine the placement of the hooks or clips on the frame. Consider the length and size of your necklaces and bracelets to ensure they have enough space to hang freely without overlapping or tangling. Mark the desired positions lightly with a pencil or small piece of tape.
Next, gather the hooks or clips that you have selected for this purpose. Decorative hooks can add a touch of elegance or personal style to your jewelry organizer, while clips provide a secure way to hang your accessories.
Using a pair of pliers, carefully screw the hooks into the frame at the marked positions. Ensure that they are securely attached and evenly spaced for a neat and organized look. If you are using clips, glue them onto the frame using a strong adhesive, making sure they are aligned properly.
As you attach the hooks or clips, periodically check the spacing and adjust as needed. This will help ensure that there is enough room for each necklace and bracelet to hang without overlapping or getting tangled with the others.
Consider varying the heights of the hooks or clips to accommodate different necklace lengths and create an aesthetically pleasing arrangement. This will also make it easier to select and access your desired piece of jewelry without having to untangle them.
Take a step back and evaluate the placement of the hooks or clips. Make any adjustments if necessary to achieve a balanced and visually appealing arrangement. This step allows you to personalize your jewelry organizer and create a functional space for your necklaces and bracelets to be organized and displayed prominently.
Once the hooks or clips are securely attached, gently tug on them to ensure they are properly anchored. This will help prevent any accidental dislodging of jewelry when you hang or remove pieces.
With the addition of hooks or clips, you have now successfully created designated spaces for hanging your necklaces and bracelets on your jewelry organizer. In the next step, we will explore how to insert a mesh or corkboard for earrings, adding further functionality to your organizer.
Step 5: Insert a Mesh or Corkboard for Earrings
Now that you have added hooks or clips for hanging necklaces and bracelets on your jewelry organizer, it’s time to create a space for your earrings by inserting a mesh or corkboard. This step will allow you to neatly display and easily access your earring collection.
First, decide whether you want to use mesh or corkboard for this purpose. Mesh offers a sleek and modern look, while corkboard provides a more traditional and practical option. Consider your personal preference and the style of your jewelry organizer.
Measure the dimensions of the frame opening or the space you want to allocate for earrings. Use these measurements to cut the mesh or corkboard to the desired size. Ensure that it fits snugly into the frame without any gaps or overlapping.
If you are using mesh, you can attach it to the frame by folding the edges of the mesh over the back of the frame and securing them with adhesive or staples. This will keep the mesh in place and prevent it from sliding or shifting when earrings are inserted or removed.
If you prefer to use corkboard, you can simply press it into the frame opening, ensuring a tight fit. The natural friction of the corkboard will securely hold it in place without the need for additional attachments.
Before finalizing the placement of the mesh or corkboard, take a moment to visualize how your earrings will be displayed. Consider the spacing and orientation of the grid or corkboard texture to maximize visibility and accessibility for your earrings.
If you have earrings with hooks or posts, insert them directly into the mesh or corkboard. For stud earrings, gently press them into the mesh or use earring backs to hold them securely in place.
Organize your earrings by color, size, or style, making it easier to find the perfect pair for any occasion. You can also arrange them in a creative pattern or design to add visual interest to your jewelry organizer.
Step back and admire your newly created earring display. It’s a practical and visually pleasing addition to your jewelry organizer that helps keep your earrings organized and easily accessible.
In the next step, we will explore how to attach cup hooks to the frame, providing a dedicated space for storing rings and stud earrings.
Step 6: Attach Cup Hooks for Rings and Stud Earrings
With the jewelry organizer taking shape, it’s time to create a dedicated space for storing rings and stud earrings by attaching cup hooks to the frame. This step will contribute to a well-organized and visually appealing display for your smaller accessories.
Start by determining the location and spacing for the cup hooks on the frame. Consider the sizes and quantities of your rings and stud earrings. Mark the desired positions lightly with a pencil to guide you during the attachment process.
Gently screw the cup hooks into the marked positions on the frame using pliers. Make sure to align them properly and ensure a secure attachment. Take care not to overtighten the cup hooks, as this may damage the frame or make it difficult to remove and add rings or stud earrings.
As you attach the cup hooks, periodically step back and assess their placement. Consider the visual balance and accessibility of the hooks. Make any necessary adjustments to create a well-organized and visually appealing arrangement.
Take into account the sizes and shapes of your rings when determining the spacing and placement of the cup hooks. Adjust the positioning as needed to accommodate larger or smaller rings, ensuring that they fit comfortably on the hooks without getting crowded.
For stud earrings, gently hook or place them directly onto the cup hooks. The securely screwed-in cup hooks will keep them in place and prevent them from slipping or falling off. Arrange the stud earrings in an organized manner, considering color, style, or size.
Step back and admire your jewelry organizer, specifically the section dedicated to rings and stud earrings. The cup hooks offer a practical and visually appealing display, keeping these smaller accessories easily accessible and nicely organized.
With the cup hooks securely attached and your rings and stud earrings neatly displayed, you have successfully completed this step of creating your jewelry organizer. In the next step, we will discuss optional ways to paint or decorate the frame, adding personal touches and enhancing its overall aesthetic.
Step 7: Optional: Paint or Decorate the Frame
As you near the completion of your jewelry organizer, consider adding a personal touch by painting or decorating the frame. This optional step allows you to customize the organizer according to your unique style and preferences.
If you choose to paint the frame, select a color that complements your room’s decor or adds a pop of color. Use a paintbrush or spray paint to apply an even coat of paint to the frame’s surface. Cover the entire frame, including the edges, and let it dry completely before moving on to the next steps.
You can also get creative by using stencils or painter’s tape to create patterns or designs on the frame. Achieve a layered effect by applying multiple coats of paint or using different colors. Experiment with different techniques to create a one-of-a-kind jewelry organizer that reflects your personal style.
If you prefer a more natural or rustic look, consider staining the frame instead. Choose a wood stain color that enhances the frame’s natural beauty and coordinates with your decor. Apply the stain following the manufacturer’s instructions, and allow it to dry thoroughly before continuing with the remaining steps.
For an added touch of elegance or whimsy, consider adding decorative elements to the frame. This could include attaching rhinestones, beads, ribbons, or other embellishments using a strong adhesive. Create unique patterns or designs to make your jewelry organizer truly stand out.
Take a moment to step back and evaluate the painted or decorated frame. Ensure that you are satisfied with the final look and that it aligns with your vision for the jewelry organizer. Make any necessary touch-ups or adjustments before proceeding to the next steps.
Remember, this step is purely optional, and your jewelry organizer will still be functional without any additional paint or decorations. However, adding these personalized touches can enhance the overall aesthetic and make it a centerpiece in your room.
Now that you have considered painting or decorating the frame, it’s time to move on to the next step and attach a picture hanger or stand for displaying your finished jewelry organizer.
Step 8: Attach a Picture Hanger or Stand for Displaying the Organizer
With your jewelry organizer almost complete, it’s time to think about how you want to display it. In this step, you will attach a picture hanger or stand to ensure that your finished organizer can be showcased on a wall or placed on a vanity or dresser.
If you plan to hang your jewelry organizer on a wall, consider using a picture hanger. Choose a hanger that is appropriate for the weight and size of your frame. Follow the instructions provided with the hanger to ensure a secure and level installation.
Before attaching the picture hanger, hold the jewelry organizer against the wall in your desired location. Mark the spot where the top of the frame aligns with the picture hanger. Measure the distance between the hanger’s mounting holes and transfer those measurements to the wall as well.
Use a drill or screwdriver to attach the picture hanger to the wall. Ensure that it is level and securely fastened. Hang the jewelry organizer on the picture hanger by aligning the hooks or wire on the back of the frame with the hanger’s mounting points.
If you prefer to display your jewelry organizer on a vanity or dresser, consider using a stand. Look for a stand that is compatible with the size and weight of your frame. Some stands come with adjustable arms or holders that can securely hold the frame in place.
Place the stand on a stable surface, such as a vanity or dresser. Slide the bottom edge of the frame into the stand’s holder or rest it on the stand’s arms, ensuring a snug fit. This will allow your jewelry organizer to stand upright, making it easily accessible and adding a decorative touch to your space.
Take a step back and ensure that the jewelry organizer is securely attached to the picture hanger or stand. Make any necessary adjustments to ensure stability and levelness. This will ensure that your jewelry organizer is displayed beautifully and stays in place.
By attaching a picture hanger or stand to your jewelry organizer, you can choose how it will be displayed in your space. Whether hung on a wall or placed on a vanity, this step adds the finishing touch and allows you to showcase and access your jewelry collection with ease.
Now that your jewelry organizer is ready to be displayed, it’s time for the final step – arranging your jewelry on the organizer to create a visually appealing and organized display.
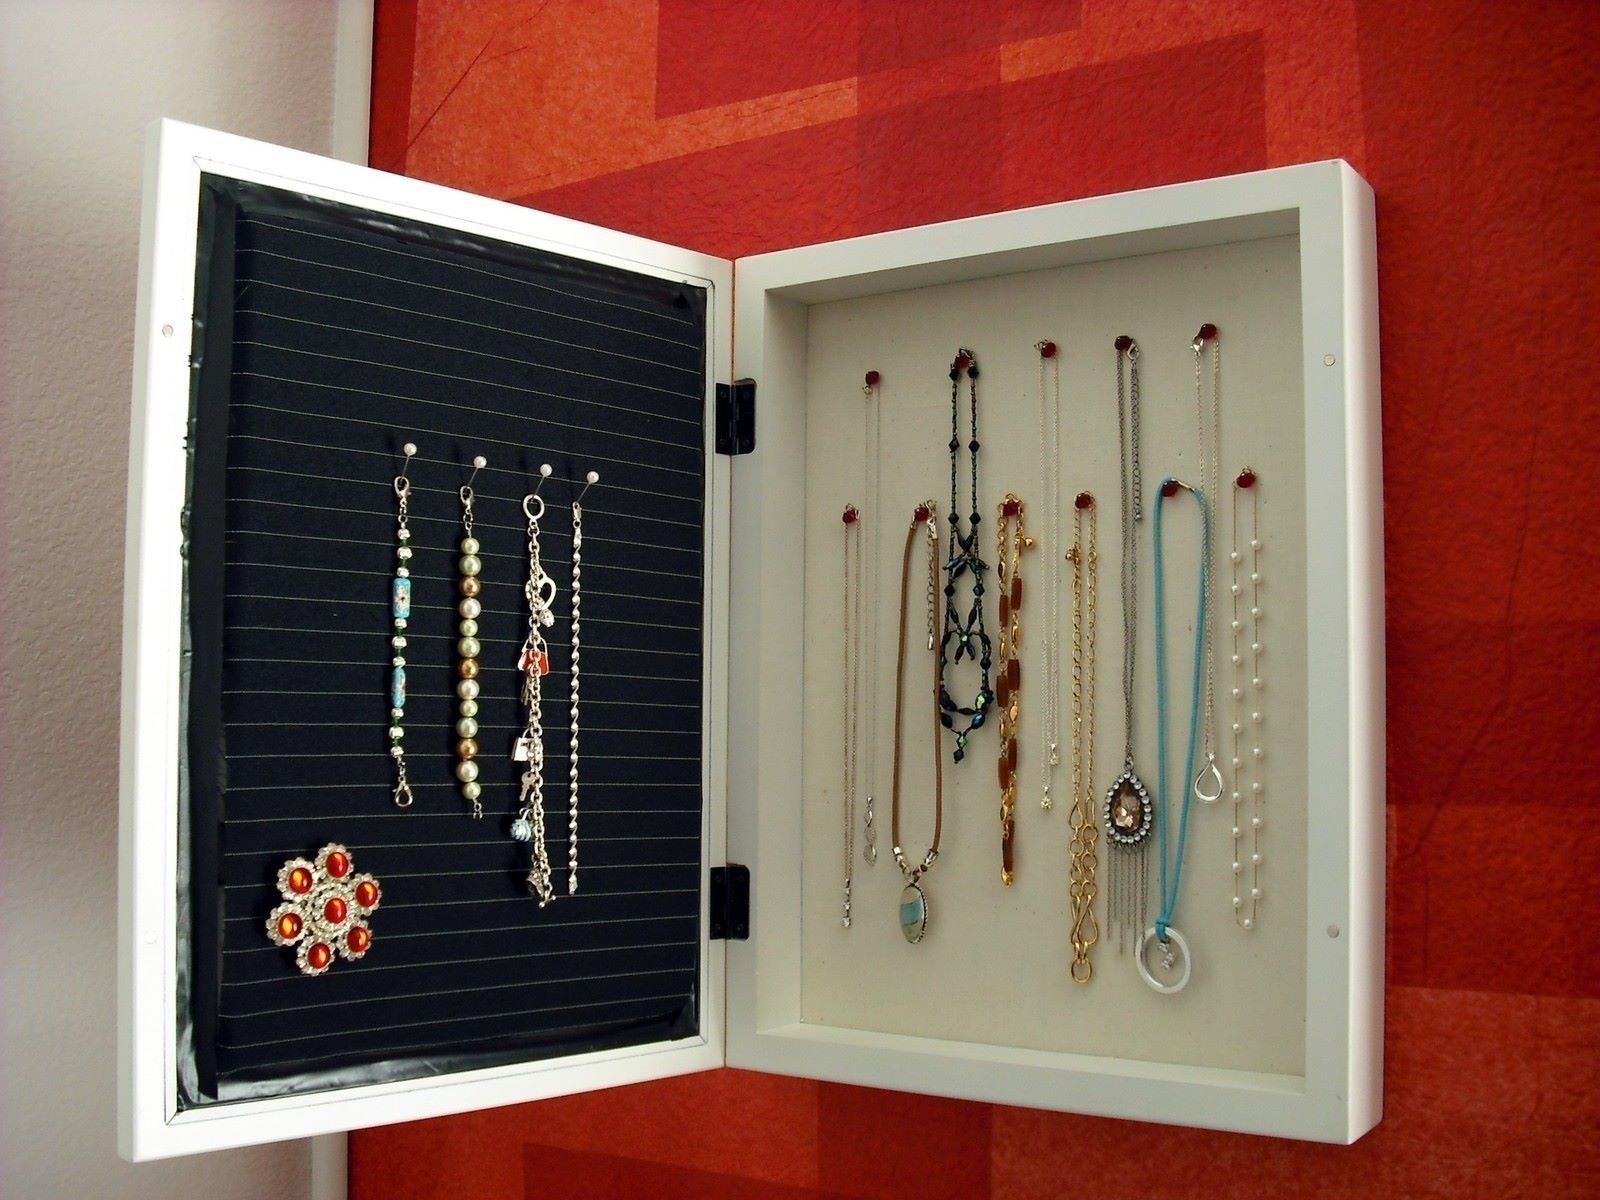
Step 9: Arrange Your Jewelry on the Organizer
With your jewelry organizer complete and ready for display, it’s time to arrange your jewelry on it. This step is crucial for creating an organized and visually appealing display that allows you to easily find and access your favorite pieces.
Start by selecting the jewelry pieces you want to showcase on the organizer. Sort them by type, such as necklaces, bracelets, earrings, or rings, to help you organize them effectively.
Begin by hanging your necklaces and bracelets on the hooks or clips you installed earlier. Take care to space them out evenly and avoid tangling. For longer necklaces, consider using the lower hooks to prevent them from dragging on the surface below.
For earrings, insert them into the mesh or corkboard you installed for this purpose. Arrange them in a way that allows each pair to be clearly visible. Consider organizing them by color, style, or size to make it easier to find your desired pair.
Use the cup hooks to hang your rings and stud earrings. Display them in a way that allows you to easily see and access each piece. Consider organizing them by metal type or style to create a visually appealing arrangement.
As you arrange your jewelry, take a step back to evaluate the overall aesthetic of the display. Make any necessary adjustments to create a balanced and visually pleasing arrangement. Consider adding decorative elements, such as small trinkets or small plants, to enhance the display and add a personal touch.
Remember to leave some empty space on the organizer to allow for future additions to your jewelry collection. This will give you room to grow and make it easier to add new pieces without overcrowding the display.
Take a moment to appreciate the transformation of your jewelry collection into a beautifully organized display on the jewelry organizer. Not only does it make for an eye-catching focal point in your space, but it also ensures that your jewelry is easily accessible and protected from tangles and damage.
Now that you have arranged your jewelry on the organizer, it’s time for the final step – hanging or displaying your finished jewelry organizer and enjoying your well-organized jewelry collection in style.
Step 10: Hang or Display Your Finished Jewelry Organizer
Congratulations! You have reached the final step in creating your jewelry organizer. Now it’s time to hang or display your finished creation to showcase your beautifully organized jewelry collection.
If you have chosen to hang your jewelry organizer, double-check that the picture hanger is securely attached to the wall. Ensure that it is level and at the desired height. Gently lift the jewelry organizer and hang it on the picture hanger, adjusting as necessary to ensure it hangs straight.
Take a step back and admire your jewelry organizer on the wall. It is now a functional and decorative piece that adds a touch of elegance and organization to your space. Consider its placement within your room to ensure it receives the attention it deserves.
If you have decided to display your jewelry organizer on a vanity or dresser, ensure that the stand is stable and secure. Carefully position the jewelry organizer on the stand, making any necessary adjustments to ensure it sits evenly and attracts attention in your space.
Stand back and appreciate the beauty of your jewelry organizer in its displayed state. Take a moment to soak in the satisfaction of having created a functional and visually appealing storage solution for your jewelry collection.
Now that your jewelry organizer is hung or displayed, take a few moments to organize any remaining jewelry items. Ensure that they are placed in their designated areas on the organizer, keeping everything neat and tidy.
As you continue to use and enjoy your jewelry organizer, periodically reassess its organization and make any necessary adjustments. This will help keep your collection organized and maximize its efficiency in both use and display.
Remember, your jewelry organizer is not only a practical storage solution but also a stylish piece of decor. Feel free to personalize it further by adding small decorative touches or incorporating seasonal accents to elevate its aesthetic appeal.
With your finished jewelry organizer proudly displayed, take a moment to appreciate all the hard work and creativity that went into creating this unique piece. Enjoy the ease of finding and selecting your favorite accessories and revel in the joy of a well-organized jewelry collection.
Now, it’s time to show off your beautiful jewelry organizer to friends and family, and enjoy the convenience and elegance it brings to your daily routine.