
Materials Needed
Before you get started on making your own corner shelf, make sure you have the following materials on hand:
- Wooden board (Choose a size and thickness that suits your desired shelf dimensions)
- Measuring tape
- Pencil
- Saw (Circular saw or miter saw)
- Sandpaper (Medium and fine-grit)
- Wood brackets or metal corner braces
- Screws
- Electric drill
- Level
- Paint or stain (optional)
- Paintbrush or foam roller (if painting)
Ensure that you have all these materials ready to go before you start the project. This will save you time and inconvenience running back and forth between the hardware store.
Additionally, it’s worth mentioning that the type of wood you choose for your corner shelf can impact its durability and aesthetics. Popular options include pine, oak, and plywood. Consider the look you want to achieve and the weight-bearing capacity required for the items you’ll place on the shelf.
Once you have gathered all the necessary materials, you’re ready to move on to the next step: measuring and marking the wall.
Step 1: Measure and Mark the Wall
The first step in making a corner shelf is to measure and mark the wall where you want to install it. This will help you determine the appropriate size and placement for your shelf.
Grab your measuring tape and measure the height and width of the corner where you plan to install the shelf. Keep in mind any obstructions such as light switches or electrical outlets that may affect the measurements. Take precise measurements and jot them down for reference.
Once you have the measurements, grab your pencil and use it to mark the top and bottom points of the shelf on the wall. Make sure the marks are level and aligned with each other. You can use a level tool to ensure accuracy.
Next, determine the depth of the shelf. Measure the distance from the marked position on the wall to the edge of the corner. This will determine how far out the shelf will extend from the wall.
Use a level to draw a horizontal line on the wall to represent the bottom edge of the shelf. This line will serve as a guide for attaching the brackets later on.
Take a step back and visually assess the marks and measurements to ensure they align with your vision for the corner shelf. Make any necessary adjustments before moving on to the next step.
With the wall properly marked and measured, you’re now ready to proceed to step 2: measuring and cutting the wood.
Step 2: Measure and Cut the Wood
Once you have measured and marked the wall, it’s time to move on to measuring and cutting the wood for your corner shelf. This step is crucial in getting the right dimensions for a seamless fit.
Start by taking your wooden board and measuring the length and width needed for the shelf. Use the measurements you recorded during step 1 as a guide. Take into account the desired depth and ensure that the wood will fit snugly into the corner.
Using a pencil, mark the measurements on the wooden board. Double-check the markings to ensure accuracy before moving on to the cutting stage.
Now, it’s time to cut the wood. Depending on the thickness of the wood and the tools you have, you can use a circular saw or a miter saw for precise cuts. Follow the marked lines and proceed with caution to avoid any accidents.
Once the cuts are made, check the pieces against the measurements and make any necessary adjustments. The wood pieces should fit together seamlessly and align with the markings on the wall.
If you’re satisfied with the cuts, proceed to the next step. However, if adjustments are needed, use sandpaper or a wood file to smooth and refine the edges until you achieve the desired fit.
Proper measurement and accurate wood cutting are essential for a well-crafted corner shelf. Take your time during this step to ensure the pieces fit together perfectly before moving on to the next stage of the project.
Step 3: Sand the Wood
Once you’ve measured and cut the wood pieces for your corner shelf, it’s important to take the time to sand them. Sanding not only creates a smooth surface but also helps to remove any rough edges or imperfections.
Begin by using medium-grit sandpaper to sand the cut edges and any visible rough areas on the wooden pieces. Sand in the direction of the wood grain for the best results. This will help to create a uniform and polished appearance.
As you sand, be sure to pay extra attention to the corners and edges, as these areas are more prone to roughness. Take your time and aim for a smooth and even finish.
Once you have completed sanding with the medium-grit sandpaper, switch to a finer grit, such as fine-grit sandpaper or sanding sponge. This will help to refine the surface and remove any remaining roughness.
Remember to sand the entire surface of the wood, including the front, back, and edges. This will ensure a consistent appearance and a comfortable feel when handling the corner shelf.
After sanding, wipe away any dust or debris with a clean, dry cloth. Inspect the wood for any remaining imperfections and sand them down gently until you achieve the desired smoothness.
By taking the time to properly sand the wood, you’ll enhance the overall look and feel of your corner shelf. It will also make it easier to apply any paint or stain in the next steps of the project.
Now that the wood is sanded and ready, it’s time to move on to the next step: attaching the brackets.
Step 4: Attach the Brackets
Attaching the brackets is a crucial step in ensuring the stability and support of your corner shelf. Brackets come in various materials and styles, so choose the ones that best suit your design and weight-bearing needs.
Start by positioning the brackets on the wall, aligning them with the marks you made earlier. Use a level to ensure they are straight and even.
Once the brackets are aligned, mark the screw holes on the wall using a pencil. Use a drill bit slightly smaller than the diameter of the screws to create pilot holes at the marked spots. This will prevent the screws from splitting the wood or damaging the wall.
With the pilot holes in place, it’s time to attach the brackets. Position them over the pilot holes and drive the screws through the bracket holes and into the wall. Use a screwdriver or an electric drill with the appropriate screwdriver attachment to securely fasten the brackets. Repeat this step for all the brackets.
As you attach the brackets, periodically check for level and make any necessary adjustments to ensure the shelf will be perfectly horizontal. Use a level across the brackets to confirm that they are all at the same height.
Once all the brackets are securely attached to the wall, take a moment to double-check their stability. Give them a gentle shake to ensure they are firmly in place and provide adequate support for the shelf.
With the brackets in place, you have now created the foundation for your corner shelf. The next step will be to install the wooden shelf onto the brackets.
Before moving on, take a moment to appreciate the progress you’ve made so far. You’re now one step closer to having a functional and stylish corner shelf in your space.
Step 5: Install the Shelf
Now that you have the brackets securely attached to the wall, it’s time to install the wooden shelf onto them. This step will bring your corner shelf project to life and provide a functional storage space or display area.
Start by placing the wooden shelf on top of the brackets, ensuring that it aligns with the horizontal line you drew on the wall during the marking phase. Double-check that the shelf is centered and level.
Once positioned correctly, use a pencil to mark the screw holes on the wood where they align with the brackets. This will serve as a guide when attaching the shelf to the brackets.
Next, remove the shelf and drill pilot holes at the marked spots on the wood. The pilot holes will prevent the wood from splitting or cracking when you drive the screws in.
With the pilot holes in place, reposition the shelf on top of the brackets and align the screw holes on the wood with the brackets beneath. Use the appropriate screws to attach the shelf to the brackets, driving them through the pilot holes.
Take care to tighten the screws just enough to secure the shelf firmly in place, but avoid over-tightening, as it can potentially damage the wood or cause it to crack.
After attaching the shelf, give it a gentle shake to ensure stability. It should feel secure, with no wobbling or movement.
Step back and admire your newly installed corner shelf. Take a moment to appreciate the progress you’ve made and envision how the shelf will enhance the functionality and aesthetic of your space.
Now that the shelf is installed, it’s time to move on to the final step: adding finishing touches to complete the project.
Step 6: Add Finishing Touches
With the corner shelf installed, it’s time to add the finishing touches to enhance its appearance and ensure durability. This step will complete the project and give your corner shelf a polished look.
If desired, you can apply a coat of paint or stain to the wooden shelf. Choose a color that complements your existing decor or adds a pop of color to the space. Use a paintbrush or foam roller to apply an even coat of paint or stain, following the manufacturer’s instructions. Allow it to dry completely before handling or decorating the shelf.
After painting or staining, consider adding a protective finish to seal the wood and provide additional durability. A clear varnish, polyurethane, or wax can help protect the surface from wear and tear, moisture, and stains. Apply the finish according to the product instructions and allow it to dry thoroughly.
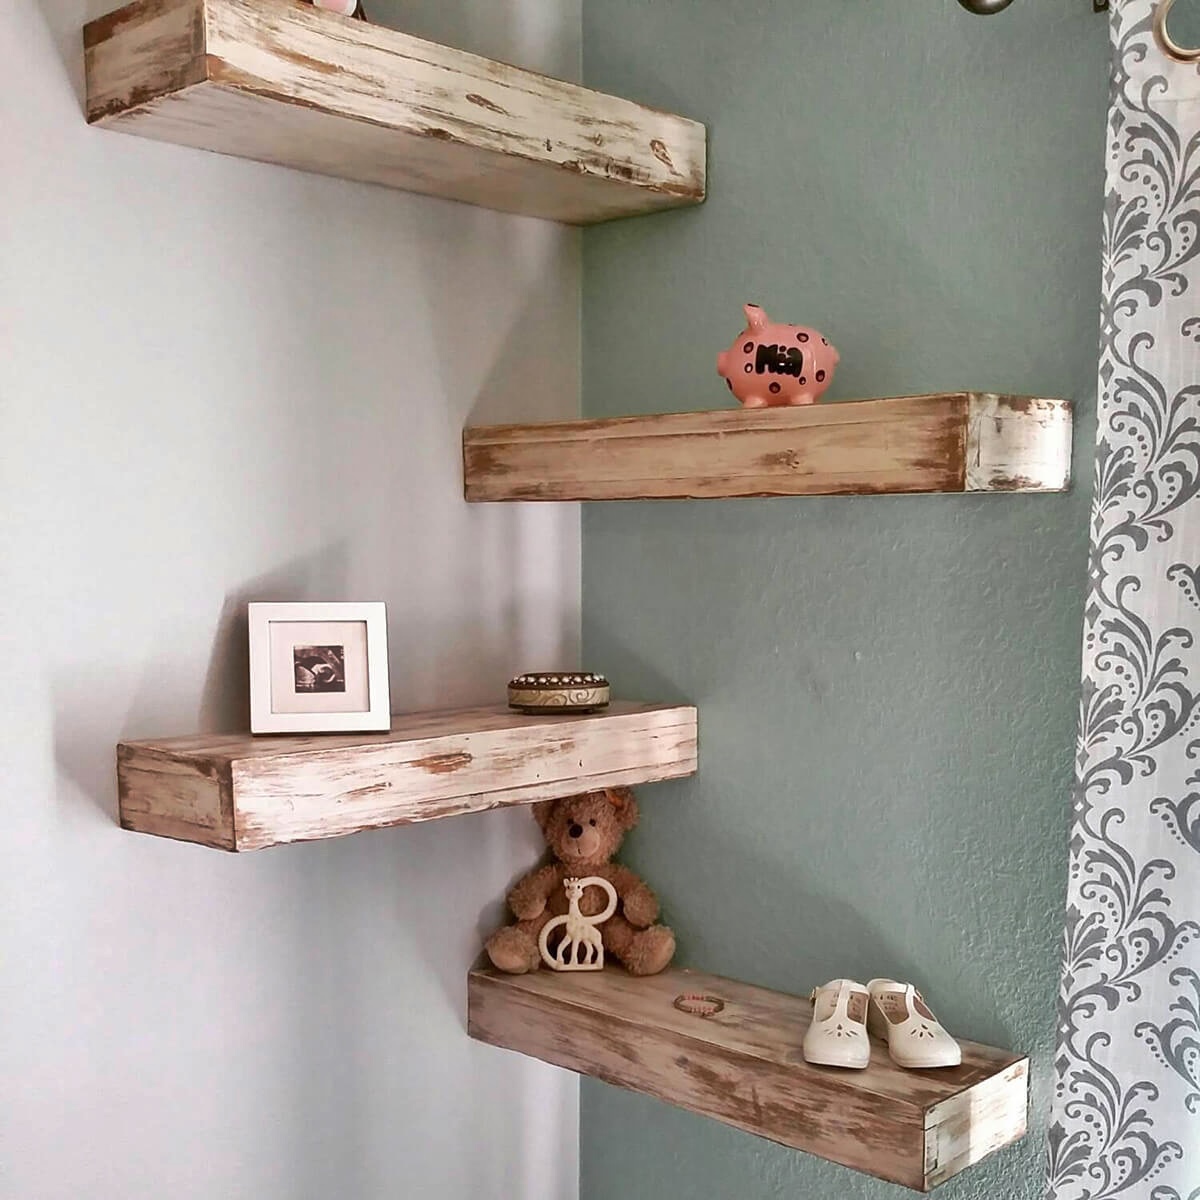
Once the finish is dry, you can now start decorating the corner shelf. Arrange your favorite books, plants, decorative items, or personal keepsakes to personalize the space and make it uniquely yours. Get creative with styling to showcase your personal style and create an eye-catching display.
Consider incorporating small decorative items or accents to enhance the overall aesthetics of the shelf. This could include colorful vases, framed photos, decorative baskets, or small sculptures. Don’t overcrowd the shelf; instead, aim for a balanced and visually appealing arrangement.
Finally, step back and assess the look of the completed corner shelf. Make any adjustments if necessary to achieve a cohesive and visually pleasing display.
By adding these finishing touches, you transform a simple wooden shelf into a stylish and functional centerpiece for your room. Enjoy the satisfaction of completing the project and creating a beautiful and practical addition to your space.
Step 7: Style and Decorate the Shelf
Now that your corner shelf is complete, it’s time to infuse your personal style and make it a visually captivating element in your space. This step focuses on styling and decorating the shelf to reflect your taste and enhance the overall aesthetic of the room.
Consider the theme or style of your room and choose decorative items that complement it. If your space has a minimalist vibe, opt for clean lines and simple objects. For a bohemian look, incorporate plants, colorful textiles, and eclectic pieces.
Start by gathering a variety of decorative items such as vases, small sculptures, picture frames, or trinkets that hold sentimental value. Lay them out and experiment with different combinations to find the most visually appealing arrangement.
Play with varying heights and textures to add depth and interest to the display. Mix and match different shapes, sizes, and colors to create a visually dynamic composition.
Consider using decorative elements such as books, candles, or small potted plants to add functionality and create visual appeal. These items not only look great but can also serve a practical purpose.
Balance is key when styling the shelf. Be mindful of creating harmony and avoiding overcrowding. Leave some empty space to avoid a cluttered appearance and allow each item to stand out.
Regularly update and rotate the items on the shelf to keep the display fresh and visually stimulating. This allows you to continuously showcase different pieces and adapt the style to different seasons or occasions.
Additionally, don’t forget to consider lighting. Incorporate a small lamp or fairy lights to add a warm and cozy ambiance to the shelf, especially if it is placed in a dimly lit area.
Step back and assess the final look of your styled corner shelf. Make any necessary adjustments to achieve the desired aesthetic and balance. Remember, styling is a personal choice, so trust your instincts and create a display that brings you joy.
By adding your personal touch and infusing your style into the shelf, you transform it from a functional piece into a visually captivating and meaningful focal point in the room.