
Choosing the Right Type of String Lights
When it comes to capturing stunning string light photos, choosing the right type of string lights can make a significant difference in the quality and overall effect of your images. Here are some key factors to consider when selecting string lights for your photoshoot:
- Light Color: String lights are available in a variety of colors, including warm white, cool white, and various vibrant hues. Consider the mood and atmosphere you want to create in your photos and select a color that complements your vision. Warm white lights tend to create a cozy and intimate ambiance, while cool white lights lend a more modern and crisp feel.
- Light Bulb Shape: String lights come in various bulb shapes such as traditional incandescent bulbs, globe bulbs, or LED lights. Each shape produces a different lighting effect. Incandescent bulbs offer a classic and nostalgic look, while globe bulbs emit a softer and more diffused light. LEDs are energy-efficient and can provide a clear and vibrant glow.
- Light Length and Density: Consider the length and density of the string lights to ensure they fit your desired shooting location and desired lighting effect. Longer strings allow for more creative opportunities, such as wrapping them around objects or extending them across a larger area. Opt for denser strings if you want to create a more pronounced and dramatic lighting effect.
- Power Source: String lights can be powered by batteries, USB, or traditional electrical outlets. Consider the availability of power sources at your chosen location and choose string lights accordingly. Battery-powered lights offer portability and flexibility, while USB or electrical-powered lights provide a consistent and reliable power supply.
- Waterproof Rating: If you plan to shoot outdoors or in a location where there’s a possibility of being exposed to moisture, opt for string lights with a waterproof rating. This will ensure the safety of your equipment and prevent any accidents or malfunctions.
Remember to thoroughly research and compare different brands and models before making your final selection. The right type of string lights can significantly enhance the overall aesthetic of your photos and help you achieve the desired mood and atmosphere.
Selecting a Location for Your Photoshoot
Choosing the perfect location for your string light photoshoot is crucial to create captivating and visually appealing images. Here are some key considerations when selecting a location:
- Aesthetic Appeal: Look for locations that have interesting backgrounds, architectural elements, or natural landscapes that will complement the overall theme of your photos. Consider whether you want an urban setting with city lights as a backdrop or a serene outdoor location with trees and foliage.
- Availability of Power: If you plan to use electrical-powered string lights, ensure that the location has easy access to power outlets. This will prevent any limitations or complications in setting up your lights and capturing the desired shots.
- Space and Accessibility: Consider the size of the location and whether it can accommodate the setup of your string lights. Ensure that there is enough space for you to move around and position your subjects comfortably. Additionally, assess the accessibility of the location, ensuring that your equipment can be easily transported.
- Lighting Conditions: Evaluate the lighting conditions at different times of the day to determine how natural light will interact with your string lights. Golden hour, the hour before sunset or after sunrise, often creates a soft, warm glow that complements the string lights beautifully.
- Permission and Safety: If you plan to shoot in a public or private location, ensure that you have the necessary permits and permissions. Additionally, prioritize safety by assessing the stability of structures or objects where you will be hanging the lights and making sure the location is hazard-free.
Remember to scout potential locations beforehand to get a better understanding of the overall ambiance and visual appeal they offer. Additionally, be open to exploring unique and unconventional locations that can add an element of surprise and creativity to your photos.
Preparing Your Camera and Settings
Before you start capturing stunning string light photos, it’s essential to prepare your camera and adjust the settings to achieve the desired results. Here are some key steps to follow:
- Shoot in Manual Mode: While automatic modes can be convenient, shooting in manual mode gives you full control over the exposure settings. This allows you to adjust the shutter speed, aperture, and ISO to capture the desired amount of light and control the overall mood of your photos.
- Use a Tripod: To ensure sharp and steady shots, it’s recommended to use a tripod. This will minimize camera shake and allow for longer exposures, especially if you’re shooting in low light conditions. Set up your tripod securely to prevent any accidental movements or vibrations.
- Set a Low ISO: To reduce noise in your images, set your camera’s ISO to the lowest possible value, typically between 100 and 200. This will help maintain image quality and capture cleaner details.
- Choose a Wide Aperture: A wide aperture (small f-stop number) creates a shallow depth of field and can help the string lights stand out with a beautiful bokeh effect. Experiment with different aperture settings to achieve the desired amount of blur or sharpness in your photos.
- Adjust Shutter Speed: Since string lights emit a relatively low amount of light, you’ll need to use a longer shutter speed to capture their glow. Start with a shutter speed of around 1/10th of a second and adjust accordingly to get the right exposure without overexposing the lights.
- Use Manual Focus: String lights can sometimes confuse autofocus systems, so switch to manual focus and adjust it until the lights appear sharp. Pay attention to the focal point, whether it’s the lights themselves or the subjects in the frame.
- Consider Using a Remote Trigger: To minimize any inadvertent movements that can cause camera shake, use a remote trigger or self-timer function to activate the camera. This will help you capture sharp images without having to touch the camera.
Take the time to familiarize yourself with your camera settings and conduct test shots to ensure everything is properly adjusted before starting your photoshoot. This preparation will help you capture the magic of the string lights with precision and control.
Setting Up the String Lights
Setting up the string lights properly is essential to achieve the desired look and create captivating string light photos. Follow these steps to ensure a seamless setup:
- Plan Your Layout: Before you start hanging the string lights, envision how you want them to be arranged. Consider the shape, pattern, and position you want to create. It could be a straight line, an arch, or even a zigzag pattern. Planning ahead will make the setup process much smoother.
- Find Anchor Points: Identify sturdy anchor points where you can secure the string lights. This could be tree branches, fences, poles, or other structures. Ensure that these points can support the weight of the lights and won’t cause any damage.
- Use Clips or Hooks: Attach clips or hooks to the anchor points to hold the string lights securely. This will prevent them from sagging or falling down. Opt for clips or hooks that are designed for outdoor use and can withstand various weather conditions.
- Test the Length: Determine how much string lights you need for your desired layout. Measure the distance between anchor points and make sure you have enough lights to cover that span. Avoid stretching the lights too taut or leaving them too loose; aim for a balanced and visually pleasing arrangement.
- Connect the Lights: If using multiple string light strands, connect them together to achieve the desired length. Follow the manufacturer’s instructions to ensure a secure and safe connection. Double-check that all the lights are working correctly before proceeding with the setup.
- Wrap the Lights: Carefully and evenly wrap the string lights around the anchor points, following your planned layout. Take your time to create neat and uniform wraps, paying attention to spacing and avoiding any unnecessary tangling or twisting.
- Safety Precautions: Ensure the string lights are safely installed, away from flammable materials, and are not a trip hazard. If using electrical-powered lights, make sure the cords are properly insulated and protected from moisture. Take extra precautions when setting up lights in outdoor locations.
Always refer to the manufacturer’s instructions and safety guidelines when setting up string lights to ensure a safe and seamless setup process. Taking the time to set up the lights correctly will result in stunning photos that effectively capture the magical glow of the string lights.
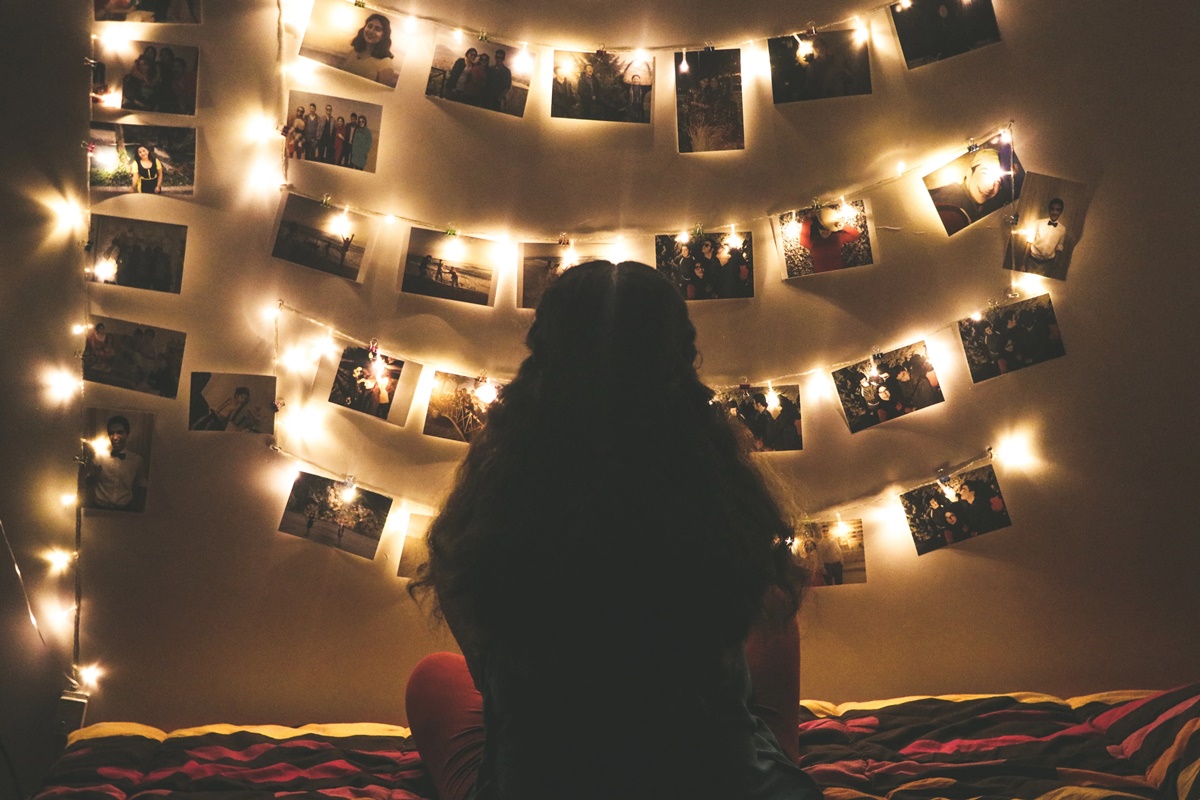
Creating Different Shapes and Patterns
One of the joys of string light photography is the ability to create different shapes and patterns with the lights. This adds an element of creativity and visual interest to your photos. Here are some techniques to experiment with:
- Swirls and Spirals: Wrap the string lights around a central point in a spiral pattern to create a mesmerizing and dynamic effect. Experiment with different sizes and tightness of the spiral to achieve unique variations.
- Horizontal Lines: Hang the string lights in straight lines horizontally to create a clean and geometric look. This is a simple yet effective way to add symmetry and structure to your photos.
- Vertical Lines: Hang the string lights vertically from top to bottom to create a cascading and dramatic effect. This can be especially effective when shooting in outdoor spaces with tall structures or trees.
- Clusters and Bunches: Gather sections of the string lights together and secure them to create clusters or bunches. This adds depth and texture to your photos and gives the lights a more concentrated appearance.
- Letters and Shapes: Use the string lights to spell out words or form specific shapes or symbols. This technique allows you to convey a message or create a personalized touch within your photos.
- Abstract Arrangements: Don’t be afraid to experiment with unconventional arrangements. Twist, bend, and loop the string lights to create abstract and unique patterns. Embrace your creativity and let your imagination run wild.
- Combine with Other Props: Incorporate other props, such as lanterns, flowers, or translucent fabrics, to enhance the visual impact of the string lights. Experiment with different combinations to create mesmerizing and enchanting scenes.
Remember to play around with different shapes and patterns during your photoshoot. Take multiple shots from various angles and distances to capture the full range of possibilities. Have fun and let your creativity shine through in creating magical compositions with your string lights.
The Importance of Lighting and Ambience
When it comes to string light photography, lighting and ambience are vital elements that significantly contribute to the overall mood and aesthetic of your photos. Here’s why they play a crucial role:
Setting the Mood: String lights emit a soft and warm glow that creates a cozy and intimate atmosphere. This gentle illumination sets the mood and evokes an enchanting and whimsical feel in your photos. The right lighting can evoke emotions and enhance the storytelling within your images.
Creating Depth and Dimension: The combination of the string lights and surrounding ambient lighting can add depth and dimension to your photos. The interplay of light and shadows adds texture and visual interest to your subjects and the overall scene. Experimenting with different lighting angles and intensities can create captivating visual effects.
Enhancing Colors: Warm string lights can complement and enhance the colors in your photos, creating a visually pleasing and cohesive look. The soft golden hues can bring out the warmth in skin tones and add a touch of magic to the surrounding environment.
Establishing a Focal Point: The placement and arrangement of string lights help create a focal point within your frame. Whether it’s a group of lights hanging from a tree or an elaborate setup, the string lights draw the viewer’s attention, guiding them through the image and adding visual interest.
Creating Visual Interest: String lights add a captivating element to your compositions, making them more visually appealing. The delicate strands and patterns of lights can add a touch of whimsy and intrigue to an otherwise ordinary scene, making it stand out and capture the viewer’s attention.
Setting the Ambience: Beyond just lighting, string lights contribute to the overall ambience of your photos. They create a sense of warmth, romance, or nostalgia, depending on the context. The soft glow can evoke feelings of joy, tranquility, or celebration, enhancing the overall mood of your images.
Understanding the importance of lighting and ambience in string light photography allows you to effectively utilize these elements to create captivating and visually stunning photos. Experiment with different lighting techniques and settings to capture the desired mood and bring your creative vision to life.
Posing and Directing Your Subjects
When photographing subjects with string lights, it’s essential to guide and direct them to create compelling and engaging compositions. Here are some tips for posing and directing your subjects:
- Establish a Connection: Encourage your subjects to establish a connection with each other and with the surrounding environment. This will bring a natural and authentic feel to the photos and create a sense of intimacy.
- Incorporate Movement: Experiment with dynamic poses and incorporate movement into your shots. Ask your subjects to sway, twirl, or interact with the string lights. This adds a sense of liveliness and captures the whimsical nature of the lights.
- Utilize the String Lights: Direct your subjects to interact with the string lights, such as touching or holding them. This creates a visual connection between the subjects and the lights, adding depth and visual interest to the composition.
- Encourage Natural Expressions: Guide your subjects to showcase their genuine emotions and expressions. Encourage laughter, smiles, and spontaneous moments to capture authentic and memorable photos.
- Play with Diverse Perspectives: Experiment with different angles and perspectives to add variety to your shots. Encourage your subjects to explore different poses, such as looking up towards the lights, lying down, or sitting amidst the string lights.
- Utilize the Surrounding Environment: Incorporate the surrounding environment in your compositions. Position your subjects in a way that showcases both the string lights and the backdrop, whether it’s a cityscape, nature scenery, or architectural elements.
- Consider Composition and Framing: Pay attention to the composition and framing of your photos. Ensure that the string lights are a prominent feature while still allowing your subjects to be the main focus. Experiment with the rule of thirds, leading lines, and negative space to create visually appealing compositions.
- Provide Clear Directions: Give clear and concise instructions to your subjects to ensure they understand what you are looking for. Be patient and supportive, providing gentle guidance and feedback throughout the photoshoot.
- Encourage Spontaneity: Allow room for spontaneous moments and unplanned interactions. Some of the most captivating photos are often captured when subjects feel comfortable and genuinely express themselves without feeling overly posed or directed.
Remember to communicate and collaborate openly with your subjects, making them feel comfortable and involved in the creative process. By posing and directing them effectively, you’ll capture authentic and visually striking images that highlight the beauty of both the subjects and the string lights.
Playing with Depth and Perspective
Playing with depth and perspective can add visual interest and dimension to your string light photos. Here are some techniques to experiment with:
- Foreground and Background: Utilize objects or elements in the foreground, such as branches, leaves, or architectural structures, to frame the string lights. This creates depth and adds a sense of context to your photos.
- Wide-Angle Shots: Use a wide-angle lens or adjust your camera’s zoom to capture a broader view of the scene. This allows you to incorporate more of the surrounding environment while still highlighting the string lights as a prominent feature.
- Focus and Blurriness: Create depth by intentionally blurring parts of the image. Focus on the string lights in the background while allowing the foreground or subjects to be slightly out of focus. This technique draws attention to the lights while adding depth through varying levels of blur.
- Play with Scale: Experiment with playing with scale and proportion. Position your subjects in relation to the string lights to create a sense of size and perspective. For example, you can place people closer to the camera to make the lights appear larger, or have them interact with the lights in a way that emphasizes size contrast.
- Overhead Shots: Capture the string lights from a bird’s-eye view by photographing from an elevated position. This perspective creates an interesting and unique composition, especially when shooting in large, open spaces where the string lights span across a vast area.
- Leading Lines: Use the string lights as leading lines to draw the viewer’s attention towards a specific point in the frame. Position the lights in a way that naturally guides the viewer’s eye towards your subjects or another focal point in the image.
- Layering: Experiment with layering different elements in your composition. Place subjects, props, or even additional string lights in the foreground, middle ground, and background to create a sense of depth and complexity in your photos.
- Reflections: Incorporate reflective surfaces, such as mirrors, water, or glass, to add another layer of depth and visual interest. The reflections of the string lights can create beautiful and abstract compositions that give a unique perspective.
Remember that playing with depth and perspective adds a dynamic element to your string light photos. It allows you to create visually intriguing compositions that draw the viewer into the scene and highlight the magical qualities of the lights.
Adding Additional Props and Decorations
Adding additional props and decorations can elevate your string light photos and enhance the visual impact. Here are some ideas for incorporating props and decorations into your compositions:
- Fairy Lights: Combine different types of string lights to create a layered and mesmerizing effect. Fairy lights, with their smaller bulbs and delicate appearance, can be intertwined with the main string lights to add depth and sparkle.
- Candles and Lanterns: Place candles or lanterns strategically around the string lights to introduce an intimate and romantic ambiance. The warm flickering flames can further enhance the overall mood of your photos.
- Flowers and Greenery: Incorporate flowers, foliage, or vines into your compositions to add a touch of natural beauty. They can be intertwined with the string lights or used as decorative elements in the foreground or background.
- Colored Gels or Filters: Experiment with colored gels or filters to add a unique and creative twist to your photos. Gently place them over the lights to change the color or add a subtle tint that complements your desired aesthetic.
- Paper Lanterns or Origami: Hang paper lanterns or origami creations alongside the string lights to add an enchanting and whimsical element. The soft glow of the lights combined with the delicate paper structures creates a magical atmosphere.
- Fabric and Draping: Use sheer fabrics, such as tulle or chiffon, to create a dreamy and ethereal effect. Drape the fabrics around the string lights or create billowing canopies to add texture and create a sense of wonder.
- Reflective Surfaces: Introduce mirrors or reflective surfaces into your compositions to create unique reflections and add a dimensional element. The reflections can provide a captivating visual effect that gives your photos an extra layer of intrigue.
- Props to Interact With: Encourage your subjects to use props that interact with the string lights. This can include sparklers, umbrellas, or transparent objects like glass orbs that catch and refract the light, creating stunning visual effects.
- Creative Light Sources: Integrate other light sources, such as glow sticks, light-up toys, or even sparklers, to add a whimsical and playful element to your string light photos.
When selecting props and decorations, ensure they complement the overall theme and aesthetic you wish to achieve. Experiment with various combinations and placements to create captivating visuals that enhance the magical allure of the string lights.
Post-Processing and Editing Techniques
Post-processing and editing play a crucial role in bringing out the full potential of your string light photos. Here are some techniques to consider when editing your images:
- Adjusting Exposure and Contrast: Fine-tune the exposure and contrast levels to enhance the overall tonal range of your photo. Increase the exposure to bring out the details in the string lights, and adjust the contrast to add depth and definition.
- Enhancing Colors: Experiment with color adjustments to make the string lights pop. Increase the saturation or vibrancy of the warmer tones to enhance their warm and magical glow. Adjust the white balance to ensure the colors appear natural and true to the scene.
- Sharpening and Detail Enhancement: Use sharpening and clarity adjustments to enhance the details in your photos. This can bring out the intricate patterns in the string lights and add an overall crispness to the image.
- Removing Distractions: Use the healing brush or clone stamp tool to remove any distractions or unwanted elements in your composition. Clean up any stray wires, unwanted objects, or blemishes that may divert the viewer’s attention.
- Adding Vignettes: Consider adding a subtle vignette effect to draw the viewer’s attention towards the center of the frame. This can help emphasize the string lights and create a more intimate and focused composition.
- Applying Filters or Presets: Experiment with filters or presets to enhance the overall mood and atmosphere of your photos. Consider cinematic presets, vintage effects, or custom filters that complement the style of your string light photos.
- Using Graduated Filters: Utilize graduated filters to adjust specific areas of your photo independently. This technique can be useful for balancing the exposure between the string lights and the background or enhancing the sky in outdoor settings.
- Cropping and Framing: Crop or reframe your image to improve the composition and draw attention to the key elements. Consider using the rule of thirds, leading lines, or other compositional techniques to create visually pleasing and balanced compositions.
- Adding Light Effects: Experiment with adding subtle light effects, such as lens flares or glows, to enhance the magical quality of the string lights. However, be mindful of not overdoing it, as it can distract from the main subject of the photo.
- Experimenting with Black and White: Try converting your string light photos to black and white to create a timeless and artistic feel. This can also help emphasize the contrast and patterns created by the string lights.
Remember, the goal of post-processing is to enhance the visual impact of your photos while maintaining a natural and authentic look. Be mindful not to over-process your images, as it can result in an unnatural and artificial appearance. Experiment with different editing techniques and find a style that complements the mood and aesthetic of your string light photos.