
Choosing the Right Yarn and Hook
When it comes to crocheting a rug, one of the most important decisions you’ll make is choosing the right yarn and hook. The yarn you select will determine the durability, appearance, and comfort of your finished rug, while the hook size will affect the size and tension of your stitches.
Firstly, consider the type of yarn that will best suit your needs. For a rug that can withstand heavy foot traffic, opt for a sturdy yarn made from natural fibers like cotton or wool. These materials are durable and easy to clean, making them ideal for rugs that will be placed in high-traffic areas like entryways or living rooms.
If you prefer a softer and more luxurious feel underfoot, consider using yarn blends that contain synthetic fibers like acrylic or nylon. These fibers provide added softness and are often more affordable than natural fibers.
Next, determine the thickness or weight of the yarn. Thicker yarns, such as bulky or super bulky, will create a rug with more texture and a chunkier appearance. On the other hand, thinner yarns, like sport weight or worsted weight, will result in a rug with a more delicate and intricate look.
As for the hook, it’s important to choose a size that complements your chosen yarn. Pay attention to the recommended hook size indicated on the yarn label, as this will ensure that your stitches are even and the tension is consistent.
If you’re unsure about which hook size to use, it’s always a good idea to do a gauge swatch. This involves crocheting a small sample using your chosen yarn and hook to determine if the resulting fabric meets your desired measurements.
Remember, the yarn and hook you choose will greatly impact the outcome of your crocheted rug. Take the time to consider your preferences, the intended use of the rug, and the desired aesthetic before making your final decision. By selecting the right yarn and hook, you’ll set yourself up for success and create a stunning rug that will serve you well for years to come.
Starting Your Rug with a Magic Ring
When beginning a crochet project, using a magic ring can be a great way to create a tight and seamless foundation. This technique is particularly useful for starting a rug, as it allows you to easily adjust the size and tension of the central hole.
To start your rug with a magic ring, begin by holding the end of your yarn in your non-dominant hand. Create a loop by crossing the working end of the yarn over the tail end, forming a U-shape. Insert your crochet hook into the center of the loop.
Next, yarn over by wrapping the working end of the yarn over the hook from the back to front. With the hook, pull the yarn through the loop, creating a slipknot around the hook. This slipknot will function as the anchor for your magic ring.
Hold the slipknot in place with your non-dominant hand, while using your dominant hand to pull the working end of the yarn tight. This will close the hole and create a secure ring for your stitches.
Now you’re ready to start crocheting your rug! Simply insert your hook into the center of the ring, yarn over, and pull through a loop. This will create your first stitch. Continue crocheting your desired stitch pattern into the ring, working over both the tail end and the working end of the yarn.
Once you have completed the desired number of stitches into the ring, gently pull the tail end of the yarn to close the center hole. This can be adjusted later if needed, ensuring that your rug starts with a neat and tight center.
Starting your rug with a magic ring not only provides a clean foundation but also allows for easy customization. By adjusting the number of stitches worked into the ring, you can control the size of the central hole and create rugs of various sizes. Experiment with different stitch patterns and yarns to achieve the desired look and feel for your crocheted rug.
Creating the Foundation Chain
The foundation chain is the backbone of your crocheted rug. It serves as the starting point from which you will build the rows of stitches that make up your rug’s surface. Creating a strong and even foundation chain is essential for the stability and overall appearance of your rug.
To create the foundation chain, start by making a slipknot and placing it on your hook. Hold the slipknot firmly between your thumb and forefinger. This will act as the first chain stitch.
Next, yarn over by wrapping the working end of the yarn over the hook from back to front. With the hook, pull the yarn through the slipknot, creating a new loop on the hook.
Continue this process, creating additional chain stitches by repeating the yarn over and pull through motion. Take care to keep your tension consistent, ensuring that each chain stitch is the same size and not too tight or too loose.
The number of foundation chain stitches you create will depend on the desired width of your rug. If you’re following a pattern, it will indicate the specific number of chains required. If you’re creating your own design, you can determine the width by measuring or estimating the desired size.
Once you have completed the foundation chain, measure it to ensure it matches the desired width. If it’s too short, simply add more chain stitches. If it’s too long, remove some stitches by unraveling the chain until you reach the desired length. Remember to always keep the slipknot secure on your hook.
Creating a smooth and even foundation chain is crucial for maintaining the integrity of your rug. Avoid twisting the chain as you work, as this can lead to a wonky shape or uneven stitches. Take your time and pay close attention to each chain stitch, ensuring they are the same size and properly aligned.
With a strong and well-executed foundation chain, you’re now ready to move on to the next step of crocheting your rug. Whether you plan to use single crochet stitches or explore more intricate stitch patterns, the foundation chain will provide the base for a beautiful and durable finished rug.
Making a Single Crochet Stitch
The single crochet stitch is one of the most fundamental stitches in crochet and will be the primary stitch used to create your rug. Mastering this stitch will allow you to create a solid and tightly woven fabric that is perfect for rugs.
To make a single crochet stitch, begin by inserting your hook into the next stitch or chain space. This can be either the first stitch of the row or the first chain of the foundation chain.
Yarn over by wrapping the working end of the yarn over the hook from back to front. With the hook, pull the yarn through the stitch or chain space, creating two loops on your hook.
Yarn over again and pull through both loops on the hook in one motion. This completes one single crochet stitch. Continue this process for each stitch or chain space across the row.
Pay attention to your tension while making single crochet stitches. Aim for a consistent tension that is not too tight or too loose. Tight stitches can result in a stiff rug, while loose stitches can lead to a floppy and unstable fabric.
As you work each stitch, take care to keep your rug flat and the edges straight. Ensure that you are working into the top of each stitch or chain and not accidentally skipping or adding stitches. This will create an even and uniform appearance.
If your rug requires multiple rows of single crochet stitches, remember to turn your work at the end of each row. This will ensure that the stitches are worked in the correct direction and that the fabric is built layer by layer.
By making single crochet stitches, row after row, you will gradually see your rug come to life. The tightness and density of the stitches will create a sturdy and durable surface that can withstand daily use.
Take your time while working single crochet stitches, especially if you are new to crocheting. Practice the motion until you feel comfortable and confident in creating smooth and even stitches.
With practice and patience, you will soon be proficient in making single crochet stitches and ready to explore more advanced stitch patterns to add dimension and texture to your crocheted rug.
Increasing and Decreasing Stitches
As you progress in crocheting your rug, you may find the need to increase or decrease stitches to shape the fabric or create design elements. These techniques allow you to adjust the width or size of your rug while maintaining the integrity of the stitch pattern you are using.
To increase the number of stitches in a row, begin by working into the same stitch or chain as the previous stitch. Instead of inserting your hook into the next stitch, insert it into the same stitch, creating two loops on your hook. Yarn over and pull through the stitch, then yarn over and pull through both loops on your hook. This creates an additional stitch in that particular stitch or chain space.
If you need to decrease stitches to narrow your rug, there are several techniques you can use. One common method is the single crochet decrease, also known as sc2tog. To do this, insert your hook into the next stitch or chain space, yarn over and pull through, then insert your hook into the following stitch or chain space, yarn over and pull through. You should have three loops on your hook. Yarn over and pull through all three loops to complete the decrease.
Another way to decrease stitches is through the use of skipping stitches. Instead of working into every stitch or chain space, simply skip one or more stitches and continue the stitch pattern as directed. This will effectively reduce the number of stitches in that section of the row.
Increasing and decreasing stitches requires careful attention to your stitch count and pattern. Always refer to your pattern instructions or plan out your increases and decreases if you are creating your own design. A well-executed increase or decrease will blend seamlessly into the overall fabric and create a clean and symmetrical appearance.
Keep in mind that increasing and decreasing stitches can also impact the overall size and shape of your rug. If you are working on a specific size, make sure to measure your rug periodically to ensure it meets your desired dimensions.
Whether you are shaping your rug or incorporating design elements, mastering the techniques of increasing and decreasing stitches will allow you to add versatility and customization to your crocheted rug. Experiment with different stitch patterns and combinations to achieve the desired effect while maintaining a balanced and attractive final product.
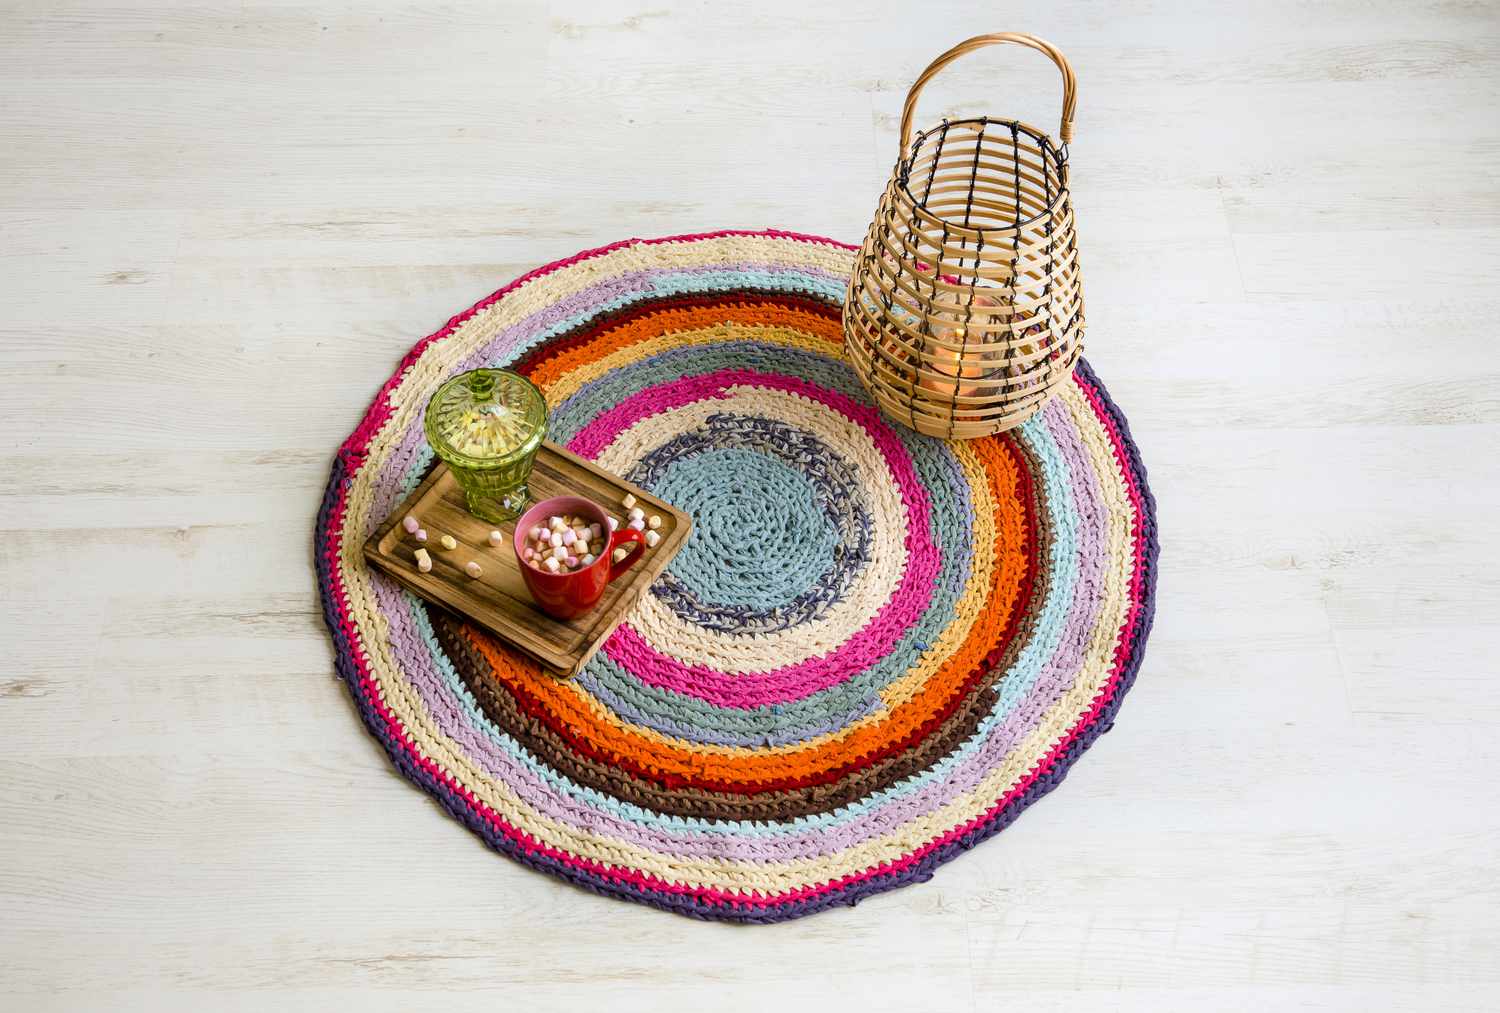
Changing Colors
Changing colors in your crocheted rug can add visual interest and create unique designs. Whether you want to create stripes, color blocks, or intricate patterns, knowing how to change colors seamlessly is an essential skill. Here are a few methods to help you change colors smoothly in your rug.
The most common method of changing colors is to complete the last stitch of the old color until you have two loops remaining on your hook. Then, drop the old color and pick up the new color, pulling it through the two remaining loops to complete the stitch. This method ensures a clean color transition without any gaps or loose ends.
Another method is the “yarn over” technique for changing colors at the beginning of a new row. To do this, start with the old color and insert your hook into the first stitch or chain space. Yarn over with the new color and pull through both the stitch or chain space and the new color. This will create a seamless color change at the beginning of the row.
If you’re working with multiple colors in a specific pattern, you may need to carry the unused colors along the back of the work. To do this, simply drop the current color and pick up the next color when needed. Make sure to catch the unused color in the stitches as you work to secure it and prevent it from showing on the front of the rug.
When changing colors, it’s important to weave in the loose ends to avoid unraveling. This can be done using a tapestry needle or by crocheting over the ends as you work. Weaving in the ends ensures that your rug remains secure and neat, even with color changes.
Experiment with different color combinations and patterns to create unique designs in your crocheted rug. Consider using a color wheel or color theory principles to select complementary or contrasting colors for a visually pleasing result.
Remember to plan your color changes ahead of time and consider the placement of each color. This will help you achieve a balanced and cohesive design in your rug.
Changing colors is a creative way to personalize your crocheted rug and make it truly unique. With a little practice and attention to detail, you can seamlessly incorporate color changes into your rug, resulting in a stunning finished piece.
Adding Texture with Different Stitch Patterns
One of the wonderful aspects of crocheting a rug is the opportunity to add texture to your design through various stitch patterns. By incorporating different stitch patterns, you can create a visually appealing and tactile rug that is both functional and decorative.
One popular stitch pattern for adding texture is the popcorn stitch. This stitch involves grouping several stitches together and then securing them with a slip stitch to form a “popcorn” or raised bump on the fabric. The popcorn stitch adds a three-dimensional element to your rug, creating a unique and eye-catching texture.
Another technique is the bobble stitch. This stitch is similar to the popcorn stitch, but instead of securing the grouped stitches with a slip stitch, you work multiple partial stitches in the same stitch or chain space. This creates a rounded, raised texture on the fabric.
If you prefer a more lacy and delicate texture, consider incorporating stitch patterns such as the shell stitch or the puff stitch. The shell stitch consists of multiple stitches worked into the same stitch or chain space, creating a fan-like shape that adds elegance and airiness to your rug. The puff stitch, on the other hand, involves pulling up multiple loops on the hook and then securing them together, resulting in a soft and plush texture.
You can also experiment with raised and lowered textures by incorporating stitch patterns like the front post double crochet or the back post double crochet. These techniques involve working stitches around the post of the stitch in the previous row, creating a raised or recessed effect on the fabric. This adds depth and dimension to your rug.
When considering stitch patterns for your rug, think about the overall design and functionality. Some stitch patterns may be denser and more suitable for high-traffic areas, while others may be more open and decorative. Consider the purpose of your rug and choose stitch patterns that complement its intended use.
Remember to keep track of your stitch patterns and make sure to follow them consistently throughout your rug. This will ensure a cohesive and visually appealing finished product. You can easily find stitch patterns in crochet pattern books or online resources, or even create your own unique stitch patterns for a truly one-of-a-kind rug.
Adding texture through different stitch patterns allows you to create a rug that is not only visually appealing but also a delight to touch. Get creative with your stitch choices and experiment with various textures to bring your crocheted rug to life.
Weaving in Ends
As you work on your crocheted rug, you will accumulate loose ends of yarn from changing colors, adding new skeins, or finishing rows. Weaving in these loose ends is an essential step to create a clean and polished finish for your rug.
To weave in ends, start by cutting the yarn, leaving a tail that is long enough to work with. Thread the tail onto a tapestry needle, then insert the needle under the stitches of the same color, going back and forth in a horizontal or vertical direction. This helps secure the yarn and prevent it from unraveling.
Continue weaving the needle under the stitches for a few inches, making sure to distribute the tension evenly so that it doesn’t pull the fabric out of shape. Once you’re satisfied that the end is secure, trim any excess yarn close to the fabric, being careful not to cut the woven tail.
If you are changing colors, you can also weave in the ends of the new color as you work. To do this, simply carry the unused color along the back of the work, weaving it under the stitches of the current color every few stitches. This technique helps minimize the number of loose ends to weave in later.
It’s important to take the time to weave in ends as you go rather than waiting until the entire rug is completed. This ensures that the ends are secure and won’t come undone during use or washing. It also saves you time and effort at the end, as there will be fewer ends to weave in.
When weaving in ends, be mindful of the placement and direction of the stitches to blend them seamlessly into the fabric. You want the woven ends to be hidden and not visible from the front of the rug. Take care to weave in ends on the back or underside of the rug, where they won’t be noticeable.
Weaving in ends is a necessary finishing touch to give your crocheted rug a polished and professional look. By taking the time to neatly secure and trim your loose ends, you ensure that the rug not only looks great but also stands up to regular use and washing.
Don’t rush through this step — pay attention to detail and take pride in the neatness of your work. With a little extra effort, your crocheted rug will be a beautiful and refined piece that can be enjoyed for years to come.
Blocking and Finishing Your Rug
Blocking and finishing your crocheted rug is the final step to ensure that it looks its best and maintains its shape over time. This process helps to even out stitches, flatten the fabric, and give your rug a professional finish. Here’s how to block and finish your rug:
First, determine the best method of blocking for your rug based on the fiber content and stitch pattern. Blocking refers to wetting the rug and allowing it to dry in a specific shape to achieve the desired dimensions. For natural fibers like cotton or wool, wet blocking is usually the preferred method. Synthetic fibers like acrylic may require a different approach, such as steam blocking.
If wet blocking is suitable, fill a basin or sink with lukewarm water and add a small amount of mild detergent. Place your rug in the water and gently press it down to ensure it is fully saturated. Let it soak for about 15-20 minutes, then carefully lift it out of the water, taking care not to wring or twist it.
Lay a clean towel on a flat surface and place the rug on top. Use another towel to gently press down and remove excess water from the rug. Once most of the water is removed, reshape the rug to its intended dimensions, gently tugging and adjusting the edges and corners.
Pin the edges of the rug in place using rust-proof T-pins or blocking wires, ensuring that the rug is flat and square. If necessary, use a tape measure or ruler to ensure all sides are equally aligned. Allow the rug to air dry completely, flipping it over halfway through to ensure even drying.
If steam blocking is recommended for your specific fiber or stitch pattern, use a handheld steamer or the steam setting on your iron to gently pass over the rug. Be cautious not to touch the rug directly with the steamer or iron, as this can cause damage. Instead, hover the steamer or iron a few inches above the surface, allowing the steam to penetrate the fibers.
Once the rug is dry and properly blocked, it’s time to add the finishing touches. Check the edges of your rug and make any necessary adjustments to ensure they are straight and even. Trim any loose yarn ends that may have surfaced during blocking or weaving in ends.
Lastly, take a moment to admire your finished rug. Run your hands over the surface, feeling the texture and appreciating the beauty of your creations. Your blocking and finishing efforts have enhanced the appearance and longevity of your rug, ensuring that it will be a cherished piece in your home for years to come.
Tips for Cleaning and Caring for Your Crocheted Rug
Proper cleaning and care are essential for maintaining the beauty and longevity of your crocheted rug. Whether you’ve created a functional rug for high-traffic areas or a decorative piece, here are some tips to help keep it looking its best:
1. Regular maintenance: Vacuum or shake your rug regularly to remove dust and debris. This will prevent dirt from becoming embedded in the fibers, keeping the rug clean and fresh.
2. Spot cleaning: Attend to spills and stains promptly by gently blotting the affected area with a clean cloth or paper towel. Avoid rubbing the stain, as this can cause it to spread or become embedded. Use a mild detergent or stain remover specifically designed for the fiber content of your rug.
3. Handwashing: If necessary, it’s best to handwash your crocheted rug. Fill a basin or sink with lukewarm water and a mild detergent suitable for the fiber type. Gently agitate the water and immerse the rug, allowing it to soak for a short time. Rinse thoroughly and press out excess water without wringing or twisting. Lay flat to dry, shaping it back to its original form if needed.
4. Machine washing: Only machine wash your rug if indicated on the yarn label and if the stitch pattern and construction can withstand it. Use a gentle cycle, cool water, and a mild detergent. Place the rug in a mesh laundry bag or pillowcase to protect it from snagging or stretching. After washing, reshape and lay flat to dry.
5. Dry cleaning: For delicate or intricate rugs, consider professional dry cleaning. Check the care instructions for any specific recommendations. Inform the dry cleaner of the fiber content and any specific areas of concern.
6. Protect from direct sunlight: Prolonged exposure to direct sunlight can cause fading and damage to your rug. If possible, place your rug away from direct sunlight or use UV-blocking window coverings to protect it.
7. Rotate regularly: To prevent uneven wear and tear, rotate your rug periodically. This helps distribute foot traffic or furniture weight across different areas of the rug, ensuring its longevity.
8. Use rug pads: Consider placing a rug pad underneath your crocheted rug. This provides extra cushioning, prevents slipping, and protects both the rug and the floor underneath.
9. Avoid high moisture areas: Keep your crocheted rug away from excessive moisture, as it can lead to mold, mildew, or fiber damage. Avoid placing it in areas prone to spills, such as kitchens or bathrooms.
10. Store properly: If you need to store your crocheted rug, clean and thoroughly dry it before rolling it up and placing it in a clean, dry storage bag. Avoid folding the rug, as this can create creases and distort the shape. Store it in a cool, dry, and well-ventilated area to prevent moisture buildup.
By following these cleaning and care tips, you can enjoy your crocheted rug for years to come. With proper maintenance, your rug will continue to provide warmth, beauty, and comfort in your home.