
Planning and Preparation
Building a trash can enclosure requires careful planning and preparation to ensure success and functionality. Before embarking on the project, take the time to assess your needs and determine the ideal location for the enclosure. This will help you choose the right materials and tools and make accurate measurements.
First, consider the number and size of the trash cans you intend to store in the enclosure. This will help you determine the dimensions and capacity needed for the structure. Additionally, think about any other storage needs you may have, such as recycling bins or gardening tools, to design a multipurpose enclosure.
Next, choose a suitable location for your trash can enclosure. It should be easily accessible for disposing of trash, but also hidden from plain sight to maintain the aesthetics of your property. Consider placing it near your house or garage for convenience, or strategically position it in a corner of your yard to minimize its visual impact.
Once you have determined the location, it’s time to select the materials and tools for the project. Common options for trash can enclosures include wood, vinyl, or metal. Each material has its own advantages and looks, so choose one that complements the style of your home and is durable enough to withstand the elements.
After selecting the materials, take accurate measurements of the available space and calculate the dimensions for the enclosure. Consider factors such as the size of the trash cans, the clearance needed for easy access, and any additional features you plan to incorporate, such as a hinged gate or a roof.
Design considerations are also important for a successful trash can enclosure. Think about how you want the structure to blend with your property’s aesthetic and whether you want it to be stand-alone or attached to an existing structure, such as a fence or wall. Sketch out your design and make any necessary adjustments before moving forward.
With your plans and measurements in hand, you can now begin building the trash can enclosure. The next steps involve setting the posts, attaching the frame, constructing the walls, installing the gate, and adding finishing touches such as painting or staining.
Remember, proper maintenance and care are essential to ensure the longevity of your trash can enclosure. Regularly clean the interior, check for any damage, and make necessary repairs to keep it functional and attractive for years to come.
Assessing Your Needs
Before you start building a trash can enclosure, it’s important to assess your specific needs to ensure that the design and size of the enclosure will meet your requirements. Consider the following factors to make an informed decision:
Number and size of trash cans: Take a look at the number of trash cans you need to store in the enclosure. If you have multiple bins, you’ll need to consider the width and depth of the structure to accommodate them appropriately. Measure the dimensions of your trash cans to determine how much space you’ll need in the enclosure. Additionally, consider if you plan to separate your trash and recycling or if you have other specific storage needs.
Location: Assess the available space in your yard or property to determine the ideal location for your trash can enclosure. Consider factors such as accessibility and convenience. You’ll want the enclosure to be easily accessible for depositing trash, but also strategically placed to maintain visual appeal and minimize odors. Consider placing it near your kitchen or garage for convenience, or away from outdoor living spaces to reduce exposure to the elements and potential odor concerns.
Aesthetics: Take into account the overall visual impact of the enclosure on your property. Think about the style of your home and yard and choose a design that harmonizes with the existing structures or landscape. Some enclosures are designed to blend in seamlessly with the surroundings, while others may have decorative elements that enhance the overall appearance of your outdoor space.
Functionality: Evaluate if you need any additional features or storage options in your trash can enclosure. Consider if you need space for storing recycling bins or composting materials. You might also want to include hooks or shelves inside the enclosure for hanging tools or storing bags. Assess your specific needs and make sure the design and size of the enclosure can accommodate them.
Local regulations: Before proceeding with the construction of a trash can enclosure, check with your local authorities to ensure that you comply with any regulations or guidelines. Some areas may have specific requirements regarding the size, materials, or location of outdoor storage structures. It’s important to be aware of these guidelines to avoid any potential issues down the road.
By thoroughly assessing your needs, you’ll be able to determine the appropriate size, design, and location for your trash can enclosure. This will ensure that it meets your functional requirements while enhancing the aesthetics of your property.
Choosing the Right Location
When building a trash can enclosure, selecting the ideal location is crucial for both functionality and aesthetics. Consider the following factors to choose the right spot:
Accessibility: Choose a location for your trash can enclosure that is easily accessible. You’ll want to make it convenient for yourself or anyone who needs to dispose of trash regularly. Consider the proximity to your home’s entrance, kitchen, or garage so that you don’t have to walk too far with your trash. Finding a spot that is easily reachable will make your daily routines more efficient.
Visibility: While accessibility is important, you’ll also want to consider the visibility of the trash can enclosure. Garbage is not the most visually appealing element, so you may want to place the enclosure in an area that is not easily visible from outdoor living spaces or high-traffic areas. This way, you can maintain the overall aesthetics of your property and keep the focus on other beautiful aspects of your outdoor space.
Odor control: Trash can produce unpleasant odors, especially during warm weather. To minimize the impact of odors, consider placing the enclosure away from outdoor seating areas, windows, and air conditioning systems. A location with good airflow can help disperse any lingering odors. You might also consider adding some odor-absorbing materials or deodorizers inside the enclosure to further prevent any unpleasant smells.
Privacy: If you value privacy, choose a location that provides some level of screening or coverage for your trash can enclosure. This might be close to a fence, a wall, or existing landscaping. By placing it in a more secluded spot, you can prevent unwanted views and maintain a sense of privacy in your outdoor living area.
Sun exposure: Consider the amount of sun exposure in the chosen location. Direct sunlight can cause the trash cans to emit more odor, especially in hot weather. Placing the enclosure in a shaded area or partially covered spot can help minimize this issue. It will also prevent excessive heat buildup inside the enclosure, which can potentially damage the trash cans.
Drainage: Ensure that the chosen location has proper drainage to prevent any water pooling around the enclosure. Standing water can lead to unpleasant odors, attract insects, and potentially damage the structure over time. If the area is prone to water accumulation, consider adding a small gravel or drainage system to keep the area dry and maintain the integrity of the enclosure.
By taking these factors into consideration, you can choose the right location for your trash can enclosure. This will not only make it convenient for everyday use but also contribute to the overall aesthetics and functionality of your outdoor space.
Selecting Materials and Tools
Choosing the right materials and tools is essential when building a trash can enclosure. The materials you select should be durable, weather-resistant, and able to withstand the elements. The tools you have on hand will help you construct the enclosure efficiently and effectively. Consider the following factors when selecting materials and tools:
Materials: Common options for trash can enclosure materials include wood, vinyl, and metal. Wood is a popular choice due to its natural look and versatility. Cedar and pressure-treated wood are excellent choices as they are resistant to rot and decay. Vinyl is another durable option that requires minimal maintenance and is available in a variety of colors and styles. Metal, such as aluminum or steel, offers strength and durability, but it may require more maintenance to prevent rust. Choose a material that matches the style of your home and suits your personal preferences.
Weather resistance: Consider the weather conditions in your area when selecting materials. If you live in an area with harsh winters or high humidity, choose materials that are resistant to moisture, rot, and insects. Wood materials should be treated or naturally resistant to decay. Vinyl and metal options should be designed specifically for outdoor use and have protective coatings to prevent damage from the elements.
Tools: The tools you will need for building a trash can enclosure depend on the design and materials chosen. Common tools include a circular saw, measuring tape, level, drill, screwdriver, hammer, and safety gear such as goggles and gloves. Consider whether you have these tools already or if you need to purchase or borrow them for the project. Having the right tools on hand will make the construction process smoother and more efficient.
Budget: The materials and tools you select should align with your budget. Determine how much you are willing to spend on the enclosure and choose materials and tools that fit within that range. Remember to consider the long-term durability and maintenance costs of the materials. While cheaper options may seem appealing initially, they may require more upkeep or replacement in the future.
Personalization: Consider any additional features or personalization you want to incorporate into the enclosure. This could include adding decorative elements, integrating a hinged gate, or including storage shelves or hooks inside. Ensure that the materials you choose are suitable for realizing these design elements and that they will enhance the functionality and aesthetics of the enclosure.
By carefully selecting the materials and tools for your trash can enclosure, you will create a sturdy and visually appealing structure that can withstand the elements and meet your specific needs.
Measuring and Calculating Dimensions
Accurate measurements and calculations are critical when building a trash can enclosure. Properly measuring the available space and calculating the dimensions will ensure that the enclosure fits seamlessly into your outdoor area and accommodates your trash cans effectively. Consider the following steps:
Measure the space: Begin by measuring the available space where you plan to place the trash can enclosure. Take into account any restrictions, such as existing structures, fences, or landscaping. Measure the width, depth, and height of the area to determine the maximum size the enclosure can be without obstructing other features or impeding functionality.
Determine the dimensions: Once you have measured the space, determine the dimensions for the enclosure based on the number and size of trash cans you need to accommodate. Measure the dimensions of your trash cans and allow some extra space for easy removal and replacement. Keep in mind any additional features you plan to incorporate, such as a hinged gate or storage shelves, and calculate the dimensions accordingly.
Consider clearances: When calculating the dimensions, ensure that you account for any necessary clearances. Leave enough width and depth clearance to comfortably fit the trash cans inside the enclosure and easily maneuver them. If you plan to have a hinged gate, allow adequate clearance for it to open and close without obstruction. Additionally, provide enough height clearance to prevent the trash cans from scraping against the top of the enclosure.
Proportion and aesthetics: Consider the proportion and aesthetics of the enclosure in relation to the surrounding area. It should not overwhelm or visually dominate the space. Choosing dimensions that are in proportion to the overall size of your property and other structures will ensure a visually appealing result.
Double-check measurements: Before proceeding with construction, double-check all measurements to ensure accuracy. Take into account any potential obstacles, such as uneven ground or slopes, and make any necessary adjustments to the dimensions to ensure a level and stable structure.
By carefully measuring and calculating the dimensions, you can ensure that your trash can enclosure fits perfectly into the available space and provides efficient storage for your trash cans. Accurate measurements will save you time and effort during the construction process and result in a cohesive and visually pleasing final product.
Design Considerations
When building a trash can enclosure, there are several design considerations to keep in mind. These factors will help you create a structure that not only serves its functional purpose but also enhances the aesthetics of your outdoor space. Consider the following design considerations:
Aesthetic Integration: Ensure that the design of the trash can enclosure complements the overall style of your property. Choose materials, colors, and finishes that harmonize with your home’s architecture and existing outdoor structures. This will create a cohesive and visually appealing look for your property.
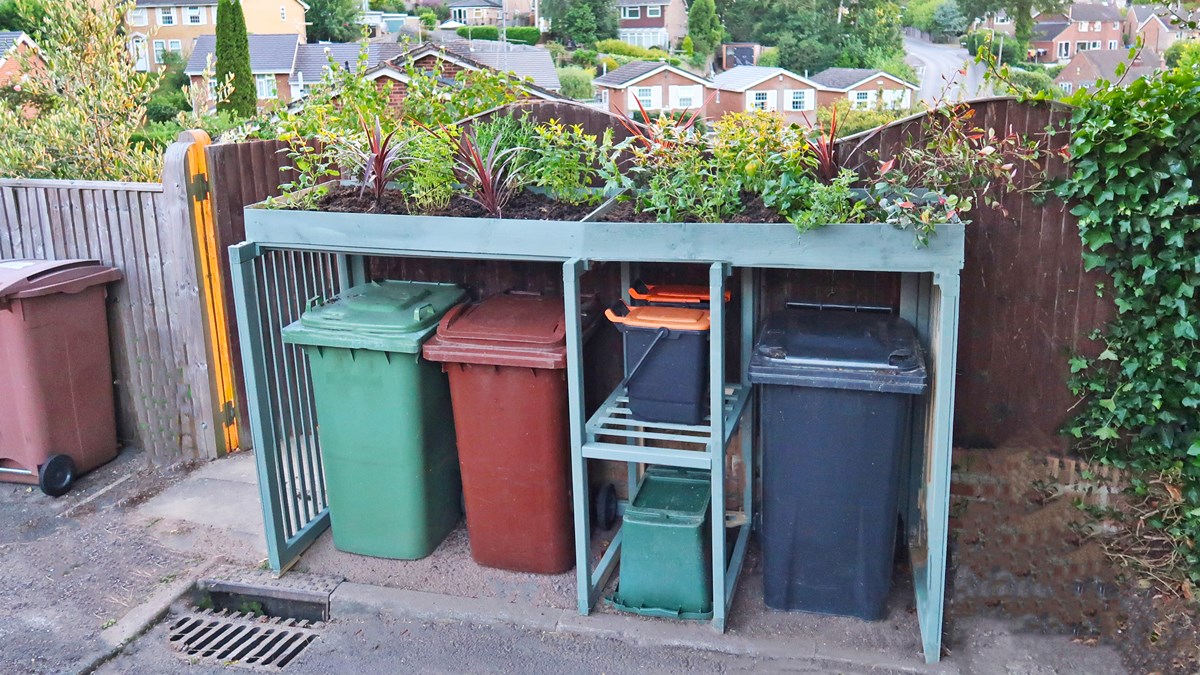
Blending with Surroundings: Take into account the landscaping and other elements in your outdoor space when designing the enclosure. Consider using plants, trellises, or decorative elements to help the enclosure blend in seamlessly with the surrounding environment. This will soften the visual impact and create a more natural look.
Stand-Alone or Attached: Decide whether you want the trash can enclosure to be stand-alone or attached to an existing structure, such as a fence or wall. This consideration may depend on the available space and your personal preference. An attached enclosure can provide added stability and a sense of continuity with the existing structures.
Ventilation: Proper ventilation is crucial to prevent the buildup of unpleasant odors inside the enclosure. Incorporate adequate ventilation, such as slats or small openings, to promote airflow and minimize any potential odor issues. This will ensure that the enclosure remains fresh and odor-free.
Security: Consider adding a lockable gate or latch to the enclosure to prevent unauthorized access. This will help keep pests and animals out of the trash cans and ensure the contents are secure. Choose a reliable locking mechanism that is easy to use but provides an effective deterrent against unwanted access.
Multipurpose Functionality: If you have other storage needs in your outdoor space, consider incorporating additional features into the enclosure. You might include hooks or shelves inside to hold gardening tools or small outdoor equipment. This will maximize the usability of the enclosure and provide added storage convenience.
Roof or Cover: Depending on your location and weather conditions, you may want to consider adding a roof or cover to the enclosure. This will protect the trash cans from rain, snow, or excessive sun exposure. Ensure that the roof or cover slopes properly to allow for adequate drainage and prevent water accumulation.
Easy Maintenance: Design the enclosure with easy maintenance in mind. Consider features such as removable panels or doors that allow for easy cleaning of the interior. Choose materials that are resistant to stains and easy to wipe clean. This will ensure that the enclosure remains tidy and well-maintained with minimal effort.
By taking these design considerations into account, you can create a trash can enclosure that seamlessly integrates into your outdoor space while providing functionality, security, and aesthetic appeal.
Building the Structure
Building the structure of a trash can enclosure requires careful planning and attention to detail. Follow these steps to construct a sturdy and functional enclosure:
Setting the Posts: Start by marking the locations where the posts will be installed. Dig holes that are deep enough to provide stability, usually around 2 feet deep. Place the posts into the holes and fill them with concrete, ensuring they are level and plumb. Allow the concrete to dry and set according to the manufacturer’s instructions.
Attaching the Frame: Once the concrete has set, attach the frame to the posts. This frame will act as the foundation for the walls and gates of the enclosure. Use sturdy screws or nails to secure the frame to the posts, ensuring that it is level and square.
Constructing the Walls: Depending on the design and materials chosen, construct the walls of the enclosure. This can be done by attaching panels or boards to the frame, ensuring that they are securely fastened. Leave spaces for doors and windows, if desired. Double-check the measurements and use a level to ensure that the walls are straight and even.
Installing the Gate: If your enclosure includes a gate, install it according to the design and measurements. Attach hinges to the gate and the corresponding side of the enclosure. Ensure that the gate swings freely and securely. Install a latch or lock to keep the gate closed and secured.
Adding Finishing Touches: Once the structure is complete, add any finishing touches to enhance its functionality and aesthetics. This may include adding shelves or hooks inside for additional storage, installing a roof or cover for protection against the elements, or integrating decorative elements to improve the appearance of the enclosure.
Painting or Staining: If desired, apply a coat of paint or stain to the enclosure to protect the wood and enhance its visual appeal. Choose a paint or stain that is specifically formulated for outdoor use and matches the style of your property.
Securing the Enclosure: Ensure that the enclosure is securely anchored to the ground to prevent it from shifting or toppling over. Use stakes or anchors to firmly secure the structure to the ground, especially in areas prone to strong winds or heavy storms.
Maintenance and Care: Regularly inspect the structure for any damage or signs of wear. Replace any damaged or warped boards, tighten loose screws or nails, and perform routine maintenance to prolong the lifespan of the enclosure. Keep the interior clean and free from debris to prevent odors and pest infestations.
By following these steps and paying attention to detail, you can build a sturdy and functional trash can enclosure that provides an organized and aesthetically pleasing solution for your outdoor garbage storage.
Setting the Posts
The process of setting the posts is a crucial step when building a trash can enclosure as it provides the foundation for the structure. Follow these steps to properly set the posts for a sturdy and stable enclosure:
1. Marking the locations: Begin by determining the locations where the posts will be placed. Take into consideration the dimensions of the enclosure and ensure that the corners are square. Use stakes driven into the ground or string lines to mark the positions of the posts accurately.
2. Digging the holes: Dig holes for the posts using a post-hole digger or an auger. The depth of the holes should typically be around 2 feet, but you may need to adjust this based on the size and height of your enclosure. The width of the holes should allow enough room for the posts to fit snugly.
3. Leveling the holes: Ensure that the bottom of each hole is level. This can be done by placing a level across the hole and adding or removing soil as needed. A level hole will result in a straight and vertical post, which is essential for the stability of the enclosure.
4. Placing the posts: Insert the posts into the holes, making sure they are straight and upright. Use a level to check their alignment from multiple angles. Make any necessary adjustments by adding or removing soil around the base of the posts to ensure they are level and plumb.
5. Filling with concrete: Once the posts are properly positioned, it’s time to fill the holes with concrete. Prepare the concrete mix according to the manufacturer’s instructions. Pour the concrete into the holes, ensuring that it completely fills the space around the posts.
6. Securing the posts: While the concrete is still wet, use a level to double-check the alignment of the posts and make any final adjustments if needed. Prop up temporary braces or supports to hold the posts in place until the concrete sets. This will prevent the posts from shifting or leaning as the concrete dries.
7. Allowing for proper curing: Follow the curing time guidelines provided by the concrete manufacturer. Typically, it takes 24 to 48 hours for the concrete to fully set. During this time, it’s important to avoid any disturbances or heavy loads on the posts to ensure that they cure properly and achieve maximum strength.
8. Removing temporary braces: Once the concrete has fully cured, carefully remove the temporary braces or supports. Check the stability of the posts by giving them a gentle shake. They should be firm and secure, indicating that they are appropriately set and ready for further construction of the enclosure.
By carefully setting the posts and ensuring they are level and properly secured in the ground, you will create a solid foundation for your trash can enclosure. This will provide the necessary stability and support for the rest of the structure, ensuring its durability and longevity.
Attaching the Frame
Attaching the frame is a critical step in building a trash can enclosure as it forms the foundation for the walls, gates, and other components. Follow these steps to properly attach the frame and ensure a sturdy and secure structure:
1. Prepare the materials: Gather the necessary materials for the frame, such as pressure-treated lumber or metal brackets. Choose materials that are durable and able to withstand outdoor conditions. Cut the pieces to the desired lengths and ensure they are square and straight.
2. Position the frame: Position the frame in the desired location, making sure it aligns with the marking for your enclosure. Use stakes or temporary supports to hold the frame in place while attaching it to the posts. Check that the frame is level and plumb, adjusting the position if necessary.
3. Attach the frame to the posts: Predrill holes through the frame and into the posts in the desired locations for attaching. Ensure that the frame is flush against the posts. Use appropriate screws or nails to secure the frame to the posts, ensuring a firm connection. Make sure to use corrosion-resistant fasteners to prevent damage from outdoor elements.
4. Check for level and stability: After attaching the frame to the posts, use a level to check that the frame is perfectly level and adjust if needed. Use temporary braces to hold the frame in place while checking for stability. The frame should feel solid and secure against the posts, with no wobbling or shifting.
5. Reinforce with angle braces: For added stability, consider using angle braces to reinforce the connection between the frame and the posts. Attach metal angle brackets at each corner of the frame, securing them to the posts and the frame. This will provide additional support and prevent any movement or sagging over time.
6. Double-check measurements and alignment: Once the frame is securely attached, double-check all measurements and alignment to ensure accuracy. Use a tape measure to confirm that the frame is square and that the dimensions match your desired enclosure specifications.
7. Prepare for further construction: With the frame securely in place, you are now ready to proceed with building the walls, gates, and other components of the trash can enclosure. Ensure that all necessary tools and materials are readily available before moving forward.
By properly attaching the frame to the posts, you will establish a strong and stable foundation for the rest of the trash can enclosure. This will ensure that the structure remains durable and secure, providing effective storage for your trash cans while enhancing the overall appearance of your outdoor space.
Constructing the Walls
Constructing the walls of your trash can enclosure is a crucial step in creating a functional and visually appealing structure. Follow these steps to ensure a successful construction process:
1. Gather the materials: Collect the materials needed for constructing the walls, such as panels, boards, or slats. Ensure that the materials you select are suitable for outdoor use and can withstand the elements. Cut the materials to the desired lengths and check for any defects or damage.
2. Prepare for assembly: Lay out the materials in the desired order and position them near the frame of the enclosure for easy access during assembly. This will help streamline the construction process and ensure that everything is within reach.
3. Start from the bottom: Begin constructing the walls from the bottom up. Attach the first piece of material to the frame using appropriate screws, nails, or brackets. Ensure that it is flush against the frame and level by using a level tool. This will serve as the base for the rest of the wall construction.
4. Continue layering: Attach the subsequent pieces of material one by one, layering them on top of each other. Secure them tightly to the frame, making sure they are level and aligned. Use a tape measure or ruler to maintain consistent spacing between the pieces, ensuring a uniform and visually appealing appearance.
5. Leave openings for doors and windows: If your trash can enclosure requires any doors or windows, remember to leave appropriate openings during the wall construction process. Precisely measure and cut the openings according to your design specifications, ensuring they fit the desired size and shape.
6. Reinforce corners: Reinforce the corners of the walls to provide additional stability and strength. Depending on the materials used, this can be done by adding corner braces or nailing shorter pieces diagonally across the corners. This will help prevent any shifting or sagging of the walls over time.
7. Double-check measurements and stability: Regularly check your measurements, ensuring that the walls are straight, level, and aligned with the desired dimensions. A tape measure and level tool will be valuable in this process. Verify the stability of the walls by gently pushing on them to ensure they are securely attached to the frame.
8. Add any desired features: If you have included any specific features, such as shelves or hooks, incorporate them into the wall construction process. Ensure that they are properly attached and securely fastened to support the desired weight and functionality.
9. Make necessary adjustments: If you encounter any issues during the wall construction process, such as warped or damaged materials, take the necessary steps to rectify the situation. Replace any defective pieces promptly to maintain structural integrity and visual appeal.
By following these steps, you can construct sturdy and visually pleasing walls for your trash can enclosure. This will provide a secure and attractive storage solution while effectively concealing your trash cans and enhancing the overall aesthetics of your outdoor space.
Installing the Gate
Installing a gate in your trash can enclosure adds functionality and convenience, allowing easy access to the trash cans while keeping them securely stored. Follow these steps to properly install a gate:
1. Select the type of gate: Determine the type of gate that best suits your needs, such as a single swing gate or a double gate. Consider the available space, the size and weight of the gate, and how it will function within the overall design of the enclosure.
2. Measure and mark: Measure and mark the desired location for the gate within the enclosure. Consider the width of the gate, leaving enough clearance on either side for easy passage. Use a level to ensure that the gate will be installed evenly and straight.
3. Attach gate hinges: Position the gate hinges on the gate and corresponding gate post. Ensure that the hinges are aligned vertically and horizontally. Mark the locations for screw holes, pre-drill them, and attach the hinges securely using appropriate screws or bolts.
4. Test the gate swing: Test the swing of the gate to ensure smooth operation. Make any necessary adjustments to the hinge placement or alignment to ensure the gate opens and closes properly without any obstructions.
5. Attach a latch or lock: Depending on your preference and needs, install a latch or lock mechanism on the gate to secure it when closed. Ensure that the latch or lock is aligned properly with the strike plate on the gate post, allowing for easy opening and closing.
6. Adjust the gate: Fine-tune the gate position and alignment as needed. Ensure that the gate is level, plumb, and evenly spaced within the enclosure. Make any necessary adjustments to the hinges and latch to achieve a proper fit and function.
7. Double-check the gate’s stability: Test the gate’s stability by gently pushing and pulling on it. Ensure that it is securely attached and does not wobble or sag. Make any additional adjustments to the hinges or latch to achieve optimal stability.
8. Consider additional features: Depending on your preference and the desired functionality, you may consider adding extra features to the gate, such as a self-closing mechanism, a handle for ease of use, or decorative elements to enhance the aesthetic appeal.
9. Test the gate’s functionality: Open and close the gate multiple times to confirm that it operates smoothly and securely. Ensure that it aligns properly with the gate post and latches securely when closed. Make any final adjustments if necessary.
By following these steps, you can install a gate that suits your needs within your trash can enclosure. This will provide easy access to your trash cans while keeping them securely contained, enhancing the overall functionality and convenience of your outdoor space.
Adding Finishing Touches
Adding finishing touches to your trash can enclosure not only enhances its functionality but also adds visual appeal to your outdoor space. Follow these steps to complete your project with finesse:
1. Paint or stain: Consider applying a coat of paint or stain to the exterior of the enclosure. Choose a color that complements the surrounding environment and matches the style of your home. Ensure that the paint or stain is suitable for outdoor use and offers protection against weather elements.
2. Seal gaps: Inspect the enclosure for any gaps or openings that may compromise its functionality or aesthetics. Use a caulk or sealant to seal any gaps in the walls or joints, preventing water infiltration and minimizing the entrance of pests or insects into the enclosure.
3. Add decorative elements: Consider incorporating decorative elements to enhance the overall look of your trash can enclosure. This could include adding trim, molding, or decorative brackets to the structure. Choose designs that align with your personal style and complement the architectural features of your home.
4. Include ventilation: Ensure proper ventilation by adding vents or slats to the walls or roof of the enclosure. This will allow for efficient airflow, reducing the risk of trapped heat or odors inside the enclosure. Consider the size and placement of the ventilation features to maintain a visually appealing appearance.
5. Install additional storage options: If storage space is a concern, incorporate additional storage options within the enclosure. You can add shelving or hooks to hold gardening tools, bags, or other outdoor supplies. Make sure the shelves or hooks are securely attached and can withstand the weight of the items to be stored.
6. Consider lighting: If you need access to your trash cans at night, adding lighting can ease the process and enhance visibility. Install outdoor lights near the enclosure or consider motion-activated lights for convenience and security.
7. Enhance accessibility: Evaluate the accessibility of the enclosure and make any necessary modifications. Ensure that the entrance and exit points are clear and unobstructed. Consider adding ramps or handles to facilitate easy movement of the trash cans in and out of the enclosure.
8. Landscaping integration: Incorporate landscaping elements around the enclosure to blend it into your outdoor space. Consider planting shrubs, flowers, or climbing vines nearby to soften the visual impact of the structure and create a more harmonious overall landscape.
9. Regular maintenance: Establish a routine maintenance plan for your trash can enclosure. Regularly inspect the structure for any signs of damage or wear and perform necessary repairs. Keep the interior clean and free from debris, ensuring proper sanitation and reducing the risk of odors or pest infestation.
By adding these finishing touches, you can elevate the functionality and aesthetics of your trash can enclosure. The final result will be a visually appealing structure that seamlessly integrates into your outdoor space while keeping your trash cans organized and concealed.
Painting or Staining
One of the final steps in completing your trash can enclosure project is to paint or stain the structure. This not only adds a finishing touch but also provides essential protection against the elements. Follow these steps to ensure a successful painting or staining process:
1. Prepare the surface: Before applying paint or stain, ensure that the surface of the enclosure is clean and dry. Remove any dirt, dust, or debris by scrubbing or power washing the structure. Repair any damaged areas, such as cracks or splinters, and sand them down for a smooth finish.
2. Choose the appropriate product: Depending on your preference and the desired look, choose either paint or stain for your enclosure. Paint offers a wide range of colors and provides better coverage, while stain allows the natural texture and grain of the wood to show through. Select a product specifically designed for outdoor use that offers protection against UV rays and water damage.
3. Test the product: Before applying paint or stain to the entire enclosure, it’s advisable to test the product on a small, inconspicuous area. This will allow you to ensure the color or finish meets your expectations and looks appealing in your outdoor space.
4. Apply the paint or stain: If using paint, apply it evenly using a high-quality brush or roller. Start from the top and work your way down, applying multiple coats as necessary for full coverage. If using stain, stir or shake the product well and then apply it evenly using a brush or cloth, following the direction of the wood grain. Allow proper drying time between coats as recommended by the manufacturer.
5. Pay attention to details: Ensure that you cover all surfaces, including the undersides of any overhangs or roof sections. Take care to reach into corners and edges, ensuring full coverage and protection. Use a smaller brush or sponge applicator for hard-to-reach areas and intricate details.
6. Allow for proper drying and curing: After applying paint or stain, allow sufficient time for the product to dry and cure. Follow the instructions provided by the manufacturer regarding drying times and curing durations. Avoid heavy use or exposure to the elements until the paint or stain has fully cured.
7. Consider maintenance requirements: Keep in mind that paint typically requires more frequent maintenance compared to stain. Regularly inspect the enclosure for any signs of wear, fading, or peeling. Touch up or reapply paint or stain as needed to maintain the desired appearance and protect the wood from weather damage.
8. Clean and store painting supplies: Properly clean your painting tools and supplies after use. Dispose of any used paint cans or containers responsibly according to local regulations.
By taking the time to properly paint or stain your trash can enclosure, you will not only enhance its appearance but also provide long-lasting protection against the elements. The finished product will be a beautiful and durable addition to your outdoor space, ensuring the longevity of your trash can enclosure for years to come.
Securing the Enclosure
Ensuring that your trash can enclosure is securely anchored will prevent shifting or tipping and provide stability and longevity. Follow these steps to properly secure your enclosure:
1. Choose anchoring method: Evaluate the options for securing the enclosure, considering your specific needs and the materials used. Common methods include ground stakes, concrete footings, and brackets for attaching to existing structures like fences or walls.
2. Ground stakes: Use ground stakes to secure the enclosure by driving them into the ground at strategic points around the base. Ensure that the stakes are long enough and made from durable materials, such as metal or heavy-duty plastic. Drive them into the ground until they are firmly embedded, providing stability and resistance against wind and movement.
3. Concrete footings: Pour footings around the base of the enclosure’s posts to provide a solid foundation. Dig holes around the posts, insert wooden or metal forms, and add concrete mix according to the manufacturer’s instructions. Smooth the surface and allow the concrete to cure fully before continuing with the installation or construction.
4. Brackets and fasteners: If attaching the enclosure to an existing structure, use sturdy brackets and appropriate fasteners to secure the enclosure. Ensure that the brackets are durable and suitable for outdoor use. Follow the manufacturer’s instructions for proper installation to ensure a secure connection.
5. Consider wind resistance: Take into account your local weather conditions, especially if you live in an area prone to strong winds or storms. Secure the enclosure accordingly to withstand high winds. Additional measures may include reinforcing with cross braces, using hurricane straps, or adding weight at the base of the enclosure.
6. Regularly inspect and maintain: Regularly check the security of the enclosure. Inspect the anchoring points, brackets, or fasteners for any signs of loosening or wear. Tighten screws, nails, or bolts as needed and replace any damaged or deteriorated parts promptly. Proper maintenance will help preserve the integrity and stability of the enclosure over time.
7. Adapt to landscape changes: Make necessary adjustments if there are changes in your landscape that may affect the stability of the enclosure. This could include shifts in soil due to erosion or expansion/contraction of the ground. Regularly monitor the enclosure’s alignment and make any modifications to ensure ongoing stability and security.
8. Consider professional installation: If you are unsure about securing the enclosure yourself or prefer expert advice, consider hiring a professional to handle the installation and ensure it is properly secured. They will have the knowledge and tools to provide a secure anchoring solution that meets your specific needs.
By securing your trash can enclosure adequately, you can enjoy peace of mind knowing that it will remain stable and functional. Taking necessary precautions will help prevent accidents, maintain the appearance of the enclosure, and ensure its durability for years to come.
Maintenance and Care
Maintaining and caring for your trash can enclosure is essential to ensure its longevity, functionality, and visual appeal. Regular upkeep will help preserve the structure and keep it in optimal condition. Follow these steps to effectively maintain and care for your enclosure:
1. Regular cleaning: Clean the interior of the enclosure regularly to prevent the buildup of dirt, debris, and odors. Remove any loose trash, sweep or hose down the floor, and wipe down the walls and surfaces using a mild detergent or disinfectant solution. Rinse thoroughly and allow the enclosure to air dry.
2. Check for damage: Periodically inspect the enclosure for any signs of damage or wear. Check for loose screws, nails, or brackets, and tighten or replace them as needed. Repair or replace any broken or deteriorated parts, such as damaged panels or gates, to maintain the structural integrity of the enclosure.
3. Monitor for pests: Keep an eye out for any signs of pest infestation, such as nests, droppings, or chewed materials. Take appropriate measures to address any pest issues promptly. Seal any gaps or openings that may provide access points for pests, and consider using pest deterrents around the enclosure.
4. Remove accumulated debris: Regularly check and remove any debris that may accumulate around and inside the enclosure. Trim any overhanging branches or vegetation that could potentially damage the structure or impede access to the enclosure. This will help maintain a clean and safe environment for the trash cans.
5. Address water drainage: Ensure that the enclosure has proper drainage to prevent water from pooling inside. Clear any leaves or debris that may clog drains or gutters, and ensure that water flows away from the enclosure to avoid potential damage. Consider adding a gravel base or drainage system if necessary.
6. Repaint or restain: Depending on the type of finish used on your enclosure, periodic repainting or restaining may be necessary to maintain the appearance and protection of the wood or other materials. Follow the manufacturer’s recommendations for repainting or restaining intervals, and ensure proper surface preparation before applying a new coat.
7. Regularly check and replace hardware: Regularly inspect the hinges, latches, handles, and other hardware components of the enclosure. Check for any signs of rust, wear, or loosening. Replace any damaged or worn hardware to ensure smooth operation and security.
8. Seek professional help if needed: If you are unsure about performing any maintenance tasks or if you notice significant damage or structural issues with the enclosure, seek professional assistance. A professional can provide guidance, repairs, or maintenance services to keep your enclosure in optimal condition.
By practicing regular maintenance and care, you can extend the lifespan of your trash can enclosure and keep it looking and functioning at its best. Consistent upkeep will ensure that your enclosure remains an attractive and functional addition to your outdoor space for years to come.