How to Determine the Size of your Throw Blanket
Determining the size of your throw blanket is an important step before starting your crochet project. Whether you want a small lap blanket or a large statement piece for your living room, taking the time to calculate the desired measurements will ensure that your finished product meets your expectations. Here are some simple steps to help you determine the size of your throw blanket.
1. Consider the Purpose: Think about how you plan to use the throw blanket. Is it for cozying up on the couch, adding an accent to your bedding, or as a decorative piece for a chair? Knowing the purpose will help you determine the appropriate size.
2. Measure the intended space: If you have a specific area in mind for your throw blanket, measure the dimensions of that space. This will give you a guideline for the maximum length and width of your blanket.
3. Select a Standard Size: If you’re unsure about the specific measurements, you can opt for a standard size based on the intended use. For example, a typical lap blanket is around 50-60 inches long and 40-50 inches wide, while a bed throw may range from 60-80 inches long and 50-70 inches wide.
4. Choose a Crochet Stitch: The type of stitch you plan to use can affect the final size of your blanket. Some stitches naturally create a tighter or looser fabric, which will impact the dimensions. Keep this in mind when selecting your stitch pattern.
5. Consider Yarn Stretch: Keep in mind that the weight and fiber content of the yarn you choose can affect the stretch and overall size of your crochet project. It’s a good idea to make a gauge swatch to determine the impact of the yarn on your desired measurements.
6. Adjust for Borders and Edges: If you plan to add a border or edging to your throw blanket, account for this in your measurements. The additional width or length needed for the border should be factored into the initial calculations.
By following these steps, you can determine the ideal size for your crochet throw blanket. Taking the time to plan and calculate before you start your project will help ensure a successful outcome that meets your size and style preferences.
The Importance of Gauge
Gauge is a crucial factor in crochet projects, and it plays a significant role in determining the size, fit, and overall look of your throw blanket. Gauge refers to the number of stitches and rows per inch that you achieve using a particular hook size and yarn. Understanding and paying attention to gauge is essential to ensure that your blanket turns out as intended.
1. Achieving the Desired Size: Gauge helps you determine if your stitches are the right size and whether you need to adjust your tension or switch to a different hook size. The same pattern can result in different dimensions if the gauge is not followed correctly. By achieving the correct gauge, you can ensure that your throw blanket turns out to be the size you desire.
2. Consistency in Stitching: Maintaining consistent tension throughout your project is important for a uniform and professional-looking finish. By consistently matching the gauge specified in the pattern, your stitches will be even and consistent, giving your blanket a polished appearance.
3. Yarn Substitution: Gauge becomes even more crucial when substituting yarns in a pattern. Different yarns have different weights and characteristics, and if not accounted for in the gauge, it can lead to a mismatch in size or drape. Always make a gauge swatch when substituting yarn to ensure that your throw blanket will turn out the way you expect.
4. Personalize Your Project: Gauge allows you to adapt patterns and customize your throw blanket by adjusting the size. By obtaining the correct stitch and row gauge, you have the flexibility to modify the dimensions to suit your preferences, whether you want a larger or smaller throw blanket.
5. Save Time and Yarn: Following the gauge specified in the pattern helps you estimate the amount of yarn required for your project. By achieving the correct gauge, you can avoid running out of yarn or having large quantities leftover. Additionally, working at the correct gauge saves you from having to unravel and restart your project due to incorrect sizing.
Understanding the importance of gauge and paying attention to it will greatly improve your crochet experience. It ensures that your throw blanket turns out the size you desire, maintains consistent stitching, accommodates yarn substitutions, allows for personalization, and helps you estimate the amount of yarn required. Take the time to create a gauge swatch and make any necessary adjustments before starting your project to ensure a successful outcome.
How to Calculate the Number of Chains for a Throw Blanket
Calculating the number of chains you need to start your throw blanket is an essential step in the crochet process. The right number of chains will ensure that your blanket is the desired width and will fit the intended space. Here are some simple steps to help you calculate the number of chains needed for your throw blanket.
1. Determine the Width: Start by deciding how wide you want your throw blanket to be. You can measure the intended space, refer to standard measurements, or choose a custom width. Once you have the desired width in inches, you can move on to the next step.
2. Decide on a Hook Size and Yarn: The hook size and yarn weight you choose will affect the gauge and the final size of your blanket. It’s important to select a hook size and yarn that work well together and achieve the desired stitch tension. Consult the pattern or experiment with different hook sizes and yarns until you achieve the desired result.
3. Determine the Gauge: Crocheting a gauge swatch is essential for determining the number of chains required. Follow the pattern instructions to create a swatch using your chosen hook size and yarn. Measure the number of stitches you get per inch and write it down.
4. Calculate the Number of Chains: To calculate the number of chains, divide the desired width of the blanket by the number of stitches per inch obtained from your gauge swatch. Round to the nearest whole number to ensure that the final number of chains is even.
5. Account for Stitch Pattern: If you plan to use a stitch pattern that requires a multiple of stitches, make sure to factor this into your calculation. Adjust the number of chains accordingly to ensure that the stitch pattern aligns correctly.
6. Start Your Blanket: Once you have determined the number of chains, you can begin crocheting your throw blanket. Create a foundation chain with the calculated number of chains, ensuring that it is the desired width.
By following these steps, you can calculate the right number of chains needed to start your throw blanket. Take the time to measure the width, choose the appropriate hook size and yarn, determine the gauge, and adjust for stitch patterns. Planning ahead will result in a well-fitting throw blanket that meets your expectations.
Factors to Consider when Determining the Number of Chains
When determining the number of chains needed for your throw blanket, there are several factors to consider. These factors can impact the final size, drape, and overall appearance of your crochet project. By taking them into account, you can ensure the success of your throw blanket. Here are some important factors to consider:
1. Yarn Weight: The weight of the yarn you use will affect the overall thickness and heaviness of your throw blanket. Chunky yarn will create a thicker and heavier blanket, while lightweight yarn will result in a more delicate and airy blanket. Consider the desired weight and warmth of your throw when selecting the yarn weight.
2. Stitch Tension: The tension at which you crochet, also known as your personal stitch tension, can impact the size and appearance of your blanket. Some crocheters naturally have looser stitches, while others tend to crochet tightly. Be aware of your stitch tension and adjust your hook size or number of chains accordingly to achieve the desired dimensions.
3. Desired Drape: The drape of your throw blanket refers to how it falls and hangs when draped over a surface or your body. A loosely crocheted blanket will have a more relaxed and flowing drape, while a tightly crocheted one will be more structured. Consider the level of drape you desire and adjust your hook size and number of chains accordingly.
4. Stitch Pattern: If you plan to incorporate a specific stitch pattern into your throw blanket, consider how it will affect the final size. Some stitch patterns naturally cause the fabric to pull or bunch up, resulting in a smaller blanket. Make sure to swatch the stitch pattern and adjust the number of chains accordingly to achieve the desired size and pattern repetition.
5. Desired Width and Length: Consider the intended use and dimensions of your throw blanket. Do you want a wide and short lap blanket or a narrower and longer one? Measure the desired width and length to help you determine the appropriate number of chains. Keep in mind that the stitch pattern and stitch tension can also affect the final dimensions.
6. Personal Preferences: Ultimately, the number of chains you choose is a matter of personal preference. Consider your own style and the look you want to achieve. If you prefer a more oversized and loose blanket, you may need more chains. If you prefer a tighter and more fitted blanket, fewer chains may be necessary.
By considering these factors, you can determine the right number of chains needed for your throw blanket. Take into account the yarn weight, stitch tension, desired drape, stitch pattern, desired width and length, and your personal preferences. Experiment with different combinations and adjustments to achieve the perfect throw blanket that fits your style and meets your needs.
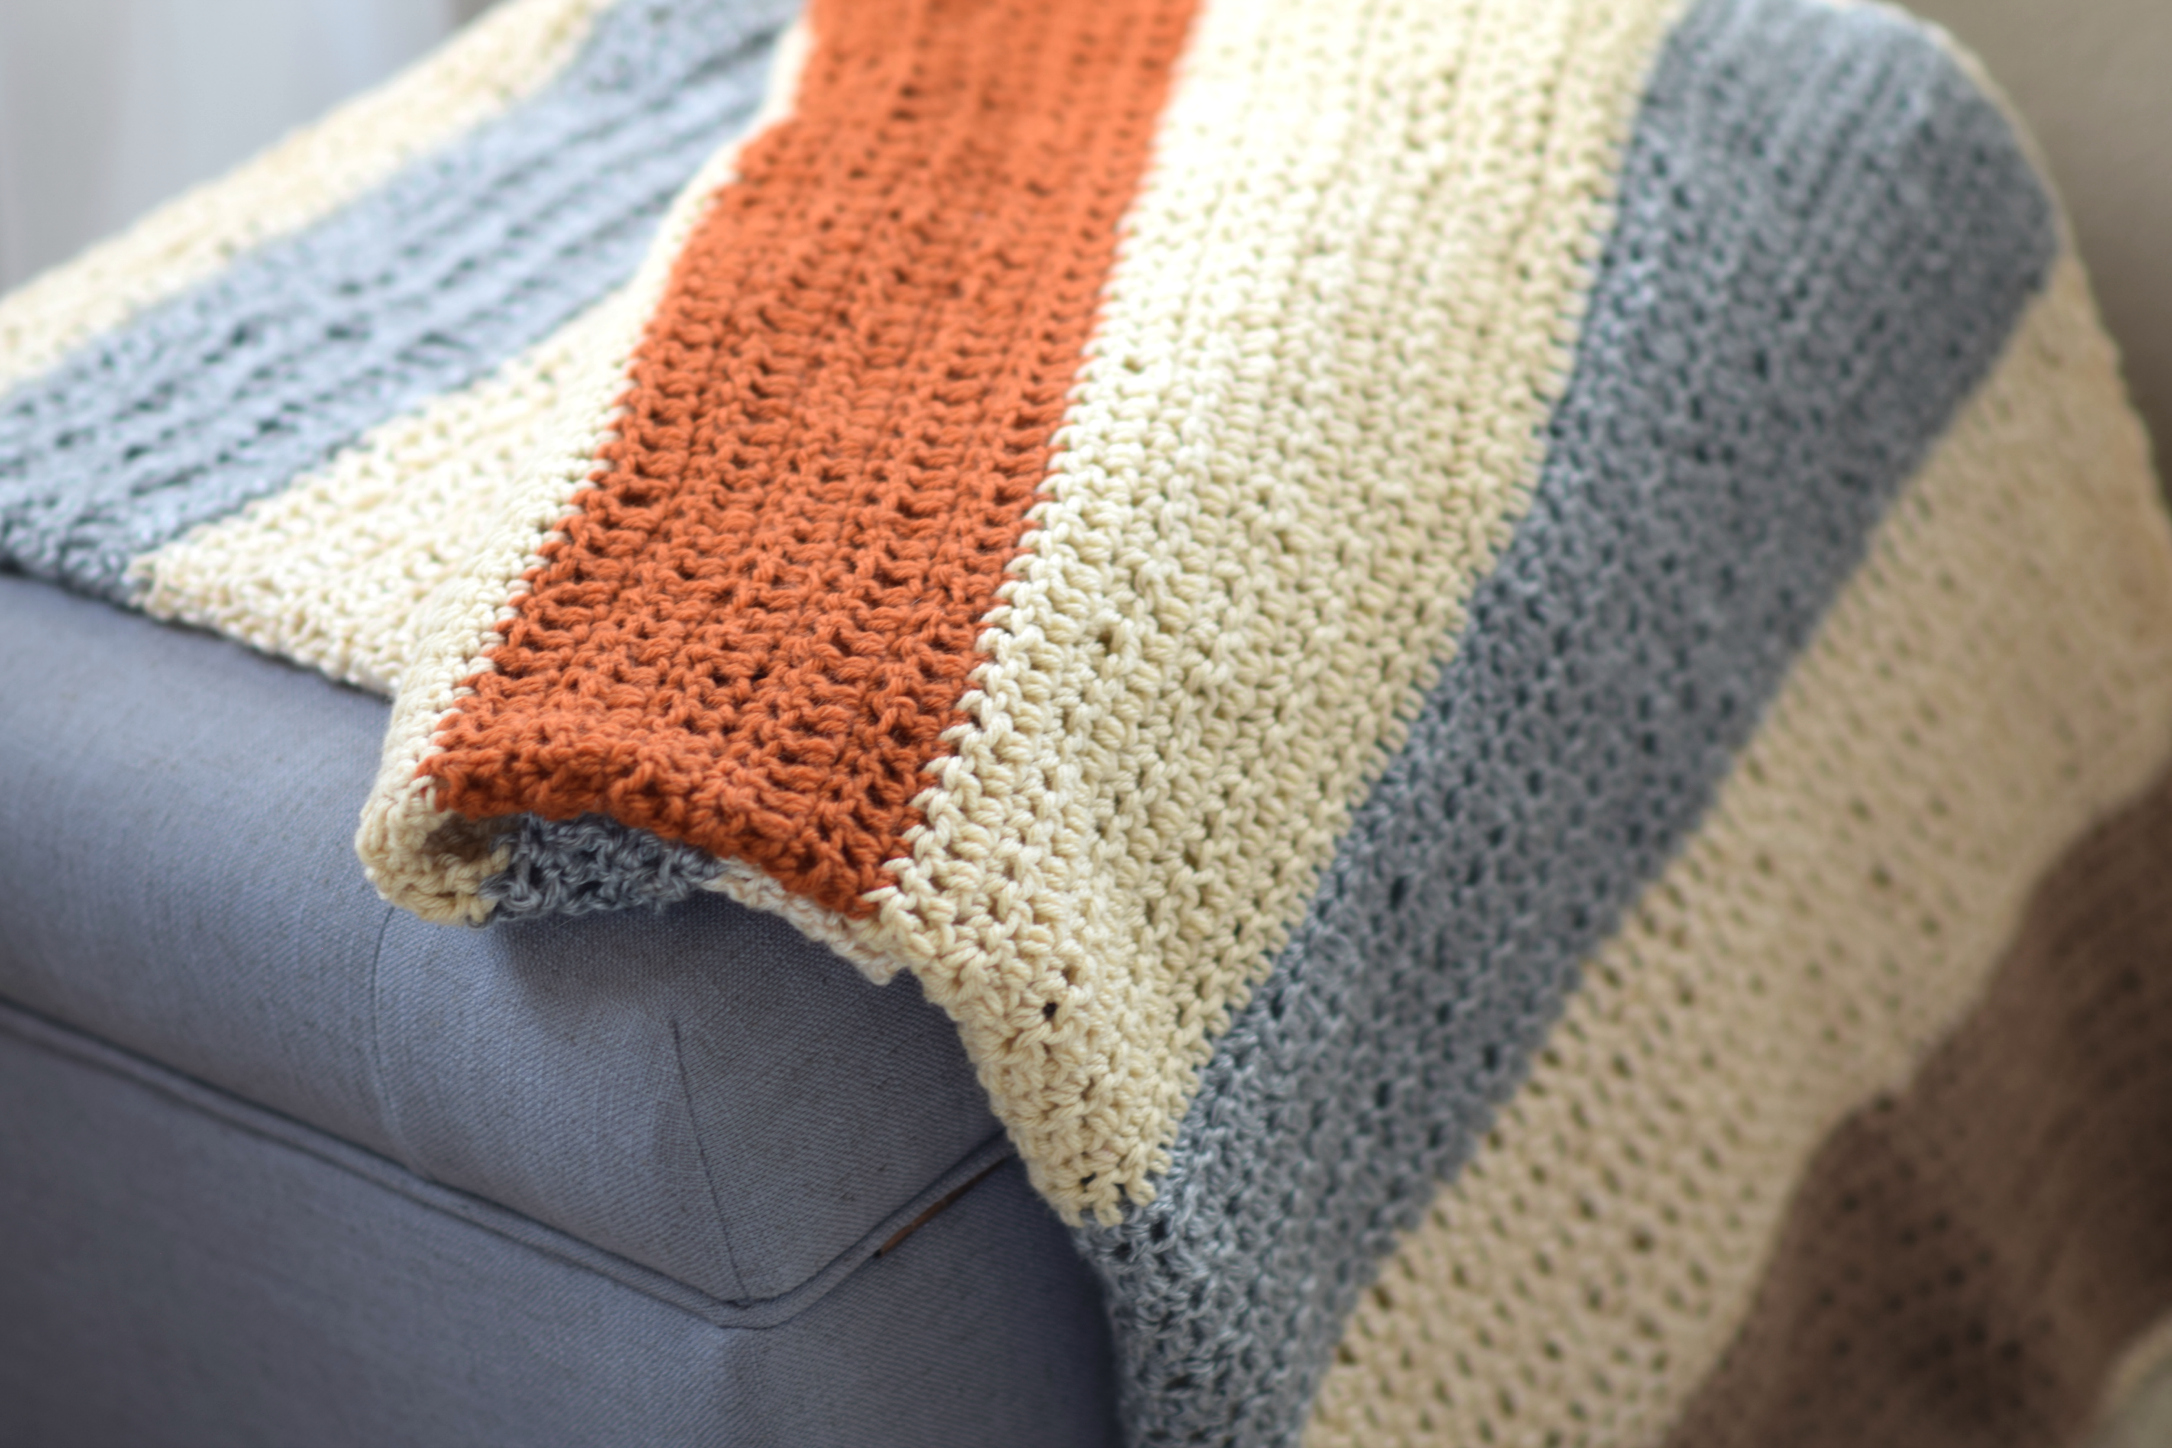
Common Measurements for Throw Blankets
Throw blankets come in a variety of sizes to suit different purposes and preferences. When choosing the measurements for your throw blanket, it’s helpful to have an understanding of common sizes that are commonly used. Here are some standard measurements for throw blankets:
- Lap Blankets: Lap blankets are typically smaller in size and are perfect for cozying up on the couch or for keeping your legs warm. They are often around 50-60 inches long and 40-50 inches wide.
- Standard Throw Blankets: Standard throw blankets are versatile and can be used as decorative accents on a bed, sofa, or chair. They are usually around 60-70 inches long and 50-60 inches wide.
- Bed Throws: Bed throws are larger in size and are designed to cover the entire surface of a bed, adding both comfort and style. They commonly range from 60-80 inches long and 50-70 inches wide, depending on the size of the bed.
- Oversized Throws: Oversized throws are perfect for those who prefer a more generous and enveloping blanket. They can measure up to 90 inches long and 70 inches wide, providing plenty of coverage and coziness.
It’s important to note that these measurements are general guidelines and can vary based on personal preference and the intended use of the throw blanket. Some people may prefer larger or smaller sizes, depending on their needs and the specific space they want to fill.
Additionally, remember to consider the type of stitch pattern and the yarn weight you intend to use when determining the final size of your throw blanket. Some stitch patterns may naturally create a more compact or stretchy fabric, affecting the overall dimensions of the blanket.
By understanding the common measurements for throw blankets, you can choose a size that best fits your needs and preferences. Whether you prefer a smaller lap blanket for personal use or a larger bed throw to make a design statement, these measurements can serve as a helpful starting point as you embark on your crochet project.
Adjusting the Number of Chains for Different Stitch Patterns
When working on a crochet project, the stitch pattern you choose can greatly impact the final size and appearance of your throw blanket. Each stitch pattern has its own unique characteristics, including stitch height, stitch width, and overall stretchiness. As a result, it may be necessary to adjust the number of chains when using different stitch patterns. Here are some considerations for adjusting the number of chains for different stitch patterns:
1. Stitch Width: Different stitch patterns have varying widths. For example, a single crochet stitch is relatively narrow, while a double crochet or treble crochet stitch is wider. To adjust the number of chains, you may need to add or subtract chains to achieve the desired width for your chosen stitch pattern.
2. Pattern Repetition: Some stitch patterns have a designated stitch count for each pattern repeat. If the number of stitches in your starting chain is not a multiple of the pattern repeat, you may need to make some adjustments. You can add or subtract chains to ensure that the stitch pattern lines up correctly and repeats evenly across your blanket.
3. Gauge Swatch: Before starting your throw blanket, it’s always a good idea to create a gauge swatch using the stitch pattern you plan to use. This will give you a clear idea of how the stitch pattern affects your tension and overall size. Based on the gauge swatch results, you can adjust the number of chains accordingly to achieve the desired dimensions.
4. Tension and Yarn Choice: Your tension and the type of yarn you select can also affect the sizing of your throw blanket. If you tend to crochet tightly, you may need to add more chains to compensate for the tighter stitch tension. Similarly, if your yarn has a different gauge or thickness, you may need to adjust the number of starting chains to create the desired size.
5. Experimentation and Swatching: Crocheting a small swatch using your chosen stitch pattern and adjusting the number of chains can help you determine the impact on size and overall appearance. Take the time to test different chain counts and assess how they affect the pattern before starting your full-sized throw blanket. This will give you confidence and ensure that you achieve the desired results.
By considering these factors and making adjustments as needed, you can successfully adapt the number of chains for different stitch patterns. Understanding how different stitch patterns impact the overall size and appearance will empower you to create beautiful and well-fitting throw blankets that showcase your chosen stitch patterns perfectly.
Tips for Starting your Throw Blanket Project
Starting a throw blanket project can be an exciting and fulfilling endeavor. Whether you’re a beginner or an experienced crocheter, these tips will help you begin your project with confidence and set you up for success:
1. Choose the Right Yarn: Selecting the right yarn is crucial for a successful throw blanket. Consider the intended use, desired texture, and maintenance requirements. Choose a yarn that is soft, durable, and suitable for the project’s purpose.
2. Gauge Swatch: Always create a gauge swatch before starting your blanket. This small sample allows you to check your stitch tension and ensure it matches the pattern requirements. Adjust your hook size if necessary to achieve the correct gauge.
3. Measure the Starting Chain: Use the measurements and stitch pattern instructions to determine the appropriate starting chain length. Remember to consider any stitch pattern multiples or adjustments needed for the desired width of your blanket.
4. Read the Pattern Thoroughly: If you’re following a pattern, read it carefully before you begin. Familiarize yourself with any abbreviations, special stitch instructions, or stitch pattern repeats. Understanding the pattern beforehand will minimize confusion and errors as you work on your blanket.
5. Mark Your Progress: It’s easy to lose track of rows or stitches, especially with larger projects like throw blankets. Use stitch markers, contrasting yarn, or even a row counter to mark your progress and keep track of where you are in the pattern.
6. Take Breaks: Crocheting for long periods can strain your hands and wrists. Take regular breaks to stretch, rest, and avoid any discomfort or strain. It’s important to keep your hands and body relaxed to maintain an enjoyable crocheting experience.
7. Join with Confidence: When connecting your starting chain into a ring or foundation row, take your time to ensure a secure and even join. A sloppy or loose join can affect the overall appearance of your blanket. Practice your joining technique if needed before starting your project.
8. Enjoy the Process: Crocheting a throw blanket is a labor of love. Embrace the journey and allow yourself to relax and enjoy the process. Celebrate your progress along the way and savor the satisfaction of creating something beautiful with your own hands.
By following these tips, you can confidently start your throw blanket project. Remember to choose the right yarn, create a gauge swatch, measure your starting chain, read the pattern thoroughly, mark your progress, take breaks, join with confidence, and most importantly, enjoy the process. With patience and perseverance, you’ll create a stunning throw blanket that brings warmth and comfort to your home.