
Choosing the Right Materials
When it comes to building a floating shelf, selecting the right materials is crucial for a sturdy and visually appealing result. Here are some key factors to consider:
- Wood: Start by choosing a high-quality wood that aligns with your desired aesthetic. Popular options include oak, pine, or walnut. Keep in mind that the wood should be strong enough to support the weight of the items you plan to display on the shelf.
- Thickness: Determine the thickness of the wood based on your preferences and the intended use of the shelf. Thicker boards are typically more durable, while thinner ones create a sleeker look.
- Support Brackets: Look for strong and durable support brackets that can hold the weight of the shelf and its contents. Metal brackets are commonly used for their strength and stability.
- Hardware: Choose the appropriate screws, anchors, and mounting hardware that are suitable for the type of wall you have. It’s essential to ensure that the hardware can securely hold the shelf against the wall.
- Finishing: Decide on the type of finish you want for your shelf. You can opt for a natural wood finish that highlights the beauty of the grain, or apply a clear sealant or paint to match the overall décor of the room.
It’s important to consider both the practical and aesthetic aspects when selecting materials for your floating shelf. By choosing the right wood, thickness, support brackets, hardware, and finish, you can create a durable and visually appealing addition to your space.
Measuring the Space
Before diving into building your floating shelf, it is crucial to take accurate measurements of the space where you plan to install it. Here are some essential steps to follow:
- Height and Width: Measure the height and width of the wall where you want to place the shelf. Consider the overall dimensions you desire for the shelf and ensure it fits well within the available space.
- Clearance: Take into account the clearance needed above and below the shelf. This will depend on the items you plan to display on the shelf. For example, if you want to showcase tall books or vases, make sure to leave enough space above the shelf to accommodate them.
- Stud Placement: Use a stud finder to locate the studs in the wall. Floating shelves are typically attached to the studs for optimal support and stability. Mark the stud locations as they will determine where the support brackets will be placed.
- Level Alignment: Using a level, draw a straight line along the wall to mark the desired height and position of the shelf. This will serve as a guide when attaching the support brackets and mounting the shelf.
Accurate measurements are essential to ensure a perfect fit and proper alignment of your floating shelf. Taking the time to measure the space correctly will help you avoid any issues during the installation process and ensure a polished and professional end result.
Cutting the Wood
Once you have chosen the right materials and measured the space, the next step in building a floating shelf is cutting the wood. This step requires precision and careful attention to detail. Here’s how to cut the wood for your shelf:
- Marking the Measurements: Use a pencil to mark the measurements directly on the wood. This will serve as a guide for cutting.
- Using a Circular Saw or Miter Saw: Depending on your preference and the complexity of the design, use a circular saw or miter saw to make the required cuts. Ensure that the saw is set to the appropriate angle for any angled cuts.
- Safety Measures: Always prioritize safety when operating power tools. Wear safety goggles and gloves, and follow the manufacturer’s instructions for the saw you are using.
- Precision Cutting: Take your time to make precise cuts along the marked lines. Double-check your measurements and adjust if needed to ensure a perfect fit.
- Smooth Edges: After cutting the wood, use sandpaper to smooth any rough edges. This will prevent splinters and create a more polished finish.
Cutting the wood accurately is crucial to ensure that the floating shelf fits perfectly in the designated space. Take your time, follow the measurements, and prioritize safety during this step to achieve a professional and flawless result.
Sanding and Finishing
After cutting the wood for your floating shelf, it’s time to sand and finish the surface to create a smooth and visually appealing final product. Here are the steps to follow:
- Sanding: Start by sanding the entire surface of the wood using sandpaper or a sanding block. This will help remove any rough edges, imperfections, or splinters. Begin with a coarse-grit sandpaper and gradually move to a finer-grit for a smoother finish.
- Sealing and Priming: If you plan to paint your floating shelf, apply a wood primer to ensure the paint adheres properly. If you prefer a natural wood finish, skip this step.
- Applying the Finish: Whether you opt for a natural wood finish or paint, carefully apply the finish using a brush or a cloth. Follow the manufacturer’s instructions for the specific finish you are using. Apply multiple coats if necessary, allowing each coat to dry completely before applying the next.
- Sanding between Coats: For a smoother finish, lightly sand between each coat of finish using a fine-grit sandpaper. This helps remove any imperfections or bubbles in the finish.
- Final Touches: Once the finish is completely dry, inspect the shelf for any remaining rough areas. Use the sandpaper to smooth out any imperfections, ensuring a flawless and refined surface.
Sanding and finishing are essential steps to enhance the appearance and durability of your floating shelf. Taking the time to sand the wood and apply the appropriate finish will result in a beautiful and long-lasting addition to your space.
Attaching the Brackets
Attaching the brackets is a critical step in building a floating shelf, as they provide the support and stability needed to hold the shelf securely against the wall. Here’s how to attach the brackets:
- Locate Studs: Using a stud finder, locate the studs in the wall where you want to mount the shelf. The studs will provide the necessary support for the brackets.
- Mark Bracket Placement: Mark the placement of the brackets on the wall, ensuring they align with the studs. Use a level to make sure the brackets are perfectly horizontal.
- Pre-Drill Holes: To prevent the wood from splitting, pre-drill pilot holes into the wall at the marked locations for the brackets. Use a drill bit that is slightly smaller than the screws you’ll be using.
- Attach Brackets: Align the brackets with the pre-drilled holes and secure them to the wall using screws. Make sure they are firmly attached and level.
- Double-Check Stability: Test the stability of the brackets by applying gentle pressure. They should be secure and able to support the weight of the shelf and its contents.
Attaching the brackets correctly is essential for the strength and stability of your floating shelf. Taking the time to locate the studs, mark the bracket placement accurately, and securely attach the brackets will ensure a secure and durable installation.
Mounting the Shelf
With the brackets securely attached to the wall, it’s time to mount the shelf onto the brackets and complete the installation process. Follow these steps to properly mount the shelf:
- Place the Shelf: Carefully position the shelf onto the brackets, making sure it rests securely and evenly.
- Verify Alignment: Use a level to check that the shelf is perfectly horizontal. Adjust if necessary by gently lifting and repositioning the shelf.
- Secure the Shelf: Once the shelf is aligned, secure it to the brackets using screws or other fasteners provided with the brackets. Make sure the screws are fully tightened but be cautious not to over-tighten and damage the wood.
- Test Stability: Apply slight pressure to the shelf to test its stability. It should feel strong and sturdy, with no wobbling or sagging.
- Clean and Inspect: After mounting the shelf, clean the surface and inspect it for any visible scratches, marks, or imperfections. Touch up the finish if needed.
Mounting the shelf is the final step in the installation process. With careful alignment and secure attachment, your floating shelf will offer both functionality and aesthetic appeal to your space.
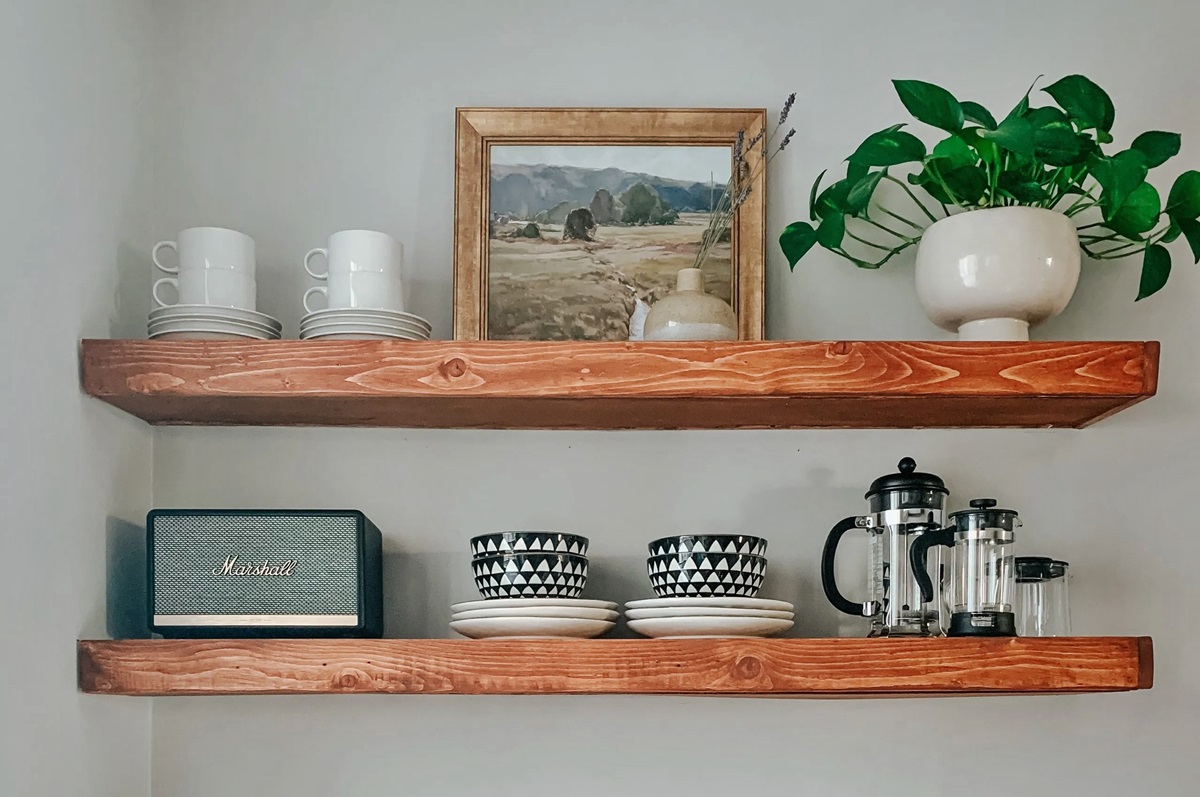
Tips for Styling the Shelf
Once you have successfully installed your floating shelf, it’s time to showcase your creativity and style by arranging items on the shelf. Here are some tips to help you create an eye-catching display:
- Balance and Symmetry: Achieve a visually pleasing display by creating balance and symmetry. Place items of similar size and shape on opposite sides of the shelf to create a harmonious arrangement.
- Varying Heights: Add visual interest by incorporating items of different heights. Play with heights to create depth and dimension on your shelf.
- Mix Textures and Materials: Combine items made of different materials such as glass, metal, wood, or ceramic to add texture and diversity to the display.
- Use Books as Props: Stack books horizontally or vertically to add height and create a foundation for other decorative pieces.
- Showcase Personal Items: Display personal items such as photographs, travel souvenirs, or heirlooms to infuse the shelf with your unique personality and memories.
- Seasonal Decor: Change the display with the seasons by incorporating seasonal decor elements such as flowers, foliage, or holiday-themed items. This will keep your shelf decor fresh and updated throughout the year.
- Negative Space: Leave some empty space on the shelf to maintain a clean and uncluttered appearance. Negative space allows each item to stand out and be appreciated individually.
Remember that the styling of your shelf is a personal opportunity for self-expression. Experiment with different arrangements and adjust as needed until you achieve a look that reflects your style and aesthetic preferences.