
Choosing the Right Location
When it comes to building a recessed shelf in your shower, choosing the right location is crucial. You’ll want to find a spot that is both practical and visually appealing. Here are some factors to consider when selecting the perfect location for your recessed shelf.
- Accessibility: Choose a spot that is easily accessible while you’re taking a shower. It should be within arm’s reach so that you can easily grab your shampoo, conditioner, and other shower essentials.
- Distance from Water Source: Consider the distance from the showerhead or water source. You don’t want the shelf to be directly under the showerhead, as the constant water flow may damage the items placed on the shelf.
- Height: Determine the ideal height for your recessed shelf. A height that is comfortable for you and your family members is key. Keep in mind that if you have children, you may want to install a lower shelf to make it easier for them to reach their bath products.
- Stability: Ensure that the chosen location provides a stable surface for the shelf. Avoid installing it on areas where there may be weak points or where the wall may flex. This will prevent any potential issues with the shelf’s structural integrity over time.
- Aesthetics: Consider how the shelf will blend with the overall design of your shower. You may want to choose a location that complements the existing tile or other materials in your bathroom. This will add a cohesive and stylish touch to the overall look.
Take your time to carefully evaluate these factors and find the best location for your recessed shower shelf. By considering both practicality and aesthetics, you’ll ensure that the shelf not only serves its purpose but also enhances the overall visual appeal of your bathroom.
Gathering the Materials
Before you start building a recessed shelf in your shower, it’s essential to gather all the necessary materials. Having everything you need beforehand will make the construction process more efficient and ensure that you have a successful end result. Here are the materials you’ll need for this project:
- Measuring Tools: Measure the dimensions of the desired location for the recessed shelf. You’ll need a tape measure, level, and a straightedge to ensure accurate measurements.
- Marker or Pencil: Use a marker or pencil to mark the area where the shelf will be installed. This will help guide you during the construction process.
- Power Tools: Depending on the type of wall and materials you’re working with, you may need a variety of power tools such as a reciprocating saw or tile saw. These tools will be used for cutting through the wall or tiles to create the opening for the recessed shelf.
- Building Materials: You’ll need materials to construct the frame and support for the recessed shelf. This includes lumber or plywood for the frame, screws or nails, and brackets or supports to hold the shelf in place.
- Waterproofing Membrane: To protect the shelf and surrounding areas from water damage, you’ll need a waterproofing membrane. This can be in the form of a liquid or adhesive membrane that is applied to the surface.
- Shelf Material: Choose a material that is suitable for use in a wet environment. This can include materials like tile, stone, or a waterproof finished product specifically designed for shower use.
- Tile or Finishing Materials: If you plan on tiling the shelf or the surrounding area, you’ll need tiles, tile adhesive, grout, and a trowel. If you’re using a different finishing material, make sure you have the appropriate adhesives or mounting accessories.
- Caulk and Sealant: Seal the edges and joints of the shelf with caulk or sealant to prevent water penetration and maintain a watertight seal.
- Protective Gear: Don’t forget to prioritize safety by wearing gloves, safety glasses, and a dust mask when using power tools and handling construction materials.
Having these materials on hand will make the construction process much smoother. Double-check your supplies before you start to ensure you have everything you need. This will save you time and ensure that your recessed shower shelf is built correctly and to your satisfaction.
Preparing the Walls
Before you can begin building a recessed shelf in your shower, it’s vital to properly prepare the walls. This step is essential to ensure a secure and stable foundation for the shelf. Here’s how to prepare the walls for the installation:
- Clean the Walls: Start by thoroughly cleaning the walls where the shelf will be installed. Remove any dirt, soap residue, or mold using a mild detergent and water. This will provide a clean surface for better adhesion of the waterproofing membrane and finishing materials.
- Repair Any Damage: Inspect the walls for any signs of damage such as cracks or loose tiles. Repair any imperfections before proceeding with the installation. Use appropriate patching materials to fill cracks and stabilize loose tiles.
- Remove Existing Tiles (if necessary): If the location for the recessed shelf has existing tiles, you might need to remove them to create the opening. Use a grout saw or chisel to carefully remove the tiles, being cautious not to damage the nearby tiles or the underlying wall surface.
- Assess the Wall Structure: Determine the wall structure and materials you’re working with. This is important to understand the thickness and stability of the wall, which will impact the construction process. If you’re unsure, consult with a professional or consider using a wall reinforcement technique.
- Ensure a Level Surface: Use a level to ensure that the walls are plumb and straight. A level surface will facilitate the installation of the shelf and help prevent any tilting or instability once installed.
Following these steps will help you create a solid foundation for your recessed shower shelf. Taking the time to properly prepare the walls will ensure a successful installation and help prolong the lifespan of your shelf. Remember, if you’re unsure about any aspect of the preparation process, it’s always best to consult with a professional for guidance.
Measuring and Marking the Dimensions
Accurate measurements are crucial when it comes to building a recessed shelf in your shower. To ensure a proper fit and seamless installation, take the time to measure and mark the dimensions correctly. Here’s how to do it:
- Determine the Shelf Size: Decide on the desired size of your recessed shelf. Consider the items you plan to store on the shelf and any space limitations in your shower. Take into account the height, width, and depth of the shelf.
- Measure the Location: Using a tape measure, carefully measure the available space where the shelf will be located. Record the measurements for the height, width, and depth of the recessed area. It’s essential to be precise to ensure a snug fit.
- Account for the Frame and Supports: Remember to account for the thickness of the frame and any supports you plan to use. This will help you determine the final dimensions of the opening and allow for a secure fit of the shelf.
- Transfer Measurements to the Wall: Once you have determined the final dimensions of the recessed area, transfer these measurements onto the wall using a marker or pencil. Use a level and straightedge to ensure accurate and straight lines.
- Mark the Cutting Lines: If you need to cut through tiles or the wall itself to create the opening, mark the cutting lines on the wall. Use a tile saw or reciprocating saw to make precise cuts along these lines, following appropriate safety guidelines.
- Double-Check the Measurements: Before proceeding with the construction, double-check your measurements to avoid any errors. Make sure the dimensions are accurate and that the marked lines align with your desired location for the recessed shelf.
Taking the time to measure and mark the dimensions accurately will ensure a smooth and successful construction process for your recessed shower shelf. Precise measurements will result in a well-fitting shelf that enhances both the functionality and aesthetics of your shower space.
Cutting the Wall to Create the Opening
To build a recessed shelf in your shower, you’ll need to cut through the wall to create the opening. This step requires precision and caution to ensure a clean and accurate cut. Here’s a step-by-step guide on how to cut the wall:
- Put on Safety Gear: Before you begin, don’t forget to put on protective gear such as safety glasses and a dust mask to keep yourself safe from any debris or dust generated during the cutting process.
- Use the Marked Lines as a Guide: With your marked cutting lines as a guide, carefully position the blade of a reciprocating saw or a tile saw against the wall. If you are cutting through tiles, make sure to use a tile saw with a diamond blade designed for cutting ceramic or porcelain tiles.
- Start Cutting Slowly: Slowly start cutting along the marked lines, applying gentle and consistent pressure. Let the blade do the work and avoid forcing it. If you’re cutting through tiles, use a continuous motion to create a clean cut.
- Work in Sections: If you’re cutting through a large area, it’s best to work in smaller sections. This will allow for more control and precision. Take breaks as needed to prevent overheating of the saw blade.
- Clean Up Any Debris: As you cut, debris and dust may accumulate. Take breaks to clean up any loose material, ensuring a clear view of your cutting lines and providing a clean work environment.
- Check the Cut: After cutting, check the opening to ensure it matches your desired dimensions. Make any necessary adjustments if needed.
Remember to work slowly and carefully during the cutting process. Take your time to achieve clean and precise cuts, as this will directly impact the final appearance and functionality of your recessed shelf.
Building the Outer Frame
Once you have created the opening for the recessed shelf in your shower, the next step is to build the outer frame. This frame will provide support and stability for the shelf. Here’s a guide on how to build the outer frame:
- Measure and Cut the Frame Pieces: Measure the dimensions of the opening and cut the frame pieces accordingly. Use a saw or a miter saw to make accurate cuts. The frame pieces will consist of horizontal and vertical pieces that will form the outline of the shelf.
- Align and Square the Pieces: Align the frame pieces to fit snugly within the opening. Use a level or square to ensure that the frame is perfectly level and square. This step is crucial for a stable and well-fitting shelf.
- Attach the Frame Pieces: Once the frame pieces are aligned and squared, use screws or nails to secure them together. Make sure to countersink the fasteners to create a flush surface.
- Reinforce the Frame (if necessary): Depending on the size and weight of the shelf, you may need to reinforce the frame for added support. This can be done by adding additional diagonal supports or braces at the corners of the frame.
- Check for Stability: After building the outer frame, check for stability by gently pushing against it. The frame should feel solid and secure, with minimal movement. If there is any wobbling or instability, make the necessary adjustments to ensure a firm structure.
Building a sturdy outer frame is essential to support the weight of the items placed on the recessed shelf and to prevent any sagging or structural issues. Take your time to accurately measure, cut, and assemble the frame pieces, ensuring a solid and durable foundation.
Installing the Shelf Support
After building the outer frame for your recessed shower shelf, the next step is to install the shelf support. These supports will provide additional stability and strength to the structure. Here’s a guide on how to install the shelf support:
- Determine the Support Placement: Decide on the placement of the shelf supports within the frame. Typically, it is recommended to install them at equal intervals along the length of the frame for optimal support.
- Mark the Support Locations: Use a pencil or marker to mark the locations where the supports will be installed. Ensure that the marks are aligned with the center of each support placement.
- Drill Pilot Holes: To prevent the wood from splitting when you attach the supports, it’s essential to drill pilot holes at the marked locations. Use a drill bit slightly smaller than the diameter of the screws or nails you’ll be using.
- Attach the Supports: Align the supports with the pilot holes and fasten them to the frame using screws or nails. Make sure that the supports are flush with the frame and securely attached. Repeat this process for each support location.
- Check for Stability: After attaching the shelf supports, check for stability by applying gentle pressure to ensure there is minimal movement. The supports should feel solid and secure, supporting the weight of the intended items on the shelf.
- Make Adjustments if Needed: If you notice any instability or wobbling, make any necessary adjustments to reinforce the shelf supports. This can be done by adding additional screws or nails, or by reinforcing the supports with additional bracing.
Proper installation of the shelf supports is crucial to maintain the integrity and stability of the recessed shelf. Taking the time to correctly position, attach, and reinforce the supports will ensure that your shelf remains strong and secure, supporting the weight of your shower essentials without any issues.
Adding Waterproofing Membrane
Before proceeding with the installation of your recessed shower shelf, it is important to add a waterproofing membrane. This step will protect the shelf and the surrounding area from water damage and ensure the longevity of your project. Here’s a guide on how to add a waterproofing membrane:
- Choose the Right Membrane: Select a waterproofing membrane that is suitable for use in wet areas such as showers. There are various options available, including liquid membranes or adhesive membranes. Follow the manufacturer’s instructions for the specific product you are using.
- Clean the Surface: Ensure that the surface of the recessed area and the outer frame is clean and free of dust or debris. Use a mild cleaner or detergent to remove any dirt or residue, and allow the area to dry completely before applying the waterproofing membrane.
- Apply the Membrane: Follow the instructions provided with the waterproofing membrane for application. Generally, this involves using a brush or roller to evenly coat the surface, making sure to cover all areas exposed to water. Apply multiple coats if necessary, allowing each coat to dry before proceeding.
- Paying Attention to Joints and Corners: Pay special attention to the joints and corners of the recessed area and the outer frame, as these areas are more prone to water penetration. Apply additional layers of the waterproofing membrane or use reinforcing fabric to provide extra protection.
- Allow for Curing Time: Follow the recommended curing time specified by the manufacturer. This is necessary to ensure that the waterproofing membrane has fully dried and formed a secure barrier against water penetration. Avoid any contact with water or moisture during this time.
- Inspect for Uniform Coverage: After the membrane has cured, inspect the surface to ensure there is a uniform coverage. Check for any areas that may have been missed or are unevenly coated. Touch up these areas as needed to maintain a consistent waterproofing layer.
Adding a waterproofing membrane is a crucial step in protecting your recessed shower shelf from water damage. By taking the time to properly apply the membrane, you can ensure the longevity and durability of your project, creating a reliable and functional shelf in your shower.
Installing the Shelf
Now that you have prepared the walls, built the outer frame, and applied the waterproofing membrane, it’s time to install the shelf itself. This step will bring your recessed shower shelf project closer to completion. Here’s a guide on how to install the shelf:
- Choose the Shelf Material: Select the material you will use for the actual shelf. This can include tile, stone, or a waterproof finished product specifically designed for shower use. Ensure that the material is appropriate for use in a wet environment.
- Measure the Shelf Dimensions: Measure the dimensions of the recessed area within the outer frame. Use these measurements to cut or shape the shelf material accordingly. Make sure the shelf fits snugly within the frame but is easily removable if necessary.
- Install the Shelf: Place the shelf material into the recessed area, ensuring it is level and aligned with the outer frame. Use construction adhesive or appropriate mounting brackets to secure the shelf in place. Follow the specific instructions for the adhesive or brackets you are using.
- Check for Stability: After installing the shelf, check for stability by applying gentle pressure. The shelf should feel secure and should not tilt or move when items are placed on it. Adjust as necessary to ensure a stable and level surface.
- Allow for Curing Time: If you used adhesive to secure the shelf, allow enough time for it to cure according to the manufacturer’s instructions. This will ensure a strong bond between the shelf material and the surrounding surfaces.
- Test the Shelf: Once the curing time has passed, test the shelf by placing items on it and applying light pressure. Verify that it can comfortably support the weight of your shower essentials without any signs of instability or failure.
By following these steps, you can successfully install the shelf in your recessed shower. It is important to ensure stability, proper alignment, and a secure bond between the shelf material and the surrounding surfaces. With the shelf in place, you’re one step closer to completing your functional and aesthetically pleasing shower space.
Applying Tile or Finishing Material
Once the recessed shelf is installed, the next step is to apply tile or finishing material to create a polished and cohesive look in your shower. This step adds the final touch to your project, blending the shelf seamlessly with the surrounding bathroom decor. Here’s how to apply tile or finishing material to your recessed shower shelf:
- Choose the Tile or Finishing Material: Select the tile or finishing material that matches your desired aesthetic. Consider factors like color, texture, and durability. Ensure that the material is suitable for use in a wet environment and will adhere securely to the shelf and surrounding surfaces.
- Prepare the Shelf Surface: Clean the surface of the recessed shelf, removing any dust, debris, or adhesive residue. Use a mild cleaner and water to ensure a clean and dry surface. This will provide a solid foundation for the tile or finishing material.
- Apply Adhesive: If you’re using tile, apply a thin layer of tile adhesive to the shelf surface. If you’re using other finishing materials, follow the specific instructions for the chosen material. Use a notched trowel to create even ridges in the adhesive, ensuring proper adhesion.
- Place the Tiles or Finishing Material: Carefully place the tiles or finishing material onto the adhesive, ensuring proper alignment and spacing. Use tile spacers, if necessary, to achieve consistent gaps between tiles. Apply gentle pressure to secure the tiles or material onto the adhesive.
- Allow for Proper Drying and Curing: Follow the manufacturer’s instructions for drying and curing times. Allow sufficient time for the adhesive to dry and cure, ensuring a strong and durable bond between the tiles or finishing material and the shelf surface.
- Grout the Tiles: If you’re using tiles, apply grout between the tiles using a grout float. Follow the manufacturer’s instructions to mix and apply the grout. Wipe off excess grout with a sponge, working at a diagonal to prevent pulling grout out from between the tiles.
- Clean and Seal: After the grout has cured, clean the tile surface with a damp sponge to remove any residual grout haze. Once the tiles are dry, apply a tile sealer to protect the grout and tiles from moisture and staining. Follow the manufacturer’s instructions for proper application.
Applying tile or finishing material to your recessed shower shelf elevates the overall appearance of your shower space. Take your time during the installation process to ensure accurate placement, proper adhesive application, and precise grouting. With the tile or finishing material in place, your recessed shelf will seamlessly blend with its surroundings and provide a beautiful and functional addition to your shower.
Grouting the Shelf
After applying tile or finishing material to your recessed shower shelf, the next step is to grout the tiles. Grouting not only adds a finished look to the shelf but also helps to seal the gaps between the tiles, providing protection against moisture and preventing dirt and debris from accumulating. Here’s how to grout the shelf:
- Prepare the Grout: Follow the manufacturer’s instructions to prepare the grout mixture. Mix the grout thoroughly until it reaches a smooth consistency. Let the grout sit for a few minutes to allow it to settle.
- Apply the Grout: Using a grout float, apply the grout to the gaps between the tiles. Hold the float at a 45-degree angle and apply firm pressure to ensure the grout fills the gaps completely. Work in small sections to prevent the grout from drying too quickly.
- Remove Excess Grout: After applying the grout, use the edge of the grout float to remove any excess grout from the surface of the tiles. Hold the float at a 90-degree angle and scrape diagonally across the tiles, removing the excess grout while leaving the gaps filled.
- Smooth and Shape the Grout: Use a rounded tool, like a grout sponge or your finger, to smooth and shape the grout lines. Wet the sponge or your finger and gently wipe away any excess grout, ensuring that the grout lines are even and consistent.
- Allow the Grout to Cure: Follow the manufacturer’s instructions for the recommended curing time of the grout. It is essential to allow the grout to fully dry and harden before exposing it to moisture.
- Clean the Tile Surface: Once the grout has cured, use a damp cloth or sponge to clean the tile surface and remove any remaining grout residue. Be careful not to disturb the newly applied grout between the tiles.
- Seal the Grout: To protect the grout and prolong its lifespan, consider applying a grout sealer. Follow the instructions provided with the sealer to ensure proper application and allow it to fully dry before using the shower.
Grouting the recessed shower shelf is the final step to complete your project. Take your time during the grouting process, paying attention to detail and ensuring even and smooth grout lines. With the grout in place, your recessed shelf will not only be visually appealing but also well-protected against moisture and dirt for years to come.
Sealing the Shelf
After completing the grouting process for your recessed shower shelf, it’s important to seal the shelf to ensure its longevity and maintain its appearance. Sealing the shelf provides an extra layer of protection against moisture, stains, and grime. Here’s how to seal the shelf:
- Clean the Shelf: Before sealing, make sure the shelf surface is clean and free from any dust, debris, or grout residue. Use a damp cloth or sponge to wipe down the surface, ensuring it is dry before proceeding.
- Select the Right Sealer: Choose a sealer that is suitable for the material used on your shelf, such as tile, stone, or another finishing material. Read the manufacturer’s instructions to ensure you select the appropriate sealer for your specific shelf material.
- Apply the Sealer: Follow the instructions provided with the sealer for proper application. It may involve using a brush, roller, or spray bottle, depending on the sealer type. Apply an even coat of the sealer to the entire surface of the shelf, including the grout lines if applicable.
- Allow for Absorption: Let the sealer sit on the shelf surface for the recommended amount of time specified by the manufacturer. This will allow the sealer to penetrate and be absorbed into the material, enhancing its protective properties.
- Remove Excess: After the absorption time, use a clean, dry cloth to gently remove any excess sealer from the surface. Be careful not to disturb the sealer that has been absorbed into the material.
- Allow the Sealer to Dry: Give the sealer sufficient time to dry and cure. This can vary depending on the type of sealer used, so refer to the manufacturer’s instructions for the recommended drying time. Avoid exposing the shelf to water or heavy use during this curing period.
- Apply Additional Coats (if necessary): Depending on the sealer type and the material of your shelf, you may need to apply multiple coats for optimal protection. Follow the manufacturer’s instructions for the recommended number of coats and drying time in between.
Sealing the recessed shower shelf adds an extra layer of protection and helps to maintain its appearance for a longer period. Taking the time to properly seal the shelf ensures that it remains resistant to moisture, stains, and dirt, allowing you to enjoy a beautiful and well-protected shelf in your shower.
Final Touches and Clean Up
With the construction of your recessed shower shelf complete, it’s time to add the final touches and clean up the area. This step ensures that everything is in order and ready for use. Here’s what you need to do for the final touches and clean up:
- Inspect the Shelf: Take a moment to inspect the recessed shelf to ensure that everything is secure and in place. Check for any loose tiles, cracks in the grout, or signs of instability. Make any necessary adjustments or repairs if needed.
- Clean the Shelf Surface: Use a damp cloth or sponge to wipe down the surface of the shelf, removing any dust, debris, or fingerprints. If you used tile, use an appropriate cleaner to remove any lingering grout haze or residue from the tiles.
- Remove Protective Coverings: If you used any protective coverings during the construction process to safeguard the shelf or surrounding areas, make sure to remove them carefully, without causing any damage to the shelf or other surfaces.
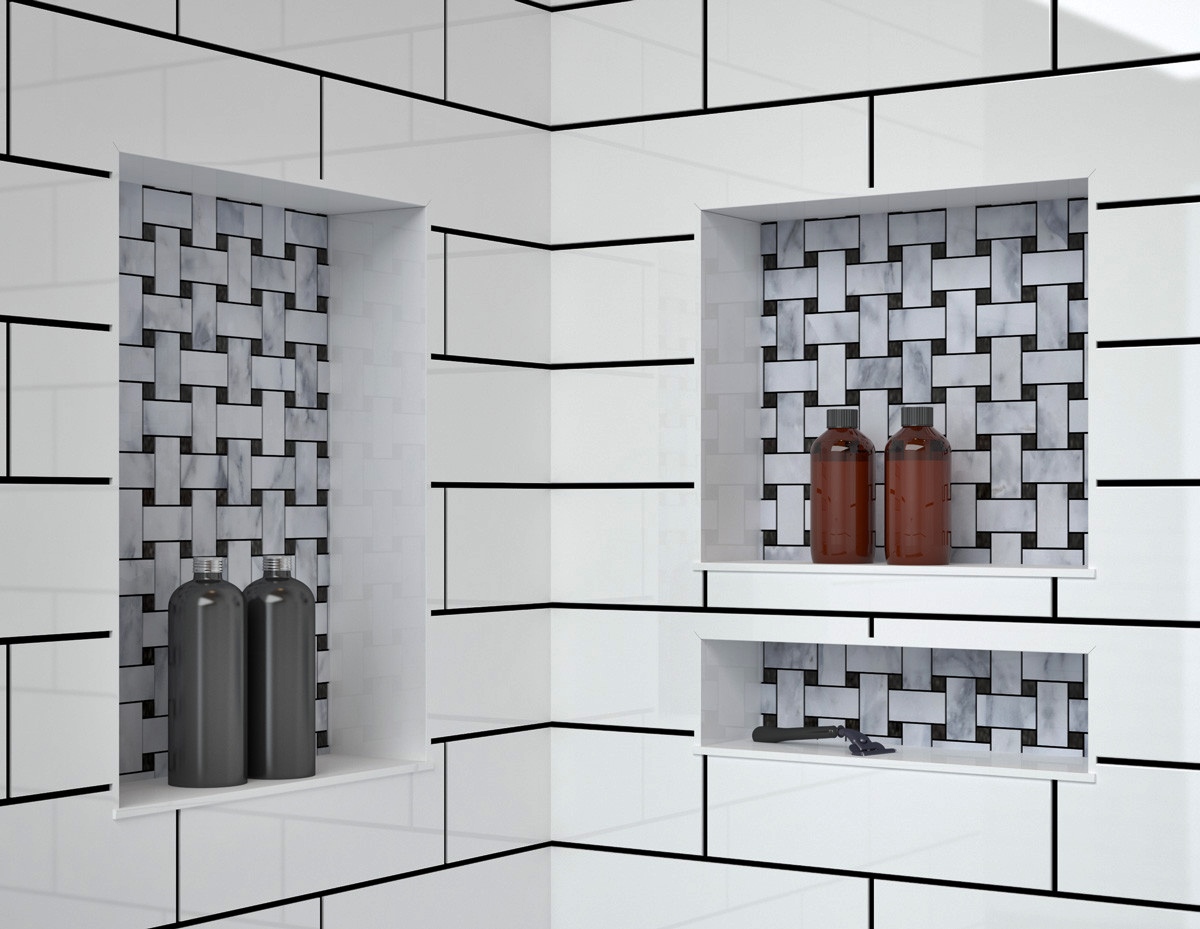
- Organize and Arrange the Shelf: Place your shower essentials, such as shampoo bottles, soap, or loofahs, on the shelf in an organized and aesthetically pleasing manner. Arrange them to suit your personal preferences and make the most of the available space.
- Wipe Down the Surrounding Area: Clean and wipe down the surrounding tiles, walls, and shower fixtures to remove any construction debris or dust that may have accumulated during the installation process.
- Dispose of Waste Materials Responsibly: Properly dispose of any leftover construction materials, such as packaging, tile scraps, or adhesive containers. Follow local waste disposal guidelines and regulations to ensure environmentally friendly practices.
- Enjoy Your New Recessed Shower Shelf: With the final touches completed and the area cleaned up, it’s time to enjoy your freshly installed recessed shower shelf! Take a moment to admire your craftsmanship and take pleasure in having a convenient and stylish storage space within your shower.
By paying attention to the final touches and carrying out a thorough clean up, you can ensure that your recessed shower shelf is not only functional but also visually appealing. Taking the time to organize, clean, and maintain the shelf will contribute to a pleasant and enjoyable showering experience for years to come.