
Planning and Preparation
Before you begin installing a shelf in a tiled shower, it is essential to take some time to plan and prepare. Proper planning will ensure a successful and long-lasting installation. Here are some important steps to follow:
Assess your needs: Start by considering why you want to install a shelf in your shower. Is it for storing shampoos, soaps, and other shower essentials? Or is it purely for aesthetic purposes? Understanding your specific requirements will help you choose the right type and size of the shelf.
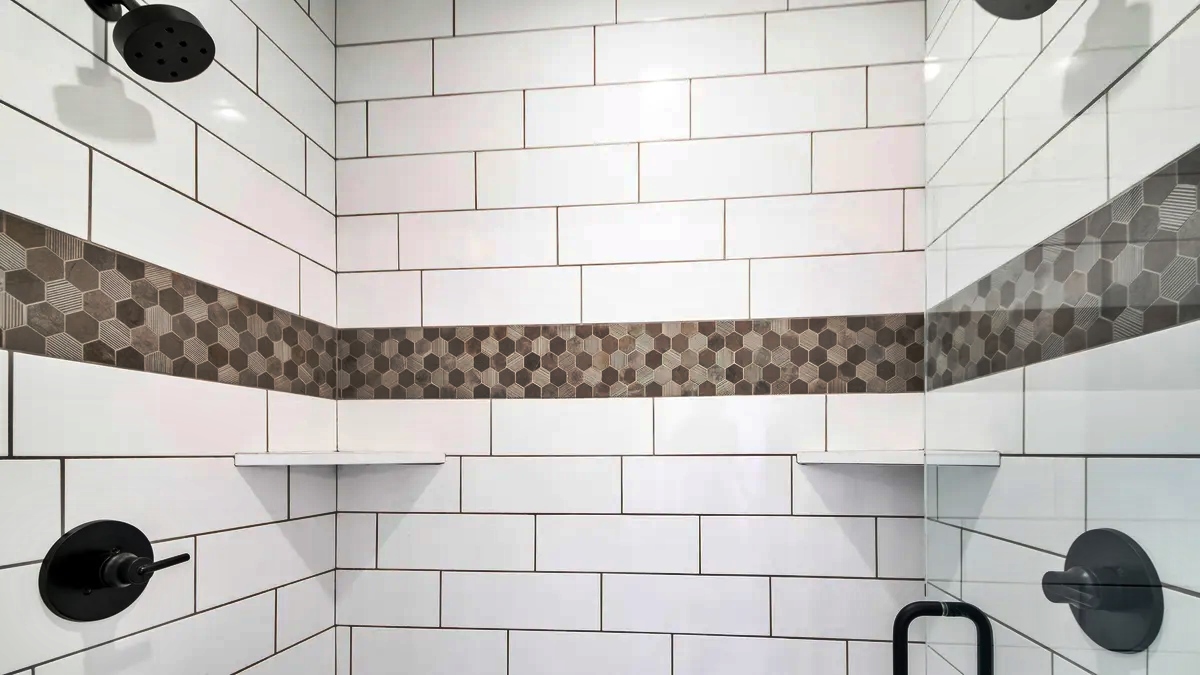
Choose the right location: The next step is to determine the ideal location for your shelf. Consider the height and accessibility, as well as the spacing between other fixtures in your shower. Make sure the selected area allows for easy reach and doesn’t hinder your movement within the shower.
Select the right shelf: There are various types of shelves available, such as corner shelves, recessed shelves, or floating shelves. Consider the style of your bathroom and the functionality you desire. Look for shelves that are made specifically for use in wet environments, such as those made from stainless steel or waterproof materials.
Take accurate measurements: Measure the space where you plan to install the shelf to ensure a proper fit. Measure the width, height, and depth of the area, taking into account any obstacles, such as showerhead pipes or electrical outlets. These measurements will help you determine the size of the shelf and ensure it fits seamlessly into the space.
Gather the necessary tools and materials: Based on your chosen shelf type, gather all the tools and materials required for the installation. This may include a drill, screws, screwdriver, level, tile drill bit or hole saw, tape measure, pencil, and safety goggles. If you are unsure of the specific tools needed, consult the shelf’s installation instructions or seek professional advice.
Prepare the tile surface: Clean the area where the shelf will be installed, ensuring it is free from any dirt, grime, or debris. If necessary, repair or replace any damaged tiles before proceeding with the installation. A clean and smooth surface will guarantee proper adhesion and a secure installation.
By carefully considering your needs, choosing the right location, and gathering the necessary tools and materials, you can confidently move on to the next steps of installing a shelf in your tiled shower.
Choosing the Right Shelf
When it comes to selecting a shelf for your tiled shower, there are several factors to consider. The right shelf will not only meet your functional needs but also enhance the overall aesthetic appeal of your shower. Here are some key points to keep in mind:
Materials: Consider the materials from which the shelf is made. For a shower environment, it is important to choose materials that are waterproof and resistant to mold and mildew. Materials like stainless steel, acrylic, glass, or ceramic are popular choices due to their durability and ability to withstand moisture.
Style: Take into account the style and design of your shower and bathroom. If your shower has a modern look, consider sleek and minimalist shelves. For a more traditional or rustic bathroom, opt for wooden shelves. Aligning the style of the shelf with the overall aesthetic of the space will create a harmonious and visually appealing result.
Size and Capacity: Evaluate the amount of storage space you require in your shower. Consider the number and size of bottles, soaps, and other items you regularly use. Choose a shelf that offers enough space to accommodate your essentials without appearing cluttered. Additionally, check the weight capacity of the shelf to ensure it can hold the items you intend to place on it.
Installation Method: Different shelves have different installation methods. Some shelves may require drilling into the tile, while others can be installed using adhesive or suction cups. Consider the ease of installation and whether you are comfortable with the chosen method. If you are unsure, consult the manufacturer’s instructions or seek professional assistance.
Maintenance: Consider the ease of cleaning and maintaining the shelf. Look for materials that are resistant to stains, scratches, and watermarks. Shelves with smooth surfaces are usually easier to wipe clean. Avoid materials that require excessive cleaning or are prone to discoloration over time.
Budget: Lastly, determine your budget for the shelf. Prices for shower shelves can vary significantly based on materials, design, and brand. Set a realistic budget and explore options within that range. Remember, it is important to prioritize quality and functionality over price to ensure a long-lasting and enjoyable shower experience.
By carefully considering the materials, style, size, installation method, maintenance requirements, and budget, you can confidently choose the right shelf that perfectly suits your tiled shower and meets your needs.
Measuring and Marking the Placement
Accurate measurements and proper placement are crucial when installing a shelf in a tiled shower. Taking the time to measure and mark the placement will ensure a seamless and secure installation. Here’s how to do it:
Measure the space: Use a tape measure to measure the width and height of the wall where you plan to install the shelf. Take note of any obstructions such as shower fixtures, soap dishes, or faucets that may affect the placement of the shelf.
Consider spacing: Determine the ideal height and spacing between the shelf and other fixtures in your shower. Make sure there is enough clearance for bottles and items to be placed on the shelf without interfering with other shower activities.
Mark the placement: Use a pencil or marker to mark the desired position of the shelf on the tile. Use a level to ensure the markings are straight and aligned with the surrounding tiles.
Check for stability: Before finalizing the placement, press gently on the wall to ensure there are no hidden voids or loose tiles. If you encounter any unstable areas, it may be necessary to reinforce the wall or adjust the placement of the shelf.
Double-check the measurements: Once you have marked the placement, review your measurements to ensure accuracy. Measure the distance between the floor or base of the shower and the marked position to confirm the desired height of the shelf.
Adjust if necessary: If, upon reviewing the measurements, you realize that the placement does not align with your needs or preferences, don’t hesitate to make adjustments. It is better to take the time to ensure the shelf is positioned correctly before proceeding to the installation stage.
By carefully measuring and marking the placement of the shelf in your tiled shower, you can ensure a precise and visually pleasing installation. Double-checking your measurements and making any necessary adjustments will help you achieve the desired outcome and avoid any issues during the installation process.
Gathering the Tools and Materials
Before proceeding with the installation of a shelf in your tiled shower, it’s essential to gather all the necessary tools and materials. Having everything prepared in advance will make the installation process smoother and more efficient. Here’s a list of the tools and materials you may need:
Drill: A power drill will be required to make holes in the tile or wall for installing the shelf bracket. Make sure you have a drill with adjustable speed settings to prevent cracking or damaging the tile.
Screws: Depending on the type of shelf and bracket you are using, you’ll need screws to secure the bracket to the wall. Ensure that the screws are the correct length and gauge to provide a secure attachment.
Screwdriver: A screwdriver will be needed to tighten the screws and ensure a proper fit. Consider using a screwdriver with interchangeable bits to accommodate different screw types and sizes.
Level: A level is essential for ensuring that the shelf is properly aligned. This tool will help you achieve a straight and even installation, preventing items from sliding off the shelf or causing imbalance.
Tile drill bit or hole saw: If you’re installing the shelf directly into tiles, you’ll need a specialized tile drill bit or hole saw. These tools will allow you to create holes without cracking or damaging the tiles.
Tape measure: A tape measure is indispensable for accurate measurements and ensuring proper placement of the shelf. Use it to measure the width, height, and depth of the area where the shelf will be installed.
Pencil: A pencil or marker will be used to mark the position of the shelf on the tile or wall. Opt for a pencil that can easily be erased once the installation is complete.
Safety goggles: Protect your eyes from any debris, tile fragments, or dust that may occur during the drilling or installation process. Safety goggles are an essential safety precaution.
Additional materials: Depending on the specific installation instructions and the type of shelf, you may require additional materials such as adhesive, mounting brackets, anchors, or grout. Ensure that you have all the necessary materials on hand before starting the installation process.
By gathering all the required tools and materials beforehand, you can save time and minimize disruptions during the installation of the shelf in your tiled shower. Double-check your supplies to ensure you have everything you need, and if in doubt, consult the manufacturer’s instructions or seek professional advice.
Removing Tiles
Before installing a shelf in a tiled shower, it may be necessary to remove some tiles to create space for the shelf and ensure a tidy installation. Here’s how to remove tiles safely and effectively:
Gather your tools: To remove tiles, you will need a few essential tools. These include a chisel, hammer, grout removal tool, and a pry bar. Additionally, wear safety goggles and gloves to protect yourself from flying debris.
Prepare the area: Clear the surrounding area to create a clean and safe workspace. Cover the floor and any nearby fixtures with a drop cloth or old towels to catch any falling debris.
Remove the grout: Start by using a grout removal tool to scrape out the grout surrounding the tiles you wish to remove. Be cautious not to damage the adjacent tiles. This step will help loosen the tiles and make them easier to remove.
Protect the adjacent tiles: Place a piece of cardboard or a thin board against the adjacent tiles to protect them from accidental damage. Use masking tape to secure the board in place.
Break the tile: Use a hammer and chisel to carefully break the tile. Start by making small cracks along the edges of the tile and work your way towards the center. Be gentle to avoid damaging surrounding tiles.
Remove the broken tile: Once the tile is cracked, use a pry bar to carefully lift and remove the broken pieces. Work with caution to prevent injury and minimize damage to the underlying structure.
Clean the surface: After removing the tiles, take the time to clean the area and remove any adhesive or grout remnants. You can use a scraper or putty knife to scrape away any residue, then wipe the surface with a damp cloth.
Inspect the surface: Examine the newly exposed area for any signs of damage or instability. Repair any cracks or weak spots before proceeding with the shelf installation. It’s crucial to have a stable and solid surface to ensure a secure installation.
Note: Removing tiles can be a challenging and time-consuming task, especially if you don’t have experience. It’s recommended to seek professional help if you are unsure or uncomfortable with the removal process. Hiring a professional can save you time, prevent unnecessary damage, and ensure a successful installation.
By following these steps, you can safely remove the necessary tiles to create space for the installation of a shelf in your tiled shower. Remember to exercise caution and take your time to minimize damage and ensure a smooth transition to the next phase of the installation process.
Installing the Shelf Bracket
Installing the shelf bracket is a critical step in ensuring a sturdy and long-lasting shelf in your tiled shower. Here is a step-by-step guide to installing the shelf bracket:
1. Position the bracket: Place the shelf bracket on the marked location, ensuring it is level and aligned with the surrounding tiles. Use a pencil to mark the screw holes on the tile.
2. Pre-drill the holes: Using a tile drill bit or hole saw, carefully drill holes at the marked positions. Take caution not to apply too much pressure, which may cause the tile to crack or chip. Use masking tape on the tile surface to prevent the drill bit from slipping.
3. Insert anchors: If your bracket requires anchors for extra support, insert them into the pre-drilled holes. Gently tap them with a hammer until they are flush with the tile surface.
4. Attach the bracket: Line up the holes on the bracket with the pre-drilled holes or anchors. Secure the bracket to the wall by inserting screws into each hole and tightening them with a screwdriver. Ensure the bracket is firmly attached and level.
5. Test the stability: Give the bracket a gentle shake to test its stability. If it feels loose or wobbles, tighten the screws further. A secure and stable bracket is essential for supporting the weight of the shelf and its contents.
6. Follow the manufacturer’s instructions: Always refer to the specific manufacturer’s instructions that come with the shelf bracket. Different brackets may have additional steps or requirements for installation. Follow these instructions carefully to ensure proper installation and avoid any damage.
7. Allow for curing time: Depending on the adhesive or anchor used, the bracket may require curing time before proceeding with the installation of the shelf. Follow the instructions provided by the manufacturer to ensure the adhesive or anchors fully set and provide maximum support.
By following these steps, you can properly install the shelf bracket in your tiled shower. A securely installed bracket serves as the foundation for your shelf, providing stability and durability for years to come. Take your time, double-check measurements, and consult the manufacturer’s instructions to ensure a successful installation.
Cutting and Fitting the Shelf
Once the bracket is securely installed in your tiled shower, the next step is to cut and fit the shelf. Proper cutting and fitting will ensure that the shelf fits seamlessly into the designated space and complements the overall design of your shower. Here’s how to cut and fit the shelf:
1. Measure the space: Use a tape measure to determine the dimensions of the area where the shelf will be placed. Measure the width, height, and depth to ensure an accurate fit.
2. Transfer measurements to the shelf: Transfer the measurements from the shower area to the shelf, making sure to account for any surrounding obstacles or fixtures. Use a pencil to mark the cutting lines on the shelf material.
3. Take safety precautions: Before cutting the shelf, put on safety goggles and ensure you are working in a well-ventilated area. If using power tools, follow the manufacturer’s safety guidelines and use a dust mask to protect against airborne particles.
4. Cut the shelf material: Use a suitable cutting tool, such as a circular saw, jigsaw, or table saw, to cut along the marked lines. Take your time and make precise cuts to achieve clean edges. If using a jigsaw, consider using a fine-toothed blade for smoother cuts.
5. Test the fit: After cutting the shelf, test its fit in the designated space. Make any necessary adjustments by sanding or trimming the edges until the shelf fits properly. Double-check the levelness and ensure it sits securely on the installed bracket.
6. Consider additional features: Depending on your personal preferences or specific needs, you may want to consider adding features to the shelf, such as rounded edges, a beveled front, or a waterproof sealant. These additional touches can enhance both the functionality and aesthetics of the shelf.
7. Clean the shelf: Before installing the shelf permanently, clean it thoroughly to remove any dust or debris from the cutting process. Use a damp cloth or sponge to wipe down the surface and ensure it’s ready for installation.
8. Secure the shelf: Once you are satisfied with the fit and appearance of the shelf, secure it onto the installed bracket according to the manufacturer’s instructions. Use the appropriate screws or fasteners to ensure a secure and stable attachment.
By following these steps, you can effectively cut and fit the shelf to perfectly match the dimensions of your tiled shower. Taking precise measurements, making accurate cuts, and testing the fit will result in a well-fitted and visually appealing shelf that enhances the functionality and beauty of your shower space.
Securing the Shelf in Place
Once you have cut and fitted the shelf in your tiled shower, it’s time to secure it in place. Properly securing the shelf will ensure its stability and prevent any accidents or mishaps. Here’s how to securely attach the shelf:
1. Position the shelf: Place the shelf onto the bracket or support mechanism, aligning it with the designated area in your shower. Double-check that it sits level and centered before proceeding.
2. Use appropriate fasteners: Depending on the type of shelf and bracket you are using, choose the appropriate fasteners for securing the shelf. This may include screws, bolts, or other fastening mechanisms. Check the manufacturer’s instructions for the recommended fasteners.
3. Mark the drilling points: If necessary, mark the drilling points on the shelf or bracket for the fasteners. Ensure the marks align with the pre-drilled holes on the bracket or the designated areas for fastening.
4. Pre-drill the holes: Using a drill bit that matches the size of the fasteners, pre-drill the holes on the shelf or bracket. Take care not to drill too deep or go through the shelf material completely. The goal is to create pilot holes for the fasteners.
5. Attach the shelf: Once the pilot holes are drilled, align the holes on the shelf with the pre-drilled holes on the bracket or support mechanism. Insert the fasteners and tighten them securely using the appropriate tools such as a screwdriver, wrench, or Allen key.
6. Test the stability: After securing the shelf, give it a gentle shake or apply light pressure to ensure it is stable and securely attached. If there is any wobbling or movement, double-check the tightness of the fasteners and make necessary adjustments.
7. Check weight capacity: Consider the weight capacity of the shelf and avoid overloading it with heavy items. Be mindful of the weight distribution when placing items on the shelf to maintain its stability and prevent any risk of it detaching from the wall.
8. Confirm levelness and alignment: Once the shelf is securely attached, use a level to confirm that it sits level and aligned with the surrounding tiles. Make any necessary adjustments to ensure a visually pleasing installation.
By following these steps, you can secure the shelf in your tiled shower, ensuring its stability and functionality. Taking the time to properly fasten the shelf will provide peace of mind and ensure that it remains securely in place for years to come.
Reinstalling Tiles
Once the shelf is securely in place, it’s time to restore the tiles that were removed during the installation process. Reinstalling the tiles requires careful attention to detail and patience to maintain the integrity and aesthetic of your tiled shower. Here’s how to reinstall the tiles:
1. Clean the tile surfaces: Before reinstalling the tiles, clean the surface area where the tiles will be placed. Remove any adhesive or grout residue and ensure the area is free from dust and debris.
2. Mix new grout: Prepare a fresh batch of grout according to the manufacturer’s instructions. Use a grout mixing tool or a trowel to achieve a smooth and consistent texture.
3. Apply the grout: Using a grout float, spread the grout over the tile joints, ensuring it fills the gaps completely. Hold the float at a 45-degree angle and work the grout into the joints in a diagonal motion.
4. Remove excess grout: After applying the grout, use the edge of the grout float to remove any excess grout from the tile surface. Hold the float at a 90-degree angle and scrape it across the tiles to remove the excess while leaving the joints intact.
5. Clean the tiles: Once the excess grout has been removed, use a damp sponge or cloth to gently wipe away any grout residue from the tile surface. Rinse the sponge frequently to avoid smearing the grout.
6. Allow the grout to cure: Follow the recommended curing time provided by the grout manufacturer. This typically ranges from 24 to 48 hours, during which you should avoid using the shower to allow the grout to fully set and harden.
7. Seal the grout: To protect the grout from staining and moisture penetration, consider applying a grout sealer once it has cured. Follow the instructions on the sealer packaging for application and drying time.
8. Clean the tiles again: Once the grout sealer has fully dried, clean the tiles with a mild tile cleaner to remove any residue or smudges. This final cleaning will add the finishing touch to your shower’s refreshed appearance.
9. Inspect and make necessary touch-ups: Take a close look at the reinstalled tiles and grout lines. If any tiles or grout appear uneven or damaged, make any necessary touch-ups by repositioning or replacing tiles or applying additional grout.
By following these steps, you can carefully and skillfully reinstall the tiles in your tiled shower. Paying attention to detail and taking the time to properly grout and clean the tiles will result in a visually appealing and professionally finished installation.
Sealing and Waterproofing the Shelf
Sealing and waterproofing the shelf in your tiled shower is essential to protect it from moisture damage and ensure its longevity. By properly sealing the shelf, you can enhance its durability and maintain its pristine appearance. Here’s how to seal and waterproof the shelf:
1. Choose the right sealant: Select a high-quality sealant that is designed for use in wet environments and is compatible with the material of your shelf. Look for sealants specifically formulated for sealing tiles, stone, or the specific material of your shelf, such as glass or stainless steel.
2. Prepare the shelf: Ensure the shelf is clean and dry before applying the sealant. Remove any dust, debris, or residues that may interfere with the proper adhesion of the sealant. You can use a mild cleanser and a damp cloth to clean the surface, then allow it to dry completely.
3. Apply the sealant: Follow the manufacturer’s instructions on the sealant packaging for the proper application method. Use a brush or sponge to apply a thin and even layer of sealant to the entire surface of the shelf, including the edges and corners. Take care to avoid the sealant coming into contact with the grout or surrounding tiles.
4. Allow the sealant to cure: After applying the sealant, allow it to cure according to the manufacturer’s instructions. This typically involves letting it dry for a specific duration before exposing it to water or heavy use. Avoid placing objects or placing pressure on the shelf during the curing process to ensure a proper bond and seal.
5. Test the waterproofing: Once the sealant has dried, perform a simple test to assess its waterproofing effectiveness. Sprinkle a few drops of water onto the sealed shelf and observe if the water beads up and rolls off the surface. If the water is absorbed or does not form beads, consider applying an additional layer of sealant for added protection.
6. Maintain regular maintenance: Keep the sealed shelf in good condition by regularly cleaning and inspecting it. Use mild cleaning agents and avoid abrasive tools or harsh chemicals that can damage the sealant. Additionally, periodically check the sealant for signs of wear or deterioration and reapply or touch up the sealant as needed.
7. Seal grout lines: It’s also important to seal the grout lines surrounding the shelf to prevent moisture infiltration. Use a grout sealer and follow the instructions provided by the manufacturer. Apply the sealer to the grout lines, ensuring thorough coverage to create a protective barrier.
By following these steps, you can effectively seal and waterproof the shelf in your tiled shower, safeguarding it against moisture damage and preserving its appearance. Regular maintenance and inspections will help maintain the sealant’s effectiveness, ensuring a long-lasting and well-protected shelf in your shower.
Cleaning and Finishing Touches
Once you have installed and sealed the shelf in your tiled shower, it’s important to maintain its cleanliness and make any necessary finishing touches. Regular cleaning and attention to detail will keep the shelf looking pristine and functional. Here are some tips for cleaning and adding the finishing touches to your shower shelf:
1. Use mild cleaners: When cleaning the shelf, opt for mild, non-abrasive cleaners that are suitable for the material of your shelf. Avoid harsh chemicals or abrasive scrubbers, as they can damage the surface of the shelf.
2. Wipe down regularly: Make it a habit to wipe down the shelf regularly to remove any soap scum, shampoo residue, or water spots. This will help prevent buildup and maintain the cleanliness of the shelf.
3. Pay attention to grout lines: Clean the grout lines around the shelf to ensure they remain free from mildew and mold. Use a grout cleaner or a mixture of baking soda and water to scrub the grout lines and remove any stains or discoloration.
4. Be cautious with abrasive items: Avoid placing abrasive items directly on the shelf, as they can scratch or damage the surface. Use coasters or trays to protect the shelf from potential scratches caused by sharp or rough objects.
5. Add organizational elements: Consider adding organizational elements to the shelf, such as small baskets or containers, to keep your shower items tidy and easy to access. This will make the shelf not only functional but also visually appealing.
6. Enhance with decorative accents: Add decorative accents or small plants to the shelf to enhance its overall appearance. Choose items that are waterproof or can withstand the humid environment of the shower.
7. Check for any loose parts: Periodically inspect the shelf and its attachments to ensure everything is securely in place. Tighten any loose screws or fasteners and make any necessary adjustments to maintain the stability of the shelf.
8. Seek professional maintenance if needed: If you encounter any issues or concerns with the shelf, such as loose tiles, damaged grout, or leaking, it’s best to seek professional maintenance. Professionals can assess and address any underlying problems to prevent further damage or ensure proper functionality.
By following these cleaning tips and adding the finishing touches, you can maintain the cleanliness, functionality, and overall appeal of the shelf in your tiled shower. Regular upkeep and attention to detail will ensure a beautiful and enjoyable shower experience.