
Why Cut Zinnias for Vase?
Zinnias are beautiful and vibrant annual flowers that make fantastic additions to any floral arrangement. Cutting zinnias for a vase not only allows you to enjoy their colorful blooms indoors but also encourages further growth in your garden. Harvesting zinnias at the right time and in the right way can ensure a longer vase life and keep your bouquets looking fresh and vibrant for days. There are several reasons why cutting zinnias for a vase is a great idea:
- Extend the Beauty: By cutting zinnias and bringing them inside, you can prolong the enjoyment of their stunning flowers. Zinnias come in a wide range of colors, from fiery oranges and reds to soothing pinks and purples, making them perfect for adding pops of color to any room.
- Create Custom Arrangements: Cutting zinnias allows you to create your own beautiful floral arrangements. Whether you prefer simple and elegant bouquets or wild and colorful displays, zinnias can be easily mixed and matched with other flowers or greenery to suit your personal style.
- Encourage More Blooms: Cutting zinnias promotes the growth of new blooms. Regularly harvesting zinnias encourages the plant to produce more flowers, allowing you to enjoy a constant supply of fresh blooms throughout the summer season.
- Share the Beauty: Cutting zinnias not only allows you to enjoy their beauty yourself but also gives you the opportunity to share them with others. Gift a vibrant bouquet to a friend or loved one to brighten their day and spread the joy of zinnias.
Whether you want to beautify your home with fresh flowers, create stunning arrangements, or encourage more blooms in your garden, cutting zinnias for a vase is a wonderful idea. Now that we understand the benefits, let’s explore the tools you’ll need to get started.
Tools You’ll Need
Before you begin cutting zinnias for a vase, make sure you have the necessary tools on hand. Having the right equipment will ensure that you can harvest the flowers effectively and preserve their freshness. Here are the essential tools you’ll need:
- Pruning Shears: A sharp pair of pruning shears is essential for cleanly cutting the zinnias’ stems. Look for shears with a sturdy construction and a comfortable grip to make the process easier.
- A Clean Bucket: Fill a clean bucket with room temperature water to immediately place your cut zinnias in. Using a bucket rather than a vase allows for easier transportation and can accommodate a larger quantity of flowers.
- Water-Filled Vase: Once you have selected and conditioned your zinnias, transfer them from the bucket to a water-filled vase. Choose a vase that complements the size and style of your arrangement.
- Flower Preservative: To keep your zinnias fresh for as long as possible, consider using a flower preservative. These powders or solutions contain nutrients that help nourish the flowers and prevent the growth of bacteria. Follow the instructions on the package for best results.
- Clean Scissors: While pruning shears are useful for cutting the zinnias in the garden, clean scissors can come in handy for trimming the stems and arranging the flowers in the vase.
By having these tools ready, you’ll be well-equipped to harvest your zinnias and create stunning arrangements. Now that you know which tools to gather, let’s move on to discussing the timing for cutting zinnias.
Timing is Key: When to Cut Zinnias
The timing of when to cut zinnias is crucial for ensuring the longevity and beauty of your floral arrangements. Here are some guidelines to help you determine the best time to harvest your zinnias:
- Morning Harvest: It’s generally recommended to cut zinnias in the morning when the temperatures are cooler and the plants are fully hydrated. This allows the flowers to retain more moisture and stay fresher in the vase.
- Fully Bloomed, Not Overripe: Look for zinnias that are fully bloomed but not overripe. The petals should be vibrant and free of blemishes or brown spots. Avoid harvesting zinnias that have begun to fade or wilt.
- Choose Mid-Length Stems: Select zinnias with mid-length stems, ideally around 6 to 8 inches long. This length allows for flexibility when arranging the flowers in the vase and provides enough stem to be trimmed later if necessary.
- Monitor the Weather: Keep an eye on the weather forecast before cutting your zinnias. Avoid harvesting them on rainy or excessively hot days, as these conditions can cause the flowers to deteriorate more quickly.
- Continuous Harvest: Zinnias are known for their prolific blooming, so don’t be afraid to cut them throughout the growing season. Regularly harvesting zinnias encourages the plant to produce new blooms, ensuring a constant supply of fresh flowers for your vases.
By following these timing guidelines, you can ensure that your zinnias are cut at their peak freshness and will thrive in your floral arrangements. Now that you know when to cut zinnias, let’s move on to discussing how to choose the right zinnias for your vase.
How to Choose the Right Zinnias
Choosing the right zinnias for your vase is essential for creating visually appealing and long-lasting floral arrangements. To select the best zinnias, consider the following factors:
- Vibrant Colors: Look for zinnias with vibrant and richly colored blooms. Opt for a mix of hues to add depth and visual interest to your arrangements.
- Sturdy Stems: The stems of the zinnias should be strong and firm, capable of supporting the weight of the flowers in a vase. Avoid zinnias with weak or floppy stems as they may droop once cut.
- Healthy Foliage: Examine the foliage of the zinnias. Choose plants with healthy, green leaves and avoid those with signs of disease, discoloration, or pest damage.
- Varying Bloom Stages: Aim for a mix of zinnias at different stages of blooming. This will provide a dynamic range of open flowers, partially open buds, and tight buds, adding visual interest and prolonging the lifespan of your arrangement.
- Size and Shape: Consider the size and shape of the zinnias. Select a mix of zinnias with different flower forms, such as single-flowered, double-flowered, or cactus-flowered varieties, to create texture and variety in your bouquet.
By carefully selecting zinnias based on their colors, stem strength, foliage health, bloom stages, and size and shape, you’ll be able to create visually stunning arrangements that will bring joy and beauty to any space. Now that you know how to choose the right zinnias, let’s move on to preparing them for the vase.
Preparing the Zinnias for Vase
Properly preparing zinnias before placing them in a vase is crucial for maximizing their vase life and ensuring they stay fresh and vibrant. Follow these steps to prepare your zinnias:
- Choose the Right Time: Harvest your zinnias in the morning when the temperatures are cooler and the plants are well-hydrated. This will help the flowers retain moisture and prolong their vase life.
- Trim the Stems: Using sharp pruning shears or clean scissors, trim the zinnia stems at a 45-degree angle. This angled cut increases the surface area for water absorption.
- Remove Excess Foliage: Strip off any leaves that will be submerged in the water to prevent bacterial growth. Keep a few leaves near the top of the stem for aesthetic purposes.
- Condition the Zinnias: Immediately after cutting, place the zinnias in a bucket filled with room temperature water. Let them sit in the water for a few hours to allow the stems to hydrate and the flowers to fully open.
- Add Flower Preservative: Consider using a flower preservative in the water to nourish the zinnias and prolong their vase life. Follow the instructions on the preservative packaging for the correct dosage.
By following these steps, you’ll ensure that your zinnias are well-prepared for their journey from the garden to the vase. Now that your zinnias are ready, it’s time to delve into the cutting process. Let’s explore the step-by-step guide on how to cut zinnias for a vase.
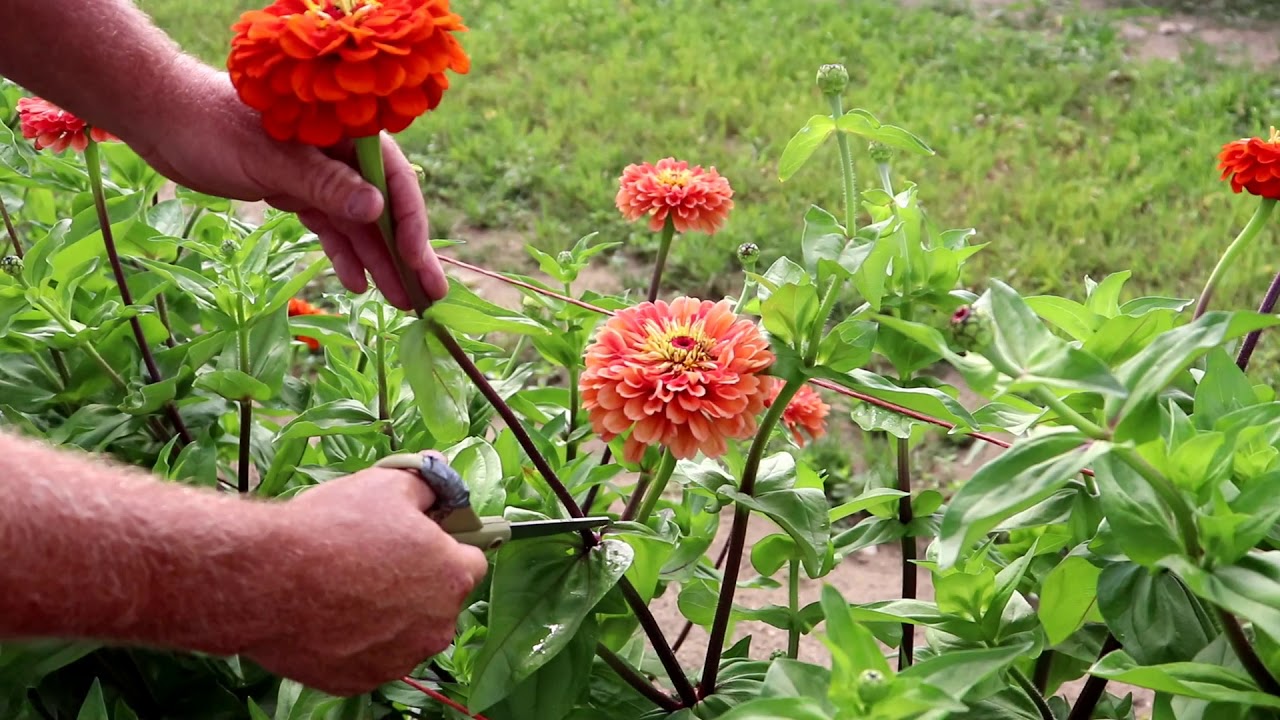
The Cutting Process: Step-by-Step Guide
Cutting zinnias for a vase may seem simple, but following the right techniques can make a significant difference in the longevity of your floral arrangements. Here’s a step-by-step guide to help you cut zinnias effectively:
- Gather Your Tools: Before you begin, ensure that you have all the necessary tools, including sharp pruning shears, a clean bucket filled with room temperature water, and a water-filled vase.
- Select the Right Zinnias: Choose fully bloomed zinnias with vibrant colors and sturdy stems. Look for zinnias with mid-length stems, around 6 to 8 inches long, for easier arranging.
- Prepare Your Pruning Shears: Make sure your pruning shears are clean and sharp. This will ensure a clean cut and minimize the risk of damaging the zinnias.
- Trim the Stems: Using your pruning shears, make a 45-degree angled cut on each zinnia stem, about half an inch above a set of leaves or a leaf node. This angled cut increases the surface area for water absorption.
- Remove Excess Foliage: Strip off any leaves that will be below the water level in the vase. Leaving a few leaves near the top of the stem can add a touch of greenery to the arrangement.
- Place Zinnias in Water: Immediately after cutting, transfer the zinnias to a clean bucket filled with room temperature water. Let them sit in the water for a few hours to fully hydrate and open up.
- Conditioning Period: After the zinnias have rested in water, you can transfer them to a water-filled vase with flower preservative added. Allow the zinnias to rest in the vase for a few more hours before arranging them.
- Arrange and Enjoy: Once the zinnias are properly conditioned, you can arrange them in your desired vase. Get creative with your arrangements by mixing zinnias with other flowers or adding greenery for a more dynamic display.
By following these step-by-step instructions, you can ensure that your zinnias are cut and prepared in a way that enhances their longevity and visual appeal. Now that you know how to cut zinnias, let’s explore some tips for extending their vase life.
Tips for Extending the Vase Life of Zinnias
To maximize the vase life of your zinnias and keep them looking fresh and vibrant for as long as possible, follow these helpful tips:
- Keep the Water Clean: Change the water in the vase every two to three days to prevent the growth of bacteria. Rinse the vase thoroughly and refill it with fresh room temperature water.
- Trim the Stems: Every time you change the water, trim the zinnia stems by about an inch to promote better water absorption. Make sure to use clean sharp pruning shears or scissors for the cuts.
- Remove Wilting Flowers: Regularly remove any wilting or faded zinnias from the arrangement. These flowers can release ethylene gas, which accelerates the aging process of the other blooms.
- Avoid Direct Sunlight and Heat: Place the vase of zinnias in a cool area away from direct sunlight and heat sources. Exposure to strong sunlight and warmth can cause the flowers to wilt and fade more quickly.
- Avoid Drafts and Air Conditioning: Zinnias are sensitive to drafts and sudden temperature changes. Keep the vase away from air vents, open windows, and areas with strong air conditioning to prevent premature wilting.
- Position the Arrangement Carefully: Avoid placing the vase of zinnias near ripening fruits, as fruits release ethylene gas, which can shorten the flower’s vase life. Keep the zinnias away from any potential sources of ethylene gas.
- Refresh the Water and Preservative: When changing the water, add fresh flower preservative according to the instructions. The preservative provides essential nutrients and helps prevent the growth of bacteria, keeping the zinnias fresh for longer.
- Mist the Flowers: If your zinnias begin to look droopy, you can mist them lightly with water to rehydrate the petals and revive their appearance. Be careful not to mist excessively, as this can lead to mold or mushy flowers.
By following these tips, you can significantly extend the vase life of your zinnias, allowing you to enjoy their beauty for an extended period. Now that you know how to keep your zinnias fresh, let’s discuss some common mistakes to avoid.
Common Mistakes to Avoid
When cutting zinnias for a vase, it’s important to be aware of common mistakes that can hinder their longevity and overall appearance. By avoiding these mistakes, you can ensure that your zinnias stay fresh and vibrant for as long as possible. Here are some common mistakes to watch out for:
- Using Dull or Dirty Tools: Using dull or dirty pruning shears can result in jagged cuts and damage to the zinnias. Make sure to use sharp and clean tools to make clean cuts and avoid introducing bacteria to the flowers.
- Skipping the Conditioning Period: Conditioning zinnias by allowing them to rest in water for a few hours after cutting is crucial for hydration and optimal vase life. Skipping this step can cause the flowers to wilt prematurely.
- Overcrowding the Vase: Overcrowding the vase with too many zinnias can restrict air circulation and promote the buildup of bacteria. This can lead to a shorter vase life for the flowers. Make sure to leave enough space between each stem.
- Neglecting Water Changes: Failing to change the water regularly can result in the growth of bacteria, leading to wilted and shorter-lived zinnias. Change the water every two to three days to keep it fresh and clean.
- Placing Zinnias in Direct Sunlight or Heat: Exposing zinnias to direct sunlight or heat sources can cause them to wilt and fade more quickly. Choose a cool and shaded location for the vase to prolong the freshness of the flowers.
- Ignoring Ethylene Gas Sources: Zinnias are sensitive to ethylene gas, which is emitted by ripening fruits. Placing the vase near fruits can accelerate the aging process of the zinnias. Keep the zinnias away from ethylene-producing sources.
- Skipping Stem Trimming: Neglecting to trim the zinnia stems regularly can lead to poor water uptake and reduced vase life. Trim the stems each time you change the water to ensure optimal hydration and nutrient absorption.
- Not Monitoring for Wilting Flowers: Leaving wilting or faded zinnias in the arrangement can release ethylene gas and hasten the deterioration of the other fresh flowers. Remove any wilting flowers promptly to extend the vase life of the zinnias.
By avoiding these common mistakes, you can ensure that your zinnias maintain their beauty and freshness for an extended period. Now that you’re aware of what to avoid, let’s explore some ideas for arranging zinnias in a vase.
Ideas for Arranging Zinnias in a Vase
Arranging zinnias in a vase allows you to showcase their vibrant colors and create stunning floral displays. Whether you prefer simple elegance or playful designs, here are some ideas to inspire your zinnia arrangements:
- Monochromatic Beauty: Create a visually striking arrangement by grouping zinnias of the same color together. Choose a single shade, such as various hues of pink, to create a monochromatic bouquet that exudes elegance and sophistication.
- Colorful Mix: Combine zinnias in different colors for a vibrant and cheerful arrangement. Mix and match complementary colors, such as orange and blue or yellow and violet, to create a stunning contrast that will catch the eye.
- Wild and Whimsical: Embrace the natural, wild beauty of zinnias by arranging them in a loose and untamed style. Allow the flowers to flow organically, varying the heights and angles to create a whimsical, garden-inspired display.
- Play with Texture: Incorporate different zinnia varieties with varying flower shapes and textures. Combine single-flowered zinnias with double-flowered or cactus-flowered varieties to add depth and texture to your arrangement.
- Introduce Greenery: Enhance the beauty of zinnias by including greenery in your arrangement. Add sprigs of foliage, such as eucalyptus or ferns, to provide a contrasting backdrop and add a touch of lushness.
- Single Stem Statements: For a minimalist and modern look, display a single zinnia stem in a slender, tall vase. Allow the beauty of the individual flower to take center stage and create a focal point in any room.
- Mixed Blooms: Combine zinnias with other types of flowers for a diverse and captivating bouquet. Pair zinnias with blooms like daisies, sunflowers, or cosmos to create a delightful mix of colors, shapes, and textures.
- Bouquet of Zinnia Varieties: Showcase the versatility of zinnias by arranging a bouquet with multiple zinnia varieties. Mix single-flowered, double-flowered, and cactus-flowered zinnias to create a captivating display of shapes and colors.
These ideas are just a starting point — feel free to get creative and experiment with different arrangements that suit your personal style and the occasion. Zinnias offer endless possibilities for creating stunning floral displays that will brighten any space. Now that you have some inspiration for arranging zinnias, let’s explore harvesting zinnia seeds for future plantings.
Harvesting Zinnia Seeds
Harvesting zinnia seeds is a rewarding way to preserve and propagate your favorite zinnia varieties for future plantings. By collecting seeds from your zinnias, you can continue to enjoy their beautiful blooms year after year. Here’s a guide on how to harvest zinnia seeds:
- Allow the Flowers to Mature: Leave a few zinnia flowers on the plant until they fully mature, and the petals start to fade and dry. This indicates that the seeds inside the flowerheads are developing.
- Remove the Flowerheads: Once the zinnia flowerheads are dry and crispy, gently remove them from the plants. You can cut the stems with pruning shears, leaving a few inches of stem attached to the flowerhead for easier handling.
- Place the Flowerheads in a Paper Bag: Put the zinnia flowerheads inside a paper bag or envelope to continue drying. Label the bag with the zinnia variety and the date of collection to keep track of the seeds.
- Allow for Complete Drying: Hang the paper bag in a cool, well-ventilated area, and allow the flowerheads to dry completely. This process typically takes a couple of weeks, during which the remaining moisture in the flowerheads will evaporate.
- Separate the Seeds: Once the flowerheads are completely dry, gently rub or crush them to release the zinnia seeds. Be careful not to damage the seeds in the process. Remove any chaff or debris from the seeds.
- Store the Seeds: Place the cleaned zinnia seeds in a labeled envelope or airtight container. Store them in a cool, dry, and dark location, such as a seed tin or glass jar, until you’re ready to plant them.
- Ensure Proper Labeling: Label each envelope or container with the zinnia variety, the date of collection, and any other necessary information. This will help you keep track of the seeds and their specific characteristics.
By following these steps, you’ll be able to harvest zinnia seeds successfully and preserve your favorite zinnia varieties for future plantings. Remember to store the seeds properly to maintain their viability. Enjoy the process of collecting and saving zinnia seeds, and look forward to planting them in your garden for beautiful displays in the seasons to come.