
Different Types of Picture Frames
A picture frame serves as both a protective barrier and a decorative element for displaying your cherished photographs and artwork. There are various types of picture frames available, each with its own unique characteristics and appeal. Understanding the different types can help you choose the perfect frame for your style and purpose.
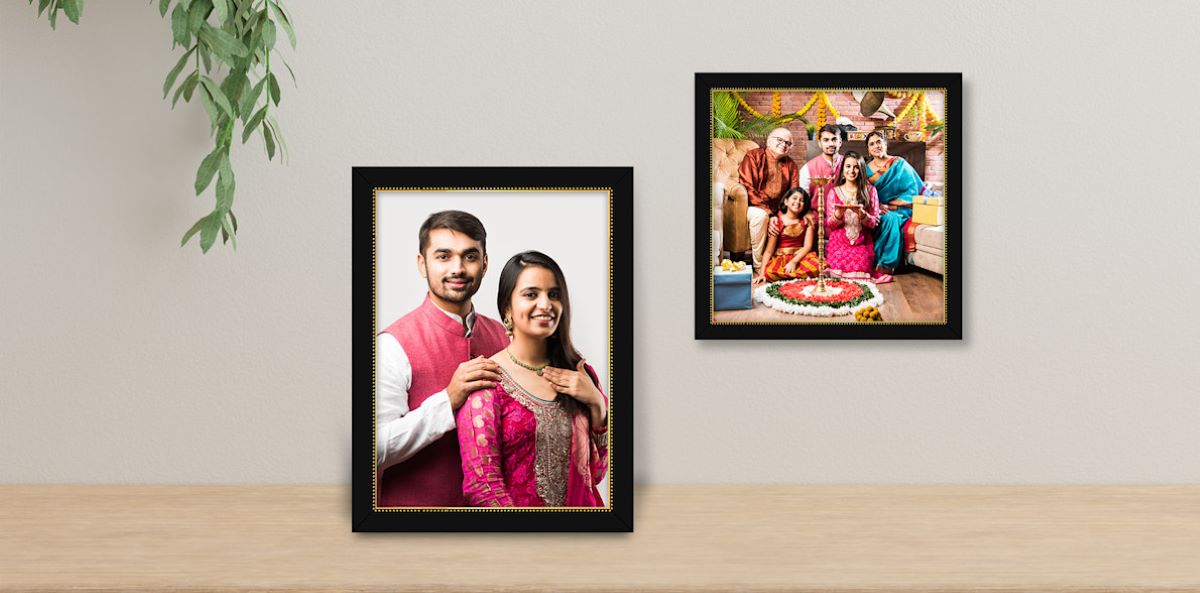
1. Traditional Frames: These frames are timeless classics that add elegance and sophistication to any space. Typically made of wood or metal, traditional frames feature intricate designs and ornate details. They are perfect for displaying formal portraits or vintage artwork.
2. Modern Frames: Minimalistic and sleek, modern frames are characterized by clean lines and contemporary designs. Often made of materials like acrylic, aluminum, or glass, modern frames provide a fresh and minimalist aesthetic that complements modern and minimalist decor.
3. Rustic Frames: If you’re a fan of a cozy and rustic ambiance, then rustic frames are the way to go. Made from reclaimed wood or distressed materials, these frames add a touch of warmth and nostalgia to your pictures. They are perfect for displaying nature-themed or vintage photographs.
4. Collage Frames: Collage frames allow you to display multiple photos in a single frame, creating a visually appealing arrangement. They come in various layouts and designs, allowing you to create a unique collage of your favorite memories.
5. Shadow Box Frames: Shadow box frames showcase three-dimensional objects or collections. With a depth that allows for items to be displayed in layers, shadow box frames are perfect for displaying cherished mementos, medals, or even dried flowers.
6. Digital Frames: Embracing technology, digital frames offer a contemporary and dynamic way to display your photos. These frames use an LCD screen to cycle through a slideshow of your digital images, bringing your pictures to life.
7. Floating Frames: Floating frames give the illusion that your photos are hovering within the frame. This modern and unique style is achieved by suspending the image between two clear panes of glass or acrylic, creating an eye-catching effect.
8. Magnetic Frames: Magnetic frames offer a hassle-free way to display your photos. These frames utilize small magnets to hold your picture in place, making it easy to switch out and update your photos as often as you like.
Choosing the right type of picture frame is not only about protecting your artwork; it’s also about enhancing its visual impact. Consider the style of your space and the message you want to convey through your photos when selecting the perfect frame.
Materials Used in Picture Frames
Picture frames are available in a wide range of materials, each providing their own unique appearance and durability. The choice of material for your picture frame can significantly impact how your artwork or photographs are showcased. Here are some commonly used materials in picture frame construction:
1. Wood: Wood frames are classic and versatile, offering a timeless aesthetic. The type of wood used can range from oak, maple, walnut, to exotic woods like mahogany or bamboo. Wooden frames are sturdy and can be stained, painted, or left in their natural finish to match any decor style.
2. Metal: Metal frames, such as aluminum or stainless steel, are popular for their sleek and contemporary look. They are lightweight and resistant to warping or humidity. Metal frames are commonly used for modern or industrial-themed settings, providing a distinct and minimalist appeal.
3. Plastic: Plastic frames, often made of high-quality acrylic or polystyrene, are lightweight and affordable. They come in various colors and finishes, making them a popular choice for more casual or temporary displays. Plastic frames are less prone to breakage and ideal for environments with children or high traffic areas.
4. Glass: Glass frames are a classic choice that provides a clear and pristine viewing experience. They can be plain glass or beveled for added elegance. Glass frames are a popular choice for displaying prestigious artwork or photographs thanks to their ability to enhance colors and details.
5. Metal and Glass Combination: Some frames combine metal with glass panels to offer a contemporary and sleek look. These frames may use metal as the main structure, while the photo is held between two panes of glass, creating a floating effect.
6. Composite Materials: Composite frames are made from a combination of materials, such as wood particles or recycled fibers, mixed with adhesives. They are lightweight, durable, and affordable, offering a variety of finishes to mimic the look of natural wood grains.
7. Leather or Fabric: For a unique and luxurious appeal, frames wrapped in leather or fabric are an excellent choice. These frames provide a soft and textured touch, adding warmth and sophistication to any artwork or photographs.
When selecting the material for your picture frame, consider the style of the artwork or photograph, the theme of the space, and your personal preferences. Each material has its own benefits and can significantly contribute to the overall visual impact of your displayed pictures.
Choosing the Right Size Frame
Choosing the correct size frame is crucial in achieving the desired visual impact for your artwork or photographs. A frame that is too small may get lost on the wall, while a frame that is too large can overpower the piece it holds. Here are some tips to help you choose the right size frame:
1. Consider the Proportions: Take into account the size of the wall or the space where you plan to hang the picture frame. A large wall may require a bigger frame to fill the space, while a smaller wall may need a more modest-sized frame for proper balance and proportion.
2. Prioritize the Artwork: The size of the frame should complement and enhance the artwork or photo it holds. Consider the subject matter, level of detail, and visual impact of the piece. A smaller and detailed image might benefit from a smaller, more intimate frame, while a large and bold artwork may require a larger frame to make a statement.
3. Measure the Artwork: Before selecting a frame, measure the dimensions of the artwork or photograph accurately. Measure both the height and width, including any borders or matting if applicable. Choose a frame size that provides enough space to showcase the entire piece without cutting off any important elements.
4. Account for Matting: If you plan to use a mat board around your artwork or photo, factor in its width when selecting the frame size. Matting can add visual depth and separation between the image and the frame, and it may require a larger frame to accommodate the additional dimensions.
5. Consider the Overall Display: If you plan to create a gallery wall or display multiple frames together, consider the arrangement as a whole. Determine the spacing between frames and how they will interact with one another. Use masking tape or cut paper to visualize the sizes and proportions of each frame before committing to a final decision.
6. Seek Professional Input: If you are uncertain about choosing the right frame size, consider consulting with a professional framer who can provide guidance and expertise. They can help you select the ideal frame size that suits your artwork, space, and personal preferences.
Remember that choosing the right size frame is not just about the dimensions; it is about creating a harmonious and visually pleasing display. Take your time, explore different options, and consider the overall aesthetics to select a frame that perfectly showcases your artwork or photographs.
Tips for Displaying Pictures in Frames
Displaying pictures in frames can transform your space and showcase your favorite memories and artwork. Here are some tips to help you create an attractive and visually appealing display:
1. Choose a Focal Point: Select a standout photograph or artwork that will serve as the focal point of your display. This piece will anchor the arrangement and draw attention to it.
2. Mix and Match Frames: Create visual interest by using a combination of different frame styles, sizes, and materials. Mix and match frames to add depth and personality to your display. However, ensure there is a cohesive element that ties them all together, such as a common color or theme.
3. Consider the Placement: Pay attention to the location where you plan to display your framed pictures. Consider the lighting, wall color, and surrounding decor. Choose a spot that will allow the frames to be appreciated and complement the overall aesthetics of the room.
4. Play with Arrangements: Experiment with different arrangements before settling on the final layout. Lay the frames on the floor or use painter’s tape to create a mock-up on the wall. Consider the balance of colors, sizes, and shapes to achieve a visually pleasing composition.
5. Create a Grid Layout: For a clean and organized look, arrange the frames in a grid pattern. This style works well with frames of the same size or similar proportions. It creates a structured and modern feel, ideal for showcasing a collection of photographs.
6. Try a Gallery Wall: A gallery wall allows you to display multiple frames in an eclectic and curated arrangement. Mix different sizes and orientations to create visual interest. Start by placing the largest frame in the center and build outwards, adding smaller frames around it.
7. Use Wall Anchors: Ensure that your frames are securely anchored to the wall, especially for larger or heavier pieces. Use wall anchors or hooks that can support the weight of the frames to prevent them from falling or shifting.
8. Keep Frames Level: Use a level or measuring tape to ensure that your frames are straight and aligned. Uneven or crooked frames can detract from the overall display and appear visually distracting.
9. Consider Matting: Matting adds a professional and polished look to framed pictures. It provides a visual separation between the artwork and the frame, enhancing the overall presentation. Choose mat colors that complement the artwork or photographs.
10. Rotate and Update: Don’t be afraid to switch out the images in your frames periodically. Rotate different photos or artwork to keep the display fresh and exciting. This allows you to showcase different memories and artwork and prevents the display from becoming stagnant.
By following these tips, you can create a stunning and visually captivating display of your framed pictures. Let your personal style shine through and be creative in arranging and showcasing your cherished memories and artwork.
Custom Picture Frames
Custom picture frames offer a personalized and unique way to display your artwork and photographs. With a custom frame, you have the freedom to choose the materials, dimensions, and design elements that best suit your style and showcase your pieces. Here are some advantages of opting for custom picture frames:
1. Perfect Fit: One of the biggest advantages of custom frames is that they are made to fit your exact specifications. Whether you have an unusually sized artwork or a specific vision in mind, a custom frame ensures a perfect fit, eliminating the need for additional matting or compromising the integrity of your piece.
2. Material Selection: Custom frames allow you to select the materials that best complement your artwork and space. You can choose from a wide variety of high-quality materials like wood, metal, acrylic, or even unique options like reclaimed barnwood or handmade paper. This gives you the opportunity to enhance the visual appeal and durability of your frames.
3. Design Options: Custom frames offer endless design possibilities. You can select from various finishes, colors, and styles to create a frame that matches your personal taste and the aesthetics of your space. From simple and minimalist to ornate and intricate, the design options are virtually limitless when it comes to custom frames.
4. Preservation and Protection: Custom frames can be tailored to provide additional protection for your artwork. You can choose archival-quality materials to ensure the longevity of your pieces, protecting them from environmental factors such as UV rays or moisture. This is especially important for delicate or valuable artwork that requires special care.
5. Framing Expertise: When you opt for a custom frame, you have access to the expertise of professional framers. They can guide you through the selection process, offer recommendations, and provide valuable insight into the best framing techniques to enhance the presentation of your artwork. Their knowledge and experience can help you achieve the desired look and quality for your frames.
6. Specialized Framing Techniques: Custom framing allows you to incorporate specialized techniques to enhance the visual appeal of your artwork. From float mounting to shadowbox framing, you can choose techniques that create a unique and eye-catching display. These techniques can add depth, dimension, and visual interest to your framed pieces.
7. Emotional Value: Custom frames provide a sense of sentimental value and personal connection. When you invest in a custom frame, you are demonstrating the importance and significance of the artwork or photograph it holds. This adds an extra level of emotional value and appreciation to the piece, making it even more special.
Custom picture frames offer a level of customization and craftsmanship that cannot be achieved with pre-made frames. They allow you to create a truly personalized display that highlights the uniqueness of your artwork and photographs. Whether it’s for your home, gallery, or a special gift, custom frames elevate the presentation and importance of your treasured pieces.
How to Hang a Picture Frame
Hanging a picture frame properly is essential to ensure that your artwork or photographs are securely displayed and visually appealing. Follow these steps to hang a picture frame with precision:
1. Prepare the Wall: Start by preparing the wall where you plan to hang the picture frame. Clean the surface to remove any dust or debris, and consider using a stud finder to locate any wall studs. If you’re unable to find a stud, use wall anchors or toggles to ensure a secure hold.
2. Arrange the Frames: If you’re hanging multiple frames, lay them out on the floor or a large table to determine the desired arrangement. This will help you visualize how the frames will look together and make any necessary adjustments before hanging.
3. Measure and Mark: Use a tape measure to determine the desired height for your picture frame. Measure from the floor or from a nearby piece of furniture to ensure proper eye-level placement. Mark the spot lightly with a pencil or painter’s tape.
4. Find the Mounting Point: Determine the mounting point on the back of the frame. Most frames have metal D-rings or wire for hanging. Measure the distance between the mounting points and transfer those measurements to the wall, starting from the mark you made in the previous step.
5. Use a Level: Place a level horizontally or vertically against the wall, aligning it with your marked points. Adjust the positioning until the level indicates that it is straight. This will ensure that your picture frame hangs level on the wall.
6. Install Hanging Hardware: Depending on the type of frame and mounting points, install the appropriate hanging hardware on the wall. This could include picture hooks, nails, screws, or wall anchors. Make sure to follow the manufacturer’s instructions and use the right tools for the job.
7. Hang the Picture Frame: With the hardware in place, carefully hang the picture frame on the wall. If using wire, loop it over the hanging hardware or hooks. For frames with D-rings, place them securely on the hooks or nails.
8. Adjust and Double-Check: Step back and check if the frame is straight and level. Make any necessary adjustments by sliding the frame slightly on the hanging hardware. Use a level again to ensure that the frame is perfectly aligned.
9. Secure the Frame: Once you are satisfied with the position, press the bottom of the frame gently against the wall to prevent it from moving or shifting. This will offer additional stability and ensure that the frame stays in place.
10. Enjoy the Display: Step back and admire your beautifully hung picture frame. Make any final adjustments if needed and then enjoy the visual impact that your framed artwork or photographs add to your space.
Remember to always take proper safety precautions when hanging picture frames. If hanging large or heavy frames, seek assistance or consult a professional to ensure a secure installation. With careful attention to detail, your picture frames will be safely and attractively displayed on your walls.
DIY Picture Frames
Creating your own DIY picture frames is not only a cost-effective alternative but also a creative and rewarding way to showcase your artwork or photographs. With just a few simple materials and some basic tools, you can craft unique frames that reflect your personal style. Here are some ideas and steps to help you get started with DIY picture frames:
1. Choose Your Materials: Decide on the materials you want to use for your frames. You can repurpose old wood, use reclaimed materials, or even experiment with unconventional options like seashells or vintage buttons.
2. Measure and Cut: Measure the dimensions of your artwork or photograph to determine the size of the frame. Use a saw or miter box to cut the material into the desired lengths and angles. Remember to account for the width of the frame when measuring.
3. Sand and Smooth: Use sandpaper to smooth the rough edges and surfaces of the frame. This will give it a polished and professional look. Pay attention to corners and joints to ensure a seamless finish.
4. Add Decorative Touches: Now comes the fun part – adding decorative touches to your DIY frame. You can paint the frame in your favorite color, distress it for a vintage look, or apply patterns or designs using stencils or decoupage. Let your creativity flow!
5. Attach Backing and Glass: Depending on the desired display, attach a backing material to the frame. This can be a piece of cardboard, foam board, or even a wooden panel. You can also add a backing stand to allow the frame to stand on its own. If using glass or acrylic, secure it in place with clips or adhesive.
6. Attach Hanging Hardware: Attach the appropriate hanging hardware to the back of the frame. This can be D-rings, sawtooth hangers, or wire. Ensure that the hardware is securely attached and able to support the weight of the frame and artwork or photograph.
7. Mount Your Artwork: Carefully mount your artwork or photograph in the frame. Use acid-free tape or photo corners to secure the piece in place. Ensure that it is centered and straight within the frame.
8. Hang and Display: Take pride in your DIY creation and hang it on your wall. Use a level to ensure that the frame is straight and aligned. Alternatively, you can display your DIY picture frames on shelves, desks, or any other flat surface.
9. Update and Re-Purpose: DIY picture frames offer the flexibility to switch out and update your artwork or photographs as often as you like. Embrace the opportunity to constantly refresh your display and showcase new items that hold special meaning.
10. Share and Inspire: Share your DIY picture frames with friends and family, and inspire others to unleash their creativity. Encourage them to make their own frames and celebrate the uniqueness and personal touch of DIY craftsmanship.
With DIY picture frames, you can add a personal touch to your displays while expressing your creativity. Enjoy the process of creating something truly one-of-a-kind and admire the beauty of your artwork and photographs within your handmade frames.
How to Care for Picture Frames
Caring for your picture frames is essential to ensure their longevity and preserve the beauty of your displayed artwork or photographs. Proper maintenance and cleaning can help protect the frame materials and maintain their visual appeal. Here are some tips to help you care for your picture frames:
1. Regular Dusting: Dust your picture frames regularly using a soft, lint-free cloth or a feather duster. Gently wipe the surface of the frame to remove any dust or debris that can accumulate over time. This simple step will help keep your frames looking clean and vibrant.
2. Avoid Direct Sunlight: Protect your picture frames from direct sunlight, as prolonged exposure can cause fading and damage. If possible, hang frames away from windows or use UV-protective glass or acrylic to shield your artwork or photographs from harmful UV rays.
3. Handle with Care: When handling your frames, be mindful of applying pressure or placing stress on the corners and joints. Support the frame with both hands to avoid bending or warping the materials. This precaution is especially important for delicate frames made of materials like glass or acrylic.
4. Clean the Glass or Acrylic: If the frame has glass or acrylic covering, clean it periodically to remove fingerprints, smudges, or dust. Use a non-abrasive glass cleaner and a soft microfiber cloth to gently wipe the surface. Ensure that the cleaner is compatible with the frame material to avoid any damage.
5. Avoid Moisture: Protect your picture frames from excessive moisture, as it can cause damage to the frame materials. Avoid hanging frames in damp areas such as bathrooms or basements. If there is a spill, wipe it immediately to prevent any moisture from seeping into the frame.
6. Check for Pest Infestations: Occasionally inspect your picture frames for signs of pest infestations, such as insects or mold. Inspect the back of the frame and the corners for any traces of pests or their droppings. If you notice any signs, take appropriate measures to address the issue promptly.
7. Regularly Inspect Hanging Hardware: Inspect the hanging hardware on your picture frames periodically to ensure that it is secure and in good condition. Check for any signs of wear or damage, such as loose screws or worn-out wire. Make any necessary repairs or replacements to prevent the frame from falling or becoming unstable.
8. Climate Control: Maintain a stable indoor climate to prevent fluctuations in temperature and humidity, as these can adversely affect your picture frames. Extreme temperature changes or high humidity levels can lead to warping, cracking, or discoloration of the frame materials.
9. Rotate Displayed Artwork: To prevent uneven exposure and wear, periodically rotate the artwork or photographs displayed in your frames. This will ensure that all pieces receive equal attention and allow for the preservation of your collection.
10. Seek Professional Assistance: If you have valuable or delicate frames, consider consulting a professional art conservator or framer for specialized care. They can provide expert advice and services to ensure the proper maintenance and preservation of your picture frames.
By following these tips, you can ensure that your picture frames remain in excellent condition and continue to enhance the beauty of your displayed artwork or photographs for years to come.
Selecting the Perfect Mat for Your Picture Frame
Choosing the right mat for your picture frame is an important step in enhancing the overall presentation and impact of your artwork or photographs. A mat not only adds a decorative element but also provides a buffer between the artwork and the glass or acrylic, protecting it from moisture and potential damage. Here are some considerations to help you select the perfect mat for your picture frame:
1. Size and Proportions: Consider the size and proportions of your artwork or photograph when selecting a mat. The mat should provide enough border space around the image to create a visually pleasing effect. Too narrow a mat can make the artwork feel cramped, while too wide a mat can overpower the image.
2. Color and Tone: Choose a mat color that complements the artwork or photograph and enhances its visual impact. Consider the dominant colors and tones in the image, as well as the overall mood or theme. A neutral-colored mat can create a timeless and classic look, while a colored mat can add vibrancy or create a thematic connection.
3. Material Quality: Quality matters when it comes to matting. Select acid-free mats made from archival-quality materials to prevent yellowing, discoloration, and damage to your artwork. Acid-free mats are also less likely to transfer acids onto the image over time, ensuring its long-term preservation.
4. Thickness and Depth: Consider the thickness and depth of the mat when choosing the right framing option. Thicker mats can provide a more substantial and elegant look, while thinner mats create a sleek and minimalist feel. The depth of the mat can create visual depth and separation between the artwork and the frame.
5. Single or Double Mat: Decide whether you prefer a single mat or a double mat for your picture frame. A single mat creates a clean and simple presentation, while a double mat adds depth and a layered effect. Double matting can be particularly effective if you want to highlight certain colors or elements within the artwork.
6. Consider the Environment: Take into account the environment where the framed piece will be displayed. If the artwork or photograph will be exposed to high humidity or moisture, consider using a mat made from moisture-resistant materials. This will help protect the artwork from potential damage caused by humidity.
7. Test Different Options: Before making a final decision, consider testing different mat options on the artwork or photograph. Use colored paper or samples to get an idea of how different mat colors, sizes, and styles will look with your piece. This allows you to visualize the impact of each option and make an informed decision.
8. Seek Professional Advice: If you are unsure about selecting the right mat for your picture frame, consider consulting a professional framer or art conservator. They can provide expert guidance, recommend suitable options based on your artwork, and discuss the different aesthetic and archival considerations.
Choosing the perfect mat for your picture frame requires careful thought and consideration. By selecting the right size, color, material, and style, you can enhance the visual presentation of your artwork or photographs, protect them from damage, and ensure their long-term preservation.
Creative Ways to Use Picture Frames in Home Decor
Picture frames are not just meant for displaying artwork and photographs; they can also be used as versatile and decorative elements in your home decor. Here are some creative ways to incorporate picture frames into your interior design:
1. Gallery Wall: Create a stunning focal point by creating a gallery wall with an array of picture frames. Mix and match different sizes, styles, and colors to create an eclectic and personalized display. Arrange the frames in a grid pattern or create an asymmetrical arrangement for a dynamic and eye-catching look.
2. Mirror Frames: Transform a plain and ordinary mirror by adding a decorative frame around it. Choose a frame that complements your home decor style, whether it’s sleek and modern or ornate and vintage. The framed mirror will not only serve as a functional piece but also add dimension and style to your space.
3. 3D Collage Frames: Instead of displaying flat artwork or photographs, create a 3D collage by arranging objects, mementos, or small keepsakes within a deep picture frame. This can include seashells, pressed flowers, ticket stubs, or any other small items that hold sentimental value. This unique display adds depth and personal touch to your home decor.
4. Chalkboard or Whiteboard Frames: Turn a picture frame into a functional and stylish chalkboard or whiteboard. Simply remove the glass and insert a chalkboard or whiteboard panel cut to the frame’s size. Hang it in your kitchen for notes and recipes or in your home office for reminders and to-do lists.
5. Jewelry Organizer: Use an ornate or decorative picture frame as a jewelry organizer. Remove the glass and insert a piece of mesh or wire within the frame. Hang necklaces, bracelets, and earrings on the mesh or use hooks to hang them from the frame. This not only keeps your jewelry organized but also adds a beautiful and practical element to your vanity or dresser.
6. Floating Shelf Display: Convert a large picture frame into a floating shelf by attaching it securely to the wall with brackets or hooks. This creates a unique and visually interesting way to display small decorative objects, potted plants, or a collection of books. It adds depth and dimension to your wall decor while also providing functional storage space.
7. Window Frame Art: Transform an old wooden window frame into a piece of art by adding colorful stained glass, mirrors, or even framed photographs behind each window pane. Hang it on a wall to create an eye-catching focal point with a vintage and rustic charm.
8. Seasonal Decor: Switch out the artwork or photographs in your frames to reflect the changing seasons or upcoming holidays. Display seasonal greetings, festive decorations, or even pressed leaves and flowers within the frames. This allows you to easily transform your home decor to suit the time of year.
Get creative and think outside the box when it comes to using picture frames in your home decor. By incorporating frames in these unique and imaginative ways, you can showcase your personal style, add visual interest to your space, and create stunning displays that are sure to impress.