
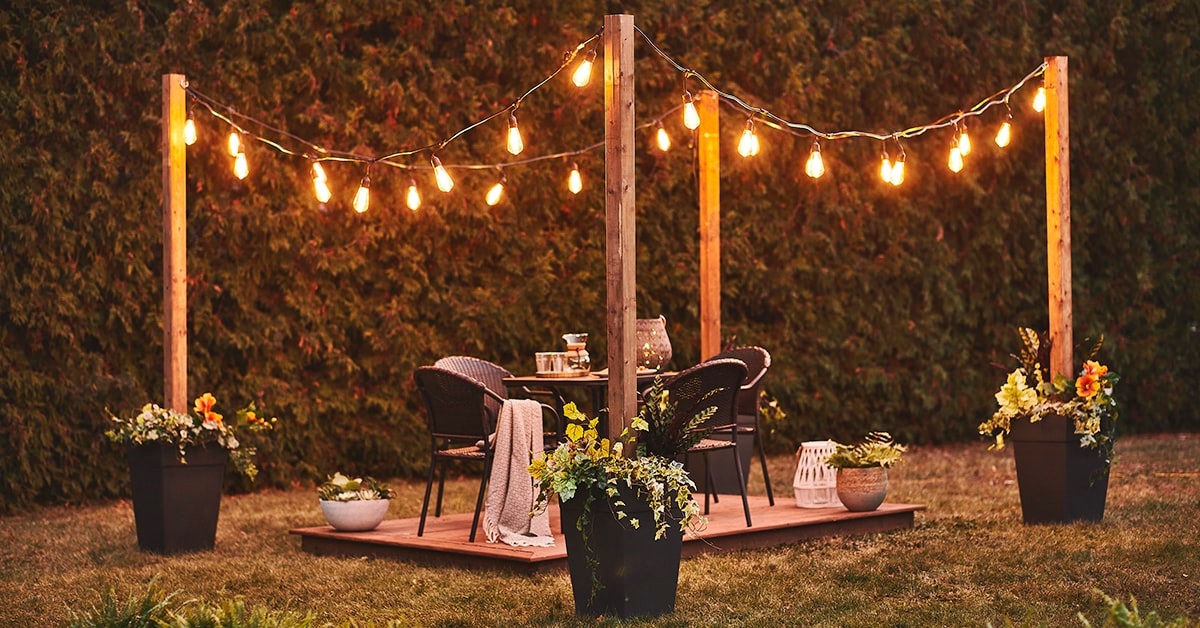
Choosing the Right Location
When it comes to creating a magical ambiance in your outdoor space, string light poles can make all the difference. But before you start digging holes and stringing lights, it’s crucial to choose the right location for your setup. Here are some factors to consider:
- Aesthetics: Take a moment to imagine how the string lights will enhance the overall look and feel of your outdoor area. Consider the architectural elements, existing landscaping, and any focal points you want to highlight. Ideally, the location should have enough open space to allow the lights to create a stunning visual display.
- Functionality: Think about how you intend to use the space. Are you planning to entertain guests, create a cozy reading nook, or simply add a touch of enchantment to your backyard? The location should cater to the specific purpose and align with the activities you envision.
- Accessibility: Ensure that the chosen area is easily accessible for installation and maintenance purposes. You’ll want to have convenient access to power sources, as well as the ability to reach the poles for bulb replacements or adjustments if needed.
- Weather Considerations: Assess how the location is exposed to the elements. Will the string lights be protected from heavy rain, strong winds, or excessive sunlight? Taking these factors into account will help prolong the lifespan of the lights and ensure a safe and enjoyable experience.
Remember, your goal is to create an inviting and captivating atmosphere, so choose a location that enhances the overall ambiance of your outdoor space. By giving careful thought to aesthetics, functionality, accessibility, and weather conditions, you can select the perfect spot to install your string light poles.
Gathering Supplies and Materials
Before you can start the installation process, it’s important to gather all the necessary supplies and materials. Having everything prepared in advance will make the process smoother and more efficient. Here’s a list of what you’ll need:
- String Lights: Choose high-quality outdoor string lights that are specifically designed for outdoor use. Look for durable and weather-resistant options that can withstand exposure to the elements.
- Poles: Select sturdy and durable poles that will support the weight of the string lights. Aluminum or steel poles are recommended for their strength and stability. Consider the desired height and overall aesthetics when choosing the length and design of the poles.
- Concrete Mix: You’ll need concrete mix to secure the poles firmly in the ground. Opt for a quick-setting concrete mix that will provide stability and durability. Follow the manufacturer’s instructions for mixing and pouring the concrete.
- Digging Tools: Depending on the type of terrain in your outdoor area, you may need a shovel, post hole digger, or auger to dig the holes for the poles. Choose tools that are appropriate for your specific soil conditions.
- Level: A level is essential for ensuring that the poles are straight and aligned properly. A bubble level or laser level will help you achieve the desired levelness of the poles.
- Electrical Components: If your string lights require electricity, you’ll need electrical wires, connectors, and a power source. Consult with a professional electrician for proper installation and safety measures.
- Safety Equipment: It’s important to prioritize your safety. Wear gloves, safety glasses, and appropriate clothing while handling tools, materials, and electrical components.
By gathering all the necessary supplies and materials beforehand, you’ll be well-prepared to start the installation process. Double-check your list and ensure that everything is in order. This will save you time and frustration as you embark on creating your beautiful string light pole setup.
Preparing the Ground
Before you can begin installing your string light poles, it’s essential to prepare the ground where they will be placed. Proper ground preparation ensures stability and longevity for your setup. Here are the steps to follow:
- Clean the Area: Start by clearing the area of any debris, rocks, or plants that may hinder the installation process. A clean and level surface will make it easier to set the poles securely.
- Mark the Pole Locations: Use stakes or markers to indicate where each pole will be placed. Measure and mark the desired distance between poles, ensuring that it is consistent throughout the setup. This will help maintain a uniform and visually appealing look.
- Check for Underground Utilities: Before digging, it’s crucial to check for any underground utilities like water lines, gas lines, or electrical cables. Contact your local utility companies to mark the locations of these lines. This will prevent accidental damage and ensure your safety.
- Determine Hole Depth: The depth of the holes will depend on the height and stability you desire for your string light poles. Typically, a hole depth of about one-third of the pole height is sufficient. However, consider your local soil conditions and consult any applicable building codes for specific guidelines.
- Loosen the Soil: Using a shovel or post hole digger, dig the holes according to the marked locations. Loosen the soil and remove any large rocks or obstacles that may interfere with the installation process.
- Level the Ground: Ensure that the ground is level and even where the poles will be placed. Use a level tool to check for any sloping or unevenness. This step is crucial for the stability and proper alignment of the poles.
By adequately preparing the ground, you can ensure a solid foundation for your string light poles. Taking the time to clear the area, marking the pole locations, checking for underground utilities, determining the hole depth, and leveling the ground will contribute to a successful and visually appealing installation process.
Measuring and Marking the Poles
Accurate measurements and precise marking are critical when installing string light poles. This will ensure that the poles are evenly spaced and aligned, resulting in a visually pleasing display. Here’s how to measure and mark the poles:
- Measure the Height: Decide on the desired height for your string light poles. Take into consideration the overall aesthetic and functionality you want to achieve. Use a measuring tape or ruler to measure the desired height from the ground up for each pole.
- Mark the Poles: Once you have determined the height, mark each pole accordingly using a pencil or marker. Make sure the marking is clearly visible and won’t smudge easily during the installation process.
- Measure the Distance: Decide on the spacing between each pole. This will depend on your personal preference, but generally, a distance of 8-10 feet between poles creates a balanced and visually pleasing effect. Measure and mark the designated distance on the ground where each pole will be placed.
- Adjust for Straight Alignment: To ensure the poles are aligned in a straight line, you can use a string or a long, straight board as a guide. Stretch the string tightly along the ground and align it with the pole markings. Make any necessary adjustments to ensure a straight line before proceeding.
- Mark the Wire Path: If you plan to conceal the wires, mark the path where they will be routed. This will help you properly position the poles and plan for any necessary trenching or wire concealing methods.
By carefully measuring and marking the poles, you can achieve a well-planned and visually appealing string light setup. Take the time to accurately measure the height and distance, mark the poles clearly, and adjust for straight alignment. This attention to detail will make the installation process smoother and help create a stunning result.
Digging the Holes
Now that you have measured and marked the locations for your string light poles, it’s time to dig the holes. Proper hole digging ensures stability and secure installation of the poles. Follow these steps to dig the holes:
- Choose the Right Tools: Depending on the soil type and the size of the holes, select the appropriate digging tools. A post hole digger or an auger is commonly used for this task. Ensure that the tools are sturdy and in good condition.
- Start Digging: Begin by breaking the ground’s surface with the digging tool. Insert the tool into the marked location and work it into the soil, digging deeper as you go. Remove the loosened soil and debris from the hole.
- Check Depth and Width: Periodically measure the depth of the hole to ensure it matches your desired specifications. Use a tape measure or a long rod to gauge the depth. Additionally, check the width of the hole to ensure it is wide enough to accommodate the pole’s diameter.
- Remove Obstacles: While digging, you may encounter rocks, tree roots, or other obstacles. Clear these obstructions from the hole to create a smooth and even surface for the pole. This will help stabilize the pole and prevent any shifting or tilting.
- Smooth the Bottom: Once the hole has reached the desired depth, use the digging tool to smooth out the bottom surface. This will ensure a stable base for the pole and help distribute the weight evenly.
- Repeat for Remaining Holes: Follow the same process of digging for each marked location. Take your time to ensure that each hole is dug to the proper dimensions and free from any obstructions.
Remember to take appropriate safety precautions while digging, such as wearing gloves and using proper body mechanics to avoid strain or injury. By following these steps and taking the time to dig the holes with care, you’ll create a solid foundation for your string light poles.
Setting the Poles
With the holes dug and prepared, it’s time to set the poles for your string lights. This step is crucial for the stability and proper alignment of the setup. Follow these guidelines to successfully set the poles:
- Position the Poles: Carefully place each pole into its corresponding hole, aligning it with the marked location. Ensure that the pole is standing straight and upright.
- Check Alignment: Use a level to check the alignment of the pole. Adjust it as necessary to ensure that it’s perfectly vertical, both in terms of side-to-side and front-to-back alignment. This will ensure that your string lights hang evenly and look visually appealing.
- Fill the Holes: Once the poles are properly aligned, fill the holes with quick-setting concrete mix. Follow the manufacturer’s instructions for the correct ratio of water and mix, and pour it into the hole around the pole. Use a shovel or trowel to ensure that the concrete fills the hole evenly and completely.
- Stabilize the Poles: While the concrete is setting, ensure that the poles remain in their desired position. Use props or braces to provide additional support and prevent any shifting or tilting of the poles during the curing process.
- Allow for Curing: Give the concrete ample time to cure based on the manufacturer’s instructions. This typically takes 24 to 48 hours. Avoid placing any stress or weight on the poles during this period to prevent damage to the newly set poles.
- Remove Braces and Props: Once the concrete has fully cured, carefully remove the braces or props that were supporting the poles. Check the stability and firmness of the poles to ensure they are securely set and ready for the next steps.
By setting the poles carefully and allowing the concrete to cure properly, you will create a solid foundation for your string light setup. Take your time to align the poles, fill the holes with concrete, and provide necessary support during the curing process. This will ensure a stable and visually appealing installation.
Securing and Leveling the Poles
Once your string light poles are set in place, the next step is to secure and level them. This will ensure that the poles remain stable and straight, providing a solid foundation for your string lights. Follow these steps to secure and level the poles:
- Tighten Pole Anchors: If your poles have built-in anchors or brackets, make sure they are securely fastened to the poles. Use the appropriate tools to tighten any screws or bolts, ensuring that the poles are firmly attached to the anchors.
- Check for Stability: Give each pole a gentle shake to check for any wobbling or instability. If you notice any movement, it may indicate that the pole’s base is not secure. To fix this, consider adding additional concrete around the base or adjusting the placement of the pole to ensure a stable position.
- Level the Poles: Use a level tool to ensure that each pole is perfectly level. Place the level horizontally or vertically against the pole, adjusting the position until the bubble is centered. This step is crucial for achieving a visually appealing and professional-looking installation.
- Adjust with Shims: If any of the poles are not perfectly level, use shims to make necessary adjustments. Place the shim beneath the pole’s base until it reaches the desired levelness. Repeat this process for each pole that requires adjustment.
- Secure with Additional Concrete: If needed, add more concrete around the base of the poles to provide extra stability. Mix the concrete according to the manufacturer’s instructions and pour it carefully around the base, ensuring that it fills any gaps and supports the pole.
- Check Alignment: Re-check the alignment of the poles to ensure they are still straight and evenly spaced. Make any final adjustments if needed to maintain a visually pleasing setup.
By securing and leveling the poles, you will ensure their stability and create a professional-looking string light installation. Carefully tighten the pole anchors, check for stability, level the poles, adjust with shims if necessary, and secure with additional concrete as needed. Taking these steps will provide a solid and level base for your string light setup.
Installing the String Lights
Now comes the exciting part – installing the string lights onto your newly set poles. Proper installation of the string lights will ensure a stunning and captivating display. Follow these steps to install the lights:
- Unroll and Inspect the Lights: Carefully unroll the string lights and inspect them for any damaged bulbs or wires. Replace any faulty bulbs or repair any damaged sections before proceeding with the installation.
- Start at One End: Begin at one end of the setup and attach the lights to the first pole. Depending on the type of string lights you have, there may be clips, hooks, or ties that allow you to easily secure the lights to the pole.
- Follow the Desired Pattern: As you move along the poles, follow the desired pattern for your string lights. You can opt for a straight line, crisscross pattern, or any other creative arrangement that suits your aesthetic preference.
- Secure the Lights: Make sure the lights are securely attached to each pole as you go. Ensure that they are evenly spaced and hang taut to create a polished and professional look.
- Test the Lights: Before completely finishing the installation, take a moment to test the lights. Plug them into a power source and ensure that all the bulbs are working properly. Make any necessary replacements or adjustments if you detect any issues.
- Continue Installing and Connecting: Repeat the process of attaching and securing the lights to each pole until you reach the end of the setup. Connect and extend the lights as necessary to achieve the desired length and coverage for your outdoor space.
By carefully installing the string lights onto your poles, you will create a captivating and enchanting ambiance. Take your time to unroll and inspect the lights, start at one end, follow the desired pattern, secure the lights, test for functionality, and continue installing until the entire setup is complete. This meticulous installation process will ensure a beautiful display that will light up your outdoor area.
Concealing the Wires
While the string lights themselves create a stunning visual effect, it’s also important to consider how to conceal the wires for a seamless and polished look. Concealing the wires not only enhances the overall aesthetic appeal but also reduces the risk of tripping hazards. Here are some methods to effectively conceal the wires:
- Use Outdoor Extension Cords: Consider using outdoor extension cords that are specifically designed for outdoor use. These cords are weather-resistant and can withstand exposure to the elements, ensuring the safety and longevity of your string light setup.
- Utilize Festoon Lighting Cable: Festoon lighting cable is a solution specifically designed for outdoor string lights. It consists of a heavy-duty cable that spans between the poles, providing a secure and neat path for the wires. This cable is available in various lengths and can be easily attached or suspended between the poles.
- Bury the Wires: If your setup allows for it, you can bury the wires underground. Dig a shallow trench or groove along the desired wire path and carefully place the wires inside. Cover the trench with soil or landscape materials to conceal the wires while still allowing easy access for maintenance or future adjustments.
- Use Wire Clips and Hooks: Wire clips and hooks can be attached to the poles to hold the wires neatly in place. These accessories are designed to secure the wires without causing damage or interfering with the functionality of the string lights.
- Camouflage with Foliage: Another creative option is to use foliage or outdoor plants to camouflage the wires. Strategically place potted plants or hanging baskets near the poles to hide the wires. Ensure that the plants are not obstructing the string lights or posing a risk of fire hazard.
- Consult with a Professional: If you are unsure about the best method to conceal the wires or if you require a more complex installation, it’s recommended to consult with a professional electrician or lighting specialist. They can provide expert guidance and ensure that the wiring is set up safely and efficiently.
By effectively concealing the wires, you will achieve a clean and polished look for your string light installation. Whether you choose to use outdoor extension cords, festoon lighting cable, bury the wires, utilize wire clips and hooks, or camouflage with foliage, there are various options available to suit your preferences and needs. Consider the specific requirements of your outdoor space and choose the method that best enhances the overall aesthetic of your string light poles.
Testing the Lights and Final Touches
Once you have installed and concealed the wires for your string light poles, it’s crucial to test the lights and add any final touches to perfect the setup. This step ensures that your string lights are functioning correctly and that the overall ambiance meets your expectations. Follow these guidelines for testing the lights and adding final touches:
- Plug in the Lights: Connect the string lights to a power source and plug them in. Ensure that the bulbs light up properly and create the desired ambiance. Take a moment to admire the overall effect and make any necessary adjustments if needed.
- Check for Consistency: Walk around the area and observe the overall consistency of the light display. Ensure that the spacing between the bulbs is uniform and that there are no dim or flickering lights. If you notice any issues, troubleshoot and replace any faulty bulbs or address any wiring concerns.
- Add Decorative Elements: Consider adding additional decorative elements to enhance the overall aesthetic of your string light setup. This could include hanging lanterns, decorative flags, or outdoor artwork that complements the lights and adds a personal touch to your outdoor space.
- Adjust the Height: If necessary, make any adjustments to the height of the poles. Depending on the specific lighting effect you desire, you may need to raise or lower the poles to achieve the optimal positioning and visual impact.
- Secure Loose Cords: Double-check that all cords and wires are securely fastened and not dangling or creating a tripping hazard. Use cable ties or wire clips to tidy up any loose cords along the poles for a neater appearance.
- Consider Timers or Dimmers: To enhance convenience and flexibility, you may want to incorporate timers or dimmers for your string lights. This allows you to easily control the brightness and duration of the lights, saving energy and providing effortless operation.
- Enjoy the Ambiance: Finally, step back and appreciate the beautiful ambiance you have created with your string light poles. Spend some time in your outdoor space and enjoy the magical and cozy atmosphere that the lights provide. Share this enchanting experience with family and friends during social gatherings or simply revel in the tranquility of your illuminated outdoor oasis.
By testing the lights, making final adjustments, and adding personal touches, you ensure that your string light poles create the desired effect and atmosphere. Pay attention to consistency, add decorative elements, adjust the height if needed, secure loose cords, and consider implementing timers or dimmers for added convenience. Once everything is in place, sit back and enjoy the delightful ambiance that your string light poles bring to your outdoor space.