
Choosing the right materials
When it comes to creating a handprint ornament, choosing the right materials is crucial. The materials you use will not only determine the final look of the ornament but also its durability and longevity. Here are some tips on selecting the right materials for your handprint ornament:
- Clay or dough: The first decision you need to make is whether you want to use clay or dough for your handprint ornament. Clay offers a more permanent option and can be baked to harden. On the other hand, dough is easier to work with and is a great choice for temporary ornaments.
- Type of clay: If you decide to go with clay, consider the type of clay you want to use. Air-dry clay is convenient as it doesn’t require baking, but it may not be as durable as oven-bake clay. Choose a clay that suits your preferences and the level of durability you desire.
- Dough recipe: If you opt for dough, there are various recipes available. Salt dough is a classic choice, made with just flour, salt, and water. Alternatively, you can explore other recipes that incorporate ingredients like cornstarch, cream of tartar, or even applesauce for added texture and scent.
- Coloring options: Consider whether you want to keep the ornament natural or add colors. If you prefer a natural look, choose a clay or dough that dries with a light or neutral shade. However, if you want to add colors, look for clay or dough that can be painted or colored after it has dried or been baked.
- Other embellishments: Think about any additional embellishments you may want to use, such as glitter, beads, or ribbons. These can add a touch of sparkle or personalization to your handprint ornament.
By taking the time to carefully choose the right materials for your handprint ornament, you can ensure that the final result is not only visually appealing but also long-lasting. Keep in mind your preferences, the level of durability you desire, and any additional embellishments you’d like to include. With the right materials, you’ll be on your way to creating a beautiful and memorable handprint ornament.
Preparing your work area
Before you begin making your handprint ornament, it’s important to prepare your work area to ensure a smooth and enjoyable crafting experience. Taking the time to set up your workspace properly will help you stay organized and make the process easier. Here are some steps to follow when preparing your work area:
- Clean and clear: Start by cleaning your work surface to remove any dirt or debris. Clear away any unnecessary items to create a clutter-free space that allows you to move around freely.
- Protective covering: To prevent any damage or staining of your work surface, place a protective covering like a plastic tablecloth or parchment paper. This will also make cleanup easier.
- Gather your supplies: Make sure you have all the necessary materials and tools within reach. This includes clay or dough, rolling pin, cookie cutters, parchment paper, and any other items you’ll need for the specific ornament design you’re creating.
- Organize your workspace: Arrange your supplies in an organized manner, placing similar items together. This will make it easier to locate and use them when needed.
- Have a water source: Depending on the type of clay or dough you’re using, have a water source nearby. This will come in handy if you need to moisten your hands or tools to prevent sticking or drying.
- Provide adequate lighting: Ensure that your work area is well-lit to see the details clearly. Natural light is ideal, but if that’s not possible, position a lamp or light source to illuminate your workspace effectively.
By preparing your work area in advance, you can set yourself up for success when making your handprint ornament. A clean and organized space will allow you to focus on the crafting process without any unnecessary distractions. Remember to gather all your supplies, protect your work surface, and ensure proper lighting. Once your work area is ready, you’ll be ready to bring your handprint ornament to life with creativity and joy!
Mixing the dough
When making a handprint ornament using dough, properly mixing the dough is essential to ensure the right consistency and texture. Following the correct mixing technique will result in a smooth and pliable dough that is easy to work with. Here are some steps to guide you through the process of mixing the dough:
- Gather your ingredients: Start by gathering all the ingredients needed for your dough recipe. This typically includes flour, salt, water, and any additional ingredients as per your chosen recipe.
- Measurements: Follow the recipe instructions to determine the precise measurements of each ingredient. Accurate measurements are crucial for achieving the desired consistency of the dough.
- Combine dry ingredients: In a mixing bowl, combine the dry ingredients, such as flour and salt. Use a whisk or fork to ensure that the ingredients are evenly mixed.
- Add water gradually: Gradually add water to the dry mixture while stirring continuously. It’s important to add the water slowly to prevent the dough from becoming too sticky or wet. Stop adding water once the dough starts coming together.
- Knead the dough: Transfer the dough onto a clean and lightly floured surface. Knead the dough with your hands by folding it over and pushing it away from you. Continue kneading for several minutes until the dough becomes smooth and elastic.
- Adjust consistency, if necessary: If the dough feels too dry, add a few drops of water and continue kneading. On the other hand, if the dough is too sticky, sprinkle a small amount of flour and incorporate it into the dough until the desired consistency is achieved.
- Resting period: Wrap the dough in plastic wrap or place it in a covered bowl. Allow the dough to rest for a specified time as mentioned in your recipe. This resting period helps the dough to relax and makes it easier to roll out.
By following these steps to mix the dough, you will create a well-balanced and workable dough for your handprint ornament. Take care to measure the ingredients accurately and knead the dough until it reaches a smooth and elastic consistency. Remember to make any necessary adjustments to the dough’s moisture content or texture. Once your dough is mixed and rested, you’ll be ready to move on to the next step of rolling it out and creating your handprint ornament.
Rolling out the dough
After mixing the dough for your handprint ornament, the next step is to roll it out to the desired thickness. Rolling out the dough evenly ensures that it will bake or dry uniformly, and it allows you to create precise handprints. Here are the steps to follow when rolling out the dough:
- Prepare your rolling surface: Place a sheet of parchment paper or a silicone baking mat on a clean, flat surface. This will prevent the dough from sticking to the surface and make it easier to transfer the ornament later.
- Flour the dough and rolling pin: Lightly sprinkle flour on top of the dough and on the rolling pin. This prevents sticking and helps the dough roll out smoothly.
- Start rolling: Begin by applying gentle pressure with the rolling pin at the center of the dough. Roll outward in all directions, maintaining an even thickness. Rotate the dough occasionally to ensure uniform thickness and prevent it from sticking to the surface.
- Check thickness: Periodically check the thickness of the rolled dough using a ruler or a stack of thin, flat objects like popsicle sticks. Aim for a thickness of about ¼ inch (0.6 cm), but adjust as desired for your specific ornament design.
- Trim excess dough: If needed, use a sharp knife or cookie cutter to trim the edges or create a specific shape for your ornament. Carefully remove the excess dough and set it aside for other projects or discard it.
- Transfer to a baking sheet: With the help of a spatula or your hands, carefully lift the rolled dough and transfer it to a baking sheet lined with parchment paper or a silicone mat. Make sure it is centered and positioned as desired.
By following these steps, you can confidently roll out the dough for your handprint ornament. Remember to use a floured surface and rolling pin to prevent sticking, and check the thickness periodically to ensure consistency. Once the dough is rolled out, you’re ready to proceed with making the handprint and adding the finishing touches to create a beautiful and personalized ornament.
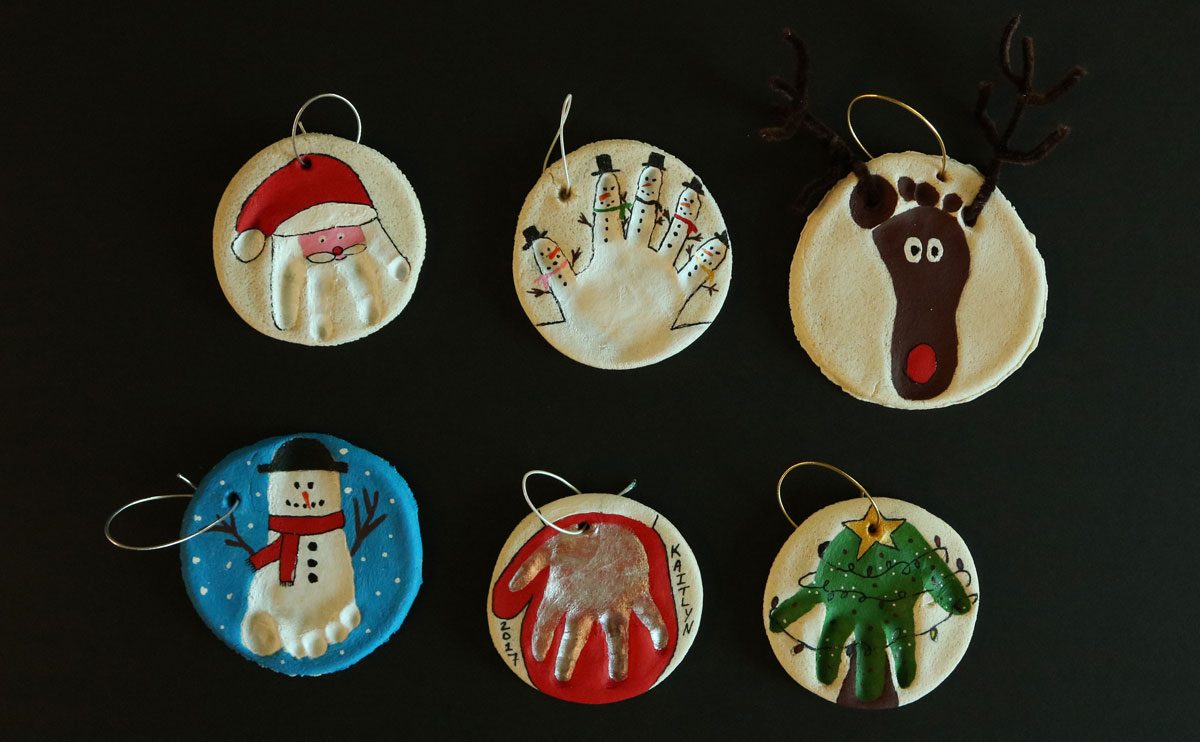
Making the handprint
Creating a handprint is the most exciting and personalized part of making a handprint ornament. This is where you capture a moment in time by imprinting your or your loved one’s hand onto the dough. Here are the steps to follow when making the handprint:
- Prepare your hand: Make sure your hands are clean and dry before placing them on the dough. It’s a good idea to wash your hands with mild soap and pat them dry to avoid any dirt or moisture transferring to the ornament.
- Create a guide: Determine the placement and orientation of the handprint on the dough. Use a pencil or a toothpick to lightly trace an outline or place markers to guide where the hand should be placed.
- Press firmly: Place your hand or the hand of your loved one onto the dough within the guide. Apply firm and even pressure to ensure a clear and defined handprint. Press each finger and the palm firmly but be careful not to press too hard and distort the impression.
- Make adjustments: If the handprint doesn’t turn out as desired, gently smooth out the dough and try again. Take your time to position the hand properly within the guide and apply consistent pressure.
- Remove excess dough: Carefully remove any excess dough around the handprint using a small knife or a suitable tool. Be cautious not to disturb or distort the handprint itself.
- Optional: Add additional details: If desired, you can use small tools like toothpicks or the tip of a pen to create personalized details, such as writing a name or adding decorative elements around the handprint. Get creative and make the ornament truly unique.
By following these steps, you can confidently make a clear and well-defined handprint on your ornament. Take your time and ensure that the handprint is positioned and pressed firmly, but not too forcefully. Remember, this handprint will serve as a lasting memory and a cherished keepsake.
Adding designs and personalization
Once you have made the handprint on your ornament, it’s time to add designs and personalization to make it uniquely yours. This is where you can let your creativity shine and make the handprint ornament even more special. Here are some ideas to help you add designs and personalization:
- Painting: Use acrylic paints or specialized ceramic paints to add color to the handprint ornament. You can paint the handprint itself or create designs and patterns around it. Let your imagination guide you as you choose colors and experiment with different painting techniques.
- Writing or engraving: Use a fine-tipped permanent marker or engraving tool to write names, dates, or messages on the back or sides of the ornament. This personal touch adds sentimental value and makes the ornament more meaningful.
- Embellishments: Get creative with embellishments like glitter, sequins, or beads. These can be glued around the handprint or used to highlight certain areas of the ornament. Just be mindful of the materials you choose, ensuring they won’t easily come off or cause any harm when displayed.
- Ribbons and bows: Attach a ribbon or bow to the top of the ornament to give it a festive touch. You can choose a ribbon color that complements the design or matches the occasion for which the ornament is intended.
- Personalized tags: Create personalized tags with the names of the person or people represented by the handprint ornament. These tags can be attached to the ornament with a string or ribbon, adding an extra touch of personalization.
- Texture and imprints: Explore different textures and shapes by pressing objects onto the dough around the handprint. Use stamps, lace, leaves, or any other textured items to create imprints or patterns that enhance the overall design of the ornament.
Adding designs and personalization to your handprint ornament allows you to make it truly unique and reflective of your own style and sentiment. Whether you choose to paint, write, embellish, or experiment with textures, let your creativity guide you. Remember, the goal is to make the handprint ornament a cherished keepsake that captures a special memory or moment in time.
Baking the ornament
Once you have completed the design and personalization of your handprint ornament, it’s time to bake it. Baking the ornament is a crucial step in the process as it helps to set the clay or dough, making it more durable and long-lasting. Here are the steps to follow when baking your handprint ornament:
- Read the instructions: Before you begin, carefully read the instructions provided with the clay or dough you are using. Different materials may require varying temperatures and baking times.
- Preheat the oven: Preheat your oven to the temperature specified in the instructions. Make sure the oven is fully heated before placing the ornament inside.
- Prepare the baking sheet: Line a baking sheet with parchment paper or use a baking stone to ensure even heating and prevent sticking. This will also make it easier to transfer the ornament in and out of the oven.
- Place the ornament on the baking sheet: Gently place the handprint ornament onto the prepared baking sheet. Make sure it is positioned securely and doesn’t touch the sides of the oven or any other objects.
- Bake according to instructions: Put the baking sheet with the ornament inside the preheated oven. Set a timer based on the baking time specified in the instructions. Avoid opening the oven door frequently as it may cause temperature fluctuations.
- Monitor the baking process: Keep an eye on the ornament as it bakes. Look for signs of over-browning or any other changes that may indicate the ornament is done. Follow the instructions closely regarding temperature and baking time adjustments if needed.
- Remove from the oven: Once the baking time is complete, carefully remove the baking sheet with the ornament from the oven. Use oven mitts or heat-resistant gloves to protect your hands.
- Cool completely: Allow the ornament to cool completely on a wire rack. This ensures that it hardens fully and prevents any potential breakage or damage.
By following these steps, you can bake your handprint ornament to perfection. Make sure to read and follow the instructions specific to the clay or dough you are using. Keep a close eye on the ornament while it bakes and handle it with care when removing it from the oven. Once cooled, your handprint ornament will be ready for the final touches and display for all to admire.
Adding finishing touches
After baking your handprint ornament, it’s time to add the final touches to enhance its overall appearance and ensure it is ready for display. These finishing touches will give your ornament a polished and professional look. Here are some ideas for adding those finishing touches:
- Smooth and sand: If you notice any rough edges or imperfections on the ornament after baking, gently sand them using fine-grit sandpaper. This will create a smooth surface and ensure a professional finish.
- Sealant or glaze: Consider applying a clear sealant or glaze to protect the ornament and give it a glossy or matte finish. Follow the instructions on the sealant or glaze product and allow it to dry completely before handling the ornament.
- Ribbons and strings: Attach a decorative ribbon, string, or twine to the top of the ornament to create a loop for hanging. Choose a color or material that complements the design and overall aesthetic of the ornament.
- Personalized tags: Create or purchase customized tags with a special message or the name of the person the handprint belongs to. Attach the tag to the ornament with a string, ribbon, or adhesive for an added personal touch.
- Embellishments: Add small decorative elements, such as small bows, beads, or charms, to further enhance the ornament. Use non-toxic glue to securely attach the embellishments, ensuring they won’t easily come off.
- Display stand or frame: Consider placing the handprint ornament on a display stand or frame to showcase it in a more prominent way. This can be especially meaningful if you plan to give the ornament as a gift or if it holds sentimental value.
- Label or card: Create a small label or card that provides information about the handprint ornament, such as the date it was made or the age of the person whose handprint it belongs to. This adds a thoughtful touch and helps preserve the memories associated with the ornament.
By adding these finishing touches, you can elevate the overall look and feel of your handprint ornament. Smooth any rough edges, apply a sealant or glaze, and attach ribbons or personalized tags to give it a personalized touch. Consider using embellishments or displaying the ornament in a stand or frame to make it even more special. These final touches will truly make your handprint ornament a standout piece that can be cherished for years to come.
Ways to display your handprint ornament
Once you have completed your handprint ornament, it’s time to find the perfect way to display and showcase its sentimental value and beauty. Here are several creative and meaningful ways to display your handprint ornament:
- Christmas tree: Hang the handprint ornament on your Christmas tree during the festive season. It will add a personal touch to your holiday decorations and serve as a reminder of cherished memories.
- Wall hanging: Use a decorative hook or ribbon to hang the ornament on a wall. This allows you to showcase the handprint year-round as a beautiful piece of wall art.
- Shadow box frame: Place the handprint ornament in a shadow box frame along with small mementos or a photograph. This creates a lovely and meaningful display that can be hung on a wall or set on a shelf or table.
- Display stand or easel: Prop up the handprint ornament on a small display stand or easel to showcase it on a tabletop, mantel, or bookshelf. This allows for easy viewing and provides an elegant presentation.
- Picture frame: Incorporate the handprint ornament into a larger picture frame. You can place it alongside a photo or artwork that complements the ornament, giving it a more cohesive and visually appealing display.
- Special keepsake box: Store the handprint ornament in a special keepsake box, ensuring it is kept safe and protected. The box can be personalized or adorned with sentimental details that make it a cherished part of your family’s memories.
- Mobile or hanging display: Create a mobile or hanging display with multiple handprint ornaments. Hang them at different heights from a decorative branch or a mobile frame, creating a unique and dynamic display.
- Gift for loved ones: Share the joy and sentiment of the handprint ornament by gifting it to loved ones. Package it in a charming gift box with a heartfelt note, allowing the recipient to display it in a way that holds meaning for them.
- Seasonal display: Alternate the handprint ornament with other seasonal decorations throughout the year. For example, place it on a decorative plate with flowers during spring or incorporate it into a festive centerpiece during Thanksgiving.
Choose a display option that resonates with you and complements your home decor. Each of these ideas offers a unique and thoughtful way to showcase the handprint ornament and its sentimental value. Whether it’s on a Christmas tree, wall, tabletop, or in a special keepsake box, displaying the handprint ornament ensures that it remains a cherished part of your family’s memories for years to come.