
Materials Needed
To make fabric curtain tie backs, you’ll need a few essential materials. Gather the items listed below before you begin the project:
- Fabric of your choice – Make sure to select a medium-weight fabric that complements your curtains. Approximately 1/2 yard of fabric should be sufficient.
- Scissors – A sharp pair of fabric scissors will make it easier to cut through the fabric neatly.
- Sewing machine or needle and thread – Choose the sewing method that you’re most comfortable with. A sewing machine will provide quicker and more precise results, but hand sewing is also an option.
- Iron – An iron will help you achieve crisp folds and smooth seams in the fabric.
- Measuring tape – Accurate measurements are crucial for creating tie backs that fit your curtains perfectly.
- Cord – Choose a sturdy cord that complements the fabric color. You’ll need approximately 2 yards of cord for each tie back.
- Rings or hooks – Opt for decorative curtain rings or hooks to attach the tie backs to the wall or curtain rod. Make sure they match the style of your curtains.
- Pins – Pins are useful for holding the fabric in place while sewing.
- Optional: Trim or embellishments – If you want to add an extra touch of decoration, consider using trim or embellishments such as ribbon, lace, or buttons.
Once you have all the necessary materials, you’ll be ready to start creating your fabric curtain tie backs. These simple yet stylish accessories will enhance the look of your curtains and add a touch of elegance to your space.
Step 1: Measure and Cut the Fabric
Before you begin sewing your fabric curtain tie backs, you’ll need to measure and cut the fabric pieces to the desired length. Follow the steps below:
- Start by measuring the length of your curtains. Decide how long you want your tie backs to be. Typically, tie backs are around 18 inches long, but you can adjust the length to fit your preferences.
- Using a measuring tape, mark the desired length on your fabric. Ensure that the fabric is folded in half lengthwise, so you only have to cut once and end up with two identical pieces.
- Once you’ve marked the length, use fabric scissors to carefully cut along the marked line. Remember to keep the fabric edges straight and even for a professional-looking result.
When cutting the fabric, be mindful of any patterns or motifs that need to be properly aligned. Take the time to match up the patterns if necessary, ensuring a cohesive look when the tie backs are in use.
Once you’ve cut the fabric, unfold it to reveal two identical pieces that will serve as the main body of your tie backs. Double-check the length to ensure it matches your desired measurement. If needed, make adjustments by trimming the fabric accordingly.
Now that you’ve completed this step, you’re ready to move on to the next stage of creating your fabric curtain tie backs. Follow the instructions for Step 2 to prepare the fabric for sewing.
Step 2: Fold and Iron the Fabric
After cutting the fabric for your curtain tie backs, the next step is to fold and iron the fabric to create neat, crisp edges. Follow these easy steps:
- Lay one of the fabric pieces on a flat, clean surface with the wrong side facing up.
- Take the bottom edge of the fabric and fold it up towards the top edge, making a fold that is approximately 1/2 inch wide. Press the fold firmly with an iron to create a crease.
- Next, fold the top edge of the fabric down towards the bottom edge, overlapping the first fold. This second fold should also be approximately 1/2 inch wide. Press the fold with the iron to create another crease.
- Now, with both the top and bottom edges folded, fold the fabric in half lengthwise, bringing the folded edges together. This will create a long, narrow strip of fabric with folded edges facing inward.
- Press the entire length of the folded fabric strip with the iron to create a crisp, clean fold along the center.
The folding and ironing process may vary depending on your fabric type and desired look. If your fabric is particularly thick or prone to wrinkling, you may need to increase the width of the folds or steam the fabric to achieve a more defined shape.
Remember, the folding and ironing step is crucial as it sets the foundation for a polished and professional end result. Take your time to ensure that the fabric is folded neatly and the creases are well-defined.
With the fabric neatly folded and ironed, you’re ready to move on to the next step of sewing the fabric together. Follow the instructions in Step 3 to see how to join the fabric edges securely.
Step 3: Sew the Fabric
Now that you have folded and ironed the fabric for your curtain tie backs, it’s time to sew the edges together to create a secure and durable finish. Follow these steps to sew the fabric:
- Position the folded fabric strip on your sewing machine or prepare your needle and thread if you will be sewing by hand.
- Starting from one end of the fabric, sew along the open side, approximately 1/4 inch away from the edge. Use a straight stitch for a clean and sturdy seam. If using a sewing machine, guide the fabric through carefully to maintain an even seam.
- Continue sewing along the entire length of the fabric strip until you reach the opposite end, ensuring that the folded edges remain aligned and secured.
- If sewing by hand, use small, neat stitches to sew the edges together, ensuring a secure seam. Take your time and maintain even tension for a professional finish.
- Once you reach the end, backstitch or knot the thread to secure the seam in place. Trim any excess thread.
Make sure to inspect your seam to ensure it is even and free from any loose threads or uneven sections. If necessary, use a pair of fabric scissors to trim any excess fabric along the seam line.
Remember, the sewing step is crucial to ensure that your tie backs are sturdy enough to hold your curtains in place. Take your time and sew with precision to ensure a high-quality end result.
With the fabric sewn together securely, you’re now ready to move on to the next step of inserting the cord. Follow the instructions in Step 4 to learn how to add the cord to your tie backs.
Step 4: Insert the Cord
Now that you have sewn the fabric for your curtain tie backs, it’s time to insert the cord to provide structure and functionality. Follow these steps to insert the cord:
- Take your fabric strip and turn it inside out so that the right side of the fabric is facing inward.
- Using a safety pin, attach one end of the cord to the open end of the fabric strip. Make sure to secure it tightly to prevent the cord from slipping out during the next steps.
- Slowly guide the safety pin and cord through the fabric tunnel formed by the sewn edges. Move along the entire length of the fabric strip, ensuring that the cord is fully inserted and centered within the fabric tunnel.
- Once you reach the other end of the fabric strip, carefully remove the safety pin. Make sure the cord is securely in place, with both ends protruding from either side of the fabric strip.
- Tie a secure knot at both ends of the cord, ensuring that the fabric strip is gathered evenly around the cord. This will create the desired gathered effect when the tie backs are in use.
Double-check to ensure that the cord is securely attached and centered within the fabric tunnel. If needed, adjust the gather of the fabric strip to achieve the desired look before tying the knots.
With the cord successfully inserted and secured, you’re ready to move on to the next step of attaching the rings. Follow the instructions in Step 5 to learn how to add the rings to your tie backs.
Step 5: Attach the Rings
Now that you have inserted the cord into your fabric curtain tie backs, it’s time to attach the rings that will allow you to hang them on your wall or curtain rod. Follow these steps to attach the rings:
- Position one end of the fabric strip near the edge, and fold it over to create a loop. The size of the loop will depend on the diameter of the rings you have chosen.
- Secure the loop by stitching or hand-sewing it together, ensuring that the fabric is securely fastened.
- Repeat the same process on the opposite end of the fabric strip, creating a second loop for the other side.
- Once both loops are securely fastened, feed the rings through the loops, ensuring they slide smoothly along the fabric strip.
- Position the rings evenly along the fabric strip, ensuring that they are spaced according to your desired aesthetic and functional needs.
Take the time to double-check the security of the loops and the smooth movement of the rings along the fabric strip. If necessary, reinforce the stitching or adjust the loops to ensure a secure attachment.
Keep in mind that the number of rings you attach will depend on the width of the fabric strip and your personal preference. Generally, three to four rings are sufficient for a standard-sized tie back, but you can adapt the number based on your curtain width and desired look.
With the rings successfully attached, you’re now ready to move on to the final step of tying and hanging the tie backs. Follow the instructions in Step 6 to learn how to complete your fabric curtain tie backs.
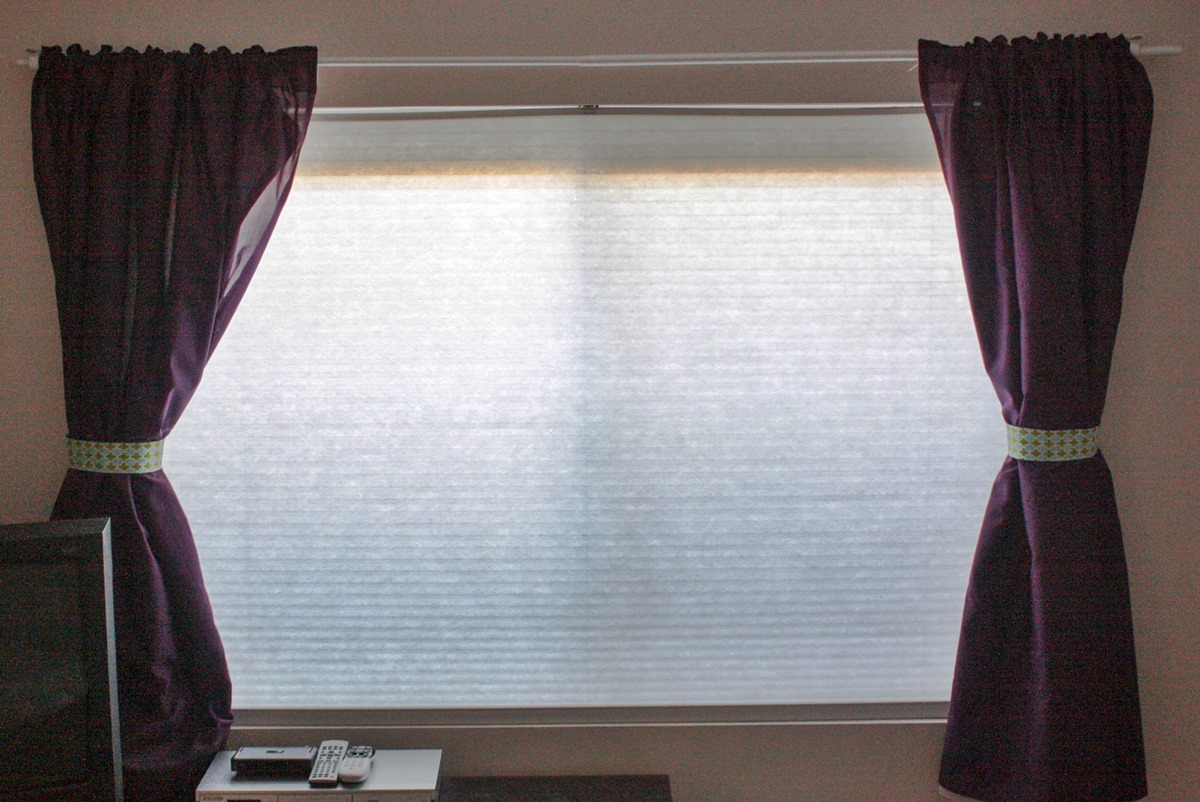
Step 6: Tie and Hang the Tie Backs
Congratulations! You’ve reached the final step of creating your fabric curtain tie backs. Now, it’s time to tie and hang your tie backs to add the finishing touch to your curtains. Follow these steps:
- Position your curtains in the desired open position, leaving enough space on either side to accommodate the tie backs.
- Take one end of the fabric tie back and wrap it around the curtain, bringing it towards the center.
- Wrap the fabric tie back around the curtain a few times until you reach your desired level of tightness and gather the curtains to your liking.
- Take the loose end of the fabric tie back and weave it through one of the rings attached to the tie back.
- Pull the loose end gently to tighten the tie back and secure it in place.
- Repeat the same process with the other tie back on the opposite side of the curtains.
Once both tie backs are securely in place, step back and admire the beautiful gathered effect and the elegant way the tie backs hold the curtains in position.
Remember to adjust the tightness of the tie backs and the position of the fabric loops as needed to achieve a symmetrical and visually pleasing look.
By tying and hanging your tie backs, you’ve not only added a functional element to your curtains but also enhanced their overall aesthetic appeal. Enjoy the stylish and practical benefits these fabric curtain tie backs bring to your space!