
Materials Needed
Before you embark on making your own cement vase, you’ll need to gather some essential materials. Be sure to have the following items on hand:
- Portland cement: This is the main ingredient in your cement mixture. It’s durable and perfect for creating a sturdy vase.
- Sand: Adding sand to your cement mixture helps improve its texture and workability.
- Water: You’ll need water to activate the cement and facilitate the mixing process.
- Mold: Choose a mold that suits the desired shape and size of your vase. It could be a plastic container, a traditional vase, or even a silicone mold.
- Release agent: To prevent the cement from sticking to the mold, you’ll need a release agent. Options include cooking oil spray, petroleum jelly, or a commercial mold release product.
- Measuring tools: Accurate measurements are crucial when mixing cement. Have measuring cups or a scale handy to ensure the right proportions.
- Mixing container and tools: Use a large, sturdy container to mix the cement, such as a bucket or a wheelbarrow. You’ll also need a stirring stick or a drill with a mixing attachment.
- Protective gear: Cement can be caustic, so it’s essential to protect yourself. Wear safety goggles, gloves, and a dust mask to avoid any potential hazards.
- Decorative elements: Consider adding some personal flair to your cement vase. Gather small stones, shells, or glass beads to embed in the surface for a unique touch.
Once you have these materials ready, you’re all set to begin the exciting process of making your own cement vase. Remember to follow the steps carefully and enjoy the creative journey!
Step 1: Prepare the Mold
Before you can start pouring the cement, you need to prepare the mold to create the perfect shape for your vase. Follow these steps to ensure a successful mold preparation:
- Choose the right mold: Select a mold that matches the size and shape you desire for your cement vase. You can use a plastic container, a traditional vase, or even a specially designed silicone mold.
- Apply a release agent: To prevent the cement from sticking to the mold, generously apply a release agent. Common options include cooking oil spray, petroleum jelly, or a commercial mold release product. Make sure to coat the entire inner surface of the mold.
- Secure the mold: Place the mold on a flat and stable surface, ensuring it is level and won’t tip over during the pouring process. You can use adhesive putty or tape to secure the mold in place, if needed.
- Consider additional reinforcements: For larger or more intricate molds, it’s a good idea to reinforce them to provide stability. This can be done by placing wire mesh or using strips of adhesive-backed foam on the inside of the mold.
Taking the time to properly prepare your mold is crucial for achieving the desired shape and ensuring easy removal of the finished vase. It also helps prevent any damage to the mold itself.
Once you’ve completed this step, you’re ready to move on to the exciting process of mixing and pouring the cement into the prepared mold. Get ready for the next step: mixing the cement!
Step 2: Mix the Cement
Now that your mold is prepared, it’s time to mix the cement. Follow these steps to ensure a well-mixed and smooth consistency:
- Gather your materials: Collect the required amount of Portland cement and sand. The exact ratio may vary depending on the specific project, so refer to the instructions on the cement packaging or your desired mix recipe.
- Measure the ingredients: Use measuring cups or a scale to accurately measure the appropriate proportions of cement and sand.
- Combine the dry ingredients: In a large mixing container, pour in the measured amounts of cement and sand. Use a stirring stick or a drill with a mixing attachment to thoroughly blend the dry ingredients together.
- Add water gradually: Slowly pour water into the mixture while continuously stirring. The amount of water needed will depend on the consistency you desire for your cement vase. Add the water in small increments to avoid making the mixture too runny.
- Mix thoroughly: Keep stirring the mixture until all the dry ingredients are fully incorporated and you achieve a smooth consistency. The mixture should be thick yet pourable.
It’s important to note that the process of mixing cement requires some trial and error. If the mixture is too dry, add a little more water. If it’s too wet, add some extra cement or sand to achieve the desired consistency.
Once your cement mixture is properly blended, you’re ready for the next exciting step: pouring the cement into the prepared mold.
Step 3: Pour the Cement into the Mold
With your cement mixture thoroughly mixed, it’s time to pour it into the prepared mold. Follow these steps to ensure a seamless pouring process:
- Prepare your workspace: Place your mold on a stable surface that is protected from spills and drips. It’s a good idea to lay down a plastic sheet or newspaper to catch any potential mess.
- Pour the cement: Slowly pour the cement mixture into the mold. Start from the center and gradually work your way towards the edges. Be careful not to overflow the mold and ensure an even distribution of the mixture.
- Tap out air bubbles: To remove any trapped air bubbles that can compromise the integrity of your vase, gently tap the sides of the mold. You can also use a vibrating tool or a rubber mallet for this purpose. Continue tapping until you no longer see any bubbles rising to the surface.
- Smooth the surface: Use a small trowel or a flat edge to smooth the surface of the poured cement. This will help create a clean and professional finish.
It’s important to work efficiently during this step as the cement will start to set. Take care to pour the mixture evenly and address any air bubbles promptly.
Once you’ve poured the cement into the mold and tapped out the air bubbles, you’re ready to move on to the next step: adding decorative touches to your cement vase.
Step 4: Tap Out the Air Bubbles
After pouring the cement into the mold, it’s important to remove any trapped air bubbles to ensure a solid and pristine finish for your vase. Follow these steps to effectively tap out the air bubbles:
- Allow the cement to settle: Let the poured cement settle in the mold for a few minutes. This will help the air bubbles rise to the surface, making them easier to remove.
- Gently tap the sides of the mold: Using your fingers or a mallet, lightly tap the sides of the mold. This tapping action will help dislodge any air bubbles and encourage them to rise to the surface.
- Use a vibrating tool: If available, you can use a handheld vibrating tool or an electric sander with a vibration setting to further agitate the cement and release trapped air bubbles. Run the tool along the sides and bottom of the mold to ensure maximum effectiveness.
- Repeat as needed: Continue tapping and using the vibrating tool until you no longer see any air bubbles rising to the surface. Be patient and thorough during this process, as even small air pockets can weaken the structure of the vase.
It’s important to note that while tapping out the air bubbles, be gentle and avoid agitating the mold too much. Excessive force can cause the cement to shift or create unwanted surface textures.
By effectively tapping out the air bubbles, you’ll ensure that your cement vase is free from imperfections and has a smooth, professional appearance. Once this step is complete, you’re ready to move on to the next exciting phase: adding decorative touches to your cement vase.
Step 5: Add Decorative Touches
Now that your cement vase is taking shape, it’s time to add some decorative touches to personalize and enhance its appearance. Follow these steps to add unique and eye-catching details:
- Choose your decorative elements: Consider what kind of embellishments you’d like to incorporate into your cement vase. Options can include small stones, shells, glass beads, or even pieces of colored glass. Select materials that complement your desired aesthetic.
- Place the decorative elements: With the cement still in its semi-wet state, gently press the chosen decorative elements into the surface of the vase. Arrange them in a pattern or randomly, depending on your creative vision.
- Embed the elements: Use your fingers or a small tool to press the decorative elements into the cement, ensuring they are securely embedded. This will prevent them from coming loose once the cement dries.
- Experiment with textures: If desired, you can also create texture on the surface of the vase using various tools or by dragging a comb or textured object lightly across the surface of the semi-wet cement.
Adding decorative touches to your cement vase allows you to showcase your creativity and make it truly unique. Feel free to explore different placement options and experiment with different textures to achieve the desired visual effect.
Once you have finished adding the decorative elements, it’s time to move on to the next step: allowing the cement to dry and cure.
Step 6: Let the Cement Dry
After adding decorative touches to your cement vase, it’s crucial to let the cement dry and cure properly. Follow these steps to ensure the cement sets and hardens correctly:
- Find an appropriate drying location: Choose a well-ventilated area where your vase can dry undisturbed. Keep it away from direct sunlight or extreme temperatures, as rapid drying can lead to cracking.
- Allow sufficient drying time: The drying time for cement can vary depending on factors such as humidity and the thickness of your vase. In general, it can take anywhere from 24 to 48 hours for the cement to dry partially.
- Cover the vase (optional): If desired, you can loosely cover the vase with a plastic bag or a sheet of plastic to slow down the drying process. This helps prevent the surface from drying out too quickly, which can lead to cracking.
- Ensure proper curing: After the initial drying period, it’s essential to allow the cement to cure fully. Curing helps strengthen the vase and enhances its durability. This process typically takes around one week, but it’s best to refer to the specific curing instructions provided by the cement manufacturer.
- Monitor the drying process: Regularly check the vase for any signs of cracking or shrinking as it dries. If you notice any issues, you can mist the surface with water to slow down the drying process and minimize the chances of damage.
Patience is key during the drying and curing process. Rushing it can lead to disappointing results, so allow sufficient time for the cement to dry and cure properly.
Once your cement vase is thoroughly dried and cured, you’re ready to move on to the exciting final step: removing the mold and adding finishing touches to your creation.
Step 7: Remove the Mold
With the cement fully dried and cured, it’s time to remove the mold and reveal the beautiful shape of your vase. Follow these steps to safely remove the mold:
- Check the dryness: Ensure that the cement is completely dry and hardened. The surface should feel firm and solid to the touch.
- Inspect the mold: Carefully examine the mold to ensure that it is free from any moisture or residue. Wipe the outer surface with a clean, dry cloth if necessary.
- Loosen the mold: Gently tap or wiggle the mold to loosen it from the cement. You can also use a rubber mallet or a soft hammer to gently loosen stubborn molds.
- Release the vacuum: If the mold is airtight and creates a vacuum seal, you can break the seal by inserting a thin object, such as a popsicle stick, between the mold and the cement. This will release the vacuum and make it easier to remove the mold.
- Carefully remove the mold: Slowly and evenly lift the mold away from the cement vase. Take your time to ensure that no part of the vase gets damaged in the process.
Removing the mold can be an exciting and satisfying moment, as it unveils the final shape and texture of your cement vase. Take care not to rush this step to avoid any accidental breakage or damage.
After successfully removing the mold, you’re ready for the final step: adding the finishing touches and making any necessary adjustments to your cement vase.
Step 8: Finishing Touches
Now that you have removed the mold and have your cement vase in its final form, it’s time to add the finishing touches and make any necessary adjustments to perfect its appearance. Follow these steps to complete your cement vase:
- Sand and smooth the surface: If there are any rough or uneven areas on the surface of your vase, use sandpaper to gently smooth them out. This will create a polished and refined look.
- Paint or seal the surface (optional): Depending on your desired aesthetic, you can choose to leave the natural color of the cement or apply a layer of paint or sealant. Use acrylic paint or a concrete sealant to enhance the visual appeal and protect the surface.
- Add a protective bottom: To avoid scratching surfaces, attach adhesive felt pads or rubber feet to the bottom of your vase. This will also provide stability and prevent slipping.
- Clean and polish: Wipe the surface of your vase with a clean, damp cloth to remove any dust or debris. If desired, apply a concrete polishing compound to bring out a glossy sheen.
- Display and enjoy: Find the perfect spot to showcase your finished cement vase. Whether it’s on a windowsill, a shelf, or as a centerpiece, your creation will add a unique touch to any space.
Remember, the finishing touches are an opportunity to express your personal style and creativity. Customize your vase to reflect your taste and preferences. Experiment with different colors, textures, or embellishments to truly make it your own.
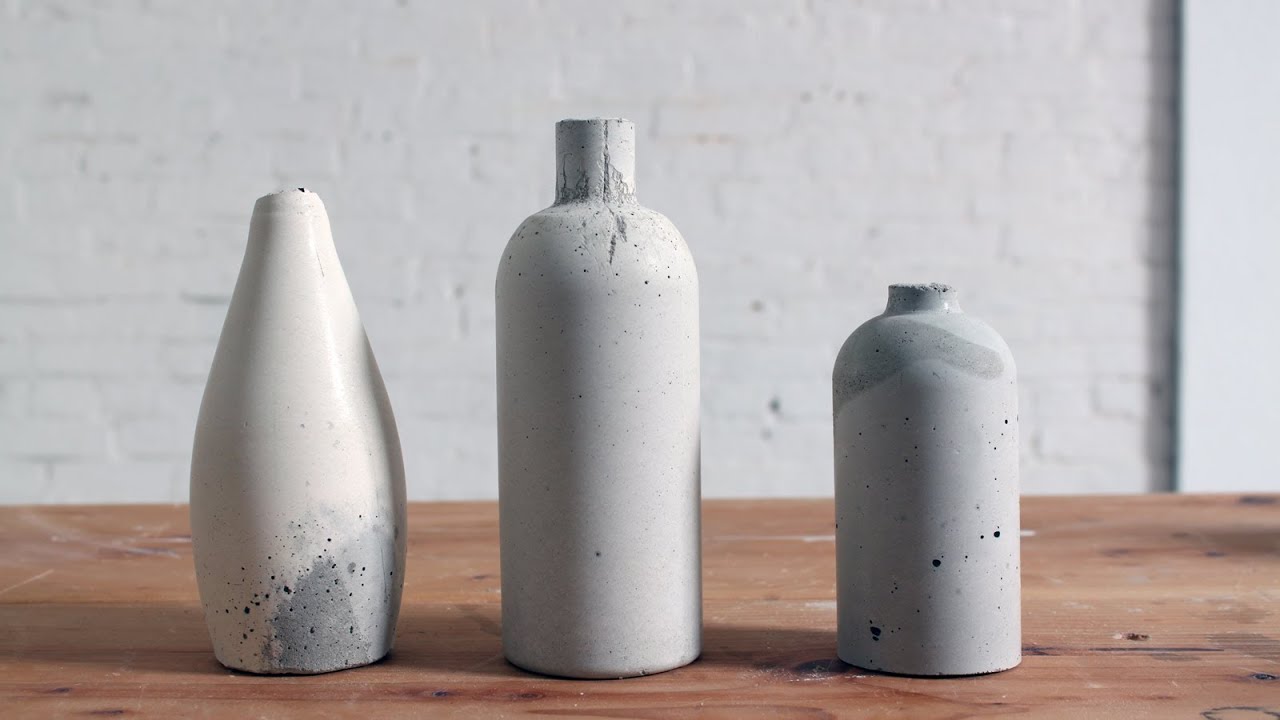
With the finishing touches complete, step back and admire your masterpiece. You have successfully made a cement vase from start to finish. Enjoy the satisfaction of creating a unique and beautiful decoration for your home!