
Materials Needed
Before you start making your own custom ice cube tray, you’ll need to gather a few essential materials. Here’s a list of what you will need:
- Food-safe silicone: Make sure to choose a FDA-approved silicone that is safe for contact with food. Look for a high-quality, platinum-cure silicone that is both flexible and durable.
- Mold release spray: This will help ensure that the silicone does not stick to the mold and makes it easier to remove the finished ice cube tray.
- Measuring cups: You will need accurate measurements for mixing and pouring the silicone, so having a set of measuring cups is crucial.
- Stirring stick or spatula: A sturdy stick or spatula will be used to mix the silicone and remove any air bubbles.
- Mixing container: Choose a container that is large enough to hold the silicone mixture and allows for easy stirring.
- Disposable plastic cups: These will be used as molds for creating the shape of the ice cube tray.
- Craft knife or scissors: You will need to cut the silicone to release the ice cube tray from the mold, so having a sharp craft knife or scissors is essential.
- Sandpaper or emery board: This will be used to smooth any rough edges or uneven surfaces on the ice cube tray.
- Optional: Food coloring or edible glitter: If you want to add a touch of creativity to your ice cube tray, you can use food coloring or edible glitter to make colorful or sparkly ice cubes.
Once you have gathered all of the materials mentioned above, you will be ready to start creating your very own custom ice cube tray. With a little time and patience, you can design a tray that perfectly suits your style and needs.
Step 1: Designing the Tray
Designing the ice cube tray is the first step in creating a unique and personalized product. Follow these steps to create a design that suits your style:
- Think about the shape and size of the ice cubes you want. Consider if you prefer traditional square ice cubes, larger cocktail-style cubes, or fun-shaped molds.
- Create a rough sketch or template of your desired ice cube tray design. This will help you visualize the final product and make the design process easier.
- Decide on the number of compartments you want in your ice cube tray. This will determine the number of molds you need to create.
- Consider any additional features you want to incorporate into your design, such as lids, handles, or special patterns.
- Take measurements of your existing ice cube trays or the space in your freezer to ensure your custom tray will fit perfectly.
- Use a 3D modeling software or hire a designer to create a digital model of your ice cube tray design if you want a more complex or intricate design.
- If you prefer a simpler approach, draw your design directly on a sheet of paper or cardboard and cut it out to create a stencil.
- Once you have finalized your design, make sure it is functional and practical for everyday use. Consider factors such as easy removal of ice cubes, stability, and stackability.
Keep in mind that the design process should be creative and enjoyable. Don’t be afraid to experiment with different shapes, patterns, and features. Your imagination is the limit!
Step 2: Choosing the Right FDA-Approved Silicone
Choosing the right FDA-approved silicone is crucial to ensure the safety and quality of your homemade ice cube tray. Follow these guidelines when selecting your silicone:
- Look for a silicone that is specifically labeled as food-grade and FDA-approved. This ensures that it is safe for contact with food and will not contaminate your ice cubes.
- Opt for a platinum-cure silicone rather than a tin-cure silicone. Platinum-cure silicone is more durable, tear-resistant, and has a longer life span.
- Consider the flexibility of the silicone. Flexible silicone makes it easier to remove the ice cubes from the tray without breaking or cracking.
- Choose a transparent or translucent silicone if you want to see the progress of freezing or if you plan to add coloring or glitter to your ice cubes.
- Ensure that the silicone is odorless and tasteless. This ensures that it will not affect the flavor or aroma of your ice cubes.
- Check for temperature resistance. Make sure the silicone can withstand freezing temperatures without losing its shape or integrity.
- Read reviews and testimonials from other users to get an idea of the quality and performance of the silicone brand you are considering.
- Consult with retailers or manufacturers to get recommendations on the best silicone for making ice cube trays.
Remember, choosing a high-quality and FDA-approved silicone will guarantee that your ice cube tray is safe for use and will last for a long time. Take your time to research and select the best silicone that meets your requirements.
Step 3: Creating the Mold
Creating a mold is an essential step in making your own ice cube tray. Follow these steps to create a mold for your design:
- Prepare the mold material according to the instructions provided. This could be a two-part silicone mold putty or a liquid silicone that requires mixing.
- If using mold putty, knead the two parts together until they are fully mixed and there are no streaks. If using liquid silicone, carefully measure and mix the components according to the instructions.
- Roll the mold putty into a ball, or pour the liquid silicone into a mixing container.
- Flatten the mold putty or spread the liquid silicone evenly on a smooth surface, slightly larger than the size of your ice cube tray design. Make sure the thickness of the mold material is adequate to avoid any tears or leaks.
- Press your ice cube tray design firmly into the mold material, ensuring it is fully submerged and with even pressure. Make sure your design is centred and properly aligned.
- Allow the mold material to fully cure or set, following the recommended time mentioned in the instructions.
- Carefully remove the ice cube tray design from the mold material, ensuring not to damage the mold or the design. If using mold putty, gently peel the hardened mold away from the design.
Creating a mold for your ice cube tray design is an important step that requires precision and patience. Take your time to ensure that your mold is well-made and free from any imperfections.
Step 4: Mixing and Pouring the Silicone
In this step, you will mix and pour the silicone to create your ice cube tray. Follow these guidelines for a successful mixing and pouring process:
- Refer to the instructions provided with your specific silicone product for accurate measurements and mixing ratios.
- If your silicone requires mixing, pour the recommended amount of Part A into a clean mixing container, followed by the recommended amount of Part B. Stir the mixture thoroughly using a stirring stick or spatula, making sure to scrape the sides and bottom of the container.
- Avoid introducing air bubbles into the silicone mixture as much as possible. Slowly and gently stir the mixture to minimize air entrapment.
- If desired, add food coloring or edible glitter to the silicone mixture and stir well to distribute the color evenly. Be cautious not to use too much coloring, as it may affect the transparency of the ice cubes.
- Hold the mixing container above the mold or molds and pour the silicone mixture slowly and evenly. Start from one end of the mold and allow the silicone to flow naturally, filling each compartment.
- If any air bubbles rise to the surface, gently tap the mold against a solid surface to release them. You can also use a toothpick or skewer to poke and remove any stubborn air bubbles.
- Continue pouring the silicone until each compartment is filled to the desired level. Leave a small amount of space at the top to allow for expansion when water freezes into ice cubes.
- Gently tap the mold or jiggle it slightly to further remove any trapped air bubbles.
Properly mixing and pouring the silicone is crucial for obtaining a smooth and flawless ice cube tray. Take your time and follow the instructions precisely for the best results.
Step 5: Removing Air Bubbles
Removing air bubbles from the silicone is an important step to ensure that your ice cube tray turns out smooth and flawless. Follow these steps to get rid of any trapped air bubbles:
- After pouring the silicone into the mold, gently tap the mold on a solid surface. This will help dislodge any air bubbles that may have risen to the surface.
- Use a toothpick or skewer to carefully poke the surface of the silicone in each compartment. This will help release any small air bubbles trapped within the silicone.
- If you notice larger air bubbles, gently pop them using the toothpick or skewer. Take your time and be patient to avoid damaging the mold or silicone.
- Another effective method is to shake the mold gently from side to side. This motion will help the air bubbles rise to the surface and escape.
- For stubborn air bubbles, you can use a heat gun or a kitchen torch to lightly pass over the surface of the silicone. The heat will cause the air bubbles to rise and pop. Be cautious not to overheat or burn the silicone.
- Continue tapping, poking, and shaking the mold until you are satisfied that most, if not all, of the air bubbles have been removed.
Removing air bubbles ensures that your ice cube tray will produce even and well-formed ice cubes. Take your time during this step to achieve the best results and a high-quality finished product.
Step 6: Curing the Silicone
Curing the silicone is a crucial step in the process of making your own ice cube tray. Curing allows the silicone to fully set and harden, ensuring its durability and longevity. Follow these steps to properly cure the silicone:
- Refer to the instructions provided with your specific silicone product for the recommended curing time. This can range from a few hours to several days, depending on the type and brand of silicone.
- Place the mold containing the poured silicone in a dry and well-ventilated area. Keep it away from any sources of moisture or direct sunlight, as this can affect the curing process.
- Check the curing progress periodically. Avoid touching or disturbing the mold during the curing time to prevent any potential damage to the silicone.
- If you notice any uneven curing or soft spots, gently tap the mold to help distribute the silicone and ensure a consistent hardness throughout.
- Allow the silicone to cure for the recommended time mentioned in the instructions. This will ensure that it reaches its maximum hardness and stability.
- Different curing methods may be recommended depending on the specific silicone product. Some silicone may require curing at room temperature, while others may require the application of heat or exposure to UV light.
- Follow the recommended curing method provided by the manufacturer to ensure proper hardening and curing of the silicone.
- Once the silicone has fully cured, it should be firm to the touch and have a consistent texture throughout.
Properly curing the silicone is essential to create a durable and long-lasting ice cube tray. Be patient and follow the instructions and curing recommendations provided by the silicone manufacturer for the best results.
Step 7: Removal from the Mold
Once the silicone has fully cured, it’s time to remove your custom ice cube tray from the mold. Follow these steps for a successful removal process:
- Carefully loosen the edges of the silicone mold using a craft knife or scissors. Be gentle to avoid damaging the mold or the ice cube tray.
- Slowly and steadily peel back the mold material, starting from one corner. Take your time to ensure that the silicone is separating from the mold without any tearing or distortion.
- If you encounter any resistance or sticking, apply a small amount of mold release spray to the area and gently work it in. This will help loosen the silicone and make it easier to remove.
- Continue peeling back the mold material until the entire ice cube tray is free from the mold.
- You may need to flex the mold slightly or use the craft knife or scissors to assist in lifting any intricate parts or edges of the silicone.
- Inspect the ice cube tray for any remaining pieces of the mold material. Carefully remove any remnants to ensure a clean and smooth surface.
- Smooth any rough edges or uneven surfaces on the ice cube tray using sandpaper or an emery board. Be cautious not to damage the silicone or alter the shape of the tray.
- Wash the ice cube tray with mild soap and warm water to remove any residue from the mold material or mold release spray. Rinse it thoroughly and allow it to air dry.
- Once completely dry, your custom ice cube tray is ready to use!
Removing the ice cube tray from the mold requires patience and precision. Take your time to ensure the tray is safely removed from the mold without any damage or distortion.
Step 8: Finishing Touches
After removing the ice cube tray from the mold, you can add some finishing touches to enhance its appearance and functionality. Follow these steps to give your custom ice cube tray those final touches:
- Inspect the ice cube tray for any imperfections or rough edges. Use sandpaper or an emery board to gently smooth out any bumps or rough surfaces.
- If desired, add some personalization to your ice cube tray. You can use food-safe markers or paint to create designs or write labels on the tray, making it uniquely yours.
- Consider adding non-slip feet or grips to the bottom of the ice cube tray to prevent it from sliding or tipping over in the freezer.
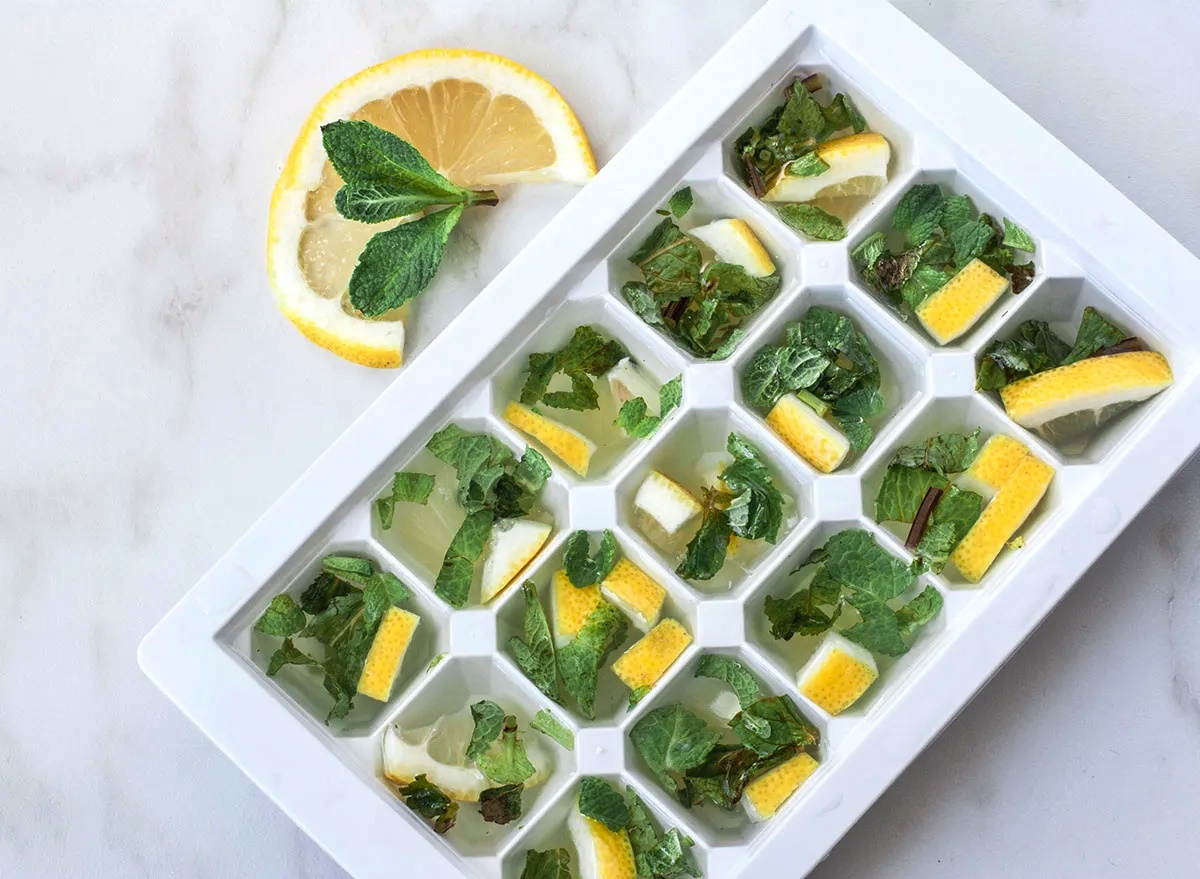
- If you want to make your ice cubes more visually appealing, you can add ingredients such as fresh fruit slices, herbs, or edible flowers to the water before freezing.
- For added convenience, you can attach a lid to your ice cube tray. This will help prevent any odors or freezer burn and make it easier to stack or store the tray.
- Ensure that the ice cube tray is thoroughly cleaned and dried before using it for the first time. This will help eliminate any residual dust or contaminants.
- Place the ice cube tray in the freezer and allow the water to freeze completely. This might take a few hours, depending on the size and shape of your ice cubes.
- Once the ice cubes are frozen, remove the tray from the freezer and gently twist or flex the silicone to release the ice cubes. Carefully transfer them to a freezer-safe bag or container for storage.
- Always handle the ice cube tray with care to prevent any damage or deformation. Avoid bending or squeezing the silicone excessively.
Adding the finishing touches to your custom ice cube tray not only enhances its aesthetics but also improves its functionality. Get creative and have fun with your design choices to make the tray uniquely yours.
Step 9: Testing the Ice Cube Tray
After creating your custom ice cube tray, it’s time to put it to the test. Follow these steps to ensure that your ice cube tray is functioning properly:
- Fill the compartments of the ice cube tray with water, leaving a small space at the top for the water to expand when freezing.
- Place the tray in the freezer and allow the water to freeze completely. This typically takes a few hours, but it may vary depending on your freezer’s temperature.
- Gently twist or flex the silicone to release the ice cubes from the tray. Be careful not to apply excessive force, as this could deform or damage the tray.
- Inspect the ice cubes for any irregularities or imperfections. They should be well-formed, without any air bubbles or trapped debris.
- Test the removal of the ice cubes from the tray. They should easily pop out without sticking or breaking. If necessary, lightly tap the tray against a solid surface to release any stubborn cubes.
- Transfer the ice cubes to a glass or container and observe their melting rate. They should melt slowly and evenly, without any leakage or excessive melting.
- Fill the ice cube tray with water again and repeat the freezing process. This time, pay attention to how the tray stacks or fits in your freezer. It should be stable and allow for easy stacking or storage.
- Try placing different liquids, such as juice or coffee, in the compartments to create flavored or decorative ice cubes. Ensure that the tray can handle various liquids without leaking or absorbing flavors or odors.
- Test any additional features of your ice cube tray, such as lids, handles, or special patterns. They should function as intended and enhance the usability of the tray.
- Take note of any issues or areas for improvement that you identify during the testing process. This will help you refine your design or adjust your technique for future ice cube tray creations.
Testing your ice cube tray ensures that it meets your expectations and performs effectively. Make necessary adjustments based on your observations to create the perfect ice cube tray for your needs.
Step 10: Maintenance and Care Tips
Maintaining and caring for your custom ice cube tray is essential to ensure its longevity and optimal performance. Follow these important maintenance and care tips for your ice cube tray:
- After each use, wash the ice cube tray with warm, soapy water. Clean any residue or debris to prevent any buildup that could affect the quality of the ice cubes.
- Do not use abrasive cleaners or scrubbers that could damage the silicone. Instead, use a soft sponge or cloth to gently clean the tray.
- If any stubborn stains or odors persist, create a mixture of baking soda and water. Scrub the tray gently with the mixture to help remove the stains or odors naturally.
- Avoid placing the silicone tray near direct heat sources, such as stovetops or open flames. Excessive heat can cause the silicone to warp or deform.
- Ensure the ice cube tray is fully dry before storing it. Any moisture left in the tray could promote the growth of mold or mildew.
- Store the ice cube tray in a cool and dry place, away from direct sunlight and extreme temperatures.
- Do not use sharp objects or utensils to pry or scrape the ice cubes from the tray. This can damage the silicone and compromise the integrity of the tray.
- If your ice cube tray has a lid, ensure it is clean and dry before placing it back on the tray. This prevents any contaminants or odors from transferring to the ice cubes.
- Regularly check the silicone for any signs of damage or wear. Cracks, tears, or deformed areas may compromise the functionality of the tray and should be addressed promptly.
- Consider periodically disinfecting the ice cube tray by soaking it in a solution of water and vinegar. This helps remove any bacteria or mold that may accumulate over time.
By following these maintenance and care tips, you can enjoy your custom ice cube tray for years to come. Proper care will ensure that it remains in excellent condition and provides you with perfectly shaped ice cubes whenever you need them.