
Materials Needed
To create a wood storage rack, you will need the following materials:
- Wooden boards (2x4s or plywood)
- Screws or nails
- Saw (circular or miter)
- Drill
- Tape measure
- Sanding block or sandpaper
- Wood glue
- Paint or stain (optional)
- Paintbrush (if using paint)
- Level
- Stud finder (if wall-mounting)
These materials are essential for creating a sturdy and functional wood storage rack. It’s important to choose high-quality wood that can support the weight of the lumber you plan to store. Additionally, screws or nails should be durable and appropriately sized to ensure a secure assembly.
A saw and drill are necessary tools for cutting the wood and attaching the pieces together. A tape measure will come in handy for precise measurements, while a sanding block or sandpaper will allow you to smooth out any rough edges.
If you wish to enhance the aesthetics of your wood storage rack, you can consider applying paint or stain to the finished product. A paintbrush will be useful for this purpose. Finally, a level will help ensure that the rack is straight and properly aligned, while a stud finder may be necessary if you plan to mount the rack on a wall.
Once you have gathered all the necessary materials, it’s time to move on to the next step: measuring and planning your wood storage rack.
Step 1: Measuring and Planning
Before you begin constructing your wood storage rack, it’s important to spend some time measuring and planning the dimensions of the rack. This step will ensure that your rack fits perfectly in the available space and meets your storage needs.
Start by determining the height, width, and depth of the rack. Consider the length of the pieces of wood you plan to store and allow for some extra space for easy access. Take into account any height restrictions if you plan to mount the rack on a wall.
Once you have the measurements, sketch a rough design of the rack on paper or use a digital design tool. This will help you visualize the final product and understand how the pieces will fit together. It’s also a good idea to label each component of the rack on your sketch to ensure a smooth assembly process.
Next, assess the available space where you intend to place the rack. Consider any obstacles or obstructions that may limit the size or placement options. If you plan to mount the rack on a wall, use a stud finder to locate the studs and mark their positions.
Remember to consider the weight of the lumber you’ll be storing. Ensure that the materials used for the rack can support the load and distribute the weight evenly across the structure. If necessary, reinforce certain areas of the rack to provide extra support.
Once you have finalized your measurements and design, double-check everything to ensure accuracy. It’s crucial to be thorough in this stage, as any mistakes or oversights can lead to an ill-fitting or unstable rack.
With your measurements and plans in hand, you are now ready to move on to the next step: gathering the necessary tools and materials for constructing your wood storage rack.
Step 2: Gathering Tools and Materials
Now that you have measured and planned your wood storage rack, it’s time to gather all the necessary tools and materials for the construction process. Ensuring you have everything you need beforehand will make the assembly smoother and more efficient.
Refer back to the list of materials needed, including wooden boards, screws or nails, a saw, drill, tape measure, sanding block or sandpaper, wood glue, paint or stain (optional), paintbrush, level, and stud finder (if wall-mounting).
Check that you have an adequate amount of wood for the required measurements. If necessary, purchase or cut additional pieces to make sure you have enough material to complete the project.
Next, gather all the necessary tools. Make sure your saw is in good working condition and that you have the appropriate type of saw for cutting the wood (circular saw or miter saw). Ensure your drill is fully charged and that you have a suitable drill bit for the screws or nails you’ll be using.
Check that the tape measure is functioning properly, as accurate measurements are crucial for a well-fitted rack. Ensure you have a sanding block or sandpaper with the appropriate grit for smoothing out any rough edges or surfaces.
If you plan to use wood glue for added stability, make sure you have a fresh bottle readily available. If you decide to apply paint or stain to your wood storage rack, gather the necessary supplies, including your desired paint or stain color and a paintbrush.
If you’re mounting the rack on a wall, locate your stud finder and ensure it’s in good working condition. This tool will help you determine the position of the studs for secure installation.
Take a moment to organize and arrange your tools and materials in a designated workspace. Having everything easily accessible will save time during the construction process and help keep your work area tidy.
With all your tools and materials gathered, you’re now prepared to move on to the next step: cutting the wood for your wood storage rack.
Step 3: Cutting the Wood
With all the necessary tools and materials at hand, it’s time to proceed to the construction phase of your wood storage rack by cutting the wood to the required dimensions. This step will transform your raw materials into the individual components that will form the structure of the rack.
Start by referring to your measurements and design plans to determine the specific lengths and widths needed for each piece of wood. Use a tape measure to carefully mark the appropriate measurements on the wooden boards.
Next, secure the wood to a stable surface, such as a workbench or sawhorse, to ensure safety and accuracy during the cutting process. If using a circular saw, attach a suitable blade for cutting through the wood. If using a miter saw, ensure the blade is properly aligned and adjusted.
When making your cuts, follow your marked measurements precisely to ensure each piece of wood is cut to the correct size. Take your time to maintain control and precision, as accurate cuts are essential for proper assembly.
Remember to wear appropriate safety gear, such as safety glasses and ear protection, during the cutting process. This will help protect your eyes and ears from any potential hazards.
Once all the pieces of wood are cut to their respective dimensions, use a sanding block or sandpaper to smooth out any rough edges or surfaces. This step will enhance the overall appearance of the rack and prevent any potential splinters.
After sanding, take a moment to clean up the work area, removing any wood debris or dust that may have accumulated. This will ensure a tidy workspace for the remaining steps of the construction process.
With the wood cut and sanded to the proper dimensions, you are now ready to move on to the next step: assembling the frame of your wood storage rack.
Step 4: Assembling the Frame
Now that you have the wood pieces cut to the desired dimensions, it’s time to start assembling the frame of your wood storage rack. This step involves joining the individual components together to create the basic structure on which the shelves will be added.
Begin by laying out the bottom and top pieces of the frame on a flat surface, ensuring they are aligned properly. Use a tape measure to confirm that the distance between the two pieces matches your desired height for the rack.
Next, position the side pieces to form rectangular corners with the bottom and top components. Use a square to ensure that the corners are perfectly 90 degrees. Secure the corners by using wood glue and driving screws or nails through the bottom and top pieces into the ends of the side pieces.
Continue by attaching the remaining side pieces at equal intervals to provide additional support and stability to the frame. Secure these pieces with wood glue and screws or nails as well.
Once the frame is fully assembled, verify that all connections are secure and the frame is stable. Use a level to make sure the frame is straight and adjust if necessary.
At this stage, you can also choose to reinforce the frame by adding diagonal support pieces. Cut these pieces at a 45-degree angle and attach them to the inside corners of the frame. This will provide extra strength.
Remember to clean off any excess glue that may have squeezed out during the assembly process. This can be done using a damp cloth or a scraper.
With the frame fully assembled and reinforced if desired, you’re now ready to move on to the next step: adding shelves to your wood storage rack.
Step 5: Adding Shelves
Now that you have the frame of your wood storage rack assembled, it’s time to move on to adding the shelves. This step will transform the frame into a functional storage unit, providing surfaces to organize and store your wood.
Start by measuring and marking the desired positions for the shelves within the frame. Consider the height of the wood pieces you plan to store and leave enough space between each shelf for easy access.
Next, cut the wooden boards to the appropriate length to serve as the shelves. Make sure they fit snugly within the frame, with no protrusions or gaps.
Place the first shelf onto the designated marks within the frame. Ensure it sits level and aligns with the edges of the frame. If necessary, use a level to confirm its horizontal position.
Secure the shelf in place by driving screws or nails through the frame into the bottom surface of the shelf. Make sure to countersink the screw heads or use finishing nails to provide a clean and flush appearance.
Repeat this process for each additional shelf, making sure to measure and align them accurately. Take the necessary time to double-check the levelness and stability of each shelf before securing it in place.
If desired, you can use wood glue along with the screws or nails for added strength and stability.
Once all the shelves are securely attached to the frame, take a step back and inspect the overall appearance and functionality. Ensure that each shelf is evenly spaced and properly aligned.
Finally, use a damp cloth or sponge to wipe off any dust or debris that may have accumulated during the construction process.
With the shelves successfully added, your wood storage rack is now ready for the next step: sanding and finishing.
Step 6: Sanding and Finishing
After adding the shelves to your wood storage rack, it’s time to focus on sanding and finishing the entire structure. This step will not only make the rack look more appealing but also protect the wood from potential damage.
Start by using a sanding block or sandpaper to smooth out any rough edges, surfaces, or imperfections on the rack. Sand in the direction of the wood grain to achieve an even and polished finish.
Pay special attention to the corners and edges, ensuring they are rounded and free of sharp edges. This will prevent any potential accidents when handling the rack.
Once the sanding is complete, thoroughly clean the rack to remove any dust or debris. You can use a soft cloth, brush, or vacuum cleaner to ensure the surface is clean and ready for finishing.
If you wish to enhance the appearance of your wood storage rack, now is the time to apply a finish. Consider using a wood stain to add color and depth to the wood or apply a clear varnish to protect the surface while maintaining the natural look.
If applying a wood stain, follow the manufacturer’s instructions and apply an even coat using a brush or cloth. Allow the stain to penetrate the wood for the recommended amount of time and then wipe away any excess to achieve the desired color.
If using a clear varnish, ensure the surface of the wood is clean and dry before applying the varnish with a brush or roller. Allow each coat to dry completely before applying additional coats. Sand lightly between coats to achieve a smooth finish.
Remember to work in a well-ventilated area and follow all safety precautions when working with stains or varnishes.
After applying the desired finish, allow sufficient drying time according to the manufacturer’s instructions. This will ensure the finish is fully cured and the rack is ready for use.
With the sanding and finishing complete, your wood storage rack is nearly finished. The next step involves mounting the rack in your chosen location.
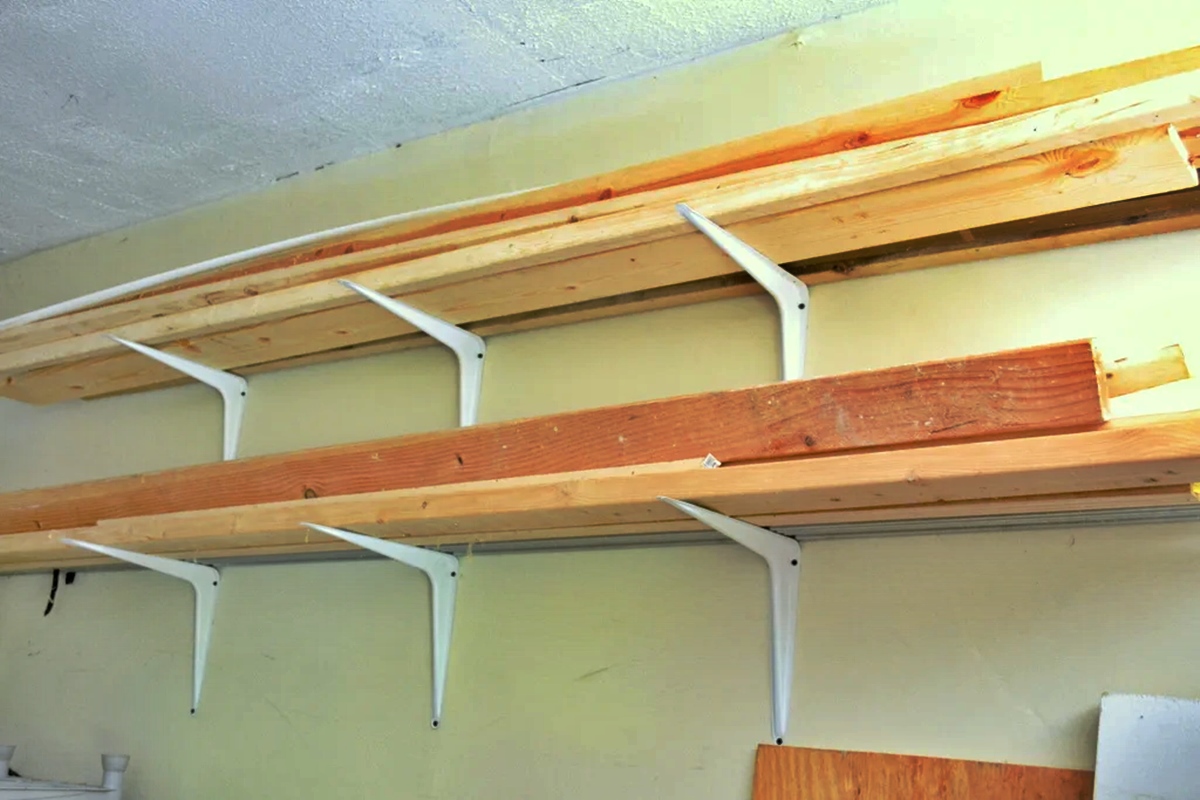
Step 7: Mounting the Rack
Once you have completed the construction and finishing of your wood storage rack, the next step is to mount it in your desired location. Mounting the rack adds stability and ensures it stays securely in place while accommodating your lumber storage needs.
If you plan to wall-mount the rack, begin by using a stud finder to locate the studs in the wall. Mark the stud locations, ensuring they align with the desired height and spacing of your rack.
Hold the rack against the wall, aligning it with the marked stud locations. Use a level to ensure the rack is plumb and straight. Mark the mounting hole locations on the wall through the pre-drilled holes in the rack.
Next, drill pilot holes into the marked locations. Select a drill bit slightly smaller than the size of the screws you’ll be using. This will help prevent the wood from splitting during the mounting process.
Attach the rack to the wall by driving screws through the pilot holes and into the studs. Use a power drill or screwdriver to tighten the screws, ensuring a secure and sturdy mount.
If wall-mounting is not suitable for your rack, you can explore alternative mounting options such as attaching it to a workbench or free-standing in your workshop. Secure the rack using brackets, clamps, or other appropriate methods based on your specific setup.
Once the rack is securely mounted, step back and inspect its alignment and stability. Ensure it is level both horizontally and vertically.
If desired, you can reinforce the mounting by adding additional screws or brackets to the rack-to-wall connection. This will provide extra support and stability, particularly if you plan to store heavy or large pieces of wood.
With the rack successfully mounted in place, you’re one step closer to having an organized and accessible wood storage solution. Now, it’s time to move on to the final step: organizing your wood within the rack.
Step 8: Organizing your Wood
With your wood storage rack fully constructed, finished, and mounted, it’s time to organize your wood within the rack. Proper organization ensures easy access, maximizes space utilization, and keeps your lumber tidy and protected.
Start by sorting your wood based on length, thickness, and type. This will help you determine the most efficient way to arrange the different pieces within the rack.
If you have varying lengths of wood, consider placing longer pieces at the back of the rack and shorter ones towards the front. This will allow you to easily locate and access the desired piece without having to move other lumber.
If possible, group similar thicknesses together to create dedicated sections within the rack. This will help prevent smaller pieces from getting lost or buried under larger ones.
Organizing your wood by type, such as separating hardwoods from softwoods or different species, can also make it easier to find the specific material you need for a project.
Consider using dividers or separators within the rack to further organize your lumber. These can be made from additional pieces of wood or metal brackets, creating designated compartments for different sizes or types of wood.
Labeling the sections or shelves of the rack can also assist in identifying and locating specific wood pieces quickly. You can use adhesive labels, tape, or markers to clearly mark the sections.
Avoid overloading the rack with excessive weight. Ensure that the weight is distributed evenly across the shelves and that the rack remains stable. If necessary, add additional support or reinforce the structure.
Regularly inspect and tidy up the rack by removing any scraps, sawdust, or debris that may accumulate over time. This will help maintain a clean and organized storage space for your wood.
By implementing these organizational strategies, you’ll be able to locate your wood easily and efficiently, saving time and ensuring that your lumber stays in good condition.
With your wood now organized within the rack, you have successfully completed the final step of this project. Congratulations! Your wood storage rack is now ready to serve as a functional and practical addition to your workshop or garage.
Additional Tips and Tricks
As you complete your wood storage rack project, consider the following additional tips and tricks to enhance your overall experience:
- Install a backing board: Adding a sturdy backing board to the back of your wood storage rack can provide extra stability and prevent lumber from falling through the back.
- Utilize adjustable shelves: If you anticipate storing lumber of different widths or need flexibility in your storage setup, consider using adjustable shelves. These can be repositioned as needed to accommodate varying sizes of wood.
- Label your wood: To easily identify different types or sizes of wood, attach labels to each piece or bundle. This will save you time when searching for specific pieces in the future.
- Implement safety measures: Always prioritize safety when working with wood. Use appropriate personal protective equipment (PPE) such as safety goggles, gloves, and ear protection. Ensure your workspace is well-lit and free from any potential hazards.
- Consider mobile options: If you have limited space or frequently need to move your wood around, consider building a mobile wood storage rack with wheels. This allows you to easily transport your lumber wherever it’s needed.
- Maintain proper humidity levels: If your wood storage area is prone to changes in humidity, consider using a dehumidifier or moisture-absorbing products to prevent damage to your wood.
- Regularly inspect and maintain your rack: Periodically check the integrity of the rack, including the mounting and fasteners, to ensure it remains secure and stable. Make any necessary repairs or adjustments promptly.
- Keep an inventory: Consider keeping a running inventory of the wood you have stored in your rack. This will help you keep track of available stock and plan your projects accordingly.
By implementing these additional tips and tricks, you can optimize the functionality, longevity, and safety of your wood storage rack.