
Materials Needed
Creating a paper mache vase is a fun and engaging craft project that allows you to unleash your creativity. Before you get started, gather the following materials:
- Newspaper
- All-purpose flour
- Water
- Mixing bowl
- Whisk or spoon
- Bucket or container for paste
- Balloon or other base for the vase shape
- Scissors
- Paintbrush
- Acrylic paint or other decorative materials
- Sealer (mod podge or clear varnish)
- Decorative fillers or flowers
Newspaper will be the primary material for building the paper mache vase. The all-purpose flour and water will be used to create a paste that will bind the newspaper strips together. You can adjust the consistency of the paste by adding more or less water as needed. Mixing the paste in a bowl or bucket is convenient for easy stirring and accessibility.
In order to shape the vase, you will need a base. A balloon can be used to create a round or oval shape, but feel free to explore other options such as a bottle or plastic container if you desire a different shape.
Scissors are an essential tool for cutting the newspaper into strips. You can vary the width of the strips based on your preference, but it is recommended to have a mix of thin and wide strips to create a sturdy structure.
A paintbrush will come in handy when applying the paste to the newspaper strips and smoothing out any wrinkles or air bubbles. Once the vase is built and dry, you can choose to paint it with acrylic paint or decorate it using other materials such as colored tissue paper, fabric, or glitter.
Finally, you will need a sealer to protect the finished product. Mod podge or clear varnish will add a glossy finish and help preserve your paper mache vase. Decorative fillers, such as stones, marbles, or dried flowers, can be added to the completed vase for an extra touch.
With these materials in hand, you are ready to embark on the paper mache vase-making journey!
Step 1: Prepare Your Work Area
Before diving into the paper mache vase project, it’s important to set up a suitable work area. This will ensure a smooth and organized crafting process. Follow these steps to prepare your work area:
Cover your workspace: Start by covering your work surface with a protective layer. Lay down a plastic tablecloth, old newspapers, or a large trash bag to catch any potential mess and make it easy to clean up afterwards.
Gather your tools and materials: Make sure you have all the necessary tools and materials within easy reach. This includes the newspaper strips, paper mache paste, base for the vase, scissors, paintbrush, acrylic paint, and any other decorative elements you plan to use. Having everything prepared ahead of time will prevent interruptions during the crafting process.
Set up adequate lighting: Good lighting is essential for precision and accuracy. Position a lamp or work light near your workspace to ensure proper visibility, especially when adding details or painting the vase.
Organize your supplies: Keep your tools and materials neatly arranged to avoid confusion and wasted time. Use small containers, cups, or ziplock bags to hold paintbrushes, scissors, and smaller decorative elements. This way, you’ll be able to find what you need easily and keep your work area clutter-free.
Ensure good ventilation: Although paper mache paste is generally non-toxic, it’s always a good idea to work in a well-ventilated area. Open windows or doors to allow for fresh air circulation, especially if you are using any sealants or paints with strong odors.
Protect your clothing: Wear old clothes or use a craft apron to protect yourself from any potential mess. Paper mache can get messy, so it’s best to be prepared and avoid staining your favorite outfit.
Have cleaning supplies nearby: Keep a damp cloth or paper towels handy for quick clean-ups and to wipe away any paste residue from your hands or work surface. A water basin or sink nearby will also be useful for washing off any excess paste or paint.
By following these steps to prepare your work area, you’ll create an efficient and comfortable space for your paper mache vase project. With everything organized and within reach, you can focus on the fun and creative process of crafting your unique vase.
Step 2: Prepare Your Base
Once your work area is ready, it’s time to prepare the base for your paper mache vase. The base will determine the shape and size of your vase, so choose a suitable object that fits your desired design. Follow these steps to prepare your base:
Select a base: Consider the shape and size you want for your vase. One option is to use a balloon – inflate it to the desired size and tie it off. This will result in a round or oval-shaped vase. Alternatively, you can use an existing object such as a bottle, plastic container, or even a sturdy cardboard tube to create a unique shape.
Stabilize the base: If you’re using a balloon, place it in a cup or jar to keep it steady while you work. This will prevent the balloon from rolling around or popping during the paper mache process. If using a different object, ensure it is stable and won’t tip over easily.
Secure the base: Use masking tape or adhesive to secure the base to your work surface. This will ensure it stays in place while you apply the paper mache layers.
Consider the opening: Decide if you want a vase with a narrow or wide opening. Adjust the size of the base accordingly. Remember that a wider opening might require additional support to maintain the desired shape and stability.
Visualize the final product: Take a moment to visualize how your base will look once it’s covered in paper mache and transformed into a vase. This will help you imagine the end result and plan any additional details or decorations you might want to add.
Preparing the base is a crucial step as it sets the foundation for your paper mache vase. Whether you choose a simple shape like a balloon or get creative with unconventional materials, make sure the base is stable and aligned with your desired design. With your base ready, you can proceed to the exciting next step of cutting strips of newspaper for the paper mache layers.
Step 3: Cut Strips of Newspaper
With your base prepared, it’s time to cut strips of newspaper that will be used to build the layers of your paper mache vase. This step is crucial as it provides the material needed to create a strong and durable structure. Follow these steps to cut the newspaper strips:
Gather your newspaper: Collect a stack of newspapers or old magazines. These will be the foundation for your paper mache vase. The number of newspapers needed will depend on the size of your vase and the thickness of the layers you want to create.
Prepare your scissors: Make sure you have a good pair of scissors handy. Sharp scissors will make the cutting process easier and result in cleaner, more precise strips. Take a moment to check the condition of your scissors and sharpen them if necessary.
Decide on the strip width: Determine the width of the strips you want to use. This can vary depending on your preference and the overall size of your vase. It’s a good idea to have a mix of thin and wide strips to create a sturdy structure. Thin strips can be around 1-2 inches wide, while wider strips can be 3-4 inches wide.
Start cutting: Take a newspaper sheet and fold it in half lengthwise. This will help to save time and cut multiple strips at once. Using your scissors, cut along the folded edge, creating uniform strips. If you prefer, you can also tear the newspaper into strips, which can create a more organic and textured look.
Continue cutting: Repeat the process with the remaining newspaper sheets until you have enough strips to cover your entire base. It’s always better to have more strips than you think you’ll need, as it’s easier to have extra than to pause in the middle of the project to cut more.
Organize the strips: Once you’ve cut enough strips, organize them in a neat pile. This will make it easier to grab them while working and prevent them from getting tangled or lost in the process. Having your strips organized and easily accessible will save you time and frustration.
By taking the time to cut your newspaper strips, you ensure that you have the necessary materials to build your paper mache vase. Whether you choose to cut the strips or tear them, creating a stack of strips ready for the next step will streamline the crafting process. Now that your strips are prepared, you’re ready to move on to the exciting next step of making the paper mache paste.
Step 4: Make the Paper Mache Paste
Now that you have your newspaper strips ready, it’s time to create the paper mache paste. This paste will act as the adhesive that holds the strips together and forms the shape of your vase. Follow these steps to make the paper mache paste:
Prepare your mixing bowl: Get a mixing bowl that is large enough to hold the amount of paste you’ll need for your project. Using a larger bowl will make it easier to stir and mix the ingredients evenly.
Add flour and water: Start by adding all-purpose flour to the mixing bowl. You’ll need approximately two parts flour to one part water. Gradually pour water into the bowl and whisk or stir until you achieve a smooth, pancake batter-like consistency. It’s important to whisk thoroughly to eliminate any lumps in the paste.
Adjust the consistency: The consistency of the paste is crucial for easy application. If the paste is too thick, add a small amount of water and continue to stir until it reaches the desired consistency. On the other hand, if the paste is too runny, slowly add more flour and mix until it thickens. It’s better to start with a slightly thicker paste and adjust it as needed.
Mix thoroughly: Take your time to mix the flour and water together until you achieve a paste with a uniform texture. Make sure there are no dry flour pockets or clumps present. Ensuring a smooth and well-blended paste will make the application process much easier later on.
Check the consistency: Test the consistency of the paste by dipping a newspaper strip into the mixture. The strip should be coated evenly with the paste without any excess dripping off. If the paste is too thin, it may not stick to the strips properly. If it’s too thick, it may be challenging to spread and apply. Adjust as necessary until you achieve the right consistency.
Transfer the paste: If desired, transfer the paper mache paste into a bucket or container that is easy to access while working on your vase. This will make it more convenient to dip the newspaper strips and keep the paste from drying out during the process.
By making the paper mache paste, you’ve prepared the essential adhesive for your project. Remember to adjust the consistency as needed to ensure easy application and smooth layering. With the paste ready, you’re now ready to move on to the exciting step of layering the newspaper strips onto your base.
Step 5: Start Layering
With your paper mache paste prepared, it’s time to start layering the newspaper strips onto your base. This step is where your paper mache vase begins to take shape. Follow these steps to effectively layer the newspaper strips:
Dip the strips: Take a newspaper strip and dip it into the paper mache paste. Make sure the entire strip is coated with the paste, ensuring that it is fully saturated but not dripping excessively.
Remove excess paste: Gently run the strip between your fingers or along the edge of the bowl to remove any excess paste. This will help prevent drips and ensure even application onto the base.
Place the strip: Carefully place the damp strip onto the base. Smooth it out with your fingers, ensuring that it adheres well to the surface. Continue adding more strips, slightly overlapping each one, to create a solid and sturdy layer. Try to create an even layer of strips to ensure a strong and balanced structure.
Vary the directions: To strengthen the structure, alternate the direction of the newspaper strips with each layer. For example, if you initially apply the strips vertically, apply the next layer horizontally or diagonally. This cross-hatching technique adds strength and stability to the vase.
Smooth out wrinkles: As you layer the strips, gently smooth out any wrinkles or bubbles that may form. Smooth the strips with your fingers or use a paintbrush to press them down and remove any air pockets. This will help create a smoother surface for painting and decorating later on.
Continue layering: Repeat the process of dipping, removing excess paste, and placing the strips until you have covered the entire base with the desired number of layers. Aim for at least three to four layers to create a durable and sturdy paper mache vase.
Overlap and blend: Make sure to overlap the strips slightly to create a seamless appearance. As you add more layers, blend them together by gently pressing the strips against each other. This will create a cohesive structure for your vase.
Layering the newspaper strips is a crucial step in building your paper mache vase. By following these steps and ensuring even application and smooth layering, you’ll create a strong foundation for your vase. With the layers complete, you’re now ready to move on to the next step of building the shape of your paper mache vase.
Step 6: Build the Shape
Now that you have layered the newspaper strips onto your base, it’s time to build the shape of your paper mache vase. This step will help transform the flat layers into a three-dimensional structure. Follow these steps to effectively build the shape of your vase:
Mold the strips: While the paper mache layers are still wet, use your hands to gently mold and shape them. Manipulate the strips to create curves, angles, or any desired contours for your vase. Flatten and smooth out any uneven areas to ensure a balanced and aesthetically pleasing shape.
Support the structure: If you are working with a larger or more intricate design, you may need to provide additional support during the shaping process. Consider using wire, aluminum foil, or crumpled newspaper to fill out the hollow areas and reinforce the structure. This will help maintain the shape as the paper mache dries.
Refine the details: Take the time to refine and perfect the shape of your vase. Smooth out any rough edges or bumps using your fingers or a damp cloth. Pay attention to the overall symmetry and proportions, making adjustments as needed. This step is crucial for achieving the desired final look of your paper mache vase.
Keep the base stable: If you are using a balloon or other removable base, secure it properly to prevent movement or collapsing during the shaping process. This will keep the vase stable and maintain the integrity of your work.
Be patient: It’s important to be patient during this step as you work on achieving the desired shape. Take breaks if needed to allow the paper mache to partially dry and become more solid. This will make it easier to mold and shape without distorting the structure.
Check for balance: Regularly assess the shape of your vase from different angles to ensure it is well-balanced and visually appealing. Make any necessary adjustments to symmetry or form to achieve the desired result.
Building the shape of your paper mache vase is an exciting and creative step. By following these steps and taking the time to mold and refine the wet paper mache layers, you’ll transform them into a unique and visually appealing vase. With the shape complete, you’re now ready to move on to the next step of smoothing the surface for a polished finish.
Step 7: Smooth the Surface
After building the shape of your paper mache vase, it’s time to focus on smoothing the surface to achieve a polished and refined finish. This step will help prepare your vase for painting or further decorative treatments. Follow these steps to effectively smooth the surface:
Sand the surface: Once the paper mache has dried completely, use fine-grit sandpaper to gently sand the surface. This will help remove any rough edges, bumps, or imperfections. Work in circular motions, applying light pressure, and be mindful not to sand too aggressively, as this may damage the underlying structure.
Fill in gaps and holes: If you come across any gaps or holes in the surface, mix a small amount of paper mache paste and fill them in. Smooth out the filled areas with your fingers or a damp cloth to ensure they blend seamlessly with the rest of the surface.
Seal the surface: To create an even smoother finish, apply a thin layer of paper mache paste or a diluted mixture of glue and water to the entire surface. Use a paintbrush or your fingers to spread the paste evenly, creating a smooth and cohesive surface. Allow it to dry completely before moving on to the next step.
Inspect and repeat: After the initial smoothing, carefully examine the surface to identify any remaining rough patches or imperfections. If necessary, repeat the sanding and sealing process to achieve a flawlessly smooth surface. Remember to be patient and attentive to detail to achieve the desired result.
Polish with tissue paper: For a smoother and more refined finish, consider using a piece of tissue paper to gently rub the surface. This will help to further smooth out any small bumps or inconsistencies, resulting in a polished appearance.
Wipe and clean: Once you’re satisfied with the smoothness of the surface, lightly dampen a clean cloth or sponge and wipe away any dust or debris. This will ensure a clean surface for painting or applying decorative finishes.
By following these steps to smooth the surface of your paper mache vase, you’ll create a polished and professional-looking result. Taking the time to meticulously sand, fill, and seal the surface will prepare your vase for the next step of adding details or applying paint or other decorative finishes.
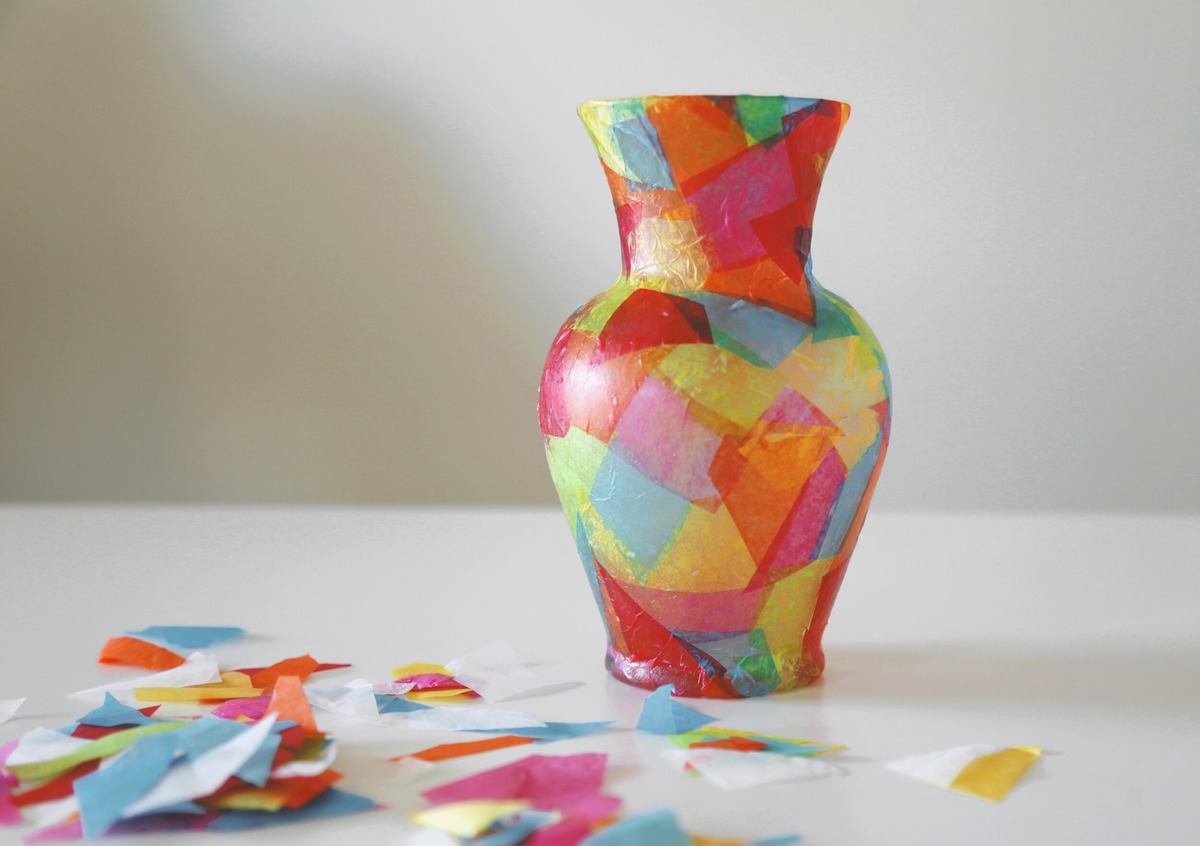
Step 8: Add Details or Texture
With the surface of your paper mache vase smoothed and prepared, it’s time to add details or texture to enhance its visual appeal. This step allows you to unleash your creativity and make your vase truly unique. Follow these steps to effectively add details or texture:
Consider your design: Think about the overall look and feel you want to achieve for your vase. Do you want it to have a sleek and polished appearance, or are you aiming for a more rustic or textured look? Consider the style and theme you want to portray before proceeding.
Paint the vase: One option is to paint the vase using acrylic paint or other suitable paint types. Choose colors that complement your décor or go for vibrant hues to make a statement. Apply multiple coats as needed, allowing each layer to dry before adding the next. Consider using different techniques like brushstrokes, blending colors, or creating patterns to add visual interest.
Add decorative elements: You can also enhance your vase by adding decorative elements such as stickers, stencils, or decals. These can be used to create intricate designs, patterns, or even personalized messages. Apply them carefully and make sure they adhere securely to the surface of your vase for a professional finish.
Experiment with texture: If you prefer a more textured look, consider incorporating materials like tissue paper, fabric, twine, or textured paint. Apply these materials to the surface of your vase using glue or the paper mache paste mixture. This will create depth and tactile interest.
Use embellishments: Explore the use of embellishments like beads, sequins, jewels, or charms to further enhance your vase. Adhere these decorations using glue or hot glue, taking care to distribute them evenly or create specific designs.
Try decoupage: Decoupage is a technique that involves adhering cut-out images or decorative papers onto the surface of an object. This can be a great way to add visual interest and create a customized design. Apply a layer of decoupage glue or Mod Podge to the surface of your vase, place the chosen materials, and add another layer of glue on top to seal and protect the design.
Add texture with paint: To create texture using paint, experiment with techniques like splattering, dabbing, or sponging. These techniques can give your vase a unique and textured appearance. Use different tools like brushes, sponges, or even household objects to achieve various effects.
By adding details or texture to your paper mache vase, you can elevate its aesthetics and make it match your personal style or home decor. Whether you choose to paint, experiment with textures, or incorporate embellishments, this step allows you to showcase your creativity and make your vase one-of-a-kind.
Step 9: Let it Dry
After adding the desired details or texture to your paper mache vase, it’s crucial to allow it to dry thoroughly. This step is essential to ensure that the vase retains its shape, the added elements adhere properly, and any applied paint or sealants cure completely. Follow these steps to effectively let your vase dry:
Find a suitable drying area: Choose a well-ventilated area where your vase can dry undisturbed. Ensure that the vase is placed on a flat surface to maintain its shape and prevent any unintended warping.
Consider drying time: The drying time of your paper mache vase will vary depending on the size, thickness of the layers, and the added details or texture. Generally, it can take anywhere from 24 to 48 hours or even longer for larger or more intricate designs. Be patient and allow enough time for the vase to dry completely.
Check for dryness: Before proceeding to the next step, make sure the vase is fully dry. Check the touch of the surface – it should feel hard and not yield or dent when pressed gently. Avoid rushing this step, as premature handling or decorating can damage the vase.
Avoid direct sunlight: While drying your vase, keep it away from direct sunlight. Exposure to intense heat or UV rays can cause the paper mache to warp or weaken. Find a shaded or dimly lit area to promote a gradual and even drying process.
Test additional elements: If you have added extra elements like beads, charms, or other decorations, ensure that they are securely attached and can withstand the drying process. If needed, gently press or reapply them as the vase dries to ensure they adhere properly.
Exercise caution while handling: It’s important to handle the drying vase with care to avoid damaging the structure or causing any undesired changes. Avoid placing heavy objects on or near the drying vase, and be cautious when moving it to prevent accidental deformations.
Allow extra drying time if needed: In some cases, the added paint, sealant, or decorative elements may require additional drying time. Follow the instructions specific to the products used, and if necessary, provide ample time for them to fully cure and dry before proceeding to the final steps.
By allowing your paper mache vase to dry completely, you ensure its stability, durability, and readiness for the final steps of decoration and sealing. Taking the time to let it dry thoroughly will result in a finished product that handles beautifully and is ready to be displayed or used.
Step 10: Paint or Decorate
Now that your paper mache vase is fully dry, it’s time to unleash your creativity and add the finishing touches through painting or decorating. This step allows you to personalize your vase and make it truly unique. Follow these steps to effectively paint or decorate your paper mache vase:
Prepare your workspace: Set up a clean and well-lit area where you can comfortably paint or decorate your vase. Cover your work surface with a protective layer to prevent any accidental spills or stains.
Choose your color scheme: Decide on the color palette or theme you want for your vase. Consider the existing décor in your space or let your imagination run wild with vibrant and contrasting hues.
Painting: If you choose to paint your vase, start by applying a base coat to create an even foundation. Use a paintbrush or sponge applicator to apply the paint, working in smooth and even strokes. Allow the base coat to dry before adding additional layers or details.
Adding designs: Once the base coat has dried, you can add designs, patterns, or motifs to your vase. Use smaller brushes or even toothpicks to create intricate details. Consider using stencils or masking tape to achieve clean lines and precise shapes.
Exploring techniques: Get creative with different painting techniques such as blending colors, dry brushing, or using a sponge to create texture. Experiment with shading, highlighting, or creating gradients to add depth and dimension to your vase.
Decorating: If you prefer to decorate your vase without paint, consider adding embellishments such as ribbons, lace, beads, or buttons. Use a strong adhesive or thread to attach these elements securely. Arrange them in a pattern or design that fits your vision.
Try decoupage: Decoupage can add a unique and artistic element to your vase. Tear or cut out images from magazines, napkins, or decorative papers, and adhere them to the vase using decoupage glue or Mod Podge. Seal the decoupage with additional layers of glue to protect the design.
Experiment with mixed media: Combine different materials like fabric, twine, or decorative tape to achieve a mixed-media effect. Use glue or the paper mache paste to affix these elements to the surface of your vase, creating a visually interesting and textured piece.
Take breaks for drying: If you’re working with multiple layers, colors, or techniques that require drying time, allow each layer to dry completely before proceeding. Patience is key to achieving a professional and polished result.
By painting or decorating your paper mache vase, you have the opportunity to truly make it your own. Whether you choose to use paint, add embellishments, or explore various techniques, this step allows you to express your creativity and add a personal touch to your finished piece.
Step 11: Seal the Vase
Once you have painted or decorated your paper mache vase, it’s important to seal it to protect the surface and enhance its durability. Sealing the vase will also provide a finishing touch, giving it a polished and professional appearance. Follow these steps to effectively seal your vase:
Choose a sealant: Select an appropriate sealant based on the materials you used to decorate your vase. Options include mod podge, clear varnish, or a spray sealant. Consider the desired finish and the level of protection you want for your vase.
Prepare your workspace: Set up a clean and well-ventilated area for the sealing process. Ensure that your workspace is free from dust and debris, as they can get trapped in the sealant.
Apply the sealant: Dip a clean paintbrush or sponge into the sealant and apply it evenly to the entire surface of the vase. Work in smooth and even strokes, ensuring complete coverage. Take care to avoid drips or pooling of the sealant.
Multiple coats: Depending on the sealant you are using, you may need to apply multiple coats. Allow each coat to dry completely before applying the next one. This will build up a thick and protective layer on your vase.
Sand between coats: For an extra smooth and polished finish, gently sand the surface between coats using fine-grit sandpaper. This will help to remove any imperfections or bumps. Wipe away the dust before applying the next coat.
Allow for adequate drying time: Follow the recommended drying time specified by the sealant manufacturer. Proper drying ensures that the sealant forms a strong and protective barrier on your vase.
Inspect for missed areas: After each coat has dried, carefully examine the vase for any missed spots or uneven coverage. Touch up these areas with additional sealant, ensuring that the entire surface is sealed and protected.
Optional finish: If desired, you can apply a final layer of clear varnish or spray sealant for added durability and a glossy finish. This step will provide an extra layer of protection and enhance the overall appearance of your vase.
Allow for final curing: After the last coat of sealant has been applied, allow your vase to cure according to the manufacturer’s instructions. This final curing time will ensure that the sealant is fully dried and hardened.
Sealing your paper mache vase is a crucial step in preserving your artwork and prolonging its lifespan. It will protect your decoration, make cleaning easier, and enhance the overall appearance. With the vase properly sealed, you can display or use it with confidence, knowing that it is protected and well-prepared for long-lasting enjoyment.
Step 12: Add Flowers or Decorative Fillers
With your paper mache vase now sealed and ready, it’s time to complete the look by adding flowers or decorative fillers. This step will bring your vase to life and allow you to showcase your creativity in arranging a beautiful centerpiece or display. Follow these steps to effectively add flowers or decorative fillers to your vase:
Choose your style: Determine the look and feel you want to achieve with your vase. Decide whether you want to go for a natural and organic look with fresh flowers or prefer the longevity of artificial flowers or decorative fillers.
Consider the size and shape: Take into account the size and shape of your vase when selecting flowers or fillers. Ensure that they are proportionate and complement the overall design of your paper mache vase.
Select your flowers: If using fresh flowers, choose blooms that are appropriate for the occasion and fit well within the vase. Consider the color palette, fragrance, and the longevity of the flowers. Trim the stems as needed to achieve the desired height and proportion.
Arrange your flowers: Carefully arrange the flowers in the vase, taking into consideration the height, colors, and arrangement style. Experiment with different placement and angles to achieve a visually pleasing display. Trim any excess foliage or leaves that may touch the water.
Add decorative fillers: If using artificial flowers or decorative fillers, select materials that complement the style of your vase and the overall aesthetic you want to achieve. Examples include dried grasses, feathers, colored stones, or even themed elements such as seashells or pinecones.
Fill the vase: Fill the vase with your chosen decorative fillers. Arrange them in a way that suits your design, whether it’s evenly distributed or artfully clustered. Consider different textures, shapes, and colors to create an eye-catching display.
Experiment with layers: Create depth and interest by layering different materials in the vase. Place larger elements towards the back and smaller ones towards the front. This will add dimension to your arrangement and make it more visually appealing.
Adjust as needed: Step back and assess your arrangement. Make any necessary adjustments to achieve the desired look. Rearrange flowers or fillers until you are satisfied with their placement and overall composition.
Refresh water or fillers: If using fresh flowers, ensure that you refresh the water regularly to keep them fresh and vibrant. For artificial flowers or decorative fillers, dust or clean them periodically to maintain their appearance and prevent any buildup of debris.
By adding flowers or decorative fillers to your paper mache vase, you bring it to life and create a striking centerpiece or display. Whether you choose fresh or artificial elements, this step provides the final touch that completes the overall look and allows you to showcase your creativity in designing a beautiful arrangement.
Step 13: Enjoy Your Paper Mache Vase
Congratulations! You have completed the process of creating your paper mache vase from start to finish. It’s now time to sit back, admire your craftsmanship, and enjoy the beauty that your creation brings to your space. Follow these steps to fully appreciate and enjoy your paper mache vase:
Find the perfect spot: Choose a prominent location in your home or office where your paper mache vase can be displayed and admired by all. Consider the lighting, surrounding decor, and the aesthetic you want to create in that space.
Arrange complementary decor: Enhance the visual impact of your paper mache vase by incorporating complementary decor items around it. You can place it on a decorative tray or add other elements like candles, books, or figurines to create an appealing composition.
Change up the look: One of the advantages of having a paper mache vase is its versatility. You can update its appearance by swapping out the flowers or decorative fillers to match different seasons or occasions. Experiment with different combinations to keep it visually fresh and interesting.
Clean and maintain: Regularly clean your paper mache vase to keep it in pristine condition. Dust the surface gently with a soft cloth or use a small, soft brush to remove any debris. If necessary, wipe the surface with a damp cloth, taking care not to damage any delicate decorations or paint.
Showcase your creativity: Share your paper mache vase creation with family, friends, or on social media to inspire others. Be proud of your artistic achievement and use it as a conversation starter and a way to express your creative talent.
Explore new projects: Now that you have successfully completed your paper mache vase, consider exploring other paper mache projects or craft ideas. The possibilities are endless, from creating sculptures to masks, figurines, or even practical items like bowls or storage containers. Let your imagination run wild and continue to enjoy the process of crafting with paper mache.
Gift it to someone special: If you feel inspired, consider gifting your paper mache vase to someone who would appreciate its unique and handmade charm. Whether it’s for a birthday, anniversary, or just to brighten someone’s day, a handmade gift like this can bring joy and serve as a meaningful and memorable gesture.
Embrace the joy and pride that comes with completing a handmade project like your paper mache vase. Not only does it add beauty to your space, but it also serves as a testament to your creativity and skill. Enjoy the satisfaction of creating something unique and relish in the pleasure it brings to you and those who admire your creation.