
Understanding the Parts of a Clock
Before you can effectively fix a clock’s hands, it’s important to understand the key components of a clock. Although the intricate workings of different types of clocks can vary, the basic parts remain the same across most designs:
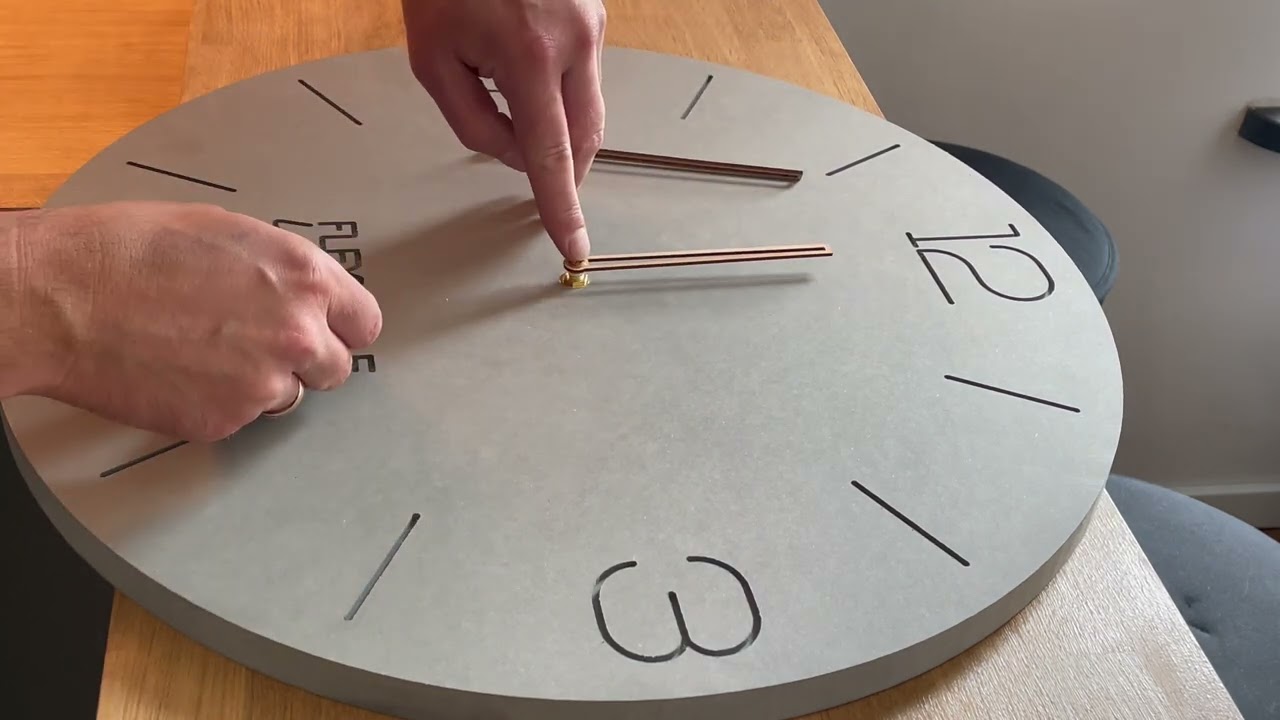
- Dial: This is the face of the clock, featuring the numbers, markings, and sometimes decorative elements.
- Hour Hand: The shorter hand that indicates the current hour on the clock.
- Minute Hand: The longer hand that indicates the minutes as they pass.
- Second Hand: Present in some clocks, this hand moves continuously and indicates the seconds.
- Hand Shaft: The central shaft that connects the clock movement to the clock hands.
- Mounting Nut: The nut that is used to secure the clock hands to the hand shaft.
By understanding these parts, you can better navigate the process of fixing or replacing the clock hands. Remember, when it comes to fixing a clock, patience and attention to detail are key. Now that you have a solid understanding of the clock’s components, let’s move on to the tools you’ll need to get started.
Tools You’ll Need
Before you begin fixing or replacing the clock hands, it’s essential to gather the necessary tools. Here are the commonly used tools for this task:
- Screwdriver: Choose a screwdriver that matches the size of the screws on your clock. It will be needed to remove any screws securing the clock hands or access panels.
- Tweezers: Tweezers can come in handy when handling small clock parts or making delicate adjustments to the clock hands.
- Needle-nose Pliers: These pliers with long, thin jaws are useful for gripping small components or adjusting the position of the clock hands.
- Soft Cloth: Use a soft, lint-free cloth or microfiber cloth to handle the clock hands and prevent scratches or damage.
- Step Stool or Ladder: In case your clock is mounted on a wall or positioned at a height, a step stool or ladder will help you safely reach and work on it.
- Magnifying Glass: Although not essential, a magnifying glass can assist in identifying tiny components or reading intricate markings on the clock hands.
Having these tools readily available will ensure a smoother repair process and help you avoid damaging the clock or its hands. With the tools in hand, you’re now ready to proceed with removing and replacing the clock hands.
Removing the Clock Hands
When it comes to fixing or replacing clock hands, the first step is to remove the existing ones. Follow these steps to remove the clock hands safely:
- Start by ensuring the clock is not running. If it’s a mechanical clock, gently stop the pendulum or remove the batteries for battery-operated clocks.
- Examine the clock hands to locate the mounting nut. It is usually located in the center of the clock hands, on the side facing the dial.
- Using a screwdriver, carefully unscrew and remove the mounting nut. Place it in a safe location to avoid losing it.
- Gently grasp the hour hand near its mounting point, usually at the center, and apply slight upward pressure while pulling the hand away from the dial. Be cautious not to bend or break the hand.
- Repeat the same process for the minute hand, taking care to avoid any unnecessary force.
- If your clock has a second hand, remove it using a similar technique. However, some clocks may have a second hand secured differently, so refer to the clock’s manual or seek professional assistance if needed.
By following these steps, you should be able to successfully remove the clock hands without causing any damage. Keep in mind that some clock hands may be more delicate or intricate, requiring extra care during removal. Once the hands are safely removed, you can proceed with replacing them or making necessary adjustments.
Replacing the Clock Hands
Replacing the clock hands is a relatively straightforward process once you have removed the old ones. Follow these steps to replace the clock hands:
- Ensure the clock is still not running. Stop the pendulum or remove the batteries if necessary.
- Examine the new clock hands to identify the hour hand, minute hand, and, if applicable, the second hand.
- Hold the hour hand near its mounting point and align it with the hand shaft in the correct position. The hand shaft should fit securely through the small hole at the center of the hour hand.
- Once the hour hand is aligned properly, slide the minute hand onto the shaft, ensuring it is in the correct position in relation to the hour hand.
- If your clock has a second hand, carefully place it on the shaft, aligning it correctly with the other hands.
- Once all the hands are in place, securely fasten the mounting nut back onto the shaft, ensuring it is tightened adequately but not overly tight.
- Give the clock hands a gentle spin to ensure they move freely and do not touch each other or the clock’s dial. Make any necessary adjustments to the position and alignment of the hands if needed.
With the clock hands properly replaced and adjusted, you can now move on to the next step, which involves fine-tuning the positioning of the hands for accurate timekeeping.
Adjusting the Clock Hands
Once you have replaced the clock hands, it’s important to ensure that they are properly adjusted for accurate timekeeping. Here’s how you can adjust the clock hands:
- Start by confirming that the clock is not running and the time is set correctly.
- Observe the movement of the clock hands for a few minutes to determine if they are moving smoothly and keeping time accurately.
- If the clock hands are lagging behind or are ahead of the correct time, carefully adjust them by gently moving the minute hand forward or backward.
- For more precise adjustments, use a pair of needle-nose pliers to grip the minute hand near its center and move it in small increments as needed.
- Ensure that the hour hand maintains the correct alignment with the minute hand and moves smoothly as well.
- Continue to observe the clock’s accuracy over the next few hours or days, making additional adjustments if required until it keeps time accurately.
- Remember that small adjustments may be necessary from time to time as the clock mechanism settles or due to temperature changes.
By carefully adjusting the clock hands, you can ensure that your clock keeps accurate time and functions properly. However, keep in mind that if you encounter any difficulties during the adjustment process or if the clock is not keeping time accurately, it may be necessary to seek professional assistance.
Troubleshooting Common Issues
While fixing or replacing clock hands, you may encounter some common issues that can affect the clock’s functionality. Here are a few troubleshooting tips for addressing these problems:
- Hands Stuck or Jammed: If the clock hands are stuck or not properly moving, check for any obstructions or debris around the hand shaft. Gently remove any obstacles to allow the hands to move freely.
- Hands Misaligned: If the clock hands are not aligned correctly or are touching each other, carefully adjust their positions by moving the minute hand slightly forward or backward. Take your time to ensure proper alignment.
- Sticky or Noisy Hands: If you notice sticky or noisy movement of the clock hands, try applying a small amount of clock oil or lubricant to the hand shaft. Be sure to use a clock-specific lubricant and follow the manufacturer’s instructions.
- Loose Clock Hands: If the clock hands feel loose or wobbly, check if the mounting nut is securely fastened. Carefully tighten the nut to provide stability to the hands, but be cautious not to overtighten and damage the clock mechanism.
- Hand Size Mismatch: In some cases, the replacement clock hands may not match the original size or style. Ensure that the new hands are compatible with your clock’s movement and dial before attempting to install them.
If you encounter more complex issues or if your troubleshooting efforts do not resolve the problem, it may be best to consult a professional clock repair technician. They have the expertise and knowledge to diagnose and address any underlying issues with your clock.
Cleaning and Maintaining the Clock Hands
Proper cleaning and maintenance of the clock hands can help prolong their lifespan and ensure accurate timekeeping. Follow these tips to keep your clock hands in optimal condition:
- Regular Dusting: Dust can accumulate on the clock hands, affecting their appearance and potentially hindering their movement. Use a soft cloth or a feather duster to gently remove dust from the hands regularly.
- Avoid Harsh Chemicals: When cleaning the clock hands, avoid using harsh chemicals, abrasive cleaners, or excessive moisture. Instead, use a dry or slightly damp cloth to gently wipe the hands if necessary.
- Prevent Oxidation: Over time, clock hands made of metal can develop oxidation or tarnish. Prevent this by keeping your clock in a dry environment and away from excessive humidity. You can also use anti-tarnish strips near the clock to absorb moisture and prevent tarnish.
- Handle with Care: When handling the clock hands, be gentle and avoid applying excessive force. Rough handling can lead to bending or breaking of the hands. Use tweezers or cloth if needed and avoid touching the hands directly with your fingers.
- Regular Inspection: Periodically inspect the clock hands for any signs of wear, damage, or misalignment. If you notice any issues, address them promptly to prevent further damage and ensure accurate timekeeping.
- Professional Maintenance: For antique or valuable clocks, consider seeking professional maintenance and cleaning. A professional clock repair technician can properly disassemble the clock hands, clean them thoroughly, and reassemble them, ensuring optimal performance.
By following these cleaning and maintenance tips, you can preserve the beauty and functionality of your clock hands. Remember, proper care and attention will contribute to the longevity and reliability of your clock.