
Tools and Materials Needed
Before you begin adding hangers to your picture frame, it’s important to gather all the necessary tools and materials. Here’s a list of what you’ll need:
- Picture frame
- Measuring tape
- Pencil
- Level
- Screwdriver or drill
- Picture hangers (e.g., D-ring hangers, sawtooth hangers, or wire hangers)
- Screws or nails (depending on the hanger type)
- Wall anchors (if necessary)
- Hammer (if using nails)
- Stud finder (optional, but helpful)
Having these tools and materials handy will ensure a smooth and efficient process when adding hangers to your picture frame. It’s always a good idea to double-check that you have everything you need before getting started.
Step 1: Choose the Right Hangers
When adding hangers to a picture frame, it’s crucial to select the right type of hangers to ensure proper hanging and stability. The type of hanger you choose will depend on the frame’s weight and the type of wall you’ll be hanging it on. Here are a few common hanger options:
- D-ring hangers: These hangers consist of two small metal loops shaped like the letter “D.” They are typically attached to the back of the frame and provide a secure hanging point.
- Sawtooth hangers: Sawtooth hangers have a jagged edge that attaches to the frame. They are easy to install and work well for lightweight frames.
- Wire hangers: Wire hangers provide flexibility in hanging options. They consist of a sturdy wire that runs across the back of the frame, attached to D-ring hangers or eye hooks.
When choosing hangers, consider the weight of your picture frame. If it’s a heavier frame, opt for D-ring hangers or wire hangers, as they provide better support. For lightweight frames, sawtooth hangers can be a suitable option.
Additionally, consider the type of wall you’ll be hanging the picture frame on. If it’s a drywall, it’s important to locate the wall studs for added strength. In this case, D-ring hangers or wire hangers that can be attached to the studs would be ideal. If you’re hanging the frame on a concrete or brick wall, you may need wall anchors to provide a secure hold.
By choosing the appropriate hangers for your picture frame, you’ll ensure that it hangs safely and securely on your chosen wall surface.
Step 2: Determine the Placement
Before attaching the hangers to your picture frame, it’s essential to determine the ideal placement for hanging. Take the following factors into consideration:
- Wall space: Assess the available wall space where you’d like to hang the picture frame. Consider the size of the frame and how it will fit in relation to other wall decor or furniture.
- Eye level: For optimal viewing, hang the picture frame at eye level. This typically means positioning the center of the frame at around 57 to 60 inches from the floor. However, adjust the height if you have specific preferences or if you’re hanging the frame above furniture.
- Grouping: If you’re planning to hang multiple picture frames as a group, consider their overall arrangement. Use a measuring tape to plan the spacing between frames, ensuring they are evenly distributed and visually pleasing.
To help visualize the placement, you can create paper templates that match the size of your frames. Tape the templates on the wall and adjust their position until you’re satisfied with the arrangement.
Another important consideration is the impact of lighting on the picture frames. If there are windows or light fixtures nearby, ensure that the frames won’t be affected by glare or direct sunlight, which could potentially damage artwork or photographs.
By taking the time to determine the ideal placement, you’ll ensure that your picture frame(s) are positioned in a visually appealing and functional way, enhancing the overall aesthetic of the room.
Step 3: Mark the Hanger Locations
Once you’ve determined the placement for your picture frame, it’s time to mark the locations where the hangers will be attached. Follow these steps to ensure proper alignment:
- Measure and mark: Use a measuring tape to find the center point of the frame’s width. Mark this point on the top back edge of the frame.
- Transfer the measurement: Measure the distance from the top of the picture frame to the point where the hanger will be attached. Transfer this measurement from the top edge to the back of the frame, making small pencil marks on both sides.
- Align the hangers: Place the selected hangers against the frame, aligning them with the pencil marks you made. Ensure that they are positioned symmetrically and centered on the back of the frame.
- Double-check the alignment: Use a level to ensure that the hangers are straight and properly aligned. Adjust as needed and recheck the level to confirm accuracy.
When marking the hanger locations, it’s advisable to use a pencil rather than a pen, as pencil marks can be easily erased or covered later. This allows for adjustments if needed before attaching the hangers.
If you’re hanging multiple frames in a group, follow the same process of measuring, marking, and aligning the hanger locations for each frame. Remember to maintain consistent spacing between the frames and ensure that they are aligned horizontally and vertically.
By following these steps and marking the hanger locations accurately, you’ll be well-prepared for the next step of attaching the hangers securely to your picture frame.
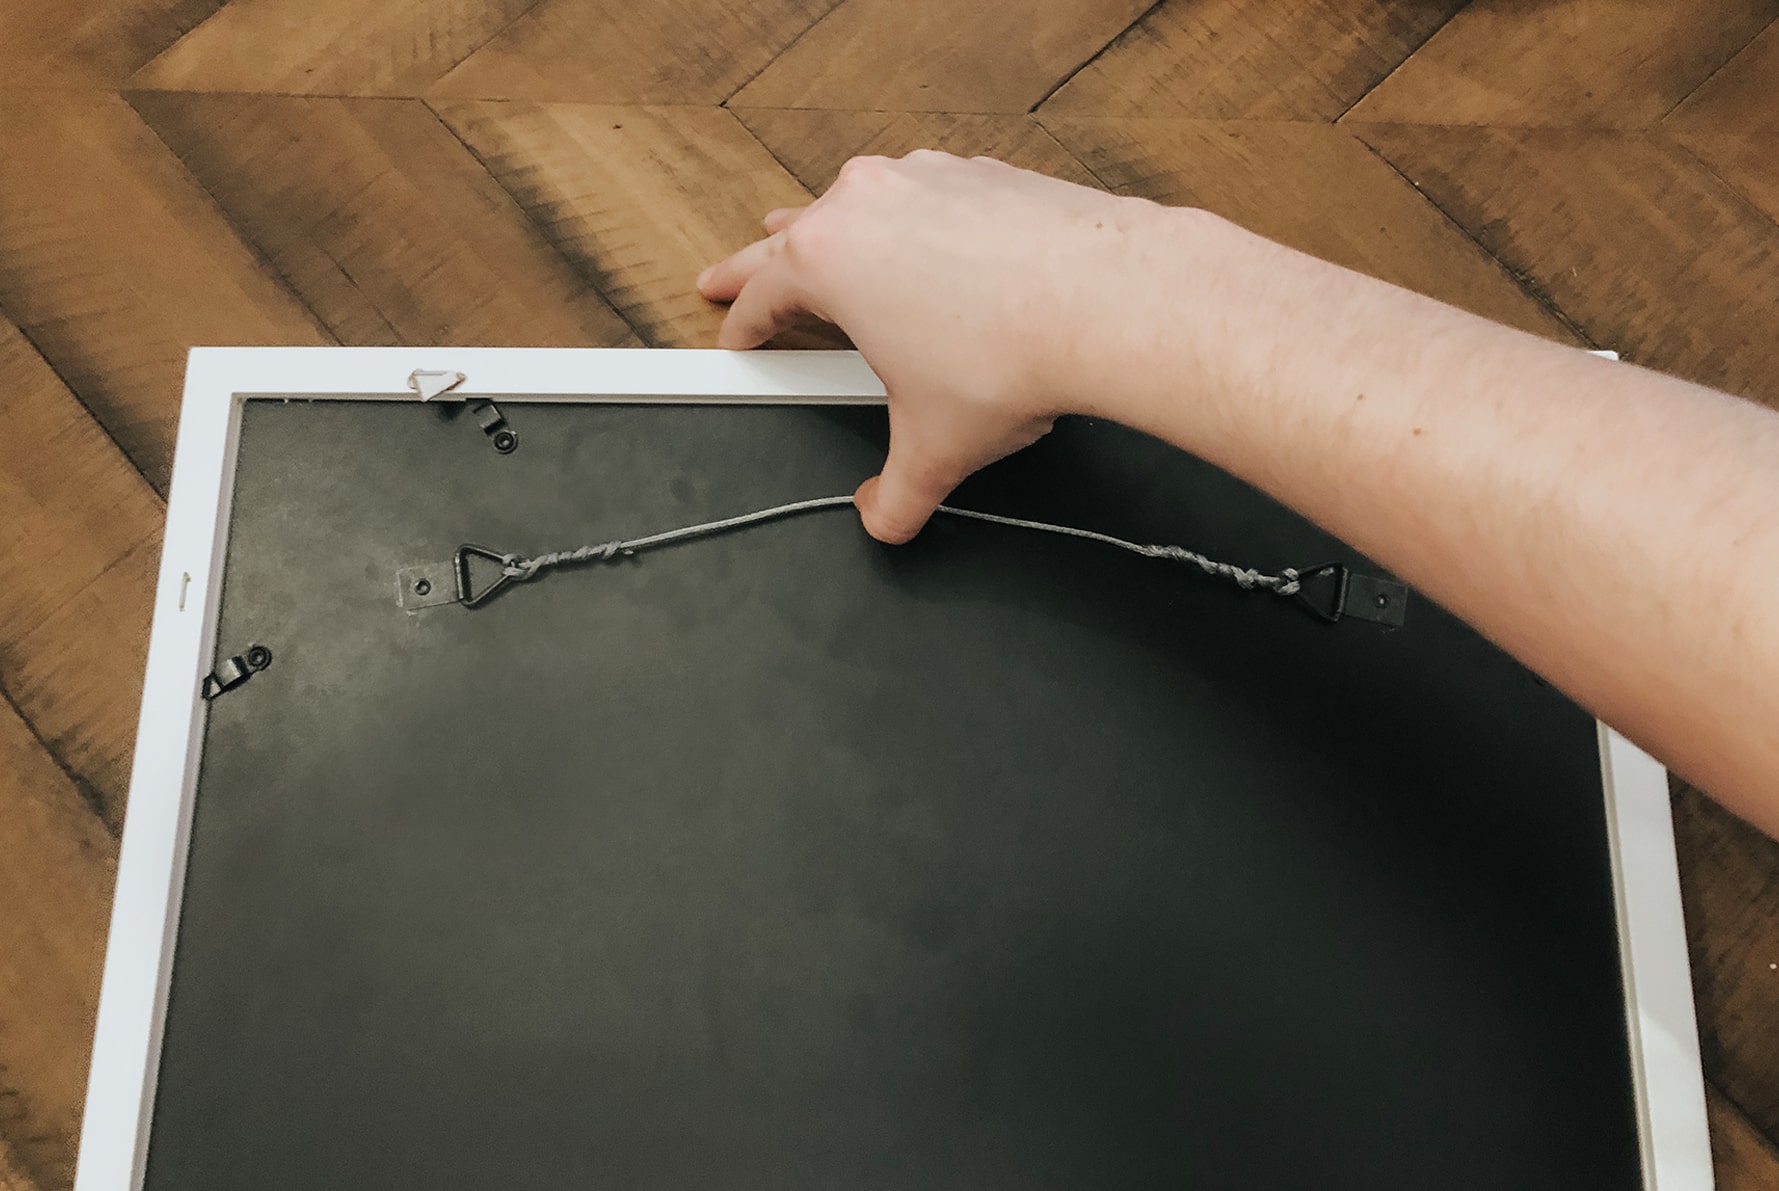
Step 4: Attach the Hangers
With the hanger locations marked on your picture frame, it’s time to attach the hangers securely. Follow these steps to ensure a strong and stable hanging:
- Prepare the frame: Before attaching the hangers, make sure the frame’s back surface is clean and free of any dust or debris. This will ensure a better grip for the hangers.
- Hanger type: Depending on the hanger type you’ve chosen, follow these guidelines:
- D-ring hangers: Place the D-ring hangers over the marked spots and align them with the pencil marks. Use a screwdriver or drill to insert screws through the holes on the hangers and into the frame. Tighten the screws until they are secure but be careful not to overtighten and damage the frame.
- Sawtooth hangers: Position the sawtooth hanger over the marked spot and align it with the pencil mark. Use a hammer to insert nails through the small holes on the hanger and into the frame. Ensure the nails are securely driven into the frame, but avoid hammering too forcefully to prevent damage.
- Wire hangers: If you’re using wire hangers, attach them to the D-ring hangers or eye hooks on the back of the frame. Thread the wire through the hangers, ensuring it is taut and securely fastened.
- Recheck the alignment: Once the hangers are attached, verify their alignment using a level. Ensure that the frame will hang straight and even on the wall.
It’s essential to follow the manufacturer’s instructions when attaching the hangers and ensure that they are securely fixed to the frame. This will provide stability and prevent any accidents or damage when hanging the picture frame.
Take your time during this step to ensure precise placement and attachment of the hangers. Double-check the alignment and make any necessary adjustments before moving on to the next step.
Step 5: Test the Stability
After attaching the hangers to your picture frame, it’s important to test the stability before hanging it on the wall. Follow these steps to ensure that your frame is securely held:
- Hold the frame: Carefully hold the picture frame by the hangers to gauge its stability.
- Check for balance: Ensure that the frame hangs straight and level. If it tilts to one side, gently adjust it until it hangs evenly.
- Check the strength: Give the frame a gentle tug to see if the hangers hold firmly. If the frame feels loose or unstable, reevaluate the hanger attachment.
- Assess the weight: If your picture frame is particularly heavy, consider using additional support such as wall anchors or heavy-duty hangers. These measures will provide extra stability and prevent the frame from falling.
Testing the stability of the frame is crucial to ensure that it can support the weight and remain securely in place. This step allows you to make any necessary adjustments or reinforcement before hanging the frame on the wall.
If the frame feels wobbly or unsteady, recheck the attachment of the hangers and make sure they are securely fastened to the frame. If needed, remove and reattach the hangers to ensure a stronger connection.
Remember, assessing the stability of the frame at this stage saves you the hassle of dealing with a potential mishap after it’s already mounted on the wall.
Step 6: Hang the Picture Frame
With the hangers securely attached and the frame stability tested, it’s time to hang your picture frame on the wall. Follow these steps to ensure a successful hanging:
- Locate the hanging point: Determine the spot on the wall where you’d like to hang the picture frame. Use a pencil to mark a small dot or make a light guideline.
- Find the wall stud: If possible, use a stud finder to locate the wall stud near the hanging point. This will provide added stability and support. Mark the location of the stud using a pencil.
- Insert wall anchors: If you’re not able to hang the frame on a stud, use wall anchors for added support. Depending on the type of wall anchor, follow the manufacturer’s instructions to insert them securely into the wall at the marked hanging point.
- Align the hangers: Hold the picture frame against the wall, aligning the hangers with the hanging point or wall anchor location. Ensure that the frame is positioned at the desired height and level.
- Attach the frame to the wall: If hanging on a stud, use screws to secure the hangers or wire to the wall. If using wall anchors, carefully insert screws into the anchors, ensuring they hold the weight of the frame.
- Double-check the placement: After attaching the frame, step back and review its placement. Ensure it hangs straight and at the desired level. Make any necessary adjustments if needed.
By following these steps, you’ll ensure that your picture frame is securely hung on the wall, enhancing the aesthetic appeal of your space.
It’s important to note that the hanging method may vary depending on the type of hangers or wall anchors used. Always refer to the manufacturer’s instructions for specific guidance.
Remember to handle the frame with care during the hanging process to avoid any damage or accidents. With the frame securely hung, step back and admire your artwork or cherished memories!
Tips for Hanging Multiple Frames
Hanging multiple picture frames together can create a stunning gallery wall or display area. Here are some helpful tips to ensure a cohesive and visually appealing arrangement:
- Plan the layout: Before hanging multiple frames, lay them out on the floor or a large table to experiment with different arrangements. Play around with the spacing, sizes, and orientations of the frames until you find a layout that you like.
- Use a template: To accurately transfer the layout from the floor to the wall, create paper templates of each frame. Trace the outline of each frame onto craft paper or newspaper, cut them out, and tape them to the wall using painter’s tape. This allows you to easily move and adjust the templates until you find the desired arrangement.
- Consider symmetry and balance: Aim for a balanced composition by evenly distributing the frames across the wall space. Maintain consistent spacing between frames to create a cohesive and visually pleasing arrangement. Use a level to ensure that the frames are hung straight and aligned horizontally.
- Mix sizes and orientations: Vary the size and orientation of the frames to add visual interest. Mix larger and smaller frames, landscape and portrait orientations, and different shapes for an eclectic and dynamic display.
- Include other elements: Don’t be afraid to incorporate other decorative elements into your gallery wall, such as mirrors, wall art, or decorative objects. This will add depth and texture to the display, creating a visually engaging focal point.
- Consider the overall aesthetic: Keep in mind the style and theme of the room when choosing frames and arranging them. Ensure that the frames complement the existing decor and enhance the overall aesthetic of the space.
- Take measurements: Measure the height and width of the wall space where you plan to hang the frames. This will help you determine the appropriate size and number of frames to create a visually balanced arrangement.
- Step back and assess: After hanging each frame, step back to view the overall arrangement. Make any necessary adjustments in terms of spacing, alignment, or frame positions to achieve the desired look.
By following these tips, you’ll be able to create a visually stunning display of multiple picture frames that adds character, personality, and charm to your space.