
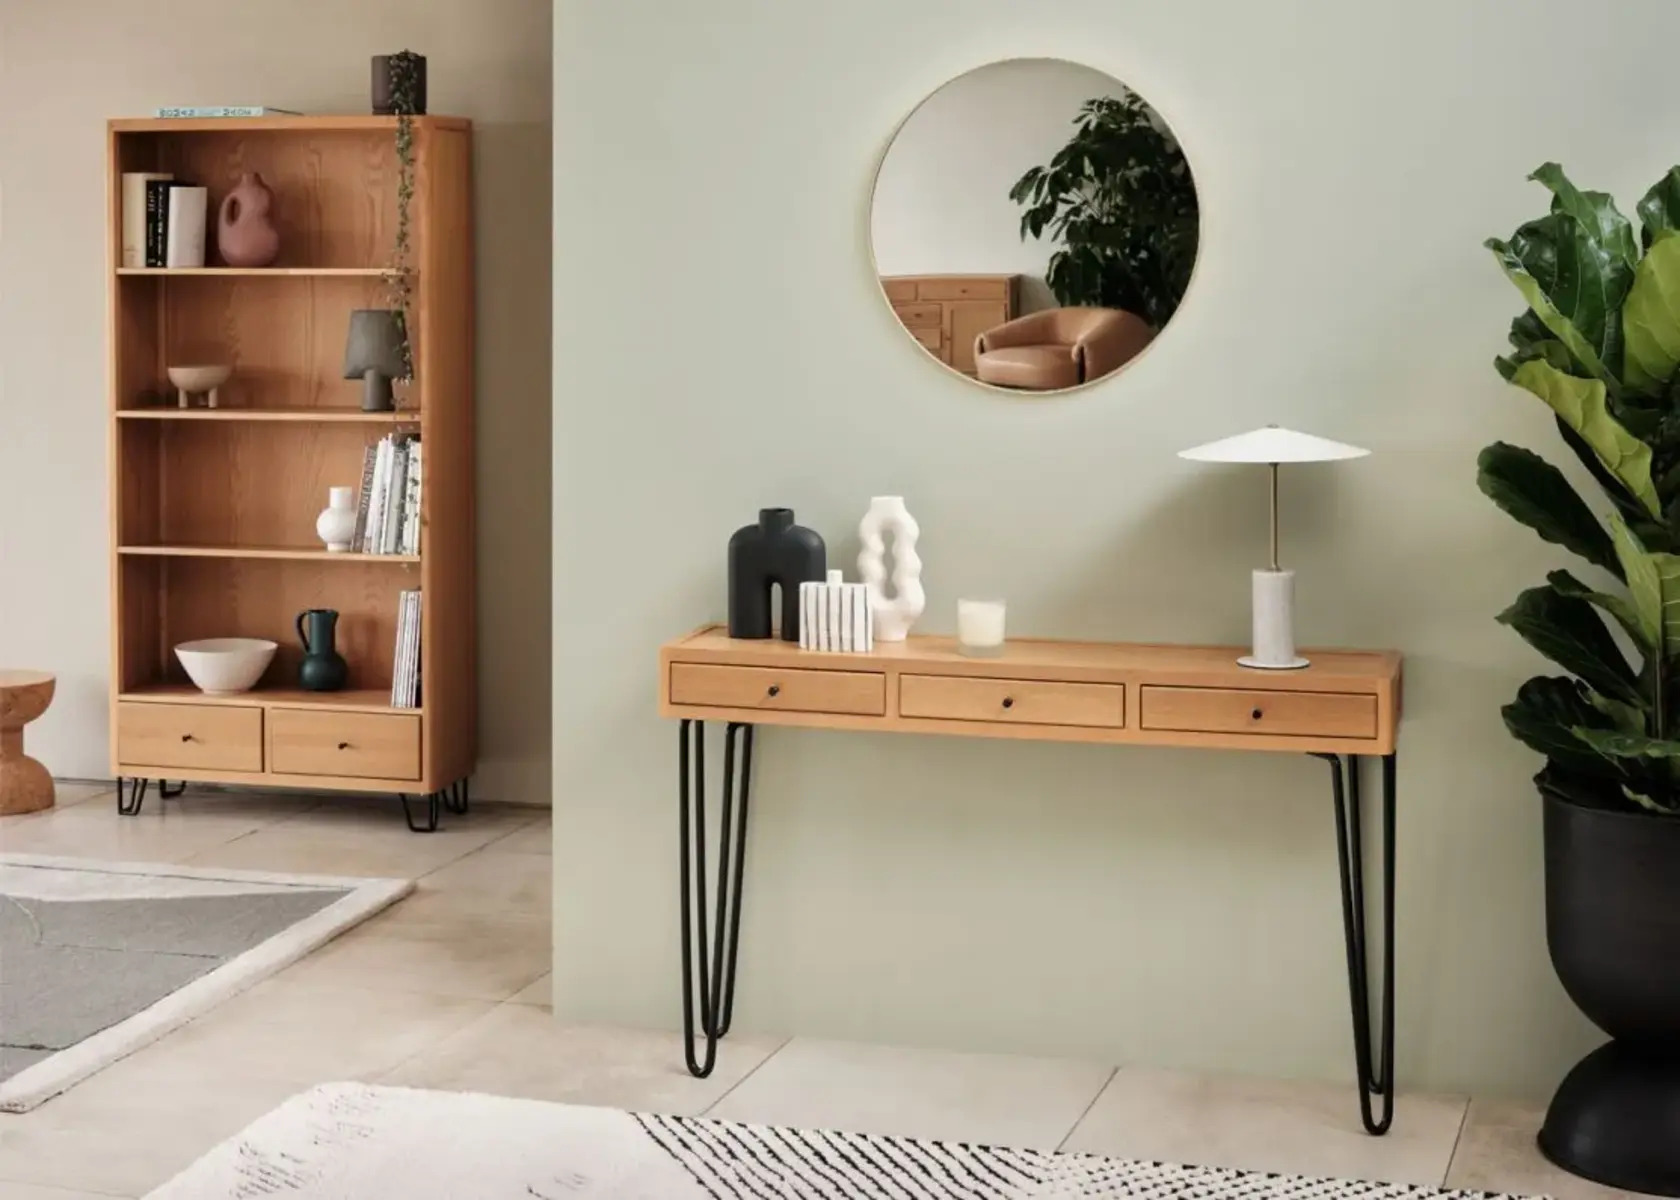
Measure the height of the console table
Before hanging a mirror over a console table, it’s crucial to measure the height of the table accurately. This step will help determine the ideal placement and ensure a balanced and visually appealing display.
To start, arm yourself with a tape measure. Place the tape measure against the floor and hold it upright against the top of the console table. Take note of the measurement from the floor to the table’s surface. This measurement will serve as the baseline for determining the mirror’s height.
Consider the purpose of the console table. Is it primarily used for decorative purposes or for functional storage? This will influence the desired height of the mirror. If the console table is meant to showcase your favorite decor items, you might want to hang the mirror slightly higher so it doesn’t compete with the displayed objects. On the other hand, if the table serves as a functional space for everyday use, a lower position for the mirror might be more suitable.
Another factor to consider is the height of the people using the console table. If it’s located in a hallway or entrance area, you’ll want to ensure the mirror is at an appropriate height for easy use by everyone in the household. Consider the average eye level of the people who will be using it and aim to position the mirror within that range.
Remember to take into account any additional elements that will sit on top of the console table, such as lamps or vases. You’ll want to leave enough space between the mirror and these items to create a visually balanced arrangement.
By taking accurate measurements and considering the purpose, users, and additional elements of the console table, you can determine the ideal height for hanging the mirror. This will lay the foundation for creating a stunning and harmonious display.
Determine the desired height of the mirror
Once you have measured the height of the console table, the next step is to determine the desired height at which you want to hang the mirror. This decision will depend on several factors, including the purpose of the mirror, the overall aesthetic you want to achieve, and personal preference.
Consider the function of the mirror. Will it primarily be used for practical purposes, such as checking your appearance before heading out the door? In that case, you may want to set the mirror at a height that allows you to see your entire face and outfit comfortably. On the other hand, if the mirror is more decorative, its height can be adjusted to create an interesting visual composition with other elements in the space, such as artwork or furniture.
Think about the overall aesthetic you want to achieve. Do you prefer a symmetrical or asymmetrical look? If you have a pair of sconces or wall decorations that will flank the mirror, you might want to position it at a height that creates a visually pleasing balance. If you’re going for a more eclectic or bohemian style, you can experiment with hanging the mirror at different heights to create an artful and whimsical arrangement.
Personal preference plays a significant role in determining the height of the mirror. Consider your own height and the heights of other household members. You want to position the mirror so that it can be easily used by everyone without straining or bending down. Additionally, take into account any specific needs or limitations, such as wheelchair accessibility, if applicable.
It’s worth noting that there are no hard and fast rules when it comes to the height of hanging a mirror. It’s ultimately a matter of finding the sweet spot that satisfies both practical and aesthetic considerations. Trust your instinct and take the time to try out different heights before settling on the final position.
By considering the mirror’s function, the overall aesthetic, personal preference, and practical considerations, you can determine the perfect height for hanging the mirror. This step will ensure that the mirror becomes the focal point and enhances the overall ambiance of your space.
Consider the size and proportion of the mirror
When hanging a mirror over a console table, it’s important to consider the size and proportion of the mirror to ensure it complements the space and creates a visually pleasing display. The right-sized mirror can instantly elevate the aesthetic appeal and functionality of the area.
First, take into account the size of the console table itself. A general guideline is to choose a mirror that is proportionate to the size of the table. If you have a large console table, you can opt for a larger mirror to create a bold and impactful statement. Conversely, if you have a smaller console table, a smaller-sized mirror will maintain a balanced and harmonious look.
Consider the overall dimensions of the wall where the mirror will be hung. If you have a large, empty wall space, a larger mirror can help fill the area and create a focal point. On the other hand, if the wall space is limited or crowded with other decorative elements, a smaller mirror might be more appropriate to maintain a sense of visual balance.
Take into account the height and width of the mirror in relation to the console table. The mirror should not overpower the table or look too small in comparison. It’s best to aim for a mirror that is approximately 60-70% of the width of the console table, but this can be adjusted depending on personal preference and the desired aesthetic.
Consider the style and shape of the mirror as well. If you have a modern or contemporary console table, a sleek and streamlined rectangular or square mirror might be a good choice. For a more traditional or eclectic style, you can opt for a decorative or ornate mirror with intricate details. The shape of the mirror should also be in harmony with the console table, whether it’s rectangular, round, oval, or irregular.
By carefully considering the size and proportion of the mirror in relation to the console table, the wall space, and the overall style of the area, you can create a cohesive and visually appealing display. Remember to experiment with different mirror sizes and shapes to find the perfect combination that enhances the beauty and functionality of your space.
Choose the right hanging hardware
Choosing the right hanging hardware is crucial for securely and safely hanging a mirror over a console table. The type of hardware you choose will depend on the weight and size of the mirror, as well as the type of wall surface on which it will be mounted.
Start by assessing the weight of the mirror. Heavier mirrors may require more heavy-duty hardware to ensure proper support. Consider the weight limit and recommended hardware specifications provided by the manufacturer. This information will help you choose the appropriate hanging hardware.
Next, determine the type of wall surface. If you have a drywall surface, you’ll need to utilize wall anchors or toggle bolts to provide additional support. These anchors distribute the weight of the mirror and prevent it from pulling away from the wall. For concrete or brick walls, use masonry screws or anchors specifically designed for those surfaces.
When it comes to the hanging hardware itself, a D-ring or mirror clips are common choices. D-rings are metal rings with screw holes that are attached to the back of the mirror frame. They offer stability and allow for easy adjustment of the hanging position. Mirror clips, on the other hand, are plastic or metal brackets that hold the mirror in place by gripping the edges. These are often used for frameless mirrors.
If the mirror has a wire across the back, make sure it’s securely attached and centered. This will allow for easier leveling and adjustment during the hanging process. Use picture hanging wire or high-quality braided wire that can support the weight of the mirror without snapping or fraying.
Additionally, consider using adhesive wall hangers or command strips for added stability, especially if you live in an earthquake-prone area or have concerns about the mirror shifting or falling off the wall. These adhesive solutions can provide an extra layer of security without causing damage to the wall surface.
Lastly, ensure that you have the necessary tools for installation, such as a drill, level, screwdriver, and tape measure. These tools will help you accurately measure, mark the wall, and install the hanging hardware with precision.
By selecting the right hanging hardware and properly installing it, you can enjoy a securely mounted mirror that not only enhances the aesthetics of the console table but also provides peace of mind knowing that it is firmly in place.
Mark the desired height on the wall
Once you have determined the desired height for hanging the mirror over the console table, the next step is to mark that height on the wall. This will serve as a guide during the installation process and ensure accurate placement.
Start by gathering a pencil, tape measure, and a level. These tools will help you measure and mark the desired height with precision.
Begin by measuring the distance from the floor to the desired height of the mirror. Use the tape measure to get an accurate measurement and record it.
Next, locate the center point of the console table by measuring its width and dividing it by two. This will give you an idea of where the center of the table lies.
Using the center point as a reference, align the tape measure vertically from the floor to the desired height of the mirror. Make sure the tape measure is level using the level tool.
Once you have your measurements in place, take the pencil and make a small mark on the wall at the desired height. You can use a light, gentle stroke to ensure it’s easily erasable if needed.
Double-check the accuracy of the mark by measuring again and confirming that it aligns with the center of the console table. Adjust the mark if necessary.
If you plan to hang multiple mirrors or other objects on the wall, it’s beneficial to mark the desired height for each of them as well. This will help you plan and ensure proper spacing and alignment.
It’s essential to take your time and be precise when marking the desired height on the wall. This step will serve as a reference point during the installation process and help you achieve a balanced and visually pleasing display.
Attach the hanging hardware to the mirror
Attaching the hanging hardware to the mirror is a crucial step in preparing it for installation over the console table. The type of hardware you choose will depend on the mirror’s design and weight, as well as the desired hanging method.
Start by gathering the necessary tools and materials, including the chosen hanging hardware, a screwdriver, and possibly additional hardware like D-rings, mirror clips, or wire.
If you are using D-rings, first determine the ideal placement on the backside of the mirror frame. Generally, it is recommended to position them along the upper corners of the mirror, approximately one-third down from the top edge. Use a pencil to mark the screw holes on the frame.
Using a screwdriver, attach the D-rings securely to the marked locations on the mirror frame. Ensure that the screws are tight to prevent the hardware from coming loose over time.
If you are using mirror clips, position them evenly along the sides or top and bottom edges of the mirror. Adjust the clips to align with the marked hanging height on the wall. Carefully screw them in place, ensuring they’re snug but not too tight to avoid damaging the mirror.
For mirrors with a wire, attach the wire securely to the D-rings or other hanging hardware on the back of the mirror. Keep the wire taut but not overly tensioned, allowing enough slack for adjustments during the installation process.
If your mirror requires additional support, such as for larger or heavier mirrors, consider using additional hardware like mirror brackets or brackets with anchors. These additional supports will provide added stability and minimize the risk of the mirror shifting or falling from the wall.
Ensure that all hanging hardware is securely attached to the mirror and can adequately support its weight. Give the mirror a gentle shake to test its stability before proceeding with the installation.
By carefully attaching the appropriate hanging hardware to the mirror, you’ll ensure that it is properly secured and ready for mounting over the console table. Take your time during this step to ensure the mirror’s stability and longevity in its new location.
Hang the mirror above the console table
Now that you have prepared the mirror with the appropriate hanging hardware, it’s time to hang it above the console table. This step requires careful execution to ensure the mirror is level, centered, and securely mounted.
Start by recruiting a helper if possible. Having an extra pair of hands will make the process easier and safer.
Position the mirror against the wall, aligning it with the marked height and center point. Hold the mirror in place and step back to assess its positioning. Ensure that it is at the desired height and centered with respect to the console table.
If using D-rings or mirror clips, carefully lower the mirror onto the wall, ensuring that the hanging hardware is aligned with the marked height and centered above the console table. Apply gentle pressure to secure the mirror against the wall.
If using a wire, lift the mirror and hook it onto the desired hanging point, whether it’s a wall hook, nail, or other hanging mechanism. Carefully adjust the position of the mirror to align it with the marked height and center point.
Once the mirror is resting against the wall, step back and assess its placement. Use a level to ensure it is perfectly horizontal. Make any necessary adjustments by gently shifting the mirror either up or down, right or left.
Ask your helper to observe from different angles and provide feedback on the mirror’s position. Take their suggestions into consideration to achieve the best possible placement.
Once you are satisfied with the mirror’s position and levelness, it’s time to secure it further. Depending on the hanging hardware used, tighten any screws or clips to ensure the mirror is firmly held in place. Check the stability by giving the mirror a gentle shake to ensure it doesn’t wobble.
Step away from the console table and mirror, observing the overall aesthetic and alignment. Take the opportunity to make any final adjustments to achieve the perfect balance and visual appeal.
Now that the mirror is securely hung above the console table, step back and admire your work. A well-placed mirror can instantly elevate the ambiance of the space, reflecting light and adding depth to the room.
Remember to occasionally check the mirror’s stability over time and tighten any screws or hardware as needed. By properly hanging the mirror, you can enjoy its beauty and functionality for years to come.
Adjust the height if necessary
After hanging the mirror above the console table, it’s important to step back and assess the overall placement. Sometimes, adjustments to the height may be necessary to achieve the desired aesthetic and functionality.
Take a moment to observe the mirror from different angles and distances. Pay attention to how it interacts with the console table and the surrounding decor. If something feels off or if you’re not entirely satisfied with the result, don’t hesitate to make adjustments.
Consider the height of the mirror in relation to the console table and the overall proportion of the space. Is the mirror too high, making it difficult to see yourself in it or diminishing its impact? Or is it too low and competing with the items on the console table?
If you decide to adjust the height, start by carefully removing the mirror from the wall. Enlist the help of another person to safely hold and support the mirror while you make the necessary changes.
Use a measuring tape to determine the new desired height. Take into account the recommended guidelines for mirror height discussed earlier, as well as your personal preferences and the specific requirements of your space.
Re-mark the wall at the new desired height using a pencil, making sure it is level and aligned with the center of the console table or any other reference points.
Once the mark is made, follow the steps outlined earlier to rehang the mirror. Use the appropriate hanging hardware and tools to securely attach the mirror to the new height.
After rehanging the mirror, step back again and assess its placement. Take the time to view it from different angles and distances to evaluate if the adjustment has achieved the desired effect.
Remember that achieving the perfect height for the mirror may require a few iterations of adjustments. Be patient and willing to experiment until you find the ideal position that enhances the visual appeal and functionality of the mirror and console table combination.
By taking the time to evaluate and adjust the height if necessary, you can ensure that the mirror becomes an integral part of the overall design and elevates the atmosphere of your space.
Step back and assess the placement
After hanging the mirror above the console table and making any necessary adjustments, it’s crucial to step back and assess the overall placement. This final step allows you to evaluate the visual impact, alignment, and overall harmony of the display.
Take a few steps back and observe the mirror from different angles and distances. Consider how it interacts with the console table, the surrounding decor, and the overall aesthetic of the space.
Assess the alignment of the mirror with the console table. Is it centered or slightly off-center? A properly centered mirror creates a visually pleasing display, providing balance and symmetry to the space. However, in some cases, an intentionally off-center placement can create a more dynamic and interesting arrangement.
Consider the height of the mirror in relation to the console table and the surrounding elements. Does it feel proportionate and balanced? Ensure that the mirror is not overwhelming or overshadowing the console table, nor too small that it loses its impact.
Take note of the reflection in the mirror. Are there any unflattering or undesired elements being reflected? Adjust the position of the mirror if necessary to create a more pleasing reflection or to highlight specific features of the room.
Evaluate the overall ambiance and functionality provided by the mirror. Does it enhance the natural light in the space? Does it create depth and add a sense of expansiveness? Consider how the mirror interacts with the overall design scheme and complements the aesthetic of the room.
Additionally, seek the feedback of others, such as family members or friends, to gain different perspectives on the placement and overall effect of the mirror. They may notice aspects that you might have missed and provide valuable insights for further improvement.
Be open to making additional adjustments if necessary. Sometimes, small changes in positioning can make a significant difference in the overall impact of the mirror and console table display. Trust your instincts and strive for a harmonious and visually appealing arrangement.
By stepping back and assessing the placement of the mirror, you can ensure that it becomes a captivating focal point that enhances the ambiance, functionality, and overall aesthetics of the space.
Consider the overall aesthetic and design
When selecting a mirror and hanging it above a console table, it’s essential to consider the overall aesthetic and design of the space. By doing so, you can create a cohesive and visually pleasing arrangement that complements the existing decor.
Take a moment to evaluate the style and theme of the room. Is it modern and sleek, rustic and charming, or eclectic and bohemian? Consider how the mirror can enhance and align with the existing aesthetic.
If you have a specific design theme or color scheme in the room, choose a mirror that harmonizes with those elements. For example, a sleek and minimalist mirror may work well in a contemporary space, while a distressed or antique mirror could be a great addition to a more vintage-inspired room.
Consider the shape and frame of the mirror. Does it have clean lines, ornate detailing, or a unique silhouette? Ensure that the mirror matches or complements the overall design scheme. The frame, in particular, can significantly impact the look and feel of the mirror and console table combination.
Think about the materials used in the room and how the mirror can tie in with them. If you have a lot of wood furniture, consider a mirror with a wooden frame. If you have metallic accents, a mirror with a metal frame or embellishments can create a cohesive look.
Evaluate the size and scale of the mirror in relation to the console table and the room as a whole. A large mirror can make a bold statement and become a striking focal point, while a smaller mirror can add subtle elegance and provide a visual break in the space.
Consider the placement of the mirror in relation to other elements in the room. Does it complement nearby artwork, sconces, or furniture? Ensure that the mirror enhances the visual flow and balance in the space.
Take note of the lighting in the room and how the mirror can utilize or reflect it. Strategically placed mirrors can amplify natural light, create the illusion of more space, and enhance the overall brightness of the room.
Lastly, trust your instincts and personal taste. Your preferences and style should guide your decision-making process. Choose a mirror that resonates with you and brings joy to your space.
By considering the overall aesthetic and design of the room, you can select a mirror that seamlessly integrates into the space, enhances its visual appeal, and creates a harmonious and captivating atmosphere.