
Measure and Mark
Before you begin installing curtain rods, it’s important to measure and mark the desired location for optimum placement. Follow these steps to ensure accurate measurements:
1. Gather the necessary tools and materials: Grab a measuring tape, pencil, and a level. Having these tools on hand will make the measuring process much easier.
2. Determine the height and width of the curtain rod: Measure the height from the floor to the desired height of the curtain rod. For standard curtain installations, a height of 4 to 6 inches above the window frame is recommended. Next, measure the width of the window or the area you want the curtain rod to cover, taking into account any overhang you desire.
3. Select the type of curtain rod: Consider the style of curtains you plan to hang and choose a compatible curtain rod. There are various options available, such as tension rods, straight rods, or decorative rods with finials.
4. Choose the right curtain rod bracket: Depending on your chosen curtain rod style, select the appropriate brackets that will securely hold the rod in place. Ensure the brackets are compatible with the type of wall or surface you are attaching them to.
5. Find the studs or use wall anchors: Before marking the installation spots, use a stud finder to locate wall studs. If studs are not available or not in the desired location, use wall anchors for added stability. Mark the spots lightly with a pencil.
6. Pre-drill holes: If using wall anchors, carefully pre-drill holes at the marked spots. Make sure the hole size matches the size of the wall anchor.
7. Install the curtain rod brackets: Align the brackets with the marked spots and attach them using screws provided. Ensure they are level and secure.
8. Attach the curtain rod: Once the brackets are installed, place the curtain rod into the brackets. Ensure it sits securely and evenly in place.
9. Hang the curtains: Finally, hang your curtains on the curtain rod, adjusting them to the desired height and length.
By following these steps, you will be able to measure and mark the perfect location for your curtain rods, ensuring a secure and polished installation. Taking the time to measure accurately will result in beautiful curtains that enhance your space and provide the desired functionality.
Gather the Necessary Tools and Materials
Before you begin the process of installing curtain rods, it’s important to gather all the necessary tools and materials. Having everything on hand will make the installation process smoother and more efficient. Here’s a list of what you’ll need:
1. Measuring tape: A measuring tape is essential for accurately measuring the height and width of your windows or the area where you plan to install the curtain rods.
2. Pencil: A pencil will be used to mark the locations for the curtain rod brackets and any drilling points. Make sure it’s sharp and easy to erase in case of any adjustments.
3. Level: A level ensures that your curtain rods will be installed straight. It’s important to have a level on hand to avoid any slanted installations that may affect the appearance of your curtains.
4. Curtain rod: Choose a curtain rod that matches your aesthetic preferences and fits the size of your windows or desired curtain coverage area. Consider the weight of your curtains and select a rod that can support that weight adequately.
5. Curtain rod brackets: The type and style of your curtains will dictate the type of curtain rod brackets you need. There are various options available, such as standard brackets, decorative brackets, or adjustable brackets. Make sure you have the brackets that are compatible with your chosen curtain rod.
6. Screws and wall anchors: Depending on the type of wall or surface you’re installing the curtain rods on, you may need screws and wall anchors for added stability. If you’re installing the rods into studs, ensure you have the appropriate screws. If you don’t have access to studs, wall anchors will provide the necessary support.
7. Drill and drill bits: If you’re using wall anchors, you’ll need a drill and drill bits to create the holes for the anchors. Make sure you have the right size of drill bit for the anchors you’re using.
8. Screwdriver or drill: You’ll need a screwdriver or a drill to attach the curtain rod brackets to the wall or window frame securely. Ensure you have the correct screwdriver or drill bit size for the screws you’re using.
9. Step ladder or stool: If your windows are higher up, you may need a step ladder or stool to reach the installation area safely. Make sure it’s sturdy and reliable.
By gathering these tools and materials before starting the installation process, you can save time and avoid any unnecessary interruptions. Having everything organized and ready to use will ensure a smooth and successful curtain rod installation. So, double-check your supplies and get ready to transform your windows with beautiful curtains.
Determine the Height and Width of the Curtain Rod
When it comes to installing curtain rods, one of the crucial steps is determining the appropriate height and width for your curtains. Proper measurements ensure that the curtains hang elegantly and function effectively. Follow these steps to determine the ideal dimensions for your curtain rod:
1. Measure the height: Start by measuring the height from the floor to the desired location of the curtain rod. This measurement will depend on your personal preference and the overall aesthetic you want to achieve. For standard installations, a height of 4 to 6 inches above the window frame is recommended. However, consider factors such as the length of your curtains and any decorative elements you plan to use.
2. Measure the width: Measure the width of the window or the area you want to cover with the curtains. This measurement will determine the length of the curtain rod you need. Keep in mind that curtains should extend beyond the window frame to create a fuller look and maximize light blockage if desired. A common rule of thumb is to add 4 to 8 inches on each side of the window, but again, consider the specific style and function you’re aiming for.
3. Overhang considerations: If your curtains have a header or tabs, be sure to account for the extra length they will add. Additionally, consider if you want to have overlap in the middle when the curtains are closed. This can help improve privacy and insulation. Measure the total width of the curtains when they are gathered together and add this to the overall width measurement.
4. Clearance from the floor: Determine how much clearance you want between the bottom of the curtain and the floor. This is especially important if you have flooring that may interfere with the curtain hanging properly. Consider factors such as high-pile carpet or large baseboards when establishing the clearance height.
By carefully measuring the height and width of your curtain rod, you can ensure a perfect fit and create a visually pleasing window treatment. Take your time during this step to get the measurements right, as it will influence the overall look and functionality of your curtains. Properly sized curtains will enhance the appearance of your windows and add a touch of sophistication to your space.
Select the Type of Curtain Rod
When it comes to choosing a curtain rod, there are several options available that can enhance the style and functionality of your curtains. Consider the following factors to determine the best type of curtain rod for your needs:
1. Tension rods: Tension rods are a popular and versatile option for hanging curtains. They are easy to install as they rely on tension to stay in place, without the need for drilling or brackets. Tension rods are adjustable in length and are suitable for lightweight curtains and temporary installations.
2. Straight rods: Straight rods, also known as basic curtain rods, are the most common and straightforward option. They typically come with mounting brackets and can support a range of curtain weights. Straight rods are available in various materials, such as metal or wood, and offer a sleek and simple look.
3. Decorative rods: If you want to make a statement with your curtains, decorative rods are an excellent choice. These rods feature decorative finials on each end, adding a touch of elegance and style to your window treatment. Decorative rods come in various designs, finishes, and materials, allowing you to find the perfect match for your decor.
4. Traverse rods: Traverse rods are ideal for curtains that need to be opened and closed frequently, such as heavy drapes or layered curtains. These rods feature a cord system or a motorized mechanism that allows you to effortlessly slide the curtains open or closed. Traverse rods offer a clean and seamless look when the curtains are closed.
5. Magnetic rods: Magnetic rods are a convenient solution for lightweight curtains or for situations where you want a quick and easy installation. These rods use magnets to adhere to metal surfaces, eliminating the need for brackets or screws. Magnetic rods are perfect for small windows, narrow spaces, or for hanging curtains temporarily.
Consider the weight and style of your curtains when selecting a curtain rod. If you have heavy curtains, such as blackout curtains or thermal curtains, opt for a rod that can support their weight adequately. Additionally, keep in mind the overall aesthetic you want to achieve in your space – whether it’s a minimalist look or a more ornate and decorative style.
By choosing the right type of curtain rod, you can enhance the overall appearance of your curtains and create a cohesive and stylish window treatment. Take your time to explore the options available and select a rod that complements your curtains and adds a beautiful finishing touch to your windows.
Choose the Right Curtain Rod Bracket
When installing curtain rods, choosing the right brackets is essential for ensuring stability and proper support. The type of curtain rod you have will influence the type of brackets you need. Consider these key factors when selecting the right curtain rod brackets:
1. Compatibility: Ensure that the brackets you choose are compatible with your curtain rod. Different types of rods require specific brackets for proper attachment. For example, if you have a wooden curtain rod, you will need brackets designed to fit a wooden rod. Checking compatibility is important to ensure a secure and snug fit.
2. Weight capacity: Consider the weight of your curtains before selecting brackets. Heavy and thick curtains may require brackets that have a higher weight capacity to prevent sagging or bending. Check the manufacturer’s specifications to determine the maximum weight the brackets can support. It is always better to choose brackets with a higher weight capacity than you actually need to ensure stability.
3. Style and design: Brackets can be functional and visually appealing, contributing to the overall aesthetics of your curtain installation. Consider the style and design of the brackets that align with your curtain rods and the desired look of your space. Brackets come in various materials, finishes, and designs, from sleek and minimalistic to decorative and ornate. Select brackets that complement your curtains and enhance the overall aesthetic appeal.
4. Wall or ceiling mount: Decide whether you want to mount the curtain rod brackets on the wall or the ceiling. Wall-mounted brackets are the most common and versatile option. However, if you have high ceilings or want to create the illusion of height, ceiling-mounted brackets can be an excellent choice. Ensure that the brackets you select are designed for the specific mounting option you prefer.
5. Single or double brackets: Determine whether you need single or double brackets. Single brackets are used when you have one curtain rod and one layer of curtains. Double brackets, on the other hand, allow you to hang two layers of curtains, such as sheers and drapes. If you plan to layer curtains, choose double brackets that can accommodate both rods securely.
6. Installation ease: Consider the ease of installation when selecting curtain rod brackets. Some brackets require drilling, while others may offer a convenient and tool-free installation process. Depending on your DIY skills and comfort level, choose brackets that align with your preferred installation method.
By carefully considering compatibility, weight capacity, style, mounting options, and your specific needs, you can choose the right curtain rod brackets. Remember that selecting high-quality brackets will provide the necessary support for your curtains and ensure a secure and visually pleasing installation.
Find the Studs or Use Wall Anchors
Properly securing your curtain rod brackets is crucial for a sturdy and long-lasting installation. There are two common methods for mounting curtain rod brackets: finding the studs in the wall or using wall anchors. Follow these steps to ensure your curtain rod brackets are securely attached:
1. Finding the studs: Studs are vertical wooden beams behind the walls that provide extra support. Using a stud finder, locate the position of the studs along the wall where you plan to install the curtain rod brackets. Studs are typically spaced 16 to 24 inches apart. Mark the location of the studs using a pencil.
2. Utilizing wall anchors: If you can’t find studs in the desired location or if they are not positioned for optimal curtain placement, wall anchors are an alternative solution. Wall anchors provide additional support by distributing the weight of the curtain rod evenly across the wall surface. Use a wall anchor kit that matches the weight capacity and thickness of your wall. Follow the manufacturer’s instructions to properly install the anchors at the marked locations.
3. Drywall considerations: If your walls are made of drywall, it’s important to use anchors even if you find the studs. Drywall alone may not have enough strength to hold the weight of the curtain rod and curtains. Wall anchors provide the necessary stability and prevent damage to the wall.
4. Weight capacity: Ensure that the selected type of wall anchors or the stud you are using can support the weight of the curtain rod and the curtains. It’s important to consider the weight of both when determining the appropriate type of anchor or stud to use.
5. Proper installation: Whether you’re using studs or wall anchors, follow the specific installation instructions provided with the brackets. Use the appropriate screws or hardware to secure the brackets in place. Ensure that the screws are tightened securely, but avoid overtightening, as it may damage the wall or strip the screws. Use a level to ensure the brackets are straight and aligned before finalizing the installation.
By finding the studs or using wall anchors to secure your curtain rod brackets, you can ensure a strong and stable installation. Taking the necessary steps to properly attach the brackets will prevent any accidents or damage caused by the weight of the curtains. Whether you rely on studs or wall anchors, it’s important to prioritize the safety and longevity of your curtain rod installation.
Pre-drill Holes
Before installing your curtain rod brackets, it’s important to pre-drill holes to ensure a secure and stable attachment. Pre-drilling holes helps prevent the wood or wall from splitting and allows for easier installation. Follow these steps to pre-drill holes properly:
1. Select the right drill bit: Choose a drill bit with a diameter slightly smaller than the screws you will be using. This will allow the screws to grip the walls or studs securely without being too loose or tight.
2. Mark the hole locations: Use the bracket as a guide and mark the exact spots where you’ll be pre-drilling the holes. Place the bracket against the wall or stud and use a pencil or marker to mark the top and bottom screw holes.
3. Ensure proper spacing: Make sure the holes are spaced evenly and are aligned with the other brackets you’ll be installing. This will ensure a level and balanced curtain rod installation.
4. Use a level: Before drilling, use a level to ensure that the marks and holes will result in a straight and even installation. Adjust the marks if needed to achieve a level placement.
5. Start drilling: Attach the appropriate drill bit to your drill. Begin drilling at a slow speed, using firm and steady pressure. Use caution and maintain control of the drill to avoid damaging the wall or stud. Drill until the bit penetrates the desired depth, which should be slightly shorter than the length of the screws you’ll be using.
6. Remove debris: After pre-drilling each hole, remove any dust or debris from the holes using a vacuum or a brush. This will ensure a clean and secure fit for the screws.
7. Repeat for all holes: Repeat the pre-drilling process for each marked hole, ensuring consistent depth and cleanliness for all holes.
By pre-drilling holes in the correct locations, you can prevent damage to the wall or stud and ensure a smooth installation of your curtain rod brackets. Taking the time to properly pre-drill will make inserting the screws easier and reduce the risk of any mishaps or potential damage to your walls.
Install the Curtain Rod Brackets
Now that you’ve pre-drilled the necessary holes, it’s time to install the curtain rod brackets. Proper installation of the brackets is crucial for a secure and stable curtain rod setup. Follow these steps to ensure a successful installation:
1. Align the brackets: Hold the first bracket up to the pre-drilled hole, making sure it aligns with the marks and is level. If necessary, make slight adjustments to ensure a proper fit and alignment. Repeat this step for the remaining brackets.
2. Insert screws: Using the provided screws or appropriate screws for your installation, carefully insert them through the holes in the bracket and into the pre-drilled holes. Apply gentle pressure as you turn the screw clockwise, making sure it engages with the wall or stud securely. Be careful not to overtighten the screws, as this can cause stripping or damage.
3. Repeat for all brackets: Install each bracket one at a time, ensuring they are all aligned properly and securely attached to the wall or studs. Use a level to check the alignment and adjust as needed.
4. Test stability: Once all brackets are installed, gently tug or shake them to ensure they are stable and securely attached. If any brackets feel loose, tighten the screws further or reposition them slightly to achieve a better fit.
5. Double-check alignment: After the brackets are secured, inspect the overall alignment of the brackets. Ensure they are straight, level, and evenly spaced. Any adjustments can be made at this stage before proceeding to the next steps.
6. Let it settle: Give the installed brackets a few hours to settle and adjust before hanging curtains. This allows any shifting or slight movements to occur naturally, ensuring the brackets are properly seated before adding additional weight.
By following these steps, you can confidently install the curtain rod brackets. Taking the time to ensure proper alignment, secure attachment, and stability will result in a strong foundation for hanging your curtains. With the brackets securely in place, you can move on to the next steps of attaching the curtain rod and hanging the curtains to complete your stylish window treatment.
Attach the Curtain Rod
Now that the curtain rod brackets are securely installed, it’s time to attach the curtain rod itself. Properly attaching the rod will ensure that it is stable and capable of supporting the weight of your curtains. Follow these steps to attach the curtain rod:
1. Choose the right curtain rod: Select a curtain rod that fits the width of your window or the desired coverage area. Ensure that the rod is compatible with the brackets you have installed.
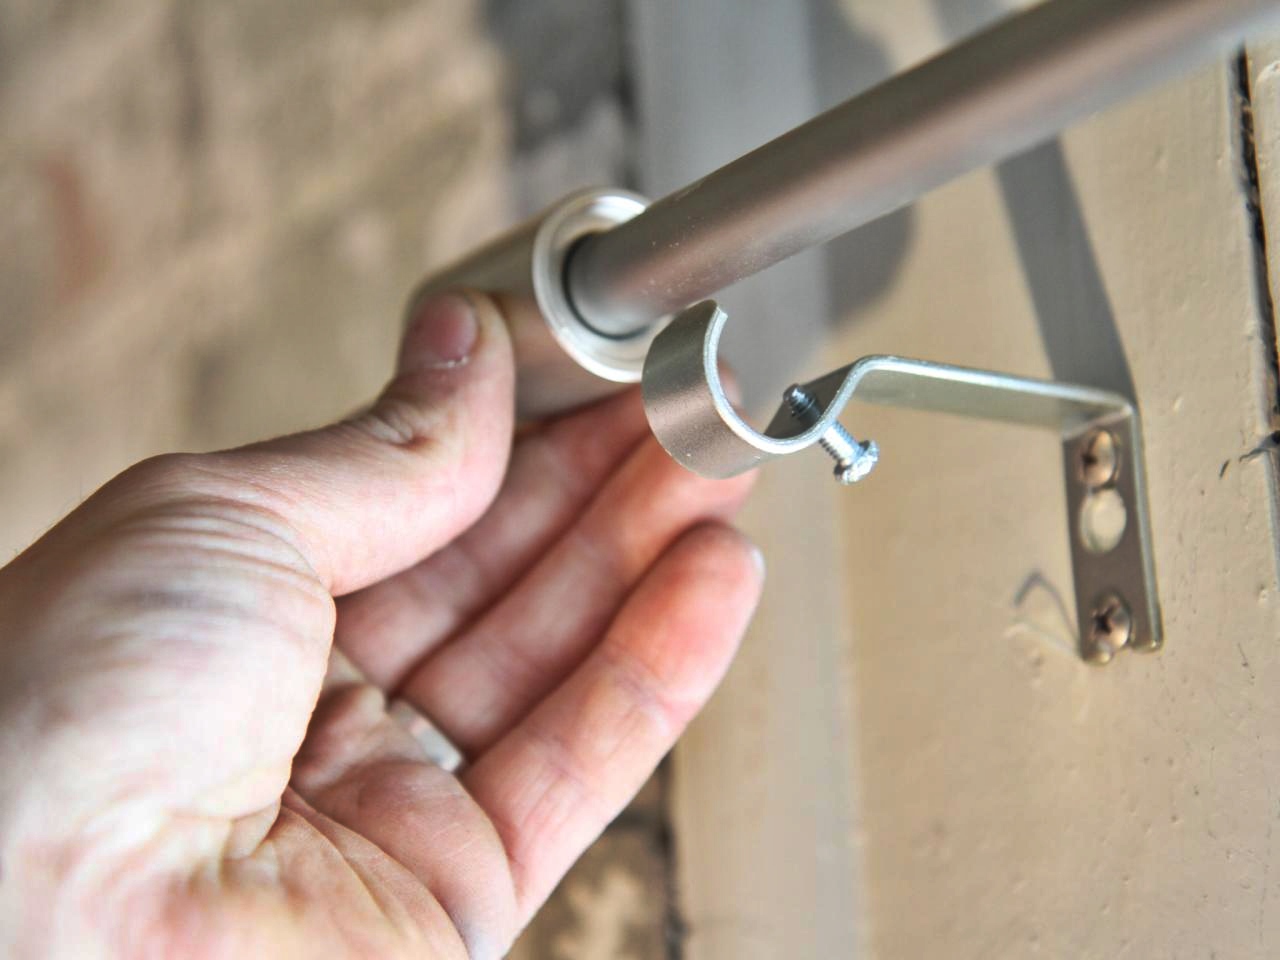
2. Insert the rod into the brackets: Place one end of the curtain rod into the bracket, making sure it sits snugly in place. Slide the rod through the brackets until the other end is also securely seated. If your rod has multiple sections, connect them according to the manufacturer’s instructions.
3. Center the rod: Position the curtain rod evenly between the brackets. Use a measuring tape or a level to ensure the rod is centered and at the desired height. This will help create a balanced and visually appealing window treatment.
4. Secure the rod if necessary: Some curtain rods come with screws or set screws that can be tightened to secure the rod in place. Follow the manufacturer’s instructions to determine if this step is required. If applicable, use a screwdriver or the provided tool to tighten the screws or set screws, ensuring that the rod is held securely.
5. Test stability: Once the curtain rod is attached, gently tug on the rod to test its stability. Ensure that it feels secure and doesn’t wobble or shift. If any adjustments are needed, double-check the brackets and connections to ensure they are properly tightened.
6. Prioritize safety: If you have children or pets, consider using safety devices such as cord cleats or cord stops to secure any cords or drapery pull cords. These devices help prevent accidents and promote a safe environment.
Attaching the curtain rod is the final step before hanging your curtains. By following these steps with care, you can ensure that your curtain rod is securely in place, ready to support and showcase your curtains effectively.
Hang the Curtains
With the curtain rod securely attached, it’s time to hang your curtains and enjoy the finished look of your window treatment. Follow these steps to effectively hang your curtains:
1. Prepare the curtains: If your curtains have been folded or packaged, remove any packaging and unfold them. If necessary, iron or steam the curtains to remove any wrinkles and ensure a clean, polished appearance.
2. Determine the curtain placement: Decide how you want your curtains to fall and how high or low you want them to hang. You may want them to skim the floor or puddle slightly for an elegant look, or you may prefer them to end just above the windowsill for a more practical option. Consider the overall style and function of the curtains when determining the placement.
3. Slide the curtains onto the rod: Slide the curtain panels onto the curtain rod through the openings or loops provided. Make sure the curtains are evenly distributed along the rod, ensuring a balanced look when they are hung.
4. Hang the curtains: With the curtains on the rod, carefully lift the rod and place it onto the brackets. Ensure that the rod sits securely in the brackets and that the curtains hang properly.
5. Adjust the curtains: Step back and assess the appearance of the curtains. Make any necessary adjustments, such as adjusting the folds or smoothing out any wrinkles, to achieve the desired look. Use curtain tiebacks or clips if needed to create different draping styles.
6. Test functionality: Open and close the curtains to ensure that they move smoothly and without any obstructions. If there are any difficulties, check for any fabric caught in the brackets or any misalignment that may cause sticking.
7. Finishing touches: Once the curtains are hung, step back and admire the completed look. Consider adding decorative elements, such as curtain rings or decorative tiebacks, to enhance the overall aesthetic or match your interior design style.
By following these steps, you can successfully hang your curtains and complete your window treatment. Take the time to adjust and arrange the curtains until you achieve the desired look. Enjoy the transformation of your space with the addition of beautiful curtains that enhance both the style and functionality of your windows.