
What is VR?
Virtual Reality, or VR, is a technology that allows users to immerse themselves in a digital environment that looks and feels like the real world. By wearing a VR headset, users can experience a virtual world that can range from realistic simulations to fantastical landscapes.
VR is achieved by creating a 3D environment that is displayed through the headset, providing a sense of depth and presence. This immersive experience is enhanced by the ability to interact with the virtual world using hand gestures or specialized controllers.
VR technology has rapidly advanced in recent years, making it more accessible and affordable for consumers. One such platform is the iPhone, which offers a great VR experience thanks to its high-resolution Retina display and powerful processing capabilities.
With the help of various VR apps and accessories, iPhone users can transform their devices into a gateway to exciting virtual worlds. Whether you’re a gaming enthusiast, an adventure seeker, or simply curious about the possibilities, VR on the iPhone has something to offer for everyone.
VR is not limited to entertainment purposes only. It has found applications in various industries, including education, healthcare, architecture, and more. The ability to simulate real-world scenarios in a controlled environment has opened up new possibilities for training, design, and research.
Being able to experience virtual reality on the iPhone opens up a world of opportunities for users to explore and engage with dynamic and immersive content. Whether you want to dive into a virtual game, explore virtual destinations, or enhance your professional skills, VR on the iPhone can take you there.
Understanding VR on iPhone
Virtual Reality (VR) on the iPhone allows users to enjoy immersive experiences and explore virtual worlds right from their smartphones. With the advancements in technology, the iPhone has become a powerful device for VR, offering high-resolution displays and robust processing capabilities.
To understand VR on the iPhone, it’s important to know the key components and how they work together to create a realistic virtual experience. The main components include:
- VR headset: This is a device that users wear on their heads to view the virtual environment. There are various types of headsets available for the iPhone, ranging from simple cardboard viewers to advanced, high-end options.
- Display: The iPhone’s Retina display plays a crucial role in enhancing the VR experience. The high pixel density and vibrant colors make the virtual environment come to life.
- Tracking sensors: These sensors detect the user’s head movements and adjust the virtual display accordingly. This ensures a more realistic and immersive experience as the virtual world reacts to the user’s movements.
- Control options: The iPhone offers various control options for VR, including on-screen touch controls, motion sensors, and external controllers. These allow users to interact with the virtual environment and navigate through virtual worlds.
VR on the iPhone is not limited to gaming. There are a wide range of VR apps available that cover various interests and purposes. Whether you’re interested in exploring virtual destinations, watching immersive videos, or engaging in educational experiences, there is something for everyone.
Furthermore, the iPhone’s App Store provides a platform for developers to create innovative and engaging VR content. This means that the selection of VR apps is continuously expanding, giving users more options and opportunities to explore different virtual experiences.
Understanding the fundamentals of VR on the iPhone is essential for maximizing the enjoyment and potential of this technology. By familiarizing yourself with the VR headset, display, tracking sensors, and control options, you can fully immerse yourself in the virtual worlds and embark on exciting adventures without leaving the comfort of your home.
Types of VR on iPhone
When it comes to experiencing virtual reality (VR) on the iPhone, there are several options available. These different types of VR on the iPhone cater to various preferences and budgets, ensuring that there is something for everyone to enjoy. Let’s explore the main types:
- Google Cardboard: Google Cardboard is an affordable VR solution that uses a simple cardboard viewer and the iPhone’s display to create a virtual reality experience. Users can download VR apps, slide their iPhone into the Cardboard viewer, and enjoy immersive content.
- Oculus Go: Oculus Go is a standalone VR headset that offers a more advanced and immersive VR experience on the iPhone. With its high-resolution display, built-in speakers, and integrated sensors, the Oculus Go provides a seamless and immersive virtual experience.
- Samsung Gear VR: If you already own a Samsung Gear VR headset, you can use it with your iPhone by connecting it wirelessly or with an adapter. The Gear VR offers a wide range of VR content, including games, videos, and immersive experiences.
- Third-Party Headsets: There are numerous third-party VR headsets available on the market that are compatible with the iPhone. These headsets vary in terms of features, comfort, and price, allowing users to choose the one that best suits their needs and preferences.
- iPhone AR/VR Apps: Apart from dedicated VR headsets, there are also augmented reality (AR) and VR apps available for the iPhone. These apps leverage the iPhone’s powerful processors and cameras to provide interactive AR and VR experiences directly on the device without the need for additional accessories.
Each type of VR on the iPhone offers a unique experience, with varying levels of immersion and interactivity. The choice of which type to use depends on your budget, desired level of immersion, and the type of content you want to experience.
It’s worth noting that while VR on the iPhone provides a fun and immersive experience, it may not match the capabilities of high-end VR systems like the Oculus Rift or HTC Vive. Nevertheless, it still offers a great entry point into the world of VR and allows users to enjoy a wide range of virtual experiences.
With the availability of different types of VR on the iPhone, you can choose the one that suits your preferences and dive into a world of immersive entertainment, education, and exploration.
VR Apps for iPhone
The iPhone offers a plethora of virtual reality (VR) apps that allow users to dive into immersive experiences and explore virtual worlds. These apps cover a wide range of interests and provide hours of entertainment and exploration. Let’s take a look at some of the top VR apps available for iPhone:
- VRSE: VRSE is an app that offers a collection of immersive virtual reality experiences, including documentaries, music videos, and short films. With stunning visuals and captivating storytelling, VRSE allows users to be transported to different worlds and perspectives.
- YouTube VR: YouTube VR allows users to watch VR videos on their iPhone, from 360-degree videos to immersive virtual reality content. Users can explore a wide range of channels, subscribe to their favorite creators, and discover new and exciting VR experiences.
- Google Arts & Culture VR: This app brings virtual reality to art lovers, allowing them to explore famous museums and art collections from around the world. Users can get up close to famous works of art, learn about their history, and experience the beauty of art in a whole new way.
- Titans of Space: Titans of Space is an educational VR experience that takes users on a tour of the solar system. Users can explore the planets, learn about their characteristics, and get a sense of the vastness of space, all from the comfort of their iPhone.
- InCell VR: InCell VR is a unique VR racing game where players are shrunk down to microscopic size and travel through the intricate world of human cells. It combines immersive visuals with educational elements, making it an engaging and educational VR experience.
These are just a few examples of the many VR apps available for iPhone. There are countless other apps that cater to various interests, such as VR games, travel experiences, architectural walkthroughs, and more.
When downloading VR apps for your iPhone, be sure to check reviews and ratings to ensure a high-quality experience. Additionally, some apps may require additional VR accessories or headsets for optimal usage, so make sure to check the app’s requirements before diving in.
With the wide range of VR apps available for the iPhone, users can unlock unlimited possibilities and embark on exciting virtual adventures right from their smartphones.
Setting up your iPhone for VR
Before you can start enjoying virtual reality (VR) on your iPhone, there are a few steps you need to take to ensure a smooth and immersive experience. Here’s a guide to setting up your iPhone for VR:
- Check iPhone compatibility: Not all iPhone models are compatible with VR. Make sure to check the VR headset or app requirements to ensure that your iPhone model is supported.
- Download VR apps: Head to the App Store and download VR apps that catch your interest. There are plenty of options available, ranging from games to educational experiences.
- Connect a VR headset: Depending on the type of VR headset you have, follow the manufacturer’s instructions to connect it to your iPhone. This may involve inserting your iPhone into a viewer or connecting it wirelessly.
- Adjust headset settings: Once your iPhone is connected to the VR headset, adjust the position and focus of the lenses to ensure a clear and comfortable view. Make sure the headset is securely strapped to your head for a stable experience.
- Calibrate tracking sensors: Many VR headsets have tracking sensors that detect the movement of your head. Calibrate these sensors according to the headset’s instructions to ensure accurate tracking and a more immersive experience.
- Configure control options: Depending on the VR app you’re using, you may have different control options, such as on-screen touch controls, motion sensors, or external controllers. Familiarize yourself with these controls to navigate through the virtual environment.
- Adjust iPhone settings: Enable “Do Not Disturb” mode or airplane mode to minimize interruptions during your VR experience. Also, adjust the display settings on your iPhone to ensure the best visual quality.
- Prepare your surroundings: Clear a safe space around you to prevent any accidents while wearing the VR headset. Remove any obstacles or fragile objects and ensure that the area is well-lit to avoid tripping or bumping into things.
Once you’ve completed these steps, you’re ready to start exploring the virtual worlds on your iPhone. Remember to take breaks and stay aware of your surroundings while using VR to ensure a safe and enjoyable experience.
It’s worth noting that not all VR apps or headsets require a physical connection to your iPhone. Some apps utilize the iPhone’s built-in sensors and cameras to provide augmented reality (AR) and virtual reality experiences directly on the device.
By following these setup steps, you can optimize your iPhone for VR and fully immerse yourself in the exciting world of virtual reality.
Best VR Headsets for iPhone
If you’re looking to enhance your virtual reality (VR) experience on your iPhone, investing in a good VR headset is a must. Here are some of the best VR headsets available for iPhone users:
- Google Cardboard: Google Cardboard is a low-cost and accessible VR headset option for iPhone users. Made from cardboard, it is compatible with a wide range of iPhone models. While it may not offer the same level of comfort and immersion as more advanced headsets, it is a great entry-level option.
- Oculus Go: The Oculus Go is a standalone VR headset that delivers an impressive VR experience for iPhone users. With its high-resolution display, built-in speakers, and comfortable design, it offers a great balance between price and performance.
- Samsung Gear VR: While primarily designed for Samsung smartphones, the Samsung Gear VR can also be used with iPhones by connecting wirelessly or with an adapter. It provides a wide range of VR experiences and has a comfortable and ergonomic design.
- Homido V2: The Homido V2 is a versatile and adjustable VR headset that is compatible with iPhones. It offers a wide field of view and allows for adjustments to ensure a comfortable fit. It also includes optional accessories such as controllers for added interactivity.
- ZEISS VR One Plus: The ZEISS VR One Plus is a premium VR headset that provides an exceptional visual experience for iPhone users. It features high-quality optics and a comfortable design, making it a popular choice among VR enthusiasts.
These VR headsets offer varying levels of comfort, visual quality, and immersion. Some come with additional features like built-in audio, adjustable straps, and controller compatibility. Consider your budget, comfort preferences, and desired features when choosing the best VR headset for your iPhone.
Remember to check the compatibility of the VR headset with your specific iPhone model. Additionally, be sure to read reviews and consider the overall user experience before making a purchase.
It’s worth noting that some VR apps and experiences can be enjoyed without a physical VR headset on the iPhone. The iPhone’s built-in sensors and cameras allow for augmented reality (AR) and virtual reality experiences directly on the device.
With the right VR headset, you can elevate your iPhone’s VR capabilities and immerse yourself in a world of captivating virtual experiences.
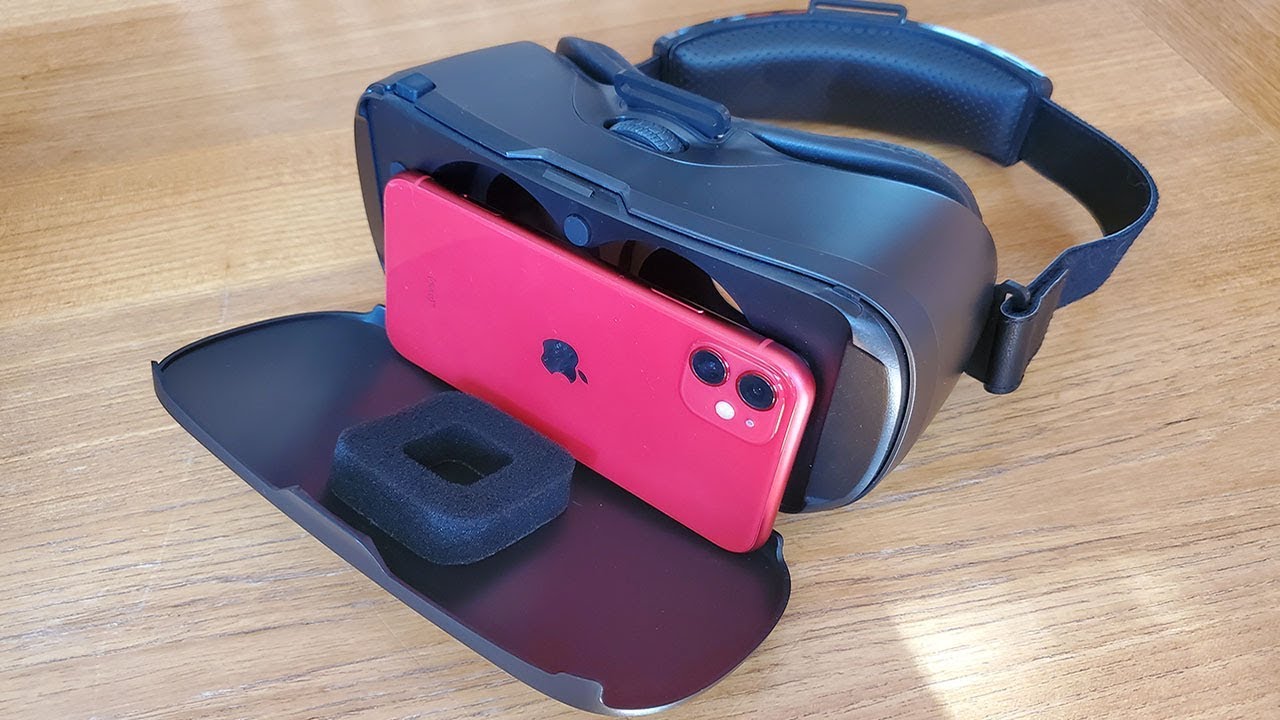
How to Watch VR on iPhone using Google Cardboard
If you have an iPhone and a Google Cardboard headset, you can easily enjoy virtual reality (VR) experiences on your device. Here’s a step-by-step guide on how to watch VR on your iPhone using Google Cardboard:
- Download Google Cardboard app: Start by downloading the Google Cardboard app from the App Store. This app acts as a hub for VR content and provides a user-friendly interface for navigating through different experiences.
- Assemble your Google Cardboard headset: Follow the instructions to assemble your Google Cardboard headset. The process usually involves folding and securing the cardboard viewer using the provided straps or adhesive.
- Insert your iPhone into the headset: Open the flap on the front of the viewer and insert your iPhone into the designated slot, making sure it fits securely. Close the flap to hold the iPhone in place.
- Launch the Google Cardboard app: Open the Google Cardboard app on your iPhone. The app will detect the VR headset and display a split-screen view for the VR experience.
- Select a VR experience: Browse through the available VR experiences in the Google Cardboard app. You can choose from a variety of categories such as games, videos, or educational content. Select the experience that interests you.
- Place the headset on your head: Slide the Google Cardboard headset over your head, adjusting the straps for a comfortable fit. Make sure the lenses align with your eyes so that you can view the virtual environment properly.
- Use the side button or your gaze to interact: Depending on the VR experience, you can either use the side button on the Google Cardboard viewer or simply gaze at interactive elements within the virtual environment to navigate, select options, or play games.
- Enjoy the VR experience: Immerse yourself in the virtual world and explore the various activities or environments offered by the app. Move your head to look around and interact with the elements of the virtual environment.
Remember to take breaks if you feel any discomfort or motion sickness while using VR. Start with short sessions and gradually increase the duration as you become more comfortable.
With your iPhone and Google Cardboard headset, you can access a wide range of VR experiences and enjoy the immersive world of virtual reality from the convenience of your own device.
How to Watch VR on iPhone using Oculus Go
If you own an iPhone and an Oculus Go headset, you can easily enjoy virtual reality (VR) experiences on your device. Here’s a step-by-step guide on how to watch VR on your iPhone using Oculus Go:
- Download the Oculus app: Start by downloading the Oculus app from the App Store on your iPhone. This app acts as a companion app for your Oculus Go headset and allows you to browse and download VR content.
- Configure the Oculus Go headset: Set up your Oculus Go headset by following the manufacturer’s instructions. This typically involves connecting the headset to a computer or the Oculus app on your iPhone to complete the initial setup process.
- Connect the Oculus Go and iPhone: Enable Bluetooth on your iPhone and turn on the Oculus Go headset. Open the Oculus app on your iPhone and follow the on-screen instructions to pair and connect the two devices.
- Browse and download VR content: Use the Oculus app on your iPhone to browse the library of VR content available. You can explore various categories such as games, videos, and experiences. Once you find something you like, tap “Download” to transfer the content to your Oculus Go headset.
- Put on the Oculus Go headset: Slide the Oculus Go headset over your head, adjusting the straps for a comfortable fit. Make sure the lenses align with your eyes, and the built-in headphones are positioned correctly for optimal audio experience.
- Navigate and interact in VR: Use the Oculus Go’s built-in controller or the touchpad located on the side of the headset to navigate through the VR interface. Select content, launch apps, and interact with the virtual environment using the controllers or your head movements.
- Enjoy the VR experience: Once you’ve selected the desired VR content, enjoy the immersive experience it offers. Look around, explore the virtual environment, and interact with objects or characters as directed by the VR app.
Remember to take breaks if you experience any discomfort or motion sickness while using VR. Start with shorter sessions and gradually increase the duration as you become more accustomed to virtual reality.
With your iPhone and Oculus Go headset, you can access a wide range of high-quality VR experiences and dive into the captivating world of virtual reality.
How to Watch VR on iPhone using Samsung Gear VR
Although primarily designed for Samsung smartphones, you can also enjoy virtual reality (VR) experiences on your iPhone using a Samsung Gear VR headset. Here’s a step-by-step guide on how to watch VR on your iPhone using Samsung Gear VR:
- Check compatibility: Confirm that your Samsung Gear VR headset is compatible with the iPhone by checking the manufacturer’s specifications. Some models may require additional adapters or accessories to connect with the iPhone.
- Securely attach the iPhone: Use the appropriate adapter or mechanism to securely attach your iPhone to the Samsung Gear VR headset. Ensure that the connection is stable and the iPhone is properly aligned with the headset’s lenses.
- Download the Oculus app: Go to the App Store on your iPhone and download the Oculus app. This app is required to access and install VR content on your iPhone for use with the Samsung Gear VR headset.
- Connect the Samsung Gear VR: Connect your iPhone to the Samsung Gear VR headset via the provided adapter, wireless connection, or any other method specified by the manufacturer.
- Launch the Oculus app: Open the Oculus app on your iPhone and follow any on-screen prompts to set up and configure the app for use with your Samsung Gear VR headset.
- Browse and install VR content: Use the Oculus app to browse the available VR content. Select the content you’re interested in and choose “Install” or “Download” to add it to your VR library on the iPhone.
- Put on the Samsung Gear VR headset: Put on the Samsung Gear VR headset, ensuring a comfortable fit and proper alignment of the lenses with your eyes. Adjust the straps to secure the headset in place.
- Launch the VR content: Use the controls on the Samsung Gear VR headset to navigate to the desired VR experience or app. Once selected, launch it to begin your immersive VR adventure.
- Enjoy the VR experience: Immerse yourself in the VR content, using head movements or any included controllers to interact with the virtual environment. Explore, play games, watch videos, or engage in any activities provided by the VR app.
It’s important to note that optimal compatibility and performance may vary when using Samsung Gear VR with an iPhone compared to a Samsung smartphone. Some features or functionalities may not be available or may be limited when using the headset with an iPhone.
By following these steps, you can make the most of your iPhone and Samsung Gear VR headset to experience a variety of captivating VR content.
Troubleshooting Common VR Issues on iPhone
While virtual reality (VR) on the iPhone offers a thrilling experience, you may encounter some common issues along the way. Here are some troubleshooting tips to help resolve common VR issues on your iPhone:
- Blurry or unclear visuals: Adjust the focus wheel or position of the VR headset to improve visual clarity. Also, ensure that the iPhone’s display is clean and free of smudges, as this can affect image quality.
- Motion sickness or discomfort: If you experience motion sickness or discomfort, take regular breaks during VR sessions and gradually increase the duration over time. Reduce the field of view or sensitivity settings within the VR app to minimize nausea.
- Overheating: Extended use of VR can cause the iPhone to overheat. To prevent this, make sure your iPhone is fully charged and consider using a cooling fan or keeping the device in a cool environment while using VR.
- Connectivity issues: If you’re experiencing connectivity issues between your iPhone and the VR headset, ensure that all connections are secure and properly aligned. Update the firmware of the VR headset or app if available.
- App crashing or freezing: If a VR app is crashing or freezing, try closing other background apps on your iPhone to free up resources. Restart the app or reinstall it if the issue persists. Make sure your iPhone’s software is up to date.
- Tracking problems: If you experience tracking issues with head movements, ensure that the VR headset’s tracking sensors are clean and free from obstructions. Reset the tracking calibration within the VR app or adjust the lighting conditions in the room.
- Controller connectivity: If you’re using an external controller for VR interaction, ensure that it’s properly connected or paired with your iPhone. Consult the controller’s manual for instructions on connecting it to your iPhone.
- Sound or audio issues: If you’re experiencing sound problems in VR, check the audio settings on both the iPhone and the VR app. Ensure that the sound volume is up, the audio is correctly routed to the VR headset, and the headset’s speakers or headphone jack is functioning properly.
- App compatibility: Some VR apps may not be fully compatible with certain iPhone models or iOS versions. Check the app’s description or developer’s website for compatibility information and ensure that your iPhone meets the requirements.
If you encounter persistent issues or ones not listed here, consult the support resources provided by the VR headset manufacturer or the specific VR app developer. They can offer guidance and troubleshooting tailored to your specific setup.
By following these troubleshooting tips, you can overcome common VR issues and ensure a smooth and enjoyable virtual reality experience on your iPhone.
Tips and Tricks for the Best VR Experience on iPhone
To enhance your virtual reality (VR) experience on the iPhone, here are some tips and tricks that can help you get the most out of your VR adventures:
- Optimize your iPhone settings: Adjust the brightness and display settings on your iPhone to ensure a clear and vibrant VR image. Enable “Do Not Disturb” mode to minimize interruptions and notifications during your VR sessions.
- Take breaks: VR experiences can be immersive and intense, so remember to take regular breaks to prevent eye strain and motion sickness. Start with shorter sessions, gradually increasing the duration as your tolerance builds.
- Use headphones: For a truly immersive audio experience, use headphones while in VR. This helps to enhance the spatial audio and provides a more realistic sense of being in the virtual environment.
- Explore different types of content: Don’t limit yourself to just games or videos. VR offers a wide range of experiences, including travel, education, art, and more. Explore different types of VR content to discover new and exciting adventures.
- Engage with interactive elements: Many VR experiences have interactive elements that allow you to engage with the virtual environment. Take advantage of these features by interacting with objects, completing tasks, or trying out different gestures and controls.
- Experiment with comfort settings: VR apps often provide comfort settings to adjust the field of view, movement sensitivity, and control options. Take the time to experiment with these settings to find what works best for you and enhances your overall comfort and enjoyment.
- Clear your play area: Before starting a VR session, make sure your play area is clear of obstacles and hazards. Remove any fragile or valuable objects that could be accidentally knocked over or damaged. This helps to ensure a safe and uninterrupted VR experience.
- Customize controls: Some VR apps allow you to customize control options to better suit your preferences. Explore the settings within the app to adjust controls like hand gestures, button mapping, or even controller sensitivity.
- Explore user-generated content: Look for VR apps or platforms that offer user-generated content. These experiences often provide a diverse range of virtual environments, games, and interactive content created by the VR community.
- Stay updated: Keep an eye out for software updates for both your iPhone and VR apps. These updates often come with performance enhancements, bug fixes, and new features that can further enhance your VR experience.
Remember, the key to a great VR experience is to have fun and be open to new adventures. With these tips and tricks, you’ll be able to fully immerse yourself in the incredible world of virtual reality on your iPhone.