
Common Troubleshooting Steps
Having trouble getting your second monitor to work? Don’t worry, you’re not alone. Many people encounter issues when trying to set up a second monitor, but luckily, there are some common troubleshooting steps you can take to address the problem.
Before diving into the solutions, it’s important to first check if all the necessary cables are properly connected. Ensure that the power cable, video cable, and any additional cables required for the specific monitor and computer setup are securely attached.
Once the connection has been verified, the next step is to update your graphics and display drivers. Outdated drivers can often lead to compatibility issues and prevent your second monitor from functioning correctly. Visit the website of your graphics card manufacturer or use a reliable driver updating software to ensure you have the latest drivers installed.
Another thing to consider is adjusting the display settings. Sometimes, the resolution or refresh rate settings may not be compatible with the second monitor. Go to the Display Settings in your operating system and experiment with different settings to find the optimal configuration for both monitors.
It’s also important to verify the hardware compatibility between your computer and the second monitor. Check if the ports on your computer and the monitor match. For instance, if your computer has an HDMI port and the monitor only supports VGA, you may need to use an adapter or consider using a different monitor.
Restarting the computer can often resolve minor software glitches that may be preventing the second monitor from working properly. Give it a try and see if the issue persists.
Inspecting the cables and ports for any physical damage is another crucial step. Loose or damaged cables can result in a poor connection and cause issues with the second monitor. Replace any cables that show signs of wear and tear.
Ensure that you are using the correct output source on your computer. Sometimes, the computer default settings might be set to display output on a different monitor or device. Use the appropriate input source on the monitor and check the display settings on your computer to ensure it recognizes the second monitor.
If you’re still experiencing issues, try rebooting your computer in Safe Mode. This mode starts your computer with only the essential drivers and services, which can help identify whether a third-party software or driver is causing the problem.
Disabling and re-enabling the second monitor can also be a useful troubleshooting step. Go to the Display Settings and disable the second monitor. After a few moments, enable it again and see if it starts working.
If all else fails, you can try resetting the monitor settings to their default values. Most monitors have a menu button that allows you to access the settings and perform a reset. Refer to the monitor’s user manual for instructions specific to your model.
Check the Connection
One of the first things you’ll want to do when troubleshooting a second monitor that won’t work is to double-check the connection. In many cases, a loose or incorrect connection can be the main culprit.
Start by examining the cables that connect your computer to the second monitor. Ensure that all the cables are securely plugged in at both ends. Sometimes, they can become loose over time or due to movement. Firmly push the cables into the respective ports to establish a stable connection.
If you’re using an HDMI or DisplayPort cable, check if there are any bent pins or other visible damage. Even minor damage can disrupt the signal and result in a non-functional second monitor. If you spot any issues, consider replacing the cable with a new one.
Additionally, if you’re using an adapter or converter to connect the monitor to your computer, make sure it’s compatible with both devices. Sometimes, using an incorrect adapter or a faulty one can lead to connectivity issues. Try using a different adapter or consult the monitor and computer manufacturer’s specifications for the recommended adapter.
In some cases, the problem may not lie with the cables, but rather with the ports themselves. Inspect the ports on both the monitor and the computer for any damage or debris. Dust or debris can accumulate over time and interfere with the connection. Gently clean the ports using a can of compressed air or a soft brush to remove any unwanted particles.
Once you’ve checked the physical connections, also ensure that you’ve selected the correct input source on the monitor. Most monitors have multiple input options, such as HDMI, DVI, or VGA. Use the monitor’s menu buttons to navigate to the input source selection and verify that the correct input source is chosen.
If you’re using a docking station or a switcher to connect multiple monitors, examine the connections and make sure everything is properly connected. Unplugging and re-plugging the devices can sometimes establish a better connection.
If you’ve followed these steps and the second monitor still isn’t working, proceed to the next troubleshooting step. Checking the connection is usually the first and easiest step to eliminate any simple connectivity problems that may be preventing your second monitor from functioning properly.
Update Graphics and Display Drivers
Outdated or incompatible graphics and display drivers can often be the cause of second monitor issues. It’s crucial to ensure that you have the latest drivers installed to enable proper communication between your computer and the monitor.
Updating your graphics and display drivers is relatively straightforward. Start by determining the make and model of your graphics card. You can find this information by checking the specifications of your computer or by using specialized software that detects your hardware.
Once you have this information, visit the website of the graphics card manufacturer. They will usually have a dedicated “Support” or “Downloads” section where you can search for the appropriate drivers for your specific graphics card model and operating system.
Download the latest version of the driver software and follow the installation instructions provided by the manufacturer. During the installation process, make sure to select the “Custom” or “Advanced” options, as this allows you to perform a clean installation and avoid any potential conflicts.
If you’re unsure about which driver to download or how to install it, you can also use driver updater software. These programs automatically detect outdated drivers and provide a convenient way to update them without manually searching for the correct driver version.
Once the drivers have been updated, restart your computer to ensure that the changes take effect. After rebooting, check if the second monitor starts working as expected. If not, move on to the next troubleshooting step.
It’s worth noting that updating graphics and display drivers not only resolves compatibility issues but can also improve performance and stability of your overall system. Regularly checking for driver updates is a good practice to ensure your computer functions optimally.
If updating the drivers didn’t solve the problem, don’t worry. There are still other troubleshooting steps you can take to get your second monitor working. Let’s explore the next step: adjusting display settings.
Adjust Display Settings
If you’re experiencing issues with your second monitor, adjusting the display settings can often help resolve the problem. Incorrect resolution or refresh rate settings can prevent your second monitor from displaying properly.
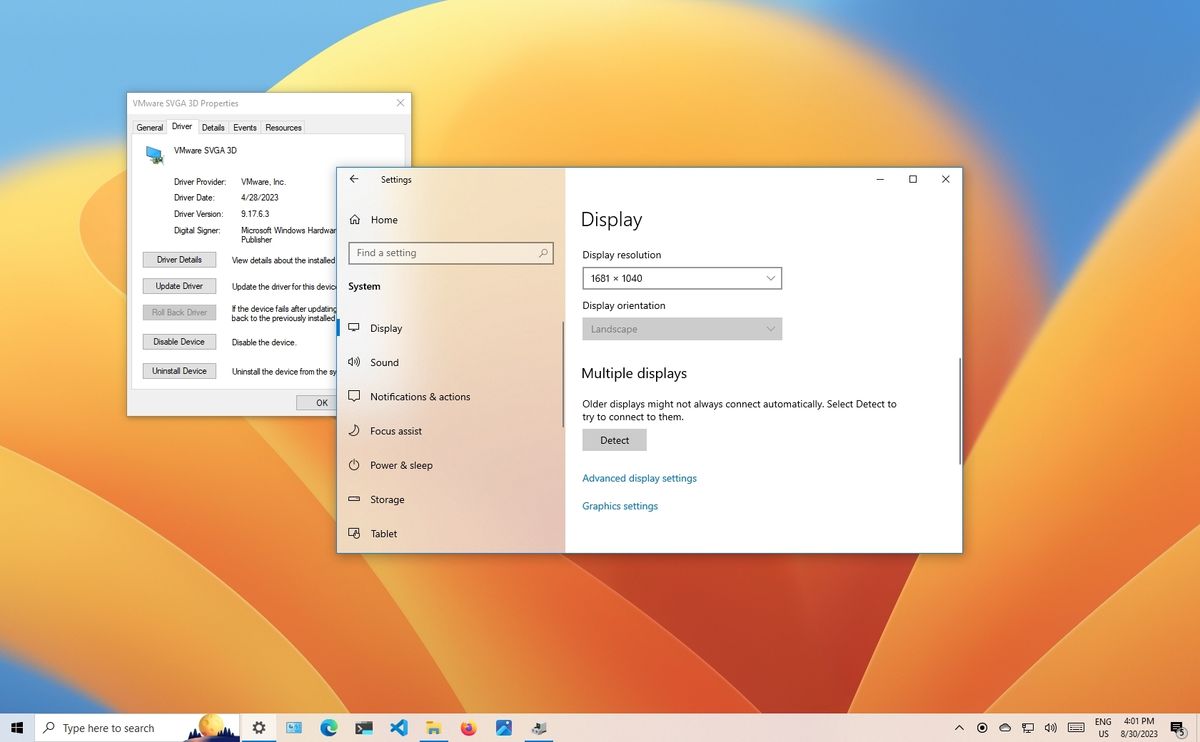
To begin, right-click on your desktop and select “Display Settings” from the context menu. This will open the display settings menu in your operating system.
In the display settings menu, you’ll find options to adjust the resolution, orientation, and scale of your displays. Start by selecting the second monitor from the drop-down menu to make changes specifically for that monitor.
Check if the resolution for the second monitor matches its native resolution. Setting a resolution that is too high or too low can result in blurry or distorted images. Refer to the monitor’s specifications or its manual to find the recommended resolution.
Next, verify the refresh rate of the second monitor. The refresh rate refers to the number of times the monitor updates the image per second. A low refresh rate can cause flickering or visual artifacts. Ensure that the refresh rate is set to a value supported by the monitor.
If you’re unsure about the optimal resolution or refresh rate, you can experiment with different settings and observe the effect on the second monitor. Keep in mind that changes may require you to confirm them within a certain time frame to ensure they are properly applied.
Adjusting the orientation of your displays can also be helpful if the second monitor is not showing up correctly. You can choose between landscape and portrait modes based on your preferences and the physical setup of your monitors.
Additionally, check the scale and layout settings. Sometimes, the scale settings for the second monitor can be set differently, resulting in elements appearing too large or small. Adjust the scaling to ensure a consistent visual experience between the displays.
After making any adjustments, test if the second monitor is now working properly. If not, continue with the next troubleshooting step.
Adjusting the display settings is a valuable troubleshooting step that can often resolve issues related to resolution, refresh rate, and orientation. By ensuring that the settings are optimized for your specific monitor setup, you can enhance the visual experience and potentially fix problems with your second monitor.
Verify Hardware Compatibility
When troubleshooting issues with your second monitor, it’s essential to consider the hardware compatibility between your computer and the monitor. Incompatibility can lead to connectivity problems and prevent the second monitor from functioning correctly.
Start by verifying the available ports on your computer and the corresponding ports on the second monitor. Common connection types include HDMI, DisplayPort, DVI, and VGA. Ensure that the ports on both the computer and monitor match. If they don’t, you may need to use an appropriate adapter or consider using a different monitor that is compatible with your computer’s available ports.
Another factor to consider is the age and specifications of your computer. Older computers might not have the necessary hardware capabilities to support multiple monitors. Check the computer’s specifications or consult the manufacturer to determine if it can handle a second monitor.
Additionally, some computers require the installation of special graphics cards or adapters to support multiple monitors. If you’re using a desktop computer, check if it has a dedicated graphics card with multiple video outputs or if it supports adding an additional graphics card.
Laptops, on the other hand, often come with built-in support for multiple monitors. However, the capabilities may vary depending on the model. Consult the laptop’s manual or visit the manufacturer’s website to determine the maximum number of monitors it can support and the recommended setup.
It’s also important to note that not all monitors can be used as a second monitor. Some monitors may have limitations on the type of input they accept or the number of monitors they can be connected to simultaneously. Check the manual or specifications of the monitor to ensure it is capable of being used as a second monitor.
If you’re using a docking station or a hub, ensure that it is compatible with your computer and the second monitor. Some docking stations or hubs may have specific requirements or limitations for connecting multiple monitors.
Verifying the hardware compatibility between your computer and the second monitor is an essential step in troubleshooting. Ensuring that the ports, specifications, and capabilities of both devices align can significantly increase the chances of a successful connection and functioning second monitor.
Restart the Computer
Restarting the computer may seem like a simple solution, but it can often resolve minor software glitches and issues that are preventing the second monitor from working properly. Restarting your computer can refresh system processes, clear temporary files, and reset configurations that may be causing conflicts.
Before restarting, make sure to save any open documents or files to avoid losing any unsaved work. Once you’re ready, follow these steps to restart your computer:
- Close all applications and programs running on your computer.
- Click on the “Start” or “Windows” button located in the bottom-left corner of the screen.
- Select the “Restart” option from the menu that appears. Alternatively, you can press the physical power button on your computer and choose the restart option.
- Wait for the computer to shut down and start back up again. This process may take a few minutes.
- Once the computer has restarted, check if the second monitor is now working properly.
If the second monitor still isn’t functioning correctly after the restart, proceed to the next troubleshooting step. Although restarting may not solve all issues, it’s a quick and easy step to perform that can help resolve many minor software-related problems.
Restarting your computer not only has the potential to fix issues with your second monitor but can also improve overall system performance. It clears temporary files, closes unnecessary processes, and provides a fresh start for your computer’s operating system.
In some cases, a basic restart might not be sufficient. For more complex issues, you might want to consider performing a full shutdown and then unplugging the power cord for a few minutes before restarting. This can help reset the computer’s hardware components.
Now that you’ve restarted your computer, let’s move on to the next troubleshooting step and inspect the cables and ports for any potential physical issues.
Inspect the Cables and Ports
When troubleshooting a second monitor that won’t work, it’s important to thoroughly inspect the cables and ports for any physical issues that may be causing the problem. Loose connections or damaged cables can prevent a proper signal transmission, resulting in a non-functional second monitor.
Start by visually examining the cables that connect your computer to the second monitor. Inspect them for any signs of damage, such as frayed wires or bent connectors. Pay close attention to the ends of the cables to ensure they are not bent or damaged.
If you suspect that a cable may be faulty, consider replacing it with a new one. Using a known working cable can help determine if the issue lies with the cable itself.
Additionally, take a close look at the ports on both the computer and the second monitor. Dust or debris can accumulate over time and hinder the connection. Use compressed air or a soft brush to gently clean the ports and remove any dirt or particles.
Ensure that all cables are securely plugged in at both ends. Sometimes, cables can become loose due to movement or accidental tugs. Firmly push the cables into the respective ports to establish a stable connection.
If you’re using adapters or converters to connect the monitor to the computer, inspect them for any damage or loose connections. Check if they are compatible with both devices and ensure that they are securely attached.
If your computer has multiple video output ports, try using a different port to connect the second monitor. Sometimes, a particular port can become faulty, and switching to a different one can resolve the issue.
After inspecting the cables and ports, restart your computer and check if the second monitor is now working properly. If not, continue to the next troubleshooting step.
Inspecting the cables and ports is a crucial troubleshooting step to identify any physical issues that may be causing the second monitor problem. By ensuring secure connections and resolving any visible damage, you can improve the chances of establishing a successful and functional connection.
Use the Correct Output Source
Using the correct output source on your computer is crucial when setting up a second monitor. If the wrong output source is selected, the computer may not recognize the second monitor or display output on a different device. Checking and adjusting the output source can help resolve issues with your second monitor.
Start by accessing the display settings on your computer. This can typically be done by right-clicking on the desktop and selecting “Display settings” or a similar option from the context menu. Alternatively, you can go to the Control Panel or System Preferences and navigate to the display settings from there.
Once you’ve accessed the display settings, look for the option that allows you to select the output source or display mode. The available options may vary depending on the operating system and graphics card.
Make sure to choose the correct output source for your second monitor. It should typically be labeled with the monitor’s name or the specific connection type (e.g., HDMI, DisplayPort). If you’re unsure which output source to select, consult the manual or specifications of the monitor.
Some computers provide additional display modes, such as “Duplicate,” “Extend,” or “Second screen only.” These modes control how the display is extended or mirrored between your computer and the second monitor. Selecting an appropriate display mode can help achieve the desired setup and functionality.
After selecting the correct output source and display mode, click “Apply” or “OK” to save the changes. The computer should then attempt to detect the second monitor and configure the settings accordingly.
If the second monitor still doesn’t work, try disconnecting and reconnecting the cable or restarting the computer for the changes to take effect.
Using the correct output source ensures that the computer sends the video signal to the intended second monitor and enables proper communication between the devices. It’s a crucial step in setting up your second monitor and resolving any issues related to display output.
Reboot in Safe Mode
If you’re experiencing persistent issues with your second monitor, rebooting your computer in Safe Mode can be a useful troubleshooting step. Safe Mode starts your computer with only essential drivers and services, allowing you to identify and resolve conflicts that may be causing the problem.
To reboot your computer in Safe Mode, follow these steps:
- Save any unsaved work and close all open applications.
- Click on the “Start” or “Windows” button and select “Restart” while holding down the Shift key. Alternatively, you can press the physical power button on your computer and hold it down until the device powers off.
- Wait for the computer to restart. As it boots up, you may see a boot menu or a series of options. Select “Safe Mode” from the list of available options. You may need to use the arrow keys on your keyboard to navigate and press the Enter key to confirm.
- Allow the computer to boot into Safe Mode. This mode may take slightly longer to start up than normal mode.
- Once you’re in Safe Mode, check if the second monitor is functioning correctly. If it is, this suggests that a third-party software or driver may be causing the problem.
- To further investigate, start uninstalling any recently installed programs or drivers that may be conflicting with the second monitor. You can do this by going to the Control Panel and accessing the “Programs and Features” or “Add or Remove Programs” section.
- Uninstall one program or driver at a time, then reboot your computer normally and test if the second monitor works. Repeat this process until you find the program or driver causing the issue.
If the second monitor does not work even in Safe Mode, it’s possible that the problem lies with the hardware or a system-level setting. In such cases, it may be necessary to consult a professional technician or the computer manufacturer for further assistance.
Rebooting your computer in Safe Mode allows you to isolate and identify potential conflicts, making it a valuable step in troubleshooting second monitor problems. By removing or disabling problematic software or drivers, you can increase the chances of resolving the issue and getting your second monitor to work properly.
Disable and Re-enable the Second Monitor
If your second monitor is not functioning as expected, disabling and re-enabling it can help refresh the connection and resolve any temporary glitches or settings issues. This can be a simple yet effective troubleshooting step to get your second monitor working again.
To disable and re-enable the second monitor, follow these steps:
- Right-click on the desktop and select “Display settings” or a similar option from the context menu. This will open the display settings menu.
- In the display settings, you should see a representation of both monitors. Locate the second monitor and click on it to select it.
- Under the selection, you will find an option to toggle the display on the selected monitor. Click on the drop-down menu and select “Disable.”
- Once the second monitor is disabled, wait for a few seconds and then go back to the drop-down menu. This time, select “Extend” or “Duplicate” to re-enable the second monitor.
- After re-enabling the second monitor, click “Apply” or “OK” to save the changes.
Wait for a moment to allow the computer to detect and configure the second monitor. If successful, the second monitor should display the content as intended.
If the second monitor still doesn’t work after re-enabling it, try disconnecting and reconnecting the cable or restarting the computer. Sometimes, a simple reset or reconnection can establish a proper connection.
Disabling and re-enabling the second monitor forces the system to re-register and reconfigure the monitor, potentially resolving any settings or communication issues. It’s a quick and straightforward step to try before proceeding to more advanced troubleshooting methods.
If you’re still having trouble with your second monitor, continue to the next troubleshooting step: resetting the monitor settings.
Reset the Monitor Settings
If you’re facing persistent issues with your second monitor, resetting the monitor settings to their default values can be a helpful troubleshooting step. This can help eliminate any customized settings or configurations that may be causing conflicts or display issues.
The exact method for resetting monitor settings may vary depending on the make and model of your monitor. Here are some general steps to guide you through the process:
- Locate the buttons or controls on the monitor itself. These are typically located beneath the screen or on the side of the monitor.
- Look for a button or a combination of buttons labeled with icons or text that indicate the menu or settings.
- Press the menu or settings button to access the monitor’s settings menu.
- Navigate through the settings menu using the arrow buttons or a scroll wheel, if available. Look for an option related to factory reset, default settings, or reset to the original configuration.
- Select the reset option and confirm your choice when prompted. Follow any additional on-screen instructions, if necessary.
- Wait for the monitor to reset. It may take a few seconds for the reset process to complete.
- After the reset is complete, the monitor should return to its default settings. You may need to readjust some settings, such as brightness or contrast, to your preference.
Once the monitor settings have been reset, reconnect the monitor to your computer and see if the issues have been resolved. Ensure that all cables are securely connected at both ends.
If resetting the monitor settings doesn’t fix the problem, there may be underlying hardware or software issues that require additional troubleshooting or professional assistance.
Resetting the monitor settings is a valuable step in troubleshooting second monitor issues. By reverting to the default configurations, you can eliminate any customized settings that might be causing conflicts and potentially restore the functionality of your second monitor.