
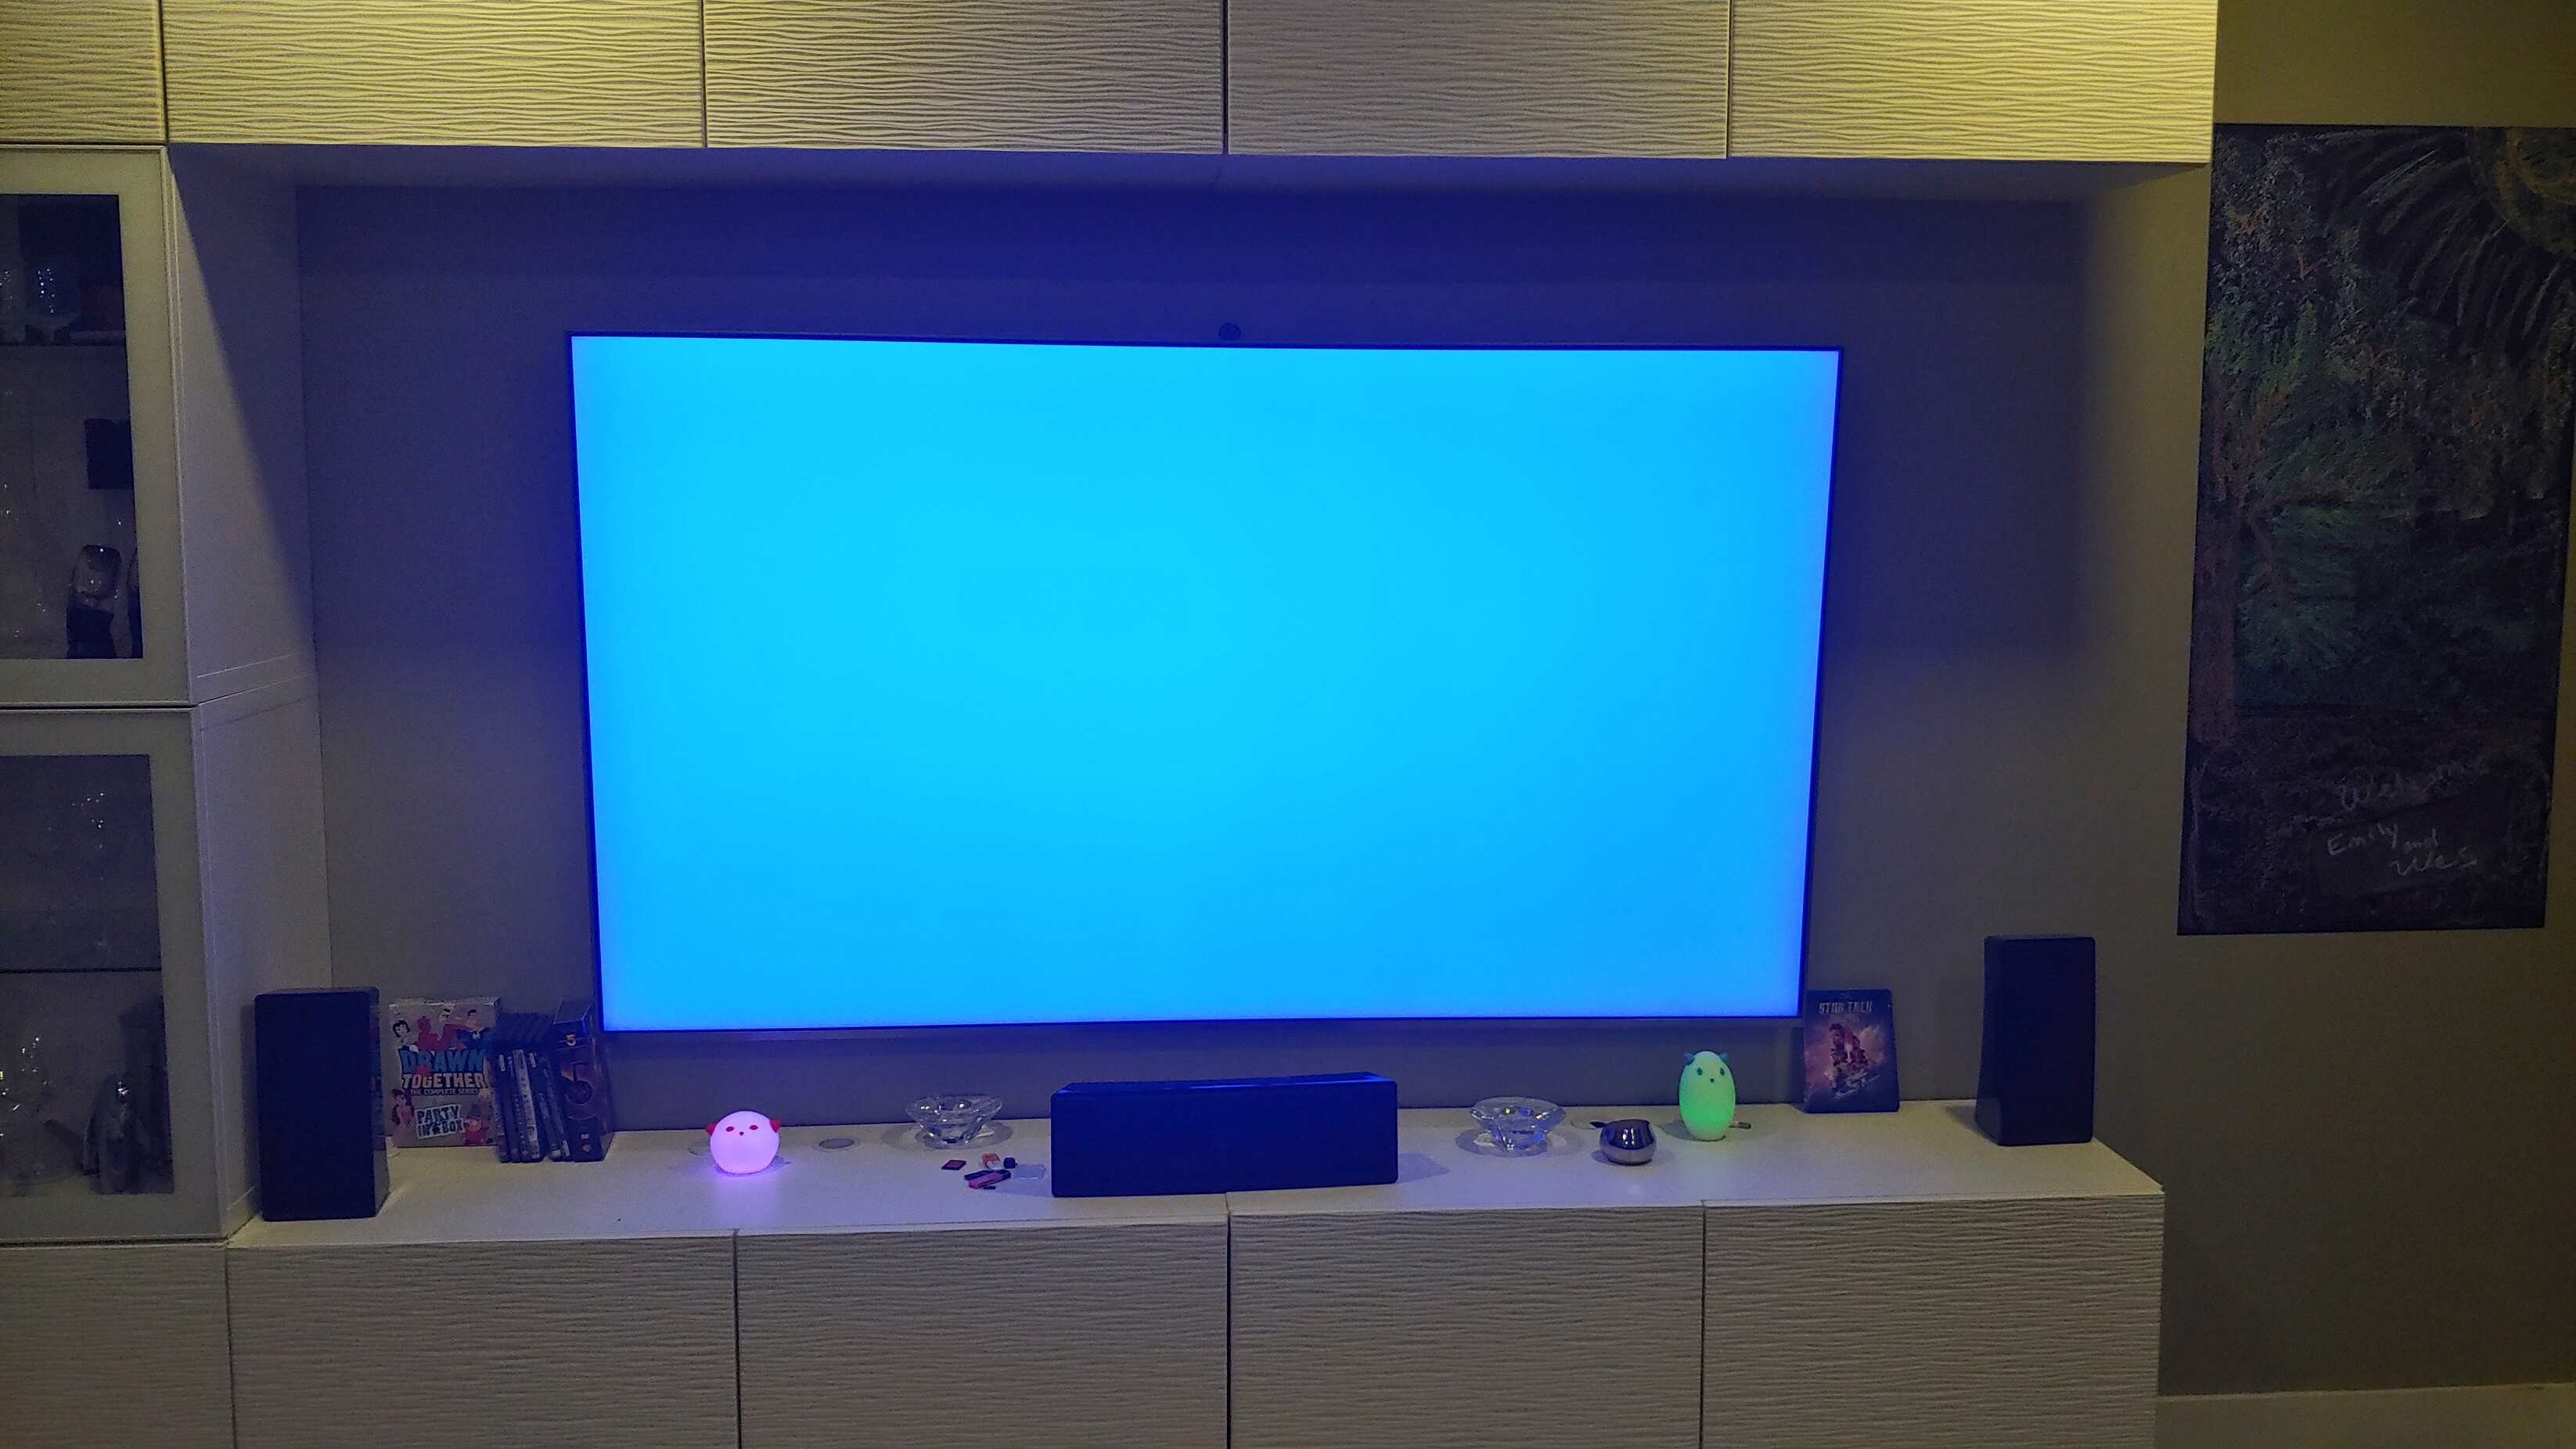
Possible Reasons for a Blue Tint on Your TV
A blue tint on your TV screen can be frustrating, as it can distort the colors and affect your viewing experience. Understanding the possible reasons behind this issue can help you troubleshoot and resolve it effectively. Here are several factors that may contribute to a blue tint on your TV:
- White balance settings: The white balance determines the overall color temperature of your TV. If the white balance is not properly calibrated, it can result in a blue tint. Adjusting the white balance settings can help restore accurate colors.
- Color temperature settings: Similar to white balance, color temperature settings control the warmth or coolness of the displayed colors. A higher color temperature can give a bluish tint, while a lower temperature might create a warm, yellowish tone. Adjusting the color temperature settings can help correct the blue tint.
- Picture mode settings: Different picture modes, such as Standard, Vivid, or Movie, can impact the color reproduction on your TV. Some modes may artificially enhance certain colors, leading to a blue tint. Experimenting with different picture modes can help find the one that best suits your preferences.
- HDMI connection issues: Problems with the HDMI cables can result in signal interference and color distortion. Ensure that the cables are properly plugged in and not damaged. Try using different HDMI ports or cables to rule out any connection-related issues.
- Cable or satellite box problems: If your TV is connected to a cable or satellite box, a malfunctioning box can cause color abnormalities, including a blue tint. Restarting or replacing the box might help resolve the issue.
- Failing backlight or LED lights: The backlight or LED lights in your TV can deteriorate over time, resulting in color imbalances. A failing backlight can cause a blue tint to dominate the screen. Professional repair or replacement may be necessary to fix this issue.
- TV picture tube or panel issues: Defective picture tubes or panels can also contribute to a blue tint. If these components are failing, it may be best to consult a professional technician for repair or replacement.
- Video input problems: In some cases, the blue tint may be specific to certain video inputs, such as a gaming console or DVD player. Check if the issue persists across multiple inputs or if it is isolated to a particular source.
- Environmental factors and lighting conditions: Ambient light and the color temperature of the room can affect how colors appear on your TV screen. Harsh lighting with a bluish hue can create a reflection on the screen, resulting in a blue tint. Adjusting the room’s lighting or using glare-reducing measures, such as curtains or blinds, can help mitigate this issue.
By considering these possible reasons for a blue tint on your TV, you can take the necessary steps to resolve the issue and restore the optimal color quality for your viewing pleasure.
White Balance Settings
The white balance settings on your TV determine the overall color temperature and balance of the displayed image. If the white balance is not properly calibrated, it can result in a blue tint dominating the screen. Understanding how to adjust the white balance settings can help you restore accurate colors and eliminate the blue tint issue.
1.1 Calibrating the white balance: Most modern TVs offer a white balance adjustment feature in their settings menu. Access the menu by pressing the “Menu” button on your TV remote and navigate to the “Picture” or “Display” settings. Look for options related to white balance or color temperature.
1.2 Using predefined modes: Many TVs provide predefined picture modes like “Standard,” “Movie,” or “Vivid.” These modes often come with preconfigured white balance settings optimized for different viewing scenarios. Experiment with different modes and select the one that produces the most accurate colors and minimizes the blue tint.
1.3 Manual adjustment: If your TV allows manual white balance adjustment, you can fine-tune the color temperature based on personal preference. Usually, you’ll find sliders or numerical values for adjusting the red, green, and blue color channels. Reducing the blue channel value can help counteract the excessive blue tint.
1.4 Utilizing calibration tools: To achieve the most accurate white balance settings, you can invest in calibration tools like colorimeters or calibration discs. These tools help measure the color accuracy of your TV and guide you through the calibration process. They provide precise values for white balance adjustment, ensuring optimal color reproduction and eliminating the blue tint.
It’s important to note that the exact steps for adjusting the white balance settings may vary depending on the make and model of your TV. Consult your TV’s user manual or visit the manufacturer’s website for specific instructions tailored to your device.
By properly calibrating the white balance settings, you can ensure that the colors displayed on your TV screen are accurate and free from a dominating blue tint. Take the time to experiment with different options and consult professional calibration tools if necessary to achieve the best results.
Color Temperature Settings
The color temperature settings on your TV control the warmth or coolness of the displayed colors. A higher color temperature can give a bluish tint to the image, while a lower temperature might create a warm, yellowish tone. Adjusting the color temperature settings can help correct the blue tint and achieve more accurate and pleasing colors on your TV.
2.1 Understanding color temperature: Color temperature is measured in Kelvin (K) and represents the hue of white light emitted by the screen. Lower color temperatures, such as 3000K, produce a warmer and more yellowish light, while higher color temperatures, such as 7000K, produce a cooler and bluish light. The optimal color temperature for your TV depends on your personal preference and environmental factors.
2.2 Accessing color temperature settings: To adjust the color temperature, access your TV’s settings menu by pressing the “Menu” button on your remote and navigate to the “Picture” or “Display” settings. Look for options related to color temperature or color tone.
2.3 Selecting preset modes: Many TVs offer preset modes like “Warm,” “Normal,” or “Cool.” These modes are preconfigured with different color temperature settings. Experiment with these modes and select the one that produces the most accurate colors and minimizes the blue tint issue. The “Warm” mode tends to produce a more yellowish hue, while the “Cool” mode may have a bluish tint.
2.4 Manual adjustment: Some TVs allow manual adjustment of the color temperature. You may find sliders or numerical values for adjusting the color temperature along the warm-cool spectrum. If you notice a blue tint on your screen, try reducing the color temperature to a lower value, which adds warmer tones and reduces the dominance of blue.
2.5 Professional calibration: For precise color temperature adjustment, professional calibration tools and services can be beneficial. These tools help measure and fine-tune the color temperature to match industry standards and produce accurate colors. Consider consulting a professional if you desire optimal color accuracy and struggle to eliminate the blue tint through manual adjustments.
Remember that the specific steps for adjusting color temperature settings may vary depending on your TV model. Refer to the user manual or manufacturer’s website for detailed instructions.
By adjusting the color temperature settings of your TV, you can achieve a more balanced and accurate representation of colors on the screen. Experiment with different settings and consult professional calibration tools if necessary to minimize the blue tint and enhance your viewing experience.
Picture Mode Settings
The picture mode settings on your TV offer different presets that affect the overall image quality, including color reproduction. These presets, such as “Standard,” “Vivid,” or “Movie,” can impact the color representation on your screen and potentially contribute to a blue tint. Understanding how to adjust the picture mode settings can help you find the optimal setting that minimizes the blue tint and delivers the most accurate colors.
3.1 Exploring different picture modes: Begin by exploring the various picture modes available on your TV. Each mode is designed to enhance the image for specific viewing scenarios. For example, the “Standard” mode aims for a natural and balanced picture, while the “Vivid” mode often exaggerates colors for a more vibrant and eye-catching display. The “Movie” mode, on the other hand, is typically calibrated to deliver a cinematic experience with more accurate colors.
3.2 Assessing color reproduction: Once you understand the purpose of different picture modes, evaluate how each mode affects the color reproduction. Some modes might artificially boost certain colors, which can result in a blue tint dominating the screen. Pay attention to any noticeable shifts in color balance and choose the mode that provides the most accurate color representation.
3.3 Customizing picture settings: If the predefined modes do not eliminate the blue tint or if you want more control over the picture quality, consider customizing the picture settings within the selected mode. Within the picture settings menu, you may find options like brightness, contrast, color saturation, and hue. Adjusting these settings can help fine-tune the color reproduction and potentially reduce the blue tint issue.
3.4 Saving personalized settings: Once you find a picture mode and adjust the settings to your liking, it’s a good idea to save the settings as a personalized preset. This way, you can easily switch back to your preferred picture mode with the optimized color settings to minimize the blue tint in the future.
It’s important to note that the availability and naming of picture modes may vary across different TV brands and models. Refer to your TV’s user manual or consult the manufacturer’s website for specific instructions related to picture mode settings.
By experimenting with different picture modes and customizing the picture settings, you can find the combination that minimizes the blue tint on your TV and provides the most accurate and visually pleasing color representation.
HDMI Connection Issues
HDMI (High-Definition Multimedia Interface) is a common method of connecting external devices to your TV. However, issues with the HDMI connection can sometimes result in color distortions, including a blue tint on the screen. Understanding and troubleshooting these HDMI connection problems can help you resolve the blue tint issue effectively.
4.1 Check cable quality: Start by examining the HDMI cable connecting your TV to the external device. Sometimes, a faulty or damaged HDMI cable can cause signal interference and lead to color abnormalities. Replace the cable if you notice any visible damage, such as fraying or bent pins.
4.2 Ensure proper connection: Double-check that the HDMI cable is securely connected to both the TV and the external device. A loose or partially inserted cable can result in intermittent or poor quality signals, which can affect color accuracy.
4.3 Try different HDMI ports: Occasionally, specific HDMI ports on your TV may have connection issues or internal faults. Test the external device with different HDMI ports to determine if the blue tint issue persists. If the issue does not occur on other ports, use a different port for the problematic device.
4.4 Test with a different device: Verify whether the blue tint issue is specific to a particular device or occurs with multiple devices connected via HDMI. Connect a different device, such as a Blu-ray player or game console, to the HDMI port and observe if the blue tint persists. This helps determine if the issue lies with the TV or the initial device.
4.5 Update firmware: Ensure that your TV’s firmware is up to date. Manufacturers often release firmware updates to address potential compatibility issues and enhance overall performance. Visit the manufacturer’s website or check the TV’s settings menu for firmware update options.
4.6 Reset the HDMI connection: Some TVs offer an HDMI reset option in the settings menu. This resets the HDMI connection parameters and can help solve issues related to color distortions. Refer to your TV’s user manual or manufacturer’s website for specific instructions on how to perform an HDMI reset.
If the blue tint issue persists despite troubleshooting the HDMI connection, it may be necessary to consult a professional technician or contact customer support for further assistance. They can provide specific guidance based on the make and model of your TV.
By addressing HDMI connection issues through cable inspection, secure connections, testing different ports and devices, updating firmware, and performing an HDMI reset if available, you can help resolve the blue tint issue and ensure a stable and high-quality HDMI connection for your TV.
Cable or Satellite Box Problems
If you’re experiencing a blue tint on your TV, it’s possible that the issue stems from problems with your cable or satellite box. These devices act as the source of the audio and video signals that your TV receives. By troubleshooting these cable or satellite box issues, you can potentially resolve the blue tint problem and improve your viewing experience.
5.1 Restart the box: Start by turning off your cable or satellite box and unplugging it from the power source. Wait for a few minutes, then plug it back in and turn it on. Restarting the box can help refresh the signal and resolve temporary communication or processing issues that may be causing the blue tint.
5.2 Check cable connections: Ensure that all cables connecting the cable or satellite box to your TV are securely plugged in. A loose or faulty cable connection can result in signal degradation, leading to color abnormalities. Reconnect the cables firmly, ensuring they are inserted in the correct ports.
5.3 Replace HDMI/optical cables: If you are using HDMI or optical cables to connect the cable or satellite box to your TV, consider swapping out the cables with new ones. Old or damaged cables can disrupt the signal transmission, affecting the color accuracy on your TV. Using high-quality cables can help ensure a reliable and error-free connection.
5.4 Contact your service provider: If you have tried the above steps and the blue tint issue persists, it may be worth contacting your cable or satellite service provider. There may be technical issues with the signal transmission or compatibility problems with your specific box model. They can provide further assistance or schedule a technician visit to diagnose and resolve the problem.
5.5 Consider a box replacement: If other troubleshooting steps fail to eliminate the blue tint, it is possible that the cable or satellite box itself is faulty. In such cases, you may need to request a replacement from your service provider. Provide them with details of the issue and follow their instructions for obtaining a new box.
Remember, it’s essential to rule out other potential causes of the blue tint, such as TV settings or connections, before assuming the problem lies with the cable or satellite box. However, addressing these box-related problems can improve signal quality and potentially resolve the blue tint on your TV.
Failing Backlight or LED Lights
A failing backlight or LED lights in your TV can contribute to color imbalances, including a blue tint on the screen. The backlight or LED lights are responsible for illuminating the display, and if they start to deteriorate or malfunction, it can result in color irregularities. Understanding the signs of failing backlight or LED lights can help you identify and address this issue.
6.1 Uneven backlighting: Turn on your TV and observe if the backlighting appears uneven or dim in certain areas of the screen. A failing backlight can cause patches or areas of the screen to be darker or brighter than others, leading to a distorted color balance and a prominent blue tint.
6.2 Flickering or flashing lights: Watch for any flickering or flashing lights on the screen, especially when the TV is first turned on. If the backlight or LED lights are failing, they may exhibit intermittent behavior, resulting in disruptions to the color reproduction and the appearance of a blue tint.
6.3 Diminished brightness: If you notice that the overall brightness of your TV has significantly decreased over time, it could be a sign of failing backlight or LED lights. Diminished brightness can impact color vibrancy and accuracy, causing a blue tint to dominate the screen.
6.4 Professional inspection and repair: If you suspect that failing backlight or LED lights are causing the blue tint on your TV, it may be necessary to consult a professional technician. They can assess the condition of the lights and determine if repair or replacement is required. Attempting to repair the lights yourself can be complex and may further damage the TV.
6.5 Consult manufacturer or warranty: If your TV is still under warranty or within the manufacturer’s specified timeframe for potential defects, reach out to the manufacturer or retailer. They may offer repair or replacement services for the failing backlight or LED lights, helping to address the blue tint issue without incurring additional costs.
Since the process of diagnosing and repairing failing backlight or LED lights varies depending on the TV model, it’s best to refer to your TV’s user manual or contact the manufacturer for specific instructions and guidance.
By recognizing the signs of failing backlight or LED lights and seeking professional assistance or taking advantage of warranty coverage, you can address the underlying issues causing the blue tint and restore the optimal color quality of your TV.
TV Picture Tube or Panel Issues
Picture tube or panel issues in your TV can significantly impact color reproduction and contribute to a blue tint on the screen. The picture tube or panel is responsible for displaying the images, and if there are defects or malfunctions, it can result in color irregularities. Understanding potential picture tube or panel issues can help you identify and address this problem effectively.
7.1 Dead pixels: Dead pixels are pixels on the screen that are stuck in a permanent state, either displaying a single color or appearing completely black. If these dead pixels are dominating the blue color, it can lead to a blue tint on the screen. Unfortunately, there is no easy DIY fix for dead pixels, and professional repair or replacement may be necessary.
7.2 Burn-in: Burn-in occurs when static images are displayed on the screen for extended periods, causing the pixel cells to age unevenly. This can result in permanent discoloration or image retention, leading to a blue tint. Preventing burn-in involves avoiding prolonged display of static images and using features like screen savers to minimize the risk.
7.3 Cracked panel: If your TV’s panel is cracked, it can affect the transmission of light and impact color reproduction. A cracked panel may cause color abnormalities, including a blue tint. Unfortunately, a cracked panel typically requires professional repair or panel replacement, as this is a complex and delicate procedure.
7.4 Professional assessment: If you suspect that your TV’s picture tube or panel is causing the blue tint issue, it may be necessary to consult a professional technician. They can conduct a thorough inspection of the TV, identify any picture tube or panel issues, and recommend appropriate repair or replacement options.
7.5 Warranty coverage: If your TV is still covered under warranty or within the manufacturer’s specified timeframe for specific defects, contact the manufacturer or retailer. They may provide repair services or replace the TV if the picture tube or panel is faulty. It’s important to review the terms of the warranty and follow the designated process for potential repairs or replacements.
As picture tube or panel issues can be intricate and delicate, it’s advisable to avoid attempting DIY repairs, as this can potentially cause further damage to the TV. Instead, rely on the expertise of certified technicians or seek assistance from the manufacturer or authorized service centers to address these problems effectively.
By diagnosing picture tube or panel issues early and seeking professional assessment or utilizing warranty coverage, you can address the root cause of the blue tint and restore the optimal color quality on your TV.
Video Input Problems
Video input problems can be another potential cause of a blue tint on your TV. The incorrect or faulty video input settings can lead to color distortions and affect the overall image quality. By troubleshooting these video input issues, you can eliminate the blue tint and restore the accurate color reproduction on your TV.
8.1 Check input source: Verify that the correct input source is selected on your TV. Use the “Input” or “Source” button on your remote control to cycle through the available options and ensure that the one corresponding to the connected device is chosen. For example, if your cable box is connected to HDMI 1, make sure HDMI 1 is selected as the input source.
8.2 Ensure cables are securely connected: Examine the cables connecting the input source to your TV. Ensure they are firmly plugged in on both ends and that there are no visible signs of damage or fraying. A loose or damaged cable connection can result in signal loss or distortion, which can manifest as a blue tint on the screen.
8.3 Try a different cable: If you suspect a faulty cable, try using a different cable to connect the device to your TV. This will help determine if the issue lies with the original cable or with the input source itself. Opt for high-quality cables to ensure optimal signal transmission and minimize the chances of color abnormalities.
8.4 Adjust video settings on the input source: Some devices, such as game consoles or Blu-ray players, have their own video output settings. Access the settings menu of the input source device and verify that the output resolution and color settings are compatible with your TV. Adjusting these settings as necessary can help eliminate any mismatches that may be causing the blue tint.
8.5 Test with a different device: Connect a different device, such as a DVD player or a different gaming console, to the same input port on your TV. If the blue tint issue persists with the new device, it suggests that the problem lies with the TV’s input port. In such cases, you may need to contact a professional technician to inspect and repair the faulty port.
If the above troubleshooting steps do not resolve the issue, consult your TV’s user manual or contact the manufacturer’s support for further assistance. They may provide specific instructions tailored to your TV model to address video input problems and eliminate the blue tint.
By ensuring correct input source selection, checking cable connections, trying different cables, adjusting video settings on the input source, and testing with different devices, you can effectively troubleshoot video input problems and resolve the blue tint issue on your TV.
Environmental Factors and Lighting Conditions
Environmental factors and lighting conditions can influence the appearance of colors on your TV screen, including the presence of a blue tint. Understanding how these factors impact color perception can help you minimize the blue tint issue and optimize your viewing experience.
9.1 Ambient light: The amount and type of ambient light in the room can affect how colors appear on the TV screen. Harsh or intense lighting, especially light with a bluish hue, can create a reflection on the screen and result in a blue tint. Consider adjusting the lighting in your room by using curtains, blinds, or dimmer switches to reduce glare and minimize the impact of ambient light.
9.2 Color temperature of lighting: The color temperature of the lighting in your room can affect the perceived color on your TV screen. For example, if you have cool white lighting with a bluish tint, it can influence the color reproduction and contribute to a blue tint on the screen. Using warm white or neutral lighting can help create a more accurate and natural color representation.
9.3 Viewing angle: The viewing angle at which you watch the TV can also affect color perception. TVs typically have optimized viewing angles, and when viewed from extreme angles, color shifts may occur. Adjusting your seating position or mounting the TV at eye level can help minimize these color distortions and prevent the dominance of a blue tint.
9.4 Glare on the TV screen: Glare on the TV screen can hinder color accuracy and contribute to the appearance of a blue tint. Positioning the TV away from direct light sources, such as windows or bright lamps, can help reduce glare and improve color reproduction on the screen. Additionally, using anti-glare screens or applying matte screen protectors can further minimize glare-related issues.
9.5 Time of day: The time of day can influence the lighting conditions in your room and impact color perception on your TV. Natural light changes throughout the day, and this can affect how colors appear on the screen. Consider adjusting the TV settings or room lighting based on the time of day to maintain optimal color representation.
By considering these environmental factors and lighting conditions, you can minimize the impact of a blue tint on your TV screen. Experiment with different settings, adjust room lighting, and reduce glare to ensure accurate color reproduction and enhance your overall viewing experience.