
Common Causes of a Line Down the Middle
A line down the middle of your scanned documents can be frustrating, making them look unprofessional and difficult to read. Several factors can contribute to this issue, and understanding the common causes can help you troubleshoot and fix the problem. Here are some of the most typical reasons why your scanner may have a line down the middle:
Dust and Dirt on the Scanner Glass: Dust particles, fingerprints, or other debris on the scanner glass can obstruct the scanning process and result in a line down the middle of the scanned image.
Scratches on the Scanner Glass: Deep scratches or marks on the scanner glass can interfere with the scanning process and create a noticeable line down the middle of the scanned documents.
Malfunctioning or Dirty Scanning Elements: Internal components of the scanner, such as the scanning head or the rollers, may be malfunctioning or contaminated with dirt, causing the line down the middle.
Improper Calibration of the Scanner: If the scanner is not properly calibrated, it may result in misalignment of the scanning elements, leading to a line down the middle of the scanned documents.
Misaligned Paper Feeder: If the paper feeder is not aligned correctly, it can cause the documents to be scanned unevenly, resulting in a line down the middle.
Low-Quality Scanner: Some lower quality or older scanners may have limitations that can cause lines or other artifacts to appear on the scanned images.
Software Issues: Problems with the scanning software or driver can sometimes cause anomalies in the scanned output, including a line down the middle of the documents.
If you are experiencing a line down the middle of your scans, don’t worry! In the next section, we will provide troubleshooting steps that you can take to fix this issue and get your scanner working flawlessly again.
Dust and Dirt on the Scanner Glass
One of the common causes of a line down the middle of scanned documents is dust and dirt on the scanner glass. Over time, dust particles, fingerprints, and other debris can accumulate on the glass surface and interfere with the scanning process. When the scanner attempts to scan a document, these obstructions can cause a line or streak to appear on the output.
To resolve this issue, you should thoroughly clean the scanner glass. Here are the steps you can follow:
- Power off the scanner and unplug it from the power source for safety.
- Identify the scanner glass, which is the flat, transparent surface where you place your documents for scanning.
- Use a soft, lint-free cloth slightly dampened with water or a mild glass cleaner to gently wipe the surface of the glass.
- Avoid using harsh chemicals, abrasive materials, or excessive moisture, as these can damage the scanner glass.
- Pay close attention to the area where the line appears and ensure thorough cleaning in that specific region.
- After cleaning, wait for the scanner glass to dry completely before turning the scanner back on.
It is recommended to clean the scanner glass regularly to prevent dust and dirt buildup. This can help maintain the quality of your scanned documents and prevent the line down the middle issue from recurring.
Once you have cleaned the scanner glass, you can retest the device to see if the issue has been resolved. If the line still persists, you may need to explore other potential causes and solutions, which will be discussed in the following sections.
Scratches on the Scanner Glass
Another possible cause for a line down the middle of scanned documents is scratches on the scanner glass. These scratches can occur over time due to regular use or mishandling of the scanner. When the scanning head passes over these scratches, it can result in a visible line or streak on the scanned output.
If you suspect that scratches are the cause of the issue, here are a few steps you can take to address the problem:
- Inspect the scanner glass carefully for any visible scratches. Shine a light source across the glass to help identify any scratches that may not be easily visible.
- If you notice scratches, you can try using a microfiber cloth or a gentle glass polishing compound specifically designed for removing scratches on glass surfaces.
- Apply the glass polishing compound to the scratched area and gently buff it in a circular motion. Follow the instructions provided with the compound for the best results.
- Repeat the process if necessary until the scratches are minimized or removed. Take caution not to apply excessive pressure that could further damage the glass.
- After polishing, clean the scanner glass with a soft, lint-free cloth to remove any residue from the polishing compound.
Note that not all scratches can be completely removed, especially if they are deep or severe. In such cases, it may be necessary to contact the manufacturer or a professional service to assess the damage and explore potential repair options.
Regular maintenance and careful handling of the scanner can help prevent scratches on the glass surface. By taking proactive measures, you can ensure that your scanner provides high-quality scans without the distraction of a line down the middle. If the issue persists even after addressing the scratches, let’s move on to the next section for further troubleshooting steps.
Malfunctioning or Dirty Scanning Elements
When your scanner has malfunctioning or dirty scanning elements, it can result in a line down the middle of scanned documents. The scanning elements, such as the scanning head or the rollers, play a crucial role in capturing and processing the image during the scanning process. If these components are not functioning properly or are contaminated with dirt or debris, it can cause distortions or anomalies in the scanned output.
To address this issue, you can follow these troubleshooting steps:
- Power off the scanner and unplug it from the power source for safety.
- Consult the scanner’s user manual or manufacturer’s documentation to locate the scanning elements. These elements are typically accessible by opening a panel or removing a cover.
- Inspect the scanning elements for any visible dirt, dust, or debris. If present, use a soft, lint-free cloth or a cleaning solution recommended by the manufacturer to carefully clean the components.
- Take extra care when cleaning sensitive scanning elements, such as the scanning head, to avoid causing further damage.
- If the scanning elements appear to be malfunctioning or damaged, it is advisable to contact the scanner’s manufacturer or customer support for guidance on repairs or replacement.
Regular cleaning and maintenance of the scanning elements can help prevent issues like lines down the middle. It is essential to follow the manufacturer’s guidelines and recommendations for cleaning procedures and interval.
If the problem persists after cleaning or if you are unsure about performing these steps yourself, it is recommended to seek professional assistance or contact the scanner’s customer support for further troubleshooting and resolution of the issue.
Improper Calibration of the Scanner
An improper calibration of the scanner can often be the cause of a line down the middle of scanned documents. Calibration is the process by which the scanner aligns its scanning elements to ensure accurate and consistent scanning results. If the scanner is not properly calibrated, it can result in misalignment of the scanning elements, leading to distortions, lines, or streaks on the scanned output.
To resolve this issue, you can try the following steps to recalibrate your scanner:
- Refer to the scanner’s user manual or manufacturer’s documentation for specific instructions on how to calibrate the scanner.
- Access the scanner’s calibration settings through its control panel or scanning software.
- Follow the on-screen prompts or instructions provided by the manufacturer to initiate the calibration process.
- In some cases, the calibration process may involve scanning a calibration sheet or performing a series of actions to realign the scanning elements.
- Once the calibration process is complete, test the scanner by scanning a document to see if the line down the middle issue has been resolved.
- If the problem persists, you may need to repeat the calibration process and ensure that you follow the instructions accurately.
It is important to note that the calibration process can vary depending on the specific scanner model and manufacturer. Therefore, it is crucial to consult the documentation or reach out to the manufacturer’s customer support for detailed instructions or troubleshooting assistance.
By properly calibrating your scanner, you can ensure that the scanning elements are correctly aligned, improving the overall quality of the scanned documents and eliminating the presence of lines or streaks down the middle.
Misaligned Paper Feeder
If you notice a line down the middle of scanned documents, another possible cause could be a misaligned paper feeder. The paper feeder is responsible for correctly feeding the documents into the scanner for scanning. If it is misaligned, the documents may not align properly with the scanning elements, resulting in a noticeable line or streak down the middle of the scans.
To address this issue, you can try the following steps to realign the paper feeder:
- Turn off the scanner and unplug it from the power source.
- Carefully inspect the paper feeder area for any obstructions or debris that may be causing the misalignment.
- If you find any obstructions, gently remove them using a soft, lint-free cloth or compressed air.
- Check the alignment guides within the paper feeder and make sure they are properly adjusted to align the documents correctly.
- If the alignment guides are adjustable, follow the scanner’s user manual or manufacturer’s instructions to realign them correctly.
- For automatic document feeders (ADFs), ensure that the documents are stacked neatly and within the recommended capacity.
- Power on the scanner and test by scanning a document to see if the line down the middle issue has been resolved.
If the problem persists, you may need to consult the scanner’s user manual or contact the manufacturer’s customer support for further assistance. They can provide specific guidance for your scanner model and offer additional troubleshooting steps if necessary.
Maintaining proper alignment of the paper feeder is crucial for achieving accurate and clean scans. By addressing any misalignment issues, you can ensure that documents are fed through the scanner correctly, eliminating the presence of lines down the middle of your scanned documents.
Low-Quality Scanner
If you consistently experience a line down the middle of your scanned documents, it’s possible that your scanner’s quality or age may be a contributing factor. Low-quality scanners or older models may have limitations that can result in lines, artifacts, or distortions on the scanned images.
Unfortunately, there is no quick fix for this issue. If you suspect that your scanner’s quality is the primary cause of the line down the middle, here are a few considerations:
Upgrade Your Scanner: If your budget allows, consider investing in a higher-quality scanner that is designed to produce better scans with fewer issues. Newer models often come equipped with advanced features for improved image quality and scanning performance.
Research Scanner Options: Before purchasing a new scanner, take the time to research different models and read user reviews. Look for scanners that have positive ratings for scanning quality and reliability.
Consult with Professionals: If you rely on scanning services for your business or professional needs, consider consulting with experts in the field who can recommend high-quality scanners based on your specific requirements.
Explore Rental Options: If purchasing a new scanner is not feasible, you may consider renting or leasing a higher-quality scanner for the duration you need it. This can be a cost-effective solution for short-term scanning needs.
Remember that investing in a higher-quality scanner can significantly improve the scanning experience and help eliminate issues like lines down the middle. It is worth considering the long-term benefits and savings that come with using a reliable and efficient scanner.
If upgrading your scanner is not an option, there are still troubleshooting steps you can take to minimize the appearance of the line down the middle. These steps include properly cleaning the scanner, adjusting settings, or contacting customer support for assistance. We will discuss these steps in the upcoming sections to help you resolve the issue with your current scanner.
Software Issues
In some cases, software issues can be the culprit behind a line down the middle of scanned documents. Problems with the scanning software or driver can cause anomalies and distortions in the scanned output, including the appearance of a line down the middle.
If you suspect software issues are causing the problem, here are some steps you can take to address them:
- Restart your computer and scanner. Sometimes, a simple restart can resolve software glitches and restore normal functionality.
- Update your scanning software and drivers to the latest versions. Manufacturers often release updates that address bugs and improve compatibility with different operating systems.
- Check the settings in your scanning software. Verify that the resolution, scan area, and other parameters are set correctly and not causing any distortions in the scanned output.
- Reset your scanner to its default settings. This can help eliminate any custom settings or configurations that may be causing the issue.
- If possible, try scanning from a different software application to see if the issue persists. This can help determine if the problem lies with the scanning software or the scanner itself.
- Uninstall and reinstall the scanning software. This can help resolve any corrupted files or settings that may be affecting the scanning process.
If you have followed these steps and the problem continues, it may be worth reaching out to the manufacturer’s customer support for further assistance. They can provide guidance on specific troubleshooting steps or offer alternative solutions to address the software-related issue.
Remember to keep your scanning software and drivers up to date to ensure optimal performance and compatibility. By addressing software issues, you can enhance the scanning experience and eliminate any lines or distortions in your scanned documents.
Troubleshooting Steps to Fix the Line Down the Middle
If you’re experiencing a line down the middle of your scanned documents, several troubleshooting steps can help you identify and resolve the issue. Follow these steps to troubleshoot and fix the problem:
- Cleaning the Scanner Glass: Start by cleaning the scanner glass using a soft, lint-free cloth and a mild glass cleaner. Remove any dust, fingerprints, or debris that might be obstructing the scanning process. Pay extra attention to the area where the line appears.
- Checking for Scratches: Inspect the scanner glass for scratches. If you notice any scratches, consider using a glass polishing compound or seek professional assistance to minimize or remove them.
- Cleaning and Calibrating the Scanning Elements: Check for dirt, dust, or malfunctions in the scanning elements, such as the scanning head and rollers. Clean them carefully and follow the manufacturer’s instructions to calibrate the scanner if necessary.
- Adjusting the Scanner Settings: Verify that the scanner settings, including resolution, color mode, and scan area, are configured correctly and not causing distortions. Resetting the scanner to default settings can help eliminate any custom settings that may be contributing to the issue.
- Aligning the Paper Feeder: Ensure that the paper feeder is properly aligned and not causing misalignment of the documents during scanning. Adjust the alignment guides according to the scanner’s instructions.
- Contacting Customer Support: If the issue persists after troubleshooting on your own, reach out to the scanner’s customer support. They can provide further assistance and guidance tailored to your specific scanner model.
- Upgrading Your Scanner: If you consistently face issues with a low-quality or outdated scanner, consider investing in a higher-quality scanner that can provide better scan results without the line down the middle issue.
By following these troubleshooting steps, you can identify the root cause of the problem and take appropriate action to resolve it. Keep in mind that the specific steps may vary depending on your scanner model and manufacturer, so consult the user manual or reach out to customer support for additional guidance.
Remember to maintain regular cleaning and maintenance of your scanner to prevent future issues and ensure optimal scan quality.
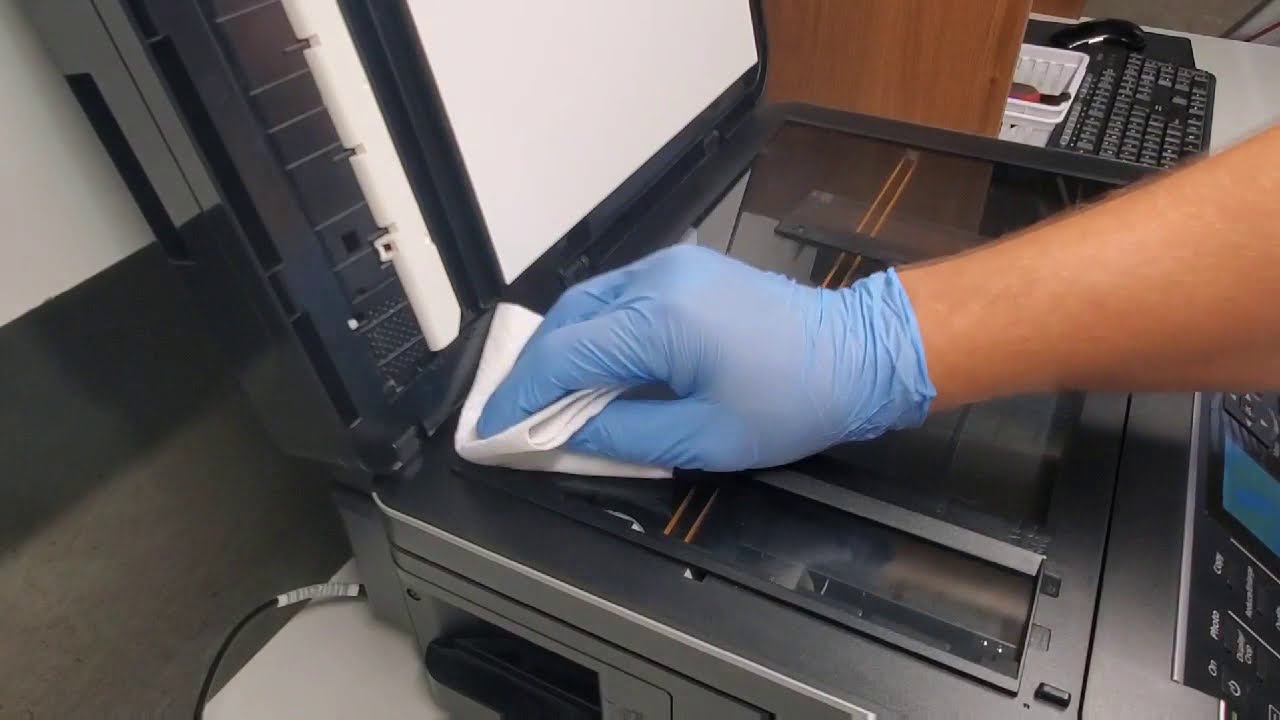
Cleaning the Scanner Glass
One of the common causes of a line down the middle of scanned documents is dust and dirt on the scanner glass. Over time, dust particles, fingerprints, and other debris can accumulate on the glass surface and interfere with the scanning process. When the scanner attempts to scan a document, these obstructions can cause a line or streak to appear on the output.
To resolve this issue, you should thoroughly clean the scanner glass. Here are the steps you can follow:
- Power off the scanner and unplug it from the power source for safety.
- Identify the scanner glass, which is the flat, transparent surface where you place your documents for scanning.
- Use a soft, lint-free cloth slightly dampened with water or a mild glass cleaner to gently wipe the surface of the glass.
- Avoid using harsh chemicals, abrasive materials, or excessive moisture, as these can damage the scanner glass.
- Pay close attention to the area where the line appears and ensure thorough cleaning in that specific region.
- After cleaning, wait for the scanner glass to dry completely before turning the scanner back on.
Regular cleaning of the scanner glass is essential for maintaining optimal scan quality. By removing dust, dirt, and fingerprints, you can ensure clear and accurate scans without the distraction of a line down the middle.
In addition to cleaning the scanner glass, it is also a good practice to keep the area around the scanner clean and free from dust. Regularly dusting the scanner and its surroundings can prevent debris from settling on the glass and interfering with the scanning process.
Remember to consult your scanner’s user manual for specific cleaning instructions and any precautions provided by the manufacturer. By properly maintaining and cleaning your scanner, you can enjoy high-quality scans free from any artifacts or distortions.
Checking for Scratches
If you notice a line down the middle of your scanned documents, another possible cause could be scratches on the scanner glass. These scratches can occur over time due to regular use or mishandling of the scanner. When the scanning head passes over these scratches, it can result in a visible line or streak on the scanned output.
To determine if scratches are the cause of the issue, you should carefully inspect the scanner glass. Here are the steps you can take:
- Examine the scanner glass under good lighting conditions. Shine a light source across the glass to help identify any scratches that may not be easily visible at first glance.
- Look closely for any visible scratches or marks on the glass surface. They may appear as fine lines or grooves.
- If you notice scratches, you can try using a microfiber cloth or a gentle glass polishing compound specifically designed for removing scratches on glass surfaces.
- Apply a small amount of the glass polishing compound to the scratched area and gently buff it in a circular motion. Follow the instructions provided with the compound for the best results.
- Continue buffing the scratched area until the scratches are minimized or removed. However, keep in mind that deep or severe scratches may be more difficult to eliminate completely.
- After polishing, clean the scanner glass with a soft, lint-free cloth to remove any residue from the polishing compound.
It is important to note that not all scratches can be completely removed, especially if they are deep or severe. In such cases, it may be necessary to contact the manufacturer or a professional service to assess the damage and explore potential repair options.
Regular maintenance and careful handling of the scanner can help prevent scratches on the glass surface. Avoid using sharp or abrasive objects near the scanner glass and handle the scanner with care to minimize the risk of scratching.
By checking for scratches and addressing them appropriately, you can improve the quality of your scanned documents and eliminate the presence of lines down the middle.
Cleaning and Calibrating the Scanning Elements
Malfunctioning or dirty scanning elements can be a potential cause of a line down the middle of scanned documents. The scanning elements, such as the scanning head or the rollers, play a vital role in capturing and processing the image during the scanning process. When these components malfunction or become contaminated with dirt or debris, it can lead to distortions or anomalies in the scanned output.
To address this issue, you can follow these steps to clean and calibrate the scanning elements:
- Power off the scanner and unplug it from the power source for safety.
- Refer to the scanner’s user manual or manufacturer’s documentation to locate the scanning elements. These elements are typically accessible by opening a panel or removing a cover.
- Inspect the scanning elements for any visible dirt, dust, or debris. If present, use a soft, lint-free cloth or a cleaning solution recommended by the manufacturer to carefully clean the components.
- Exercise caution when cleaning sensitive scanning elements, such as the scanning head, to avoid causing further damage.
- For calibration, follow the manufacturer’s instructions provided in the user manual or documentation specific to your scanner model. This typically involves initiating a calibration process through the scanner’s control panel or scanning software.
- During calibration, the scanner will perform a series of internal adjustments to ensure that the scanning elements are properly aligned and calibrated for accurate scans.
- After cleaning and calibration, power on the scanner and test it by scanning a document to see if the line down the middle issue has been resolved.
Regular cleaning and maintenance of the scanning elements are essential to ensure optimal scan quality. By removing dirt and debris and calibrating the scanner, you can eliminate issues like lines or streaks down the middle of your scanned documents.
If the problem persists after cleaning and calibration attempts, consult the scanner’s user manual or contact the manufacturer’s customer support for further assistance and troubleshooting steps specific to your scanner model.
Adjusting the Scanner Settings
When encountering a line down the middle of scanned documents, one possible cause could be incorrect scanner settings. Improperly configured settings such as resolution, color mode, or scan area can affect the overall scan quality and result in distortions, including the appearance of a line down the middle.
To address this issue, follow these steps to adjust the scanner settings:
- Open the scanning software or access the scanner’s control panel, depending on the interface provided by your scanner model.
- Locate the settings menu or tab within the scanning software or control panel.
- Verify that the resolution setting is appropriate for your scanning needs. Higher resolution settings can provide more detailed scans but may also increase file sizes.
- Ensure that the color mode is set correctly. Choose grayscale for black and white documents or full color for color documents.
- Check the scan area settings to ensure that they match the size of the document you are scanning and do not cause any cropping or other distortions.
- If your scanner provides advanced settings, review them to ensure that they are not causing any unwanted effects on the scanned output.
- Save the changed settings and close the scanning software or control panel.
- Perform a test scan to check if the line down the middle issue has been resolved.
It is important to note that specific steps may vary depending on your scanner model and the software or control panel provided by the manufacturer. Refer to the scanner’s user manual or manufacturer’s documentation for detailed instructions on adjusting settings specific to your scanner.
Regularly reviewing and adjusting the scanner settings can help ensure that your scanned documents are of high quality and free from any distortions or artifacts like lines down the middle. If the issue persists, consider exploring other troubleshooting steps or contacting the manufacturer’s customer support for further assistance.
Aligning the Paper Feeder
If you notice a line down the middle of your scanned documents, it may be due to a misaligned paper feeder. The paper feeder is responsible for properly guiding the documents through the scanner for accurate scanning. If it is misaligned, the documents may not align correctly with the scanning elements, resulting in a visible line or streak down the middle of the scans.
To address this issue, follow these steps to align the paper feeder:
- Turn off the scanner and unplug it from the power source for safety.
- Inspect the paper feeder area for any obstructions or debris that may be causing the misalignment. Remove any visible dirt or debris using a soft, lint-free cloth or compressed air.
- Check the alignment guides within the paper feeder. These guides are adjustable and are designed to ensure that the documents are fed through the scanner in a straight and aligned manner.
- Refer to the scanner’s user manual or manufacturer’s instructions to understand how to adjust the alignment guides properly.
- Make sure the alignment guides are snugly fitted against the documents but not too tight that it causes distortion or paper jams during the scanning process.
- Power on the scanner and perform a test scan to check if the line down the middle issue has been resolved.
Regularly checking and adjusting the alignment of the paper feeder can help ensure that your scanned documents are accurately aligned and free from any distortions or lines down the middle.
If you have followed these steps and the issue persists, consult the scanner’s user manual for additional troubleshooting steps or consider contacting the manufacturer’s customer support for further assistance. They can provide specific guidance based on your scanner model and help resolve any alignment-related issues you may be experiencing.
Contacting Customer Support
If you have followed the troubleshooting steps mentioned earlier and are still experiencing a line down the middle of your scanned documents, it may be time to seek assistance from the manufacturer’s customer support. Customer support teams are trained to handle technical issues and can provide you with specific guidance tailored to your scanner model and situation.
Here are the steps you can take to contact customer support:
- Find the contact information for the scanner manufacturer’s customer support. This information can usually be found on their website, in the scanner’s user manual, or on the warranty documentation.
- Prepare the necessary details before reaching out to customer support. This may include the model and serial number of your scanner, the exact issue you are facing, and the troubleshooting steps you have already taken.
- Contact customer support through the provided channels, such as phone, email, or live chat. Explain the problem in detail and provide all the relevant information to help the support team assist you effectively.
- Follow the instructions and suggestions provided by the customer support representative. They may guide you through additional troubleshooting steps or recommend a solution based on your specific situation.
- If the issue cannot be resolved through troubleshooting, the customer support team may advise on warranty coverage, repair services, or other options available to resolve the problem.
Remember to remain patient and cooperative during your interaction with customer support. They are there to help you resolve the issue and ensure your satisfaction with the product.
Keep in mind that contacting customer support should be considered as a viable solution if you have exhausted all other troubleshooting steps. Their expertise and knowledge can provide valuable insights and solutions to address the line down the middle issue with your scanner.
Upgrading Your Scanner
If you have tried various troubleshooting steps and are still experiencing a line down the middle of your scanned documents, it may be worth considering upgrading your scanner. Upgrading to a higher-quality scanner can provide better scan quality, improved features, and overall enhanced performance.
Here are some reasons why upgrading your scanner might be a beneficial solution:
- Improved Scan Quality: Higher-quality scanners often have advanced technology that produces sharper and more accurate scans. This can help eliminate issues like lines or streaks down the middle of your documents.
- Advanced Features: Upgrading your scanner can provide access to a range of new features, such as automatic document feeders (ADFs), double-sided scanning, or built-in image processing capabilities. These features can streamline your scanning workflow and enhance productivity.
- Better Durability and Reliability: Newer scanners are typically designed with improved build quality and longer lifespan. Upgrading can offer a more durable and reliable device, reducing the risk of malfunctions and downtime.
- Compatibility with Modern Systems: Older scanners may have limitations in terms of compatibility with the latest operating systems and software. Upgrading ensures compatibility and seamless integration with modern computing systems.
- Increased Speed and Efficiency: Upgraded scanners often come with faster scanning speeds, reducing the time it takes to scan your documents. This can be particularly beneficial for busy environments that require high-volume scanning.
Before purchasing a new scanner, consider your specific needs and requirements. Research different scanner models, read user reviews, and compare specifications to ensure you select a scanner that best fits your scanning needs and budget.
If you rely on scanning services for your business or professional needs, consulting with experts in the field can provide valuable insights and recommendations on high-quality scanners that align with your specific requirements.
Remember that upgrading your scanner is an investment that can significantly improve the scanning experience and eliminate the line down the middle issue. Take into consideration the long-term benefits, features, and capabilities when making your decision.