
Why Check Printer Ink Levels on Epson Printers?
Keeping track of your printer ink levels is crucial for several reasons. Whether you have a home printer or use one in a professional setting, here are a few key reasons why you should regularly check your printer ink levels, especially when using Epson printers.
- Prevent print interruptions: Running out of ink in the middle of an important print job can be frustrating and time-consuming. By staying aware of your ink levels, you can plan ahead and ensure you have enough ink to complete your tasks without any unexpected interruptions.
- Efficient workflow: Maintaining optimal ink levels allows for a smooth workflow. You can print documents with confidence, knowing that your ink levels will not hinder the printing quality or quantity. This is especially important when dealing with time-sensitive projects or high-volume printing.
- Quality control: Low ink levels can often result in poor print quality. Faded or streaky prints can be a sign that your ink cartridges need to be replaced. By monitoring your ink levels, you can ensure that your prints maintain the professional quality and clarity expected.
- Cost savings: Regularly checking your ink levels can also help you save money in the long run. By knowing when your ink is running low, you can avoid unnecessary waste by purchasing new cartridges only when needed. This way, you can optimize your ink usage, minimize expenses, and reduce environmental impact.
- Extended printer life: Neglecting to monitor your ink levels can potentially damage your printer. Printing with empty or near-empty cartridges can cause the printhead to overheat or clog. By keeping your ink levels properly replenished, you can ensure a longer life for your Epson printer and avoid costly repairs.
Overall, regularly checking your printer ink levels on Epson printers is a simple yet effective practice that can help you maintain productivity, control costs, and produce high-quality prints. Now, let’s explore some methods to easily check your ink levels on Epson printers.
Method 1: Checking Ink Levels via Printer Software
Epson printers come with dedicated software that allows users to monitor ink levels and perform various printing tasks. Here’s how you can check your ink levels using the printer software:
- Open the Epson Print Utility: Start by opening the Epson Print Utility on your computer. You can typically find it in your list of applications or by searching for it in the Start menu.
- Select your printer: Once the Epson Print Utility is open, select your printer from the list of available devices. Make sure your printer is connected to your computer and turned on.
- Access the printer status: Look for the option to view printer status or ink levels within the Epson Print Utility. The location of this feature may vary depending on the printer model and software version.
- Check the ink levels: Once you have accessed the printer status, you will typically see a visual representation of the ink levels for each cartridge. You may also see additional details such as the estimated number of pages that can be printed with the remaining ink.
- Take appropriate action: If any of the ink levels are low or running out, it is recommended to prepare replacement cartridges to ensure uninterrupted printing. Most Epson printer software will provide guidance on how to replace the cartridges.
It’s important to note that the steps mentioned above may vary slightly depending on your printer model and the software version installed on your computer. If you are unable to find the printer status or ink level information in the Epson Print Utility, refer to the printer’s user manual or visit the Epson support website for specific instructions.
Now that you know how to check ink levels using the printer software, let’s explore another method of checking ink levels directly from the printer menu.
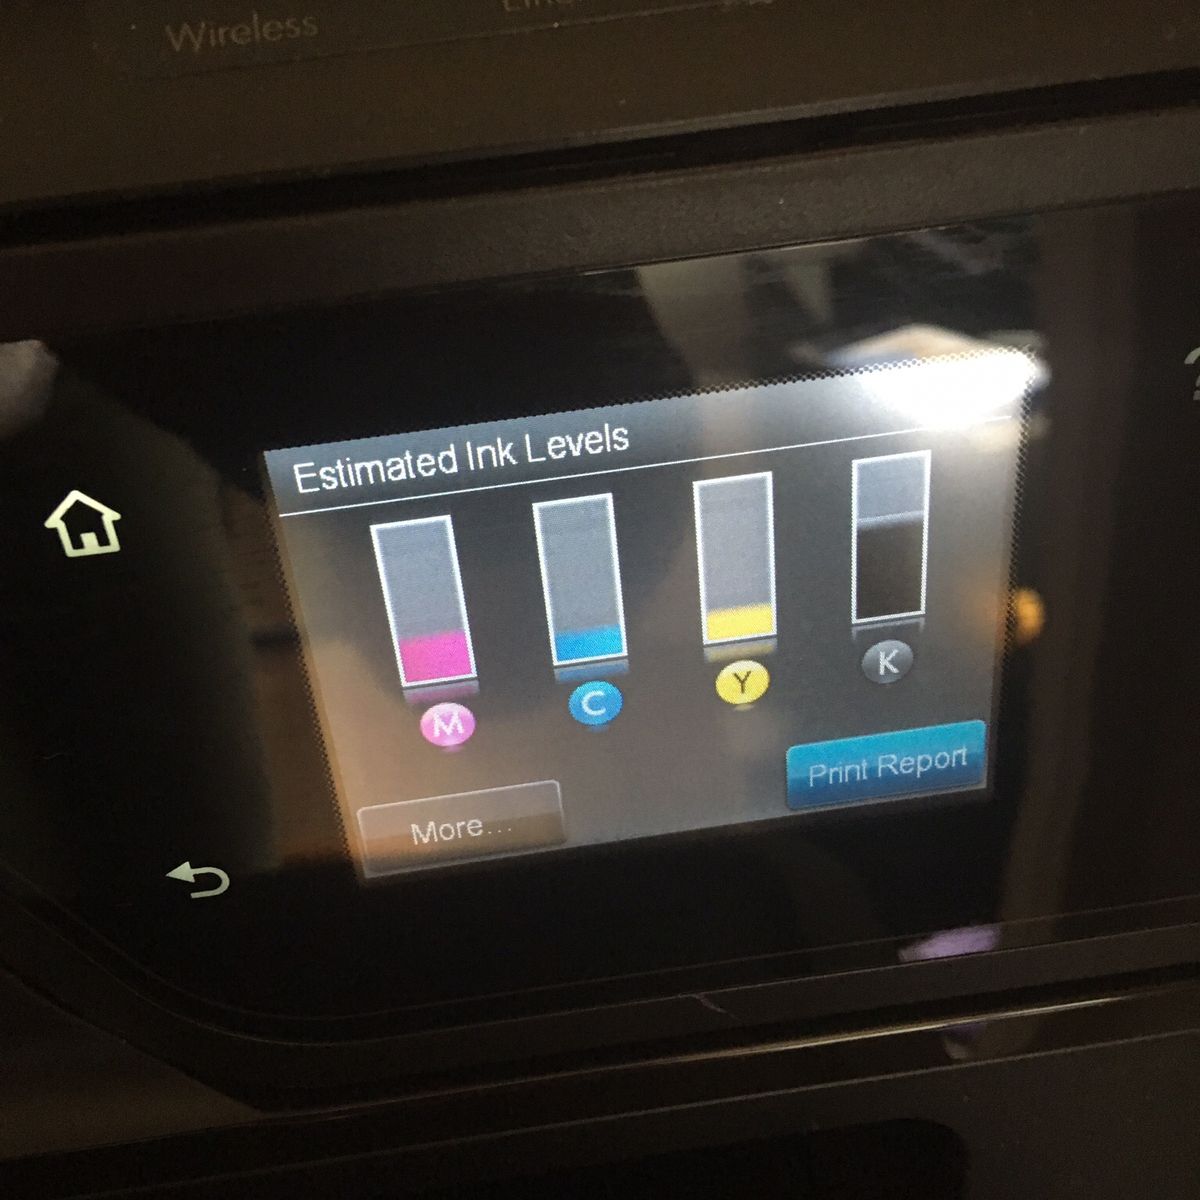
Method 2: Checking Ink Levels via Printer Menu
If you prefer to check your printer ink levels directly from the control panel of your Epson printer, you can do so by following these steps:
- Access the printer menu: On your Epson printer, navigate to the menu or settings options. The exact method for accessing the menu may differ depending on your printer model, so refer to the user manual if needed.
- Find the ink level option: Once you are in the printer menu, look for an option related to ink levels or cartridge information. This option might be under a sub-menu like “Maintenance” or “Supplies.”
- Check the ink levels: Select the ink level option, and your printer will display the remaining ink levels for all installed cartridges. This information may be displayed as a percentage or in a visual format to indicate the level of ink remaining.
- Plan for replacement: If any of the ink levels are low or nearing empty, it’s a good idea to have replacement cartridges ready in order to avoid any printing interruptions. Note down the specific cartridge(s) that require replacement.
Remember that the steps provided above are general guidelines, and the exact process may vary depending on your Epson printer model. If you encounter any difficulties or cannot find the ink level option in your printer menu, consult the user manual or visit the Epson support website for further assistance.
Now that you know how to check ink levels via the printer menu, let’s explore another method of checking ink levels using your computer’s operating system.
Method 3: Checking Ink Levels via Operating System
In addition to using printer-specific software and menus, you can also check your Epson printer’s ink levels through your computer’s operating system. Here’s how:
- Open the Printers & Scanners settings: On Windows, go to the Control Panel or Settings and select “Devices” or “Printers & Scanners.” On macOS, go to “System Preferences” and choose “Printers & Scanners.”
- Select your Epson printer: In the Printers & Scanners settings, locate your Epson printer from the list of available devices. Make sure your printer is connected and turned on.
- Open printer properties: Right-click (or Control-click on macOS) on your Epson printer and select “Properties” or “Print Preferences.”
- Check ink levels: Look for an option or tab related to ink or supplies within the printer properties. Click on this option to view the ink levels for each cartridge installed in your Epson printer.
- Verify and plan for replacements: Take note of any cartridges that have low ink levels or are nearing empty. Prepare replacement cartridges to ensure uninterrupted printing when needed.
Keep in mind that the specific steps may vary slightly depending on your operating system version. If you are unable to locate the ink level information or encounter any difficulties, refer to the operating system’s documentation or seek assistance from Epson support.
By checking ink levels via the operating system, you can conveniently monitor your printer’s ink levels without relying on dedicated software or accessing the printer menu directly.
Now that you’re familiar with three different methods of checking ink levels on your Epson printer, let’s explore some tips to ensure accurate monitoring and avoid common pitfalls.
Tips for Accurate Ink Level Monitoring
Accurately monitoring your printer’s ink levels is essential for maintaining optimal print quality and avoiding unexpected interruptions. Here are some tips to ensure accurate ink level monitoring on your Epson printer:
- Regularly check ink levels: Make it a habit to check your ink levels at regular intervals, especially before starting important print jobs. This will help you plan ahead and avoid running out of ink in the middle of a printing task.
- Use genuine Epson ink cartridges: To ensure accurate and reliable ink level readings, always use genuine Epson ink cartridges. Non-genuine cartridges may not provide accurate readings or cause compatibility issues with your printer.
- Do not remove cartridges unnecessarily: Avoid removing ink cartridges unnecessarily, as this can disrupt the ink level tracking system. Only remove cartridges when they are empty or need replacement.
- Keep cartridges properly installed: Ensure that cartridges are securely installed in their respective slots. Loose or improperly installed cartridges may not provide accurate ink level readings.
- Perform regular nozzle checks and cleanings: Regularly perform nozzle checks and printer cleanings as recommended by Epson. This helps maintain optimal print quality and prevents clogs that can interfere with accurate ink level readings.
- Update printer drivers and software: Keep your Epson printer drivers and software up to date. Regular updates can fix bugs and improve the accuracy of ink level monitoring in the printer software and operating system.
- Consider using monitoring tools: If you often print large volumes or require precise ink level information, you may consider using third-party monitoring tools that provide more detailed insights into your printer’s ink levels.
Following these tips will help you accurately monitor your Epson printer’s ink levels, ensuring optimal print quality and avoiding any surprises during your printing tasks.
Now that you have a better understanding of ink level monitoring, let’s address some common questions related to checking ink levels on Epson printers.
FAQs about Checking Ink Levels on Epson Printers
Here are some frequently asked questions related to checking ink levels on Epson printers:
- Q: Can I check the ink levels on my Epson printer from my smartphone or tablet?
- Q: How often should I check the ink levels on my Epson printer?
- Q: What should I do if my printer shows low ink levels but the print quality is still good?
- Q: Can I continue printing with low ink levels?
- Q: Why are my ink levels decreasing even when I haven’t printed many pages?
A: Yes, depending on your Epson printer model and the availability of mobile apps, you may be able to check ink levels using your smartphone or tablet. Epson provides mobile apps like Epson iPrint that allow you to monitor ink levels and perform other printing tasks remotely.
A: It is recommended to check your ink levels regularly, especially before important print jobs. The frequency may vary depending on your printing needs and usage, but checking once a week or before significant print projects is a good practice.
A: Sometimes, the printer may display low ink levels even if the print quality is still satisfactory. If you are experiencing this, you can continue printing until the print quality starts to degrade. However, be prepared with replacement cartridges to avoid any interruptions.
A: While you can often continue printing with low ink levels, it is advisable to replace the cartridges as soon as possible. Continued printing with low ink levels can result in reduced print quality or potential damage to the printer’s printhead. It’s best to have replacement cartridges on hand to avoid any printing issues.
A: Ink levels can decrease over time due to regular maintenance tasks performed by the printer, such as printhead cleaning cycles. Additionally, ink may be used for periodic nozzle checks and other background operations. These factors can contribute to the gradual decrease in ink levels, even if you haven’t printed many pages.
Remember, it’s always a good idea to refer to your printer’s user manual or visit the Epson support website for model-specific instructions on checking ink levels and troubleshooting any issues you may encounter.
Now that you have information about checking ink levels on Epson printers and some commonly asked questions, you are well-equipped to monitor your printer’s ink levels accurately and efficiently.