
Definition of Audio Clipping
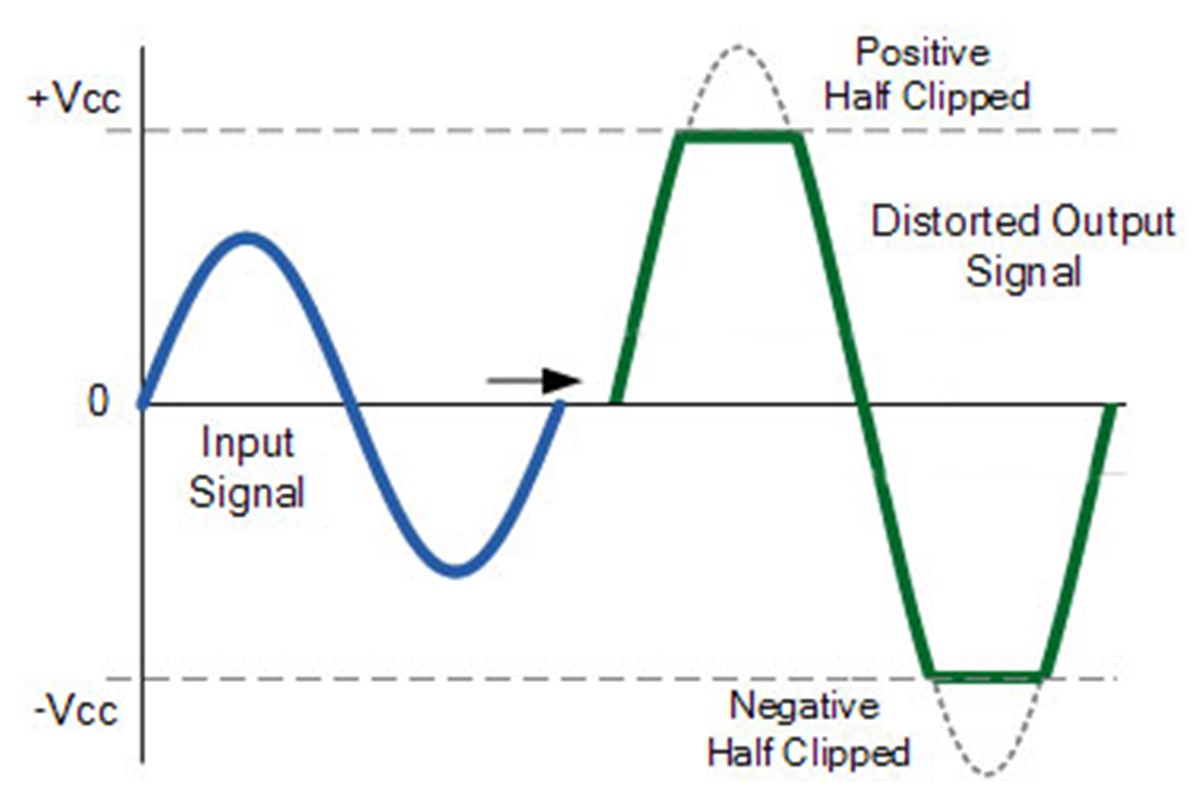
Audio clipping refers to a phenomenon that occurs when an audio signal exceeds the maximum level that a speaker or audio device can handle. It is a form of distortion that occurs when the waveform of an audio signal is cut off or “clipped” due to insufficient power or headroom.
When an audio signal is amplified beyond the capabilities of the speaker or audio device, the waveform becomes flattened at the peaks, resulting in a distorted and unpleasant sound. The clipped portions of the audio signal are essentially chopped off, resulting in a squared-off waveform.
Clipping can occur at various stages of audio production and playback, including during recording, mixing, and amplification. It can be caused by factors such as improper gain staging, excessive volume levels, or inadequate equipment.
Audio clipping is commonly associated with loud or distorted sounds heard in speakers, headphones, or audio recordings. It is important to understand the causes and effects of clipping to ensure optimal sound quality and prevent any potential damage to audio equipment.
Causes of Audio Clipping
Audio clipping can occur due to several reasons, and understanding the causes is crucial in addressing and preventing this issue. Here are some common causes of audio clipping:
- Excessive Signal Levels: One of the primary causes of audio clipping is amplifying the audio signal to levels that exceed the capacity of the speaker or audio device. This can happen when the volume is set too high, or when there is an imbalance between the input signal and the output capabilities of the equipment.
- Improper Gain Staging: Improper gain staging refers to mismanaging the gain levels at different stages of the audio chain. When the gain is set too high at any point in the signal path, it can lead to clipping. This can happen during recording, mixing, or amplification if the gain is improperly set.
- Overdriving Amplifiers: When amplifiers are pushed beyond their maximum specified power levels, they can introduce distortion and clipping. Overdriving an amplifier can happen when the input signal is too high for the amplifier to handle, or when the amplifier is not properly matched to the speakers.
- Low-quality Audio Equipment: Using low-quality or poorly designed audio equipment can contribute to clipping issues. Inferior speakers, amplifiers, or audio interfaces may not be able to handle high signal levels, leading to clipping and distortion.
- Power Supply Limitations: Inadequate power supply can also cause audio clipping. When the power supply cannot meet the demands of the audio equipment, it can result in distortion and clipping of the audio signal.
It is important to be aware of these causes and take appropriate measures to avoid audio clipping. Proper gain staging, using high-quality equipment, and monitoring signal levels are some steps that can help prevent clipping and ensure optimal sound quality.
Effects of Audio Clipping on Sound Quality
When audio clipping occurs, it has a significant impact on the sound quality. The following are the effects of audio clipping:
- Distortion: The most noticeable effect of audio clipping is distortion. Clipping causes the audio signal to become distorted, resulting in a harsh and unpleasant sound. The clipped portions of the waveform create harsh, square-wave-like peaks, which can be particularly noticeable in high-frequency sounds.
- Loss of Dynamic Range: Clipping reduces the dynamic range of the audio signal. Dynamic range refers to the difference between the softest and loudest sounds in a piece of audio. When clipping occurs, the peaks of the audio signal get clipped, reducing the overall dynamic range and making the audio sound compressed and less natural.
- Integrity of Original Sound: Clipping can compromise the integrity of the original sound. It alters the waveform and introduces unwanted harmonics and artifacts, leading to a distorted representation of the original audio. This can be especially detrimental when working with high-quality audio recordings or during live performances.
- Listener Fatigue: Continuous exposure to clipped audio can cause listener fatigue. The distorted and harsh sounds generated by clipping can be tiring and unpleasant to listen to for extended periods, diminishing the overall listening experience.
- Potential Speaker Damage: When an audio signal clips, it can introduce excessive amounts of power into the speaker system. This can potentially damage the speaker components, including the voice coil, diaphragm, and other sensitive parts. Prolonged exposure to clipped audio can lead to permanent damage, reducing the lifespan and performance of the speaker.
Overall, audio clipping has detrimental effects on sound quality, introducing distortion, reducing dynamic range, compromising the original sound, causing listener fatigue, and potentially damaging speakers if left unaddressed.
Distortion Types in Clipping
When audio clipping occurs, it introduces various types of distortion to the audio signal. Understanding the different distortion types can help in identifying and addressing clipping issues. Here are the common distortion types that can occur in clipping:
- Harmonic Distortion: Harmonic distortion is one of the most prevalent types of distortion in audio clipping. It occurs when the clipped portions of the waveform generate additional harmonics that were not present in the original audio signal. These harmonics can introduce unwanted frequencies and alter the timbre of the sound.
- Intermodulation Distortion: Intermodulation distortion, also known as IMD, happens when the clipped portions of the audio signal interact with other frequencies present in the signal. This can result in the creation of new frequencies that were not part of the original audio, leading to a muddier and less defined sound.
- Transient Distortion: Transient distortion occurs when the sharp and fast-changing transients in the audio signal get distorted due to clipping. These transients are responsible for the initial attack and impact of sounds, such as drum hits or plucked guitar strings. Clipping can flatten or round off these transients, diminishing their impact and clarity.
- Phase Distortion: Phase distortion occurs when the phase relationship between different frequencies in the audio signal is altered due to clipping. This can result in phase cancellation or phase shifts, affecting the stereo image and spatial perception of the sound.
- Amplitude Distortion: Amplitude distortion is a general term used to describe any alterations in the amplitude or level of the audio signal due to clipping. It can manifest as apparent changes in volume, sudden jumps or drops in the signal level, or uneven frequency response.
These distortion types can vary in their severity and characteristics depending on the extent and nature of the audio clipping. Identifying the specific distortion type can help in implementing appropriate measures to mitigate the effects of clipping and restore optimal sound quality.
Recognizing Audio Clipping
Recognizing audio clipping is essential to address and rectify any issues that may arise. Here are some common signs and indicators to help you identify audio clipping:
- Distorted Sound: One of the most prominent indications of clipping is distorted sound. If the audio you are listening to sounds harsh, distorted, or muffled, it may be a result of clipping. Pay attention to any unwanted artifacts or unnatural characteristics in the sound.
- Harsh and Clipped Peaks: Clipped audio signals often exhibit squared-off or flattened peaks. This can be visually observed in audio waveforms or level meters, where the signal reaches a maximum and is abruptly cut off, resulting in a flat or plateaued shape instead of smooth peaks.
- Crackling or Popping Sounds: Another telltale sign of audio clipping is the presence of crackling or popping sounds. These intermittent noises can occur when the audio signal clips and produces sudden bursts of distorted energy.
- Reduced Dynamic Range: Clipping can cause a reduction in the dynamic range of the audio. If you notice that softer sounds are not as audible or that the sound lacks nuance and subtlety, it could be an indication of clipping affecting the dynamic range.
- Visual Clues: If you are working with audio software or a mixer, you can look for visual cues that indicate clipping. These can include red clipping indicators on level meters, waveform displays with flat tops, or other visual warnings that signal audio exceeding the maximum level.
By being aware of these signs, you can quickly identify when audio clipping is occurring and take appropriate steps to rectify the issue. Monitoring the sound quality and paying attention to visual indicators are invaluable in recognizing and addressing audio clipping.
Preventing Audio Clipping
Preventing audio clipping is essential to ensure optimal sound quality and preserve the integrity of your audio signals. Here are some effective strategies to prevent audio clipping:
- Adjust Gain Levels: Proper gain staging is crucial to avoid clipping. Set the gain or volume levels at each stage of the audio chain appropriately. Avoid excessively high input levels that can overload the subsequent stages and cause clipping. Optimize the gain structure to maintain a healthy signal-to-noise ratio.
- Use Compression or Limiting: Utilize compression or limiting on audio signals that tend to clip. These tools can help control dynamic range and prevent sudden spikes in signal levels that lead to clipping. Experiment with attack and release settings to find the right balance between preserving dynamics and avoiding clipping.
- Monitor Audio Levels: Regularly monitor the levels of your audio signals during recording, mixing, and playback. Keep an eye on your peak meters and ensure that the signal levels do not consistently exceed the maximum allowed level. Make adjustments as needed to maintain a healthy margin below the clipping threshold.
- Upgrade Audio Equipment: If your audio equipment is incapable of handling high signal levels without clipping, consider upgrading to higher-quality gear. Quality speakers, amplifiers, audio interfaces, and cables can handle higher power and provide better headroom, reducing the likelihood of clipping.
- Use a Limiter on Master Outputs: When working with audio in a live performance or mastering context, employing a limiter on the master output can help prevent clipping. Set the limiter to a fairly conservative threshold to catch any peaks and prevent them from exceeding the maximum level.
- Avoid Overlapping Frequencies: Overlapping frequencies can lead to undesired clipping. Be mindful when layering multiple sounds or instruments, particularly in the low-frequency range, to prevent excessive buildup and potential clipping. Use EQ techniques to create separation and ensure each element has its own sonic space.
By implementing these preventive measures, you can significantly reduce the risk of audio clipping and maintain the integrity and quality of your audio signals.
Troubleshooting Audio Clipping Issues
Audio clipping can be a frustrating issue to deal with, but there are several troubleshooting steps you can take to identify and resolve the problem. Here are some strategies to help you troubleshoot audio clipping issues:
- Check Signal Chains: Examine your signal chains, including cables, connections, and audio equipment, to ensure everything is properly connected and functioning. Loose or faulty connections can introduce noise and distortion, including clipping. Make sure all connections are secure and cables are in good working condition.
- Review Gain Staging: Double-check your gain staging at each stage of the audio chain. Ensure that signal levels are set appropriately to avoid clipping. Make adjustments as necessary to optimize gain levels and ensure a healthy signal-to-noise ratio.
- Monitor Signal Levels: Continuously monitor the signal levels of your audio source and various stages of the signal chain. Use visual level meters or audio monitoring software to keep track of peak levels. Avoid sustained clipping by adjusting gain levels or applying appropriate processing like compression or limiting.
- Inspect Audio Settings: Check the settings on your audio equipment, software, or DAW (Digital Audio Workstation). Ensure that sample rates, bit depths, and buffer sizes are properly set. Incorrect settings may lead to unstable audio processing and potential clipping issues.
- Experiment with EQ: Use equalization to address frequency buildup or resonances that may be contributing to clipping. Carefully identify problem frequencies and apply gentle cuts to reduce the likelihood of excessive clipping in those frequency ranges.
- Avoid Digital Clipping: When working with digital audio, avoid excessive levels that can cause digital clipping. Keep an eye on peak meters and make sure your audio does not exceed 0 dBFS (Full Scale). Maintain a healthy headroom to avoid introducing unwanted distortion.
- Consult with Professionals: If you have exhausted all troubleshooting options and continue to experience audio clipping, it may be beneficial to seek assistance from audio professionals or technicians. They can offer insights, diagnose equipment issues, or provide guidance specific to your setup.
By systematically troubleshooting and applying these strategies, you can identify and resolve audio clipping issues, ensuring clean and undistorted sound reproduction.