
Understanding Aperture
Aperture is one of the fundamental concepts in photography. In simple terms, it refers to the opening in the lens through which light enters the camera. It plays a crucial role in determining the amount of light that reaches the image sensor or film, thus affecting the exposure of the photograph.
The aperture is represented by an f-number, also known as the f-stop. This number indicates the size of the aperture opening. The lower the f-number, the wider the aperture and vice versa.
One important aspect to understand is that the f-stop doesn’t directly measure the physical size of the aperture, but rather the ratio between the focal length of the lens and the diameter of the aperture opening. For example, a lens with a focal length of 50mm and an aperture diameter of 25mm would have an f-stop of f/2.
Aperture not only controls the amount of light entering the camera but also affects the depth of field. Depth of field refers to the range of distance in a scene that appears sharp and in focus. A wider aperture (lower f-number) results in a shallow depth of field, where only the subject is in focus while the background appears blurry. On the other hand, a narrower aperture (higher f-number) creates a deeper depth of field, where both the subject and the background are in focus.
In addition to controlling exposure and depth of field, aperture also influences lens performance. Most lenses tend to perform at their best when set to a medium aperture range, typically around f/8 to f/11. At this range, the lens achieves optimal sharpness and minimizes issues like distortion or vignetting that might be present when shooting at wider or narrower apertures.
Understanding aperture is essential for every photographer, as it allows for creative control over the exposure and depth of field in their images. By mastering aperture settings, photographers can create stunning visual effects and convey their artistic vision.
How Aperture Affects Depth of Field
Aperture plays a significant role in determining the depth of field in a photograph. Depth of field refers to the range of distance within an image that appears in sharp focus. Understanding how aperture affects depth of field can help photographers effectively control what is in focus and create visually compelling images.
When it comes to depth of field, the aperture setting directly impacts the amount of background blur and the overall sharpness of the image. A wider aperture, indicated by a lower f-number such as f/2.8, produces a shallow depth of field. This means that the subject in focus stands out distinctly from the background, which appears blurred or out of focus. This effect is often used in portraits or macro photography to isolate the subject and create a pleasing background bokeh.
On the other hand, a narrower aperture, represented by a higher f-number like f/16, creates a deeper depth of field. This allows for more of the scene to be in focus, from the foreground to the background. Landscape photography frequently utilizes smaller apertures to ensure that all elements in the frame are sharp and clear, from the closest foreground objects to the distant mountains.
It’s important to note that depth of field is not solely determined by aperture. Factors such as distance to the subject, focal length, and sensor size also come into play. However, aperture remains a crucial control in achieving the desired depth of field effect.
It’s worth experimenting with different aperture settings to understand how they impact depth of field. By adjusting the aperture, photographers can intentionally draw attention to specific elements within the frame or create a dreamy, ethereal atmosphere by blurring the background.
Ultimately, understanding how aperture affects depth of field opens up creative possibilities for photographers. It allows them to control the visual hierarchy within a photograph, guide the viewer’s attention, and convey the desired mood or emotion.
Aperture and Exposure
Aperture is a critical factor when it comes to controlling the exposure of a photograph. It determines the amount of light that reaches the camera’s image sensor or film, which directly affects the overall brightness and tonal range of the image.
When shooting in automatic or semi-automatic modes, such as aperture priority or program mode, the camera will adjust the shutter speed based on the chosen aperture and the prevailing lighting conditions. This automatic adjustment is done to maintain a proper exposure, where the image neither appears too bright (overexposed) nor too dark (underexposed).
A wider aperture, indicated by a lower f-number like f/2.8, allows more light to enter the camera, resulting in a brighter image. This can be particularly useful in low-light situations when you want to capture well-exposed photos without increasing the ISO too much. Additionally, using a wider aperture can also help achieve a faster shutter speed, reducing the chance of camera shake and motion blur.
Conversely, a narrower aperture, represented by a higher f-number such as f/16, restricts the amount of light entering the camera. This can be beneficial when shooting in bright lighting conditions, preventing the image from being overexposed. However, using a smaller aperture may require a slower shutter speed, which increases the risk of motion blur. In these instances, a tripod or other stabilization methods might be necessary.
It’s essential to strike a balance between the desired depth of field and the necessary exposure when choosing the aperture. For example, if you’re shooting a landscape and want everything in focus from the foreground to the background, you might need to use a smaller aperture like f/11 or f/16 to ensure sufficient depth of field. However, be aware that this may require a longer exposure time or the use of other exposure compensation techniques like filters.
Understanding the relationship between aperture and exposure allows photographers to have greater creative control over their images. By consciously adjusting the aperture, photographers can manipulate the amount of light reaching the camera and, consequently, create well-exposed, visually appealing photographs.
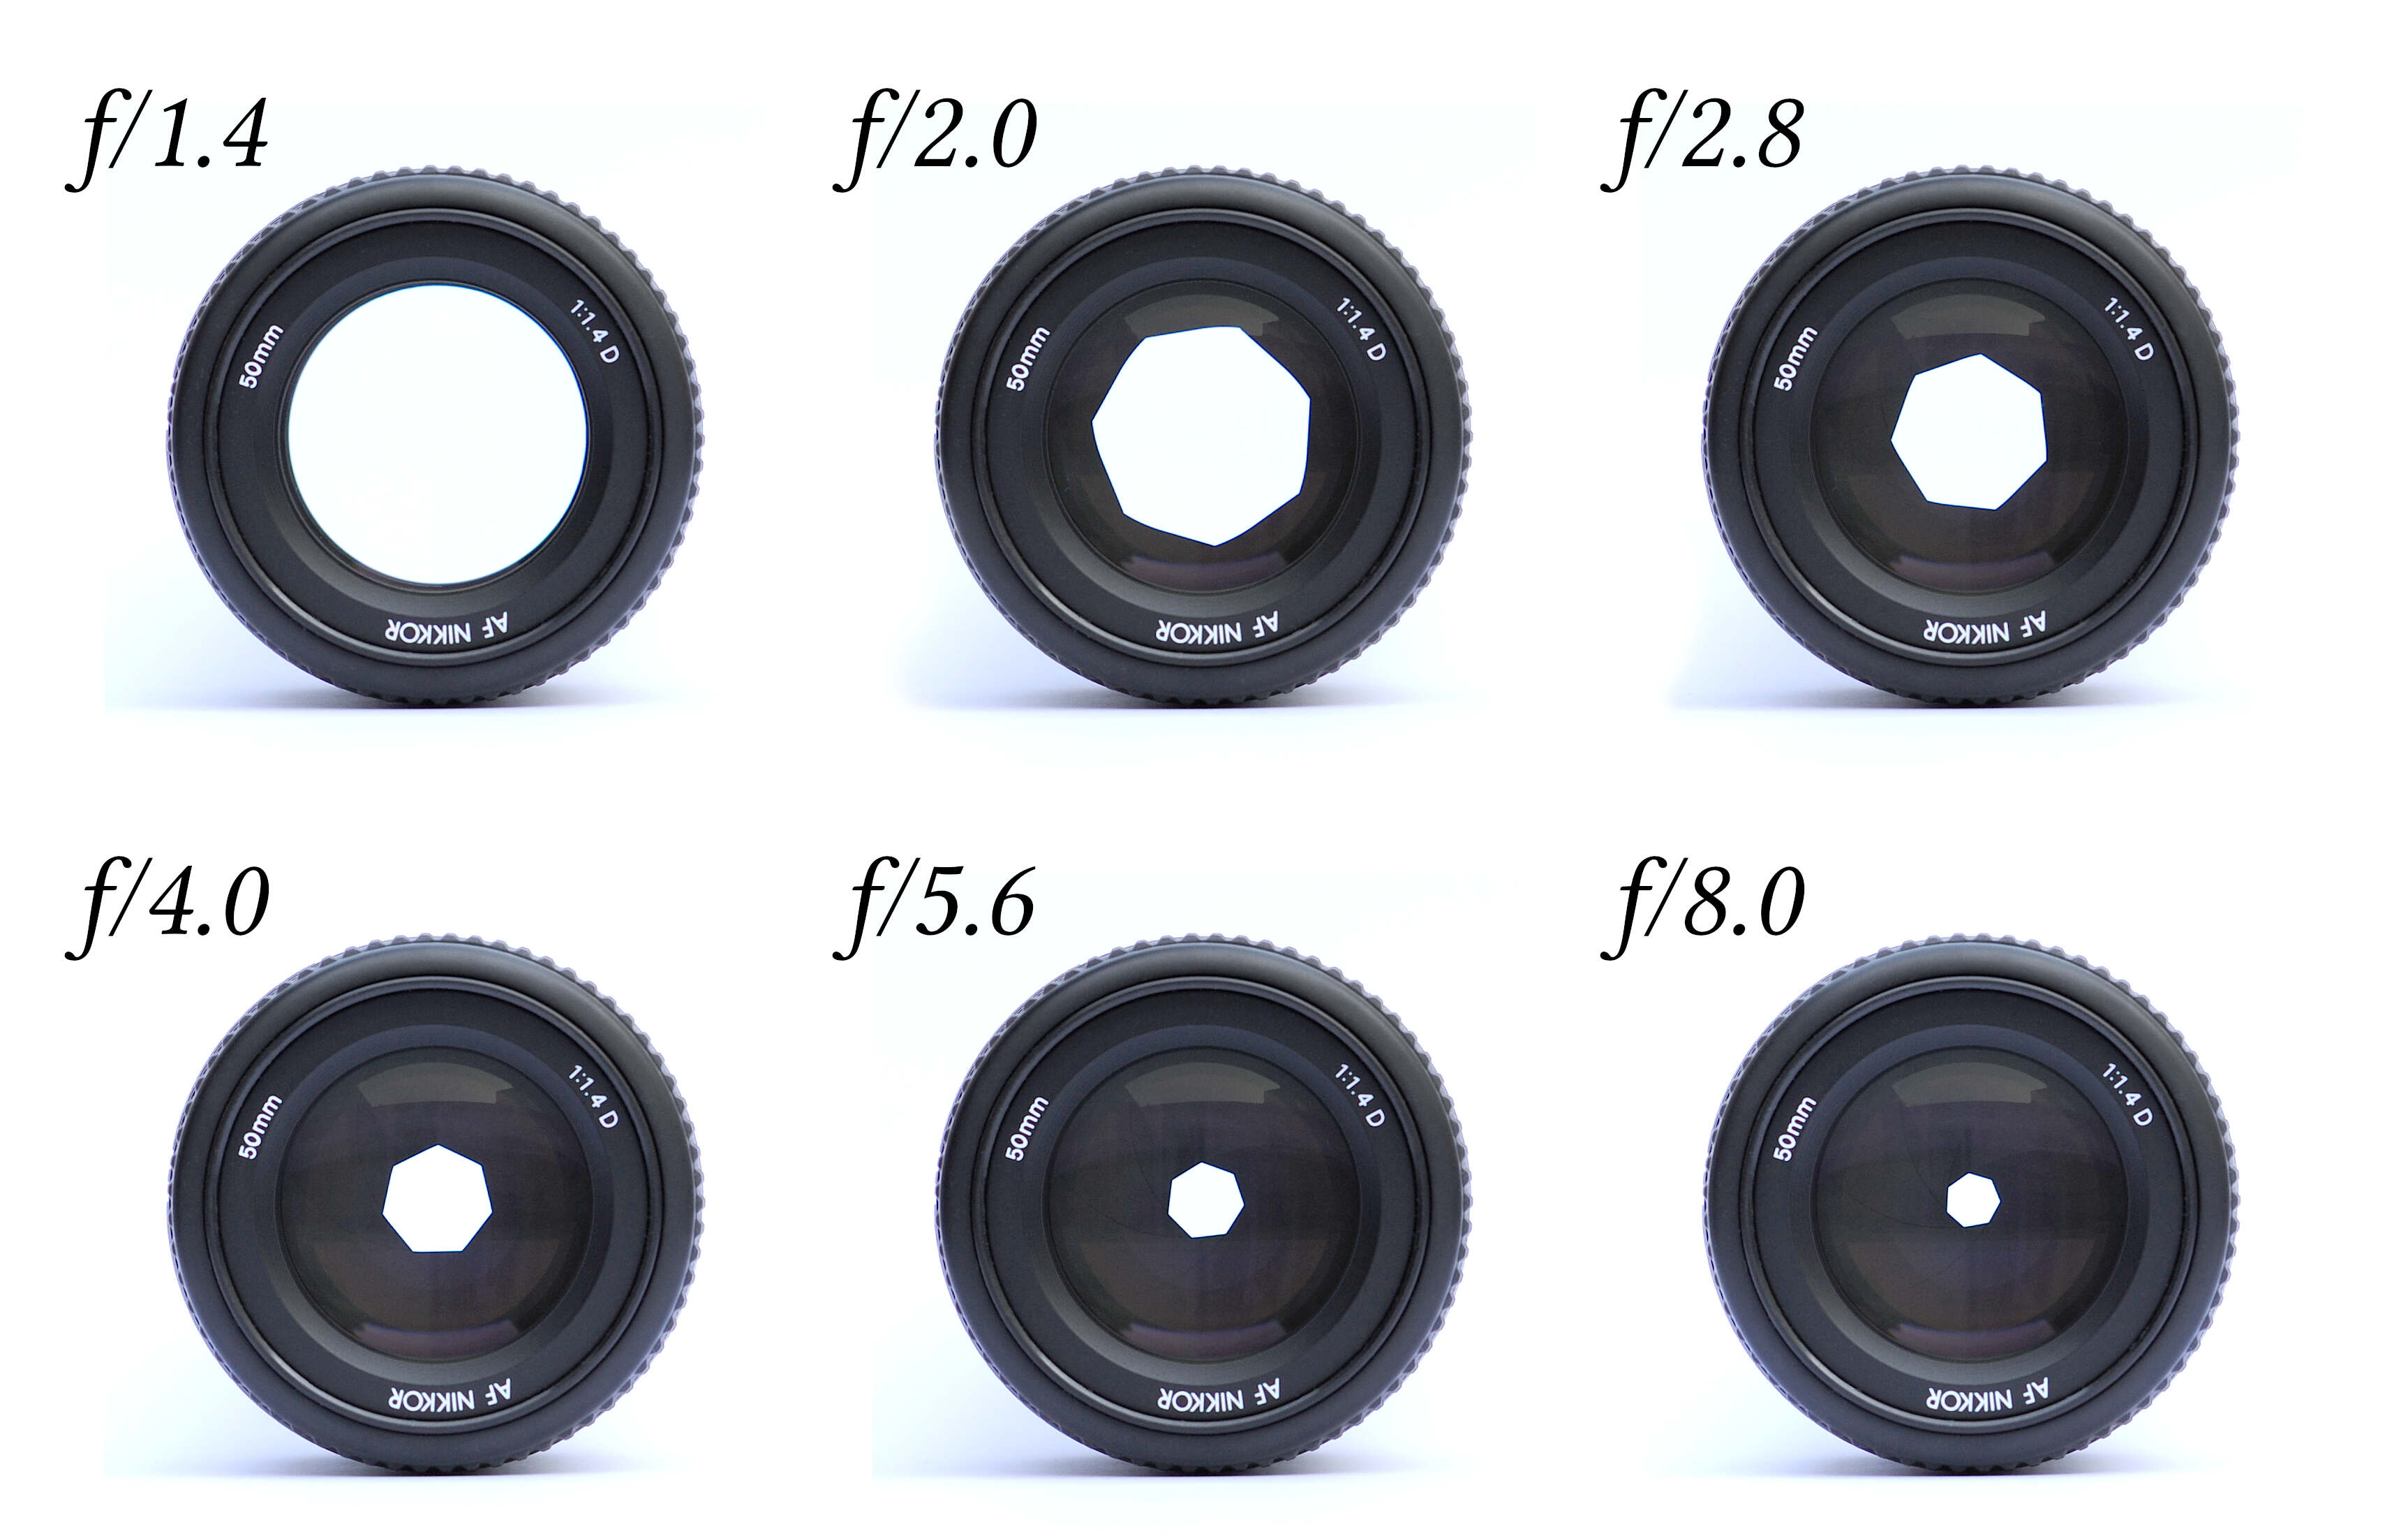
The Aperture Scale
The aperture scale, also known as the f-stop scale, is a standardized system used to measure and determine the size of the aperture opening in a lens. Understanding the aperture scale is crucial for photographers, as it allows them to control the amount of light that enters the camera and influences various aspects of image quality.
The aperture scale typically starts at the widest possible aperture for a lens, often labeled as the maximum aperture or the lowest f-number. For example, a lens may have a maximum aperture of f/2.8. This means that the aperture opening is relatively wide, allowing a significant amount of light to reach the image sensor or film.
As we move along the aperture scale, the f-number increases, indicating a narrower aperture opening. For instance, the next stop on the scale might be f/4, then f/5.6, and so on. Each increase in f-number halves the size of the aperture opening, resulting in a reduced amount of light entering the camera.
The values on the aperture scale follow a specific sequence, often referred to as “full stops” or “one-stop increments.” These values are standardized and correspond to changes in the amount of light entering the camera. Common full stops on the aperture scale include f/1.4, f/2, f/2.8, f/4, f/5.6, f/8, f/11, f/16, f/22, and so on.
Additionally, between each full stop, there are half stops and third stops. These intermediate increments allow for more precise control over the exposure and depth of field. For example, between f/2.8 and f/4, there would be a half-stop increment of f/3.5, followed by a third-stop increment of f/3.2.
It’s important to note that not all lenses have the same range of aperture settings. Some lenses may have a maximum aperture of f/4, while others may go as wide as f/1.2. The available range of aperture settings will depend on the specific lens you are using.
Understanding the aperture scale and the corresponding f-stop values allows photographers to make informed decisions about exposure and depth of field. By selecting the appropriate aperture setting, photographers can achieve the desired balance between letting in enough light for proper exposure and controlling the depth of field to enhance their creative vision.
Aperture Priority Mode vs Manual Mode
When it comes to controlling the aperture settings on your camera, two main shooting modes are commonly used: Aperture Priority Mode and Manual Mode. Each mode offers distinct advantages and is suitable for different shooting scenarios. Understanding the differences between these modes can help photographers make informed decisions and achieve their desired results.
Aperture Priority Mode, often denoted by “A” or “Av” on the camera’s mode dial, allows photographers to select the desired aperture while the camera automatically adjusts the corresponding shutter speed for proper exposure. In this mode, photographers have control over depth of field and can creatively play with the background blur or sharpness of their subject.
Aperture Priority Mode is particularly beneficial in situations where you want to prioritize your creative vision or control over depth of field. For example, when shooting portraits, you may want to use a wide aperture to achieve a shallow depth of field and blur the background, creating a pleasing bokeh effect. In Aperture Priority Mode, you select the desired f-stop, and the camera takes care of adjusting the shutter speed accordingly.
On the other hand, Manual Mode, often designated by “M” on the camera’s mode dial, provides full control over both the aperture and the shutter speed. In this mode, photographers manually set both parameters to achieve the desired exposure. Manual Mode offers the highest level of control and is ideal for photographers who prefer to have complete command over all aspects of the exposure.
Manual Mode is advantageous in situations where lighting conditions are challenging or inconsistent. For example, when shooting in a concert with rapidly changing stage lights, Manual Mode allows you to set a specific aperture and shutter speed combination that ensures proper exposure regardless of the changing conditions.
Additionally, Manual Mode is often preferred by experienced photographers who have a deep understanding of the exposure triangle and want precise control over the final result. It allows for meticulous adjustments to achieve a specific aesthetic or to compensate for tricky lighting situations.
Deciding between Aperture Priority Mode and Manual Mode depends on personal shooting style and the level of control required in a given situation. Aperture Priority Mode is ideal for those who want to control depth of field and let the camera handle the shutter speed, while Manual Mode provides complete freedom to adjust both aperture and shutter speed independently.
Ultimately, both modes have their merits, and the choice between them will depend on your shooting preferences, the desired level of control, and the specific shooting conditions you encounter.
Choosing the Right Aperture for Your Photos
Choosing the right aperture is crucial for capturing the desired look and feel in your photographs. The aperture setting directly affects the exposure, depth of field, and overall image quality. Understanding how to select the appropriate aperture for each situation allows photographers to have greater control over their creative vision.
One of the main considerations when choosing the aperture is the desired depth of field. If you want a shallow depth of field with a subject in sharp focus and a blurred background, opt for a wider aperture (lower f-number). This can be perfect for portraits or close-up photography, where you want to isolate the subject and create a pleasing bokeh effect. On the other hand, if you aim to have a larger area of the scene in focus, such as in landscape photography, consider using a narrower aperture (higher f-number) to achieve a deep depth of field.
Another factor to consider is the available light. In low-light situations, widening the aperture can allow more light to reach the camera’s sensor, resulting in a better-exposed image without having to rely heavily on high ISO settings. However, in bright lighting conditions, using a narrower aperture can help prevent overexposure and retain details in highlights.
The choice of aperture can also depend on the lens you use. Some lenses, particularly prime lenses, tend to provide better image quality and sharpness when stopped down a few f-stops from their maximum aperture. It’s a good idea to test different aperture settings with your lens to discover its optimal performance range.
Consider the type of photography you are doing and the desired outcome. For example, when photographing fast-moving subjects like wildlife or sports, using a wider aperture can help you achieve a faster shutter speed to freeze the action. On the other hand, for landscape photography, where the entire scene is usually in focus, a narrower aperture may be more suitable to ensure sharpness throughout the frame.
Experimentation is key to finding the right aperture settings for your photos. Take the time to test different apertures in various shooting conditions and evaluate the results. Pay attention to the depth of field, exposure, and overall image quality achieved with each aperture setting. Over time, you will develop an intuitive sense of which aperture works best for different situations and allow you to consistently capture the look and feel you envision.
Advantages and Disadvantages of Different Apertures
Choosing the right aperture for your photos involves understanding the advantages and disadvantages associated with different aperture settings. Different apertures have distinct characteristics that can impact the exposure, depth of field, and overall image quality. By being aware of these advantages and disadvantages, photographers can make informed decisions and achieve their desired results.
Wider Apertures (Lower f-numbers)
Advantages:
- Creates a shallower depth of field, allowing you to isolate the subject and blur the background.
- Allows more light to enter the camera, making it suitable for low-light photography.
- Enables faster shutter speed, reducing the risk of motion blur.
Disadvantages:
- May result in thinner depth of field, making it more challenging to keep the entire subject in focus.
- Can lead to softer image quality when used at the widest aperture, especially with certain lenses.
- May cause overexposure in bright lighting conditions, requiring the use of additional exposure adjustments or filters.
Narrower Apertures (Higher f-numbers)
Advantages:
- Provides a larger depth of field, allowing for more of the scene to be in focus.
- Increases image sharpness, especially in mid-range aperture settings that many lenses perform best at.
- Reduces the risk of overexposure in bright lighting conditions.
Disadvantages:
- May result in slower shutter speed, making it challenging to capture fast-moving subjects without motion blur.
- Requires more light or higher ISO settings in low-light situations, potentially introducing noise into the image.
- May limit the ability to achieve a blurred background and separate the subject from the surroundings.
Understanding the advantages and disadvantages of different apertures allows photographers to make intentional choices based on their specific needs and creative vision. It’s important to experiment with different aperture settings in various shooting conditions to develop a sense of how these factors influence the final outcome of your photographs. With practice, you can leverage the strengths of different aperture settings to enhance your storytelling and capture compelling images.
Using Aperture to Create Special Effects
Aperture is a powerful tool that can be used creatively to produce various special effects in photography. By intentionally manipulating the aperture settings, photographers can achieve unique results that enhance the visual impact and storytelling of their images.
One popular technique is creating a shallow depth of field with a wide aperture (lower f-number). This technique allows you to isolate the subject from the background, creating a stunning background blur or bokeh effect. By blurring the background, the subject becomes the main focus of the image, drawing attention and adding a sense of depth and separation.
Conversely, using a narrow aperture (higher f-number) can create a deep depth of field, ensuring that both the subject and the background are sharply in focus. This technique is particularly useful in landscape photography, where you want to capture intricate details throughout the entire scene, from the foreground to the distant horizon.
Another technique involves using a small aperture combined with a long exposure to capture light trails or create starburst effects. By setting the camera to a narrow aperture like f/16 or f/22 and using a longer shutter speed, stationary light sources such as city lights or headlights can turn into beautiful streaks of light or bursts of star-shaped highlights, adding a dynamic and mesmerizing element to the photograph.
Aperture can also be utilized to manipulate the appearance of sunbursts or sun flares in your images. By shooting with a narrow aperture like f/16 or f/22 and intentionally positioning the sun within the frame, you can create a starburst effect around the sun, adding a dramatic and captivating element to your photographs.
Furthermore, playing with the aperture settings can help create special effects like split focus or tilt-shift. By using a tilt-shift lens or a specialized lens adapter, you can tilt the plane of focus and create a unique effect where only a certain portion of the image appears sharp while the rest is blurred. This technique is popular for creating a miniature or “toy” effect, where large scenes, such as cityscapes or landscapes, appear as if they are miniature models.
Experimenting with different aperture settings and incorporating creative techniques into your photography allows you to add a personal and artistic touch to your images. By understanding the ways in which aperture can be used to create special effects, you can elevate your photography and capture truly captivating and memorable moments.
Aperture and Lens Performance
Aperture plays a significant role in the overall performance of a lens. The choice of aperture setting can impact factors such as image sharpness, distortion, chromatic aberration, and vignetting. Understanding how aperture affects lens performance is essential for photographers who strive to achieve the best image quality in their photographs.
One important consideration is that most lenses tend to perform at their best when stopped down a few f-stops from their maximum aperture. This means that using a medium aperture setting, typically around f/8 to f/11, can often result in optimal sharpness and clarity throughout the image. Many lenses exhibit improved edge-to-edge sharpness and reduced distortion when not used at their widest or narrowest aperture settings.
When shooting wide open at the lens’s maximum aperture, especially with cheaper or older lenses, you may encounter certain performance issues. These can include softness at the edges, decreased contrast, and more pronounced chromatic aberration (color fringing) or distortion. However, it’s important to note that this can vary depending on the specific lens and the quality of its design and construction.
It’s also worth noting that using an extremely narrow aperture (high f-number) can introduce diffraction, which can lead to a loss of overall image sharpness. Diffraction occurs when light passing through a small aperture begins to spread out, causing a loss of fine detail in the image. As a general guideline, it’s recommended to avoid using the smallest f-stop values on your lens (such as f/22) unless necessary for achieving a specific depth of field or capturing long exposures.
When considering lens performance, it’s crucial to understand that every lens has its own characteristics and sweet spots in terms of aperture performance. Some lenses may perform exceptionally well even at wider apertures, while others may require stopping down to achieve optimal results. It’s essential to test and experiment with your specific lens to determine its performance quirks and identify the aperture range where it shines the most.
Ultimately, understanding how aperture can impact lens performance allows photographers to make informed decisions when selecting the appropriate aperture setting. By knowing the strengths and weaknesses of their lenses, photographers can optimize image quality, minimize potential issues, and ensure they capture the best possible photographs in any given situation.
Aperture and Bokeh
Aperture plays a crucial role in the creation and quality of bokeh in photography. Bokeh refers to the aesthetic quality of the out-of-focus areas in an image, particularly the soft and smooth blurred background that often enhances the subject and adds a visually pleasing element to the composition.
One of the main factors that influence the appearance and quality of bokeh is the aperture setting. Using a wider aperture (lower f-number) creates a shallow depth of field, which means that the area in focus becomes narrower, while the background becomes more blurred. This effect allows for a more pronounced bokeh, with the out-of-focus areas appearing as soft, creamy, and visually pleasing blobs of color and light.
By selecting a wide aperture, such as f/1.8 or f/2.8, photographers can achieve a greater separation between the subject and the background while creating a more prominent bokeh effect. This technique is especially popular in portrait photography, where a smooth and pleasing background blur helps isolate the subject and draw attention to their features or expressions.
Additionally, the quality of the bokeh can also be affected by the design and construction of the lens. Some lenses are specifically designed to produce smoother and more appealing bokeh by incorporating features such as rounded aperture blades. These rounded blades create a more circular and natural shape to out-of-focus highlights, resulting in a more aesthetically pleasing bokeh appearance.
It’s worth noting that bokeh can also be influenced by other factors, such as the distance between the subject and the background, the focal length of the lens, and the size of the image sensor or film. However, the aperture setting remains one of the most critical factors in achieving the desired bokeh effect.
Experimenting with different aperture settings and observing the resulting bokeh can be a fascinating and creative aspect of photography. By understanding how aperture affects bokeh, photographers can control the visual impact of their images, adding a sense of depth, dimension, and aesthetic appeal.
Remember, bokeh is not just limited to the background; it can also be present in foreground elements or other out-of-focus areas within the frame. Utilizing aperture creatively and being mindful of the bokeh characteristics can lead to stunning and captivating visual effects in your photographs.