
Understanding Servo Motors
Servo motors are essential components in many electronic devices, providing precise control over angular position, velocity, and acceleration. Unlike standard motors, servo motors are equipped with a closed-loop feedback system that enables them to maintain a specific position or track a set trajectory accurately. This feedback loop consists of a position sensor, a controller, and a motor. When a command is sent to the servo motor, the controller compares the actual position feedback with the desired position and adjusts the motor’s movement to minimize the error.
One of the key features of servo motors is their ability to rotate to a specific angle and hold that position. This makes them ideal for applications that require controlled and precise movement, such as robotics, remote-controlled vehicles, and industrial automation.
Furthermore, servo motors are available in various sizes and torque ratings, allowing them to be used in a wide range of applications. Whether it’s a small micro servo for hobby projects or a large industrial servo for heavy-duty machinery, there’s a servo motor suitable for almost any need.
It’s important to note that servo motors operate based on pulse-width modulation (PWM) signals. The duration of the pulse determines the position of the servo motor’s shaft, with a typical range of 1000 to 2000 microseconds representing the full rotation span. Understanding this signal modulation is crucial for effectively controlling servo motors.
Overall, servo motors provide precise control, high torque, and positional feedback, making them indispensable for a myriad of applications where accuracy and reliability are paramount.
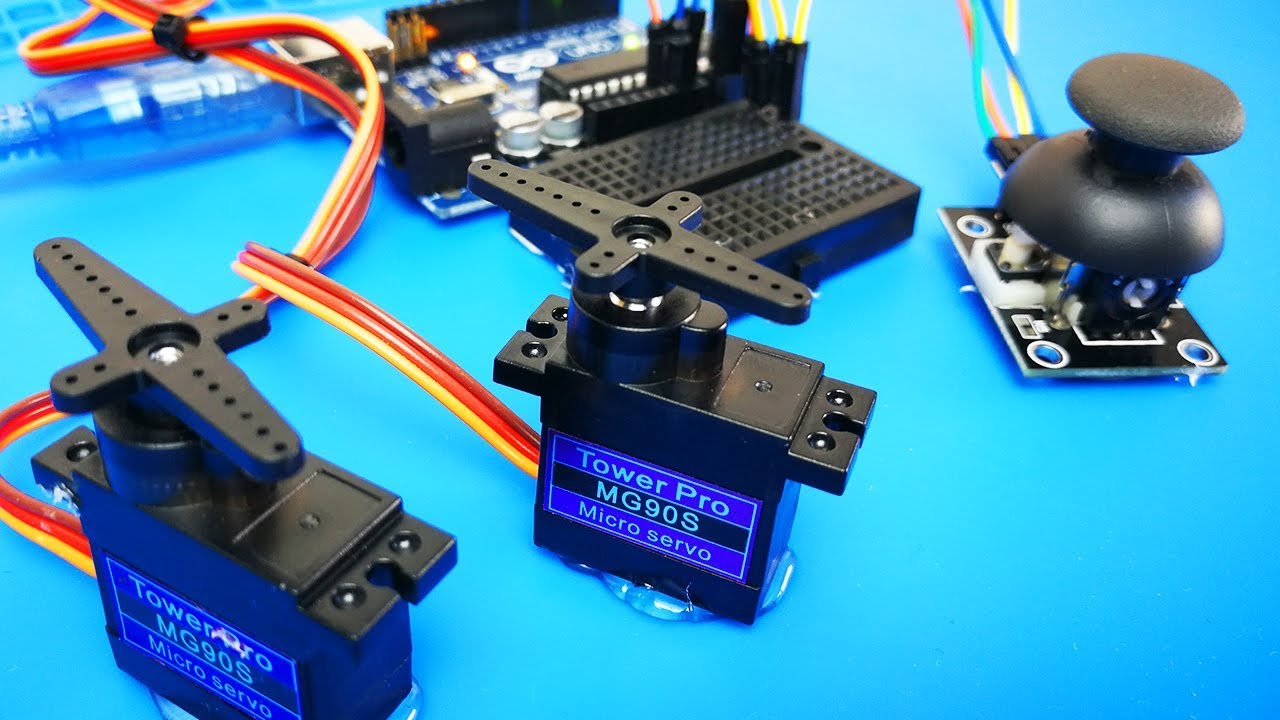
Choosing the Right Joystick
When it comes to controlling servo motors, selecting the appropriate joystick is crucial to ensure seamless and intuitive manipulation. There are several factors to consider when choosing a joystick for servo control, including the type of joystick, its range of motion, and its compatibility with the servo motor’s input requirements.
First and foremost, the type of joystick plays a significant role in the user experience and the precision of servo manipulation. Analog joysticks, which provide continuous and proportional control, are often preferred for servo applications due to their ability to deliver smooth and precise movements. Digital joysticks, on the other hand, offer discrete directional inputs and may not offer the same level of fine control as their analog counterparts.
Another critical consideration is the range of motion offered by the joystick. Servo motors typically operate within a specific angular range, and the joystick’s motion should align with this range to enable accurate control. Additionally, the physical ergonomics of the joystick should be taken into account to ensure comfortable and intuitive operation, especially for extended use.
Furthermore, compatibility with the servo motor’s input requirements is paramount. The joystick should provide the necessary output signals, such as analog or digital signals, that match the input specifications of the servo motor. Understanding the voltage levels, signal types, and communication protocols required by the servo motor is essential for selecting a compatible joystick.
Additionally, considerations such as durability, sensitivity, and the presence of additional features, such as integrated buttons or switches, can further influence the choice of joystick for servo manipulation. It’s important to assess the specific needs of the application and the user’s preferences to determine the most suitable joystick for the task at hand.
In essence, choosing the right joystick for servo control involves evaluating the type, range of motion, compatibility, and additional features to ensure seamless and precise manipulation of servo motors.
Wiring the Joystick to the Servo Motor
Properly wiring the joystick to the servo motor is a critical step in establishing a functional and responsive control system. The wiring process involves connecting the various electrical components in a manner that facilitates the transmission of control signals from the joystick to the servo motor, enabling seamless manipulation of the motor’s position and movement.
Before initiating the wiring process, it is essential to gather the necessary components, including the joystick, servo motor, and any additional hardware required for interfacing the two devices. Additionally, identifying the specific input and output requirements of the servo motor, such as voltage levels, signal types, and communication protocols, is crucial for determining the appropriate wiring configuration.
The first step in wiring the joystick to the servo motor involves establishing the electrical connections between the two devices. This typically entails connecting the output signals from the joystick to the input interface of the servo motor, ensuring that the electrical characteristics of the signals align with the motor’s requirements. Depending on the type of joystick and servo motor, this may involve soldering, using jumper wires, or utilizing compatible connectors to establish a secure and reliable connection.
Furthermore, it is important to consider the power supply for both the joystick and the servo motor. Ensuring that the power source can adequately meet the electrical demands of both devices is essential for stable and consistent operation. Additionally, incorporating appropriate voltage regulation and protection measures can safeguard the components from potential electrical issues.
Once the physical connections are established, attention should be directed towards the signal processing and interfacing aspects of the wiring. This may involve integrating signal conditioning circuitry, such as analog-to-digital converters or signal amplifiers, to ensure that the signals from the joystick are accurately interpreted and transmitted to the servo motor for precise control.
Overall, wiring the joystick to the servo motor involves meticulous attention to detail, adherence to the electrical specifications of the components, and the implementation of robust interfacing techniques to facilitate seamless and responsive control over the servo motor’s movements.
Writing the Code for Servo Manipulation
Creating the code for servo manipulation is a pivotal aspect of integrating the joystick control with the servo motor. The code serves as the bridge between the physical input from the joystick and the desired output to the servo motor, translating user commands into precise movements of the motor. This process involves programming the microcontroller or embedded system to interpret the joystick inputs and generate the corresponding control signals for the servo motor.
First and foremost, it is essential to select the appropriate programming language and development environment for the microcontroller or embedded platform being used. Common choices include Arduino IDE for Arduino-based systems, Python for Raspberry Pi, or platform-specific languages for other microcontroller architectures. Familiarity with the chosen programming environment is crucial for efficiently implementing the code for servo manipulation.
The code typically begins by initializing the necessary input and output pins for the joystick and servo motor, respectively. This involves configuring the microcontroller’s GPIO (General Purpose Input/Output) pins to receive the analog or digital signals from the joystick and generate the corresponding PWM signals for the servo motor.
Subsequently, the code incorporates the logic for interpreting the joystick inputs and mapping them to the desired movements of the servo motor. This may involve scaling the analog joystick readings to match the angular range of the servo motor, implementing dead zones to eliminate noise and ensure stable control, and applying any necessary calibration to align the joystick inputs with the motor’s movement characteristics.
Furthermore, the code should include the necessary routines for generating the PWM signals that drive the servo motor. This entails setting the pulse width based on the mapped joystick inputs to command the servo motor to move to the desired position. Additionally, incorporating features such as acceleration profiles, speed control, and error handling can enhance the responsiveness and reliability of the servo manipulation.
It is also important to consider implementing safety measures and error-checking routines within the code to prevent erratic movements or potential damage to the servo motor. This may involve validating the input ranges, incorporating limits on the servo motor’s movements, and implementing fail-safe mechanisms to handle unexpected conditions.
In essence, writing the code for servo manipulation involves translating the user’s joystick inputs into precise control signals for the servo motor, encompassing input processing, signal generation, and safety considerations to ensure accurate and reliable motor movements.
Testing and Calibrating the System
After wiring the joystick to the servo motor and writing the code for servo manipulation, thorough testing and calibration are essential to ensure the system functions as intended, providing precise control over the servo motor’s movements. Testing involves verifying the responsiveness, accuracy, and stability of the servo control system, while calibration focuses on fine-tuning the system parameters to optimize performance and minimize errors.
Initiating the testing phase involves conducting preliminary checks to ensure that all physical connections between the joystick, microcontroller, and servo motor are secure and correctly configured. Verifying the power supply, signal integrity, and mechanical linkages is crucial to preemptively identify any potential issues that could affect the system’s performance.
Once the physical setup is validated, the next step is to assess the functionality of the joystick control and its interaction with the servo motor. This includes testing the full range of motion of the servo motor in response to the joystick inputs, evaluating the smoothness and accuracy of the motor’s movements, and identifying any irregularities or unexpected behavior that may indicate wiring or code-related issues.
Furthermore, testing should encompass real-world scenarios relevant to the intended application of the servo control system. This may involve simulating specific tasks or movements that the servo motor is expected to perform, allowing for a comprehensive assessment of the system’s capabilities under practical conditions.
Following the testing phase, calibration becomes pivotal in refining the system’s performance. This involves adjusting the code parameters, such as joystick sensitivity, dead zones, and motor control profiles, to optimize the responsiveness and accuracy of the servo motor’s movements. Additionally, calibrating the servo motor itself, if applicable, to account for mechanical tolerances and positional offsets can further enhance the system’s precision.
During calibration, it is important to leverage feedback mechanisms, such as visualizing the joystick inputs and the corresponding motor movements, to iteratively fine-tune the system parameters. This iterative approach allows for incremental adjustments and immediate evaluation of the impact on the servo control, facilitating the attainment of optimal performance.
Throughout the testing and calibration process, documentation of the observed behavior, adjustments made, and the resulting system performance is crucial for tracking the system’s evolution and facilitating future troubleshooting or enhancements.