
Identifying the Problem
One of the most common issues Xbox One gamers encounter is a loose joystick on their controller. This problem can significantly impact gameplay, causing frustration and hindering the overall gaming experience. Identifying the problem is the first step toward finding a solution and restoring the controller to its optimal functionality.
When experiencing a loose joystick, gamers may notice that the thumbstick moves excessively or feels imprecise, impacting control and accuracy in games. The issue can arise from prolonged use, wear and tear, or physical damage to the controller. It’s crucial to address this problem promptly to prevent further damage and maintain an enjoyable gaming experience.
Recognizing the symptoms of a loose joystick is essential for troubleshooting. Gamers may observe increased play in the joystick, a lack of responsiveness, or difficulty maintaining precise movements in-game. These indicators can help pinpoint the issue and guide the repair process, ensuring that the controller functions optimally once the fix is implemented.
Tools Needed for the Fix
Before embarking on the journey to tighten the loose joystick on your Xbox One controller, it’s essential to gather the necessary tools to facilitate a successful repair. Having the right tools at your disposal will streamline the process and ensure that the fix is executed effectively.
Here’s a list of the tools you’ll need:
- Phillips Head Screwdriver: This tool is crucial for removing the screws that secure the controller’s casing. Ensure that the screwdriver is the appropriate size to fit the screws without causing damage.
- Spudger or Plastic Opening Tool: Utilize this tool to carefully pry open the controller’s casing without scratching or damaging the surface. A spudger or plastic opening tool offers precision and minimizes the risk of cosmetic harm to the controller.
- Tweezers: Tweezers are invaluable for handling small components within the controller, especially during the disassembly and reassembly stages. They aid in maneuvering delicate parts with accuracy.
- Replacement Thumbstick Module: If the joystick’s issue stems from irreparable damage or wear, having a replacement thumbstick module on hand is essential for a seamless fix. Ensure that the replacement part is compatible with the Xbox One controller model.
- Cotton Swabs and Isopropyl Alcohol: These items are useful for cleaning any internal components affected by debris or dust, thereby optimizing the controller’s performance post-repair.
- Clean Workspace: Prepare a clean, well-lit workspace to carry out the repair. A clutter-free environment will minimize the risk of misplacing small components and ensure a smooth process.
By assembling these tools, you’ll be well-equipped to address the loose joystick issue with precision and efficiency, setting the stage for a successful repair.
Disassembling the Controller
Before delving into the intricate process of fixing the loose joystick on your Xbox One controller, it’s crucial to navigate the initial step of disassembling the device. This phase requires meticulous attention to detail and a methodical approach to ensure that the controller’s internal components are accessed safely and without damage.
Here’s a step-by-step guide to disassembling the controller:
- Prepare the Workspace: Find a clean, well-lit area to work in and lay down a soft cloth to protect the controller’s surface from scratches. Ensure that all the necessary tools are within reach.
- Remove the Batteries: Take out the batteries from the controller to prevent any power-related mishaps during the disassembly process.
- Unscrew the Casing: Use the Phillips head screwdriver to carefully remove the screws securing the controller’s casing. Keep the screws in a secure place to prevent misplacement.
- Pry Open the Casing: Gently insert the spudger or plastic opening tool along the seams of the controller to separate the casing. Exercise caution to avoid exerting excessive force, which could lead to damage.
- Separate the Casing: Slowly lift the casing from the controller, ensuring that no cables or ribbons are still connected. If any cables are present, carefully disconnect them using the tweezers.
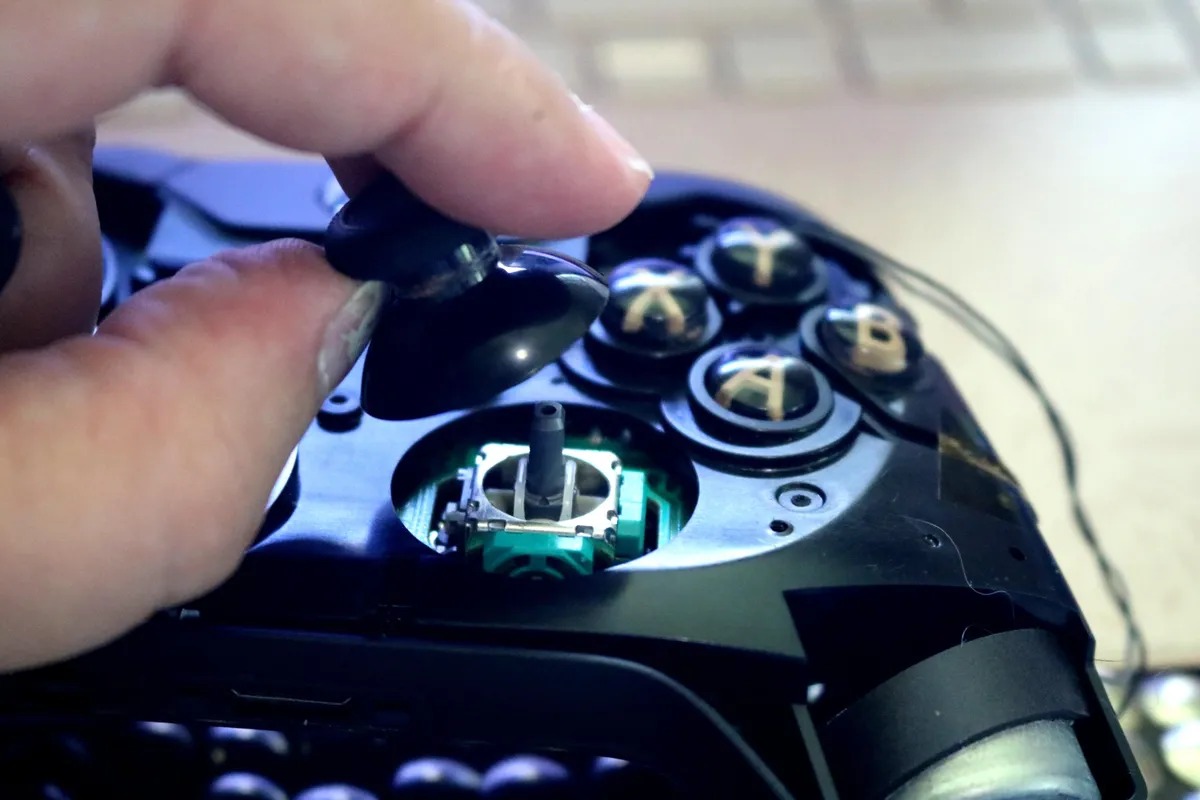
- Access the Joystick Module: With the casing removed, the joystick module will be visible. Take note of its placement and the connections to prepare for the next phase of the repair.
By methodically disassembling the controller, you’ll gain access to the internal components, setting the stage for the subsequent steps involved in fixing the loose joystick and restoring the controller to its optimal state.
Fixing the Loose Joystick
Once the Xbox One controller is disassembled, the next crucial step is addressing the issue of the loose joystick. This phase requires precision and attention to detail to ensure that the joystick is tightened effectively, restoring precise control and responsiveness to the controller.
Here’s a comprehensive guide to fixing the loose joystick:
- Assess the Joystick Module: Examine the joystick module for any visible signs of wear, damage, or misalignment. If the issue stems from a damaged or worn module, it may be necessary to replace it with a compatible spare part.
- Inspect the Joystick Mechanism: Carefully analyze the internal mechanism of the joystick for any debris, dust, or foreign particles that may be contributing to the looseness. Clean the area using isopropyl alcohol and cotton swabs to ensure optimal functionality.
- Adjust the Tension: If the joystick’s looseness is due to tension issues, carefully adjust the tension mechanism within the module. This delicate process requires precision to ensure that the tension is restored without causing further damage.
- Secure the Joystick: If the joystick’s housing is loose or misaligned, carefully reposition and secure it within the module, ensuring a snug fit that allows for smooth and precise movements.
- Replace the Joystick Module (if necessary): In cases where the joystick module is irreparably damaged, carefully replace it with a compatible spare part, ensuring that all connections are secure and aligned.
By meticulously addressing the root cause of the loose joystick and implementing the appropriate corrective measures, you’ll effectively restore the controller’s functionality, paving the way for an enhanced gaming experience.
Reassembling the Controller
After successfully addressing the issue of the loose joystick, the next crucial step in the repair process is reassembling the Xbox One controller. This phase demands careful attention to detail and a methodical approach to ensure that all internal components are securely restored, culminating in a fully functional and aesthetically intact controller.
Here’s a step-by-step guide to reassembling the controller:
- Position the Joystick Module: Carefully place the joystick module back into its designated position within the controller, ensuring that all connections align correctly.
- Secure the Casing: Gently reattach the controller’s casing, ensuring that any disconnected cables or ribbons are meticulously reconnected. Exercise caution to avoid pinching or damaging any internal components during this process.
- Reattach the Screws: Use the Phillips head screwdriver to secure the casing by reinserting and tightening the screws, ensuring that the casing is firmly held in place.
- Insert the Batteries: Place the batteries back into the controller, ensuring that they are correctly positioned and secure.
- Test the Buttons and Joysticks: Before fully reassembling the controller, perform a preliminary test to ensure that all buttons and joysticks are functioning as expected. This step allows for immediate identification of any issues that may require further attention.
- Final Checks: Once the controller is reassembled, perform a final visual inspection to ensure that all components are correctly positioned and that the casing is securely fastened, resulting in a cosmetically and functionally restored controller.
By meticulously reassembling the controller, you’ll ensure that all internal components are securely restored, culminating in a fully functional and aesthetically intact controller, ready to deliver an optimal gaming experience.
Testing the Joystick
Following the meticulous reassembly of the Xbox One controller, the next crucial step is to thoroughly test the joystick to ensure that the repair has effectively addressed the issue of looseness, restoring precise control and responsiveness to the controller. This phase allows for immediate identification of any remaining issues and provides an opportunity to fine-tune the repair before resuming regular gameplay.
Here’s a comprehensive guide to testing the joystick:
- Power On the Controller: Turn on the controller and ensure that it establishes a connection with the console, indicating that the reassembly process was successful.
- Check Joystick Responsiveness: Navigate through the controller’s menu and test the joystick’s responsiveness, ensuring that it accurately registers movements and maintains precision.
- Test in-game Movements: Launch a game and test the joystick’s performance in various in-game scenarios, such as character movement and camera control. Verify that the joystick’s movements are smooth, precise, and free from any residual looseness.
- Assess Button Functionality: While testing the joystick, assess the functionality of all buttons and triggers, ensuring that the controller operates seamlessly across all inputs.
- Perform Calibration (if necessary): If the joystick exhibits any irregularities or sensitivity issues, consider calibrating it through the console’s settings to fine-tune its performance.
By conducting a comprehensive testing process, you’ll ascertain that the joystick’s functionality has been fully restored, allowing for a seamless and immersive gaming experience without the hindrance of a loose joystick.
Tips for Preventing Future Issues
After successfully addressing the loose joystick issue and restoring the Xbox One controller to optimal functionality, it’s essential to implement preventive measures to mitigate the risk of similar issues in the future. By incorporating these proactive strategies, gamers can prolong the lifespan of their controllers and maintain a consistent gaming experience free from joystick-related hindrances.
Here are valuable tips for preventing future issues with the Xbox One controller:
- Regular Cleaning and Maintenance: Periodically clean the controller’s joysticks and buttons using compressed air to remove dust and debris that may contribute to wear and looseness over time.
- Proper Storage: Store the controller in a clean, dry, and dust-free environment, minimizing exposure to elements that could compromise its internal components.
- Moderate Usage: Avoid excessive force when using the joysticks and buttons, as undue pressure can contribute to premature wear and looseness. Encourage gentle and precise movements during gameplay.
- Invest in Protective Accessories: Consider using protective silicone covers or cases for the controller to shield it from accidental damage and minimize the impact of wear on its components.
- Regular Inspections: Periodically inspect the controller for any signs of wear, misalignment, or irregularities in its functionality. Promptly addressing minor issues can prevent them from escalating into significant problems.
- Timely Repairs: If any issues arise, such as slight looseness in the joysticks, address them promptly to prevent further wear and maintain the controller’s optimal performance.
By integrating these preventive measures into their gaming routine, users can safeguard their Xbox One controllers against potential issues, ensuring a prolonged lifespan and a consistently enjoyable gaming experience.