
Signs of a Weak Motorcycle Battery
Signs of a Weak Motorcycle Battery
Recognizing the signs of a weak motorcycle battery is crucial for ensuring a smooth and hassle-free riding experience. Here are some key indicators that may signal a declining battery:
- Slow Engine Crank: If the engine cranks slowly when starting the motorcycle, it could indicate a weakening battery. This is often accompanied by a sluggish ignition process.
- Dim Lights: Diminished brightness in the motorcycle’s headlights and dashboard lights is a common symptom of a weak battery. If you notice a significant decrease in luminosity, it may be time to inspect the battery.
- Electrical Issues: Malfunctions in the electrical components, such as difficulty in starting the motorcycle or erratic behavior of the turn signals, may point to battery-related issues.
- Clicking Sound: A clicking sound when attempting to start the motorcycle is a telltale sign of a weakened battery. This occurs when the battery lacks sufficient power to engage the starter motor effectively.
- Old Age: As with any battery, the lifespan of a motorcycle battery diminishes over time. If your battery is over three years old, it’s advisable to be particularly vigilant for signs of deterioration.
Being attuned to these warning signs can help preemptively address potential battery issues, ensuring the reliability and longevity of your motorcycle’s power source.
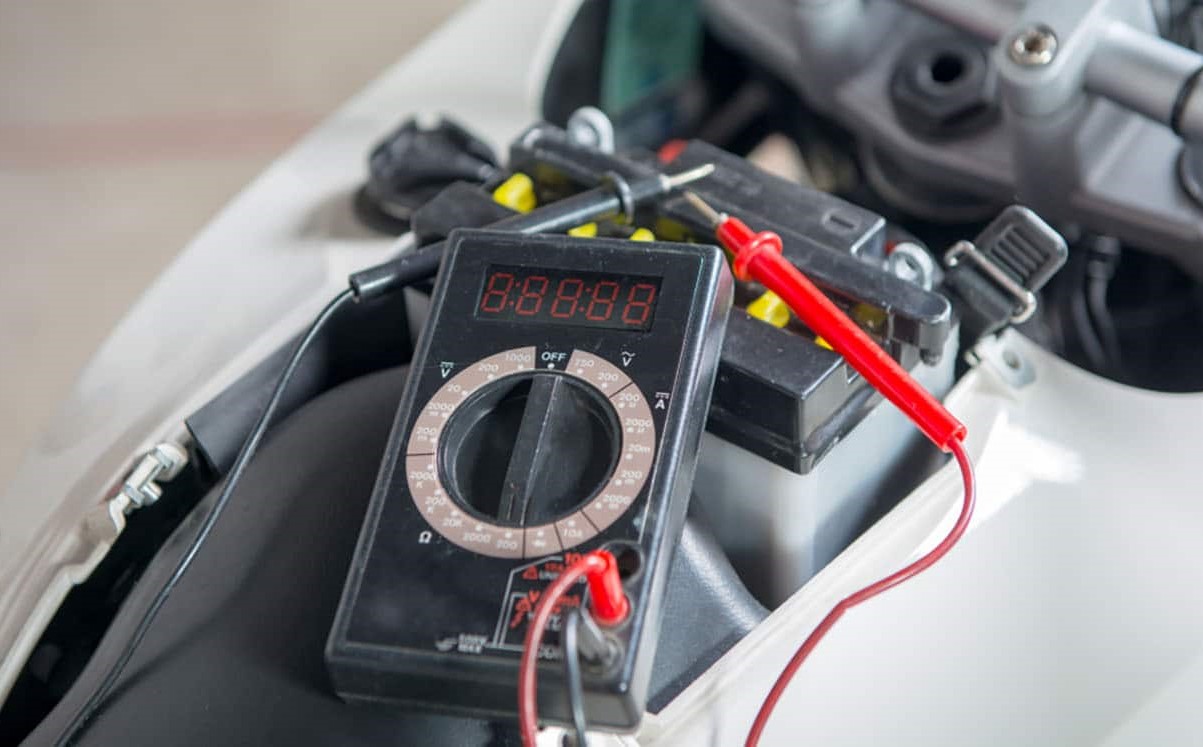
Voltage Testing
Conducting voltage testing is a fundamental method for assessing the health of a motorcycle battery. This diagnostic procedure provides valuable insights into the battery’s charge level and overall functionality. Here’s how to perform a voltage test:
Equipment Needed: To conduct a voltage test, you will require a multimeter, which is readily available at automotive supply stores or online retailers. Ensure that the multimeter is set to measure direct current (DC) voltage.
Procedure: Start by turning off the motorcycle’s engine and all electrical components. Carefully disconnect the battery terminals, beginning with the negative (black) terminal followed by the positive (red) terminal. Set the multimeter to the appropriate voltage range, typically 20 volts for motorcycle batteries. Then, connect the multimeter’s probes to the corresponding battery terminals – red to positive and black to negative. The multimeter will display the battery’s voltage, providing a clear indication of its charge status.
Interpreting the Results: A fully charged 12-volt motorcycle battery should ideally register around 12.6 to 13.2 volts. If the reading falls below 12.4 volts, it may signify a partially discharged battery, while a reading below 12 volts indicates a significantly depleted charge. Conversely, a voltage reading exceeding 13.2 volts could indicate an overcharged battery, warranting further inspection.
Regular voltage testing is an effective means of monitoring the battery’s condition and can aid in identifying potential issues before they escalate. By integrating this simple yet invaluable procedure into your maintenance routine, you can proactively safeguard your motorcycle’s electrical system and optimize its performance.
Visual Inspection
Performing a thorough visual inspection is an essential aspect of assessing the overall health and condition of a motorcycle battery. By meticulously examining the battery and its surroundings, riders can detect visible indicators of potential issues. Here’s how to conduct a comprehensive visual inspection:
Examine the Battery Exterior: Start by visually inspecting the battery casing for any signs of damage, such as cracks, leakage, or corrosion. If any physical abnormalities are detected, it may indicate a compromised battery that requires immediate attention.
Check the Terminals and Connections: Inspect the battery terminals and cable connections for corrosion, rust, or looseness. Corroded terminals can impede the flow of electricity and compromise the battery’s performance. It’s advisable to clean the terminals regularly to prevent corrosion buildup and ensure optimal electrical conductivity.
Assess the Electrolyte Level (for Flooded Batteries): If your motorcycle is equipped with a flooded (wet cell) battery, visually inspect the electrolyte level. Ensure that the electrolyte (battery acid) covers the battery plates adequately. If the electrolyte level is low, carefully add distilled water to reach the recommended level, as specified by the manufacturer.
Observe the Battery Age and Label: Take note of the battery’s manufacturing date, which is typically indicated on the battery case. If the battery is approaching or has surpassed its expected lifespan, it may be prudent to consider a replacement, especially if other signs of deterioration are present.
By routinely conducting visual inspections, riders can proactively identify potential battery issues and take preemptive measures to maintain a reliable and robust electrical system for their motorcycles. This proactive approach can contribute to enhanced safety, performance, and longevity of the battery.
Load Testing
Load testing is a critical diagnostic procedure that assesses the ability of a motorcycle battery to deliver power under real-world conditions. This method provides valuable insights into the battery’s capacity and performance, helping to ascertain its overall health. Here’s how to conduct a load test:
Equipment Needed: To perform a load test, you will require a load tester, which is specifically designed to apply a controlled electrical load to the battery and evaluate its response. Load testers are available at automotive supply stores and are an indispensable tool for assessing battery performance.
Procedure: Begin by ensuring that the motorcycle’s engine and all electrical components are turned off. Connect the load tester to the battery following the manufacturer’s instructions. The load tester will apply a simulated load to the battery, gauging its ability to sustain power output under stress. Observe the load tester’s display to determine the battery’s voltage and performance under the applied load.
Interpreting the Results: During the load test, a healthy motorcycle battery should maintain a stable voltage within the specified range, indicative of its ability to supply consistent power. If the battery’s voltage drops significantly during the test, it may suggest a diminished capacity to deliver power effectively, signaling the need for a replacement.
Load testing is an indispensable tool for evaluating the functional capacity of a motorcycle battery and can reveal underlying issues that may not be apparent through other diagnostic methods. By integrating load testing into your battery maintenance regimen, you can gain a comprehensive understanding of the battery’s performance and make informed decisions regarding its upkeep and potential replacement.
Maintenance Tips for Motorcycle Batteries
Effectively maintaining a motorcycle battery is essential for optimizing its performance, extending its lifespan, and ensuring reliable operation. By adhering to these proactive maintenance tips, riders can mitigate potential issues and preserve the integrity of their motorcycle’s electrical system:
- Regular Charging: Routinely charge the battery, especially during periods of inactivity or storage. Utilize a quality battery charger to maintain an optimal charge level, preventing depletion and sulfation.
- Keep Terminals Clean: Periodically inspect the battery terminals and cable connections, ensuring they are free from corrosion, rust, or debris. Clean the terminals with a wire brush and apply a thin coat of dielectric grease to inhibit corrosion.
- Secure Mounting: Verify that the battery is securely mounted within the motorcycle’s battery compartment to prevent excessive vibration, which can lead to internal damage and premature wear.
- Protect from Extreme Temperatures: Shield the battery from extreme heat or cold, as temperature fluctuations can impact its performance. Consider using insulating wraps or thermal barriers if the motorcycle is exposed to harsh environmental conditions.
- Proper Ventilation: For flooded (wet cell) batteries, ensure adequate ventilation to dissipate any hydrogen gas emitted during charging. Avoid overfilling the battery and maintain the recommended electrolyte level.
- Periodic Inspection: Conduct regular visual inspections to identify any signs of damage, leakage, or electrolyte levels for flooded batteries. Address any abnormalities promptly to prevent further deterioration.
- Utilize Smart Chargers: Invest in smart battery chargers that incorporate microprocessor technology to deliver an optimized charging regimen, preventing overcharging and maintaining the battery’s health.
By conscientiously implementing these maintenance practices, riders can safeguard their motorcycle batteries against premature failure and degradation, ensuring a dependable power source for their vehicles. Proactive maintenance not only enhances the battery’s longevity but also contributes to the overall safety and performance of the motorcycle.