
Choosing the Right Cable
When it comes to setting up a reliable and efficient network or audio-visual system, selecting the appropriate cable is crucial. The BNC (Bayonet Neill-Concelman) connector is commonly used for coaxial cable connections, and choosing the right cable is the first step in ensuring a secure and seamless connection. Here’s a step-by-step guide to help you choose the right cable for your BNC connector:
- Understand Your Requirements: Before selecting a cable, it’s essential to understand the specific needs of your application. Consider factors such as the required bandwidth, signal strength, and environmental conditions the cable will be exposed to. For instance, if you’re dealing with high-frequency signals or operating in a harsh industrial environment, you may need a cable with superior shielding and durability.
- Assess the Cable Type: Coaxial cables come in various types, each designed for specific applications. RG-59 and RG-6 are commonly used for video and CCTV installations, while RG-8 and RG-11 are suitable for long-distance data transmission. Understanding the differences between these cable types will help you make an informed decision based on your connectivity requirements.
- Consider Cable Length: The length of the cable plays a crucial role in signal integrity. Longer cable runs can lead to signal degradation, so it’s important to choose a cable length that meets the spatial requirements of your setup without compromising signal quality.
- Examine Connector Compatibility: Ensure that the cable you choose is compatible with BNC connectors. Different cables have varying connector types, and selecting a cable with the correct connector interface is essential for a secure and stable connection.
- Assess Signal Loss and Attenuation: Signal loss and attenuation can occur during transmission, especially over longer cable runs. It’s important to select a cable with low signal loss and attenuation characteristics to maintain signal integrity and minimize data errors.
By carefully considering these factors, you can make an informed decision when choosing the right cable for your BNC connector. This initial step sets the foundation for a reliable and high-performance connection, ensuring that your network or audio-visual system operates effectively.
Preparing the Cable
Before connecting a BNC connector, it’s essential to properly prepare the cable to ensure a secure and reliable connection. Here’s a step-by-step guide to preparing the cable for the BNC connector:
- Gather the Necessary Tools: To prepare the cable, you’ll need specific tools such as a cable cutter/stripper, a pair of cable crimpers, and possibly a multimeter for testing continuity. Having the right tools on hand will streamline the preparation process and help achieve precise results.
- Measure and Mark the Cable: Begin by measuring the length of the cable required for the connection and mark the cutting point using a marker or tape. It’s crucial to ensure accurate measurements to avoid wastage and achieve a proper fit for the BNC connector.
- Strip the Outer Jacket: Use a cable stripper to carefully remove the outer jacket of the coaxial cable. Make a circular cut around the outer jacket, ensuring not to damage the inner insulation or shield. Gently peel off the outer jacket to expose the inner components of the cable.
- Expose the Shield and Dielectric: After removing the outer jacket, carefully expose the shield and dielectric material. The shield may consist of braided wire or foil, and the dielectric is the insulating material surrounding the central conductor. Take care not to damage the shield or the dielectric during this process.
- Trim the Exposed Conductor: Once the shield and dielectric are exposed, trim the exposed conductor to the appropriate length. This ensures that the conductor fits perfectly within the BNC connector without any excess protruding, which could cause signal interference or connection issues.
- Check for Damage and Continuity: Before proceeding to attach the BNC connector, inspect the exposed components of the cable for any signs of damage or irregularities. Additionally, use a multimeter to check for continuity to ensure that the cable is free from any internal faults that could affect the connection.
By following these preparatory steps, you can ensure that the cable is ready for the next phase of connecting the BNC connector. Proper preparation is key to establishing a secure and stable connection, laying the groundwork for reliable network or audio-visual connectivity.
Stripping the Cable
Stripping the cable is a critical step in the process of connecting a BNC connector, and it requires precision and attention to detail to ensure a successful connection. Here’s a step-by-step guide to effectively strip the cable for the BNC connector:
- Select the Right Tool: Use a high-quality cable stripper designed for coaxial cables. The stripper should be adjustable to accommodate various cable diameters and should have cutting blades that are sharp and in good condition to ensure clean and precise cuts.
- Secure the Cable: Before stripping the cable, secure it in a stable position using a vise or cable holder. This prevents the cable from moving during the stripping process, allowing for more accurate cuts and reducing the risk of injury.
- Measure the Stripping Length: Refer to the specifications provided with the BNC connector to determine the required length for stripping the cable. Measure and mark the stripping length on the cable using a marker or tape to ensure consistency and accuracy.
- Adjust the Cable Stripper: Set the cable stripper to the appropriate stripping length based on the markings made on the cable. Ensure that the cutting blades are aligned with the marked stripping length to achieve a clean and uniform cut.
- Perform the Stripping Process: Carefully position the cable within the cable stripper, ensuring that it is held securely in place. Rotate the stripper around the cable in a smooth and controlled motion to make the cut. Avoid applying excessive force, as this can damage the inner components of the cable.
- Remove the Outer Jacket: After making the cut, gently remove the outer jacket of the cable to expose the inner components. Take care to avoid damaging the shield or the dielectric material during this process, as any damage can compromise the integrity of the cable.
- Inspect the Stripped Cable: Once the outer jacket is removed, inspect the stripped portion of the cable to ensure that the shield and the dielectric are intact and undamaged. Any irregularities or damage should be addressed before proceeding to the next steps.
By following these steps, you can effectively strip the cable in preparation for attaching the BNC connector. Attention to detail and precision during the stripping process is essential for creating a secure and reliable connection, ultimately contributing to the overall performance of the network or audio-visual system.
Preparing the BNC Connector
Before attaching the BNC connector to the coaxial cable, it’s essential to prepare the connector to ensure a proper and secure connection. Here’s a step-by-step guide to preparing the BNC connector for the next phase of the installation process:
- Inspect the BNC Connector: Begin by carefully examining the BNC connector to ensure that it is free from any physical defects or irregularities. Check for any signs of damage, such as bent pins or misaligned components, and ensure that the connector is clean and debris-free.
- Verify Connector Compatibility: Confirm that the BNC connector is compatible with the type of cable being used. Different BNC connectors are designed for specific cable types and sizes, so it’s important to ensure that the connector matches the specifications of the cable to achieve a proper fit.
- Prepare the Connector Components: If the BNC connector consists of multiple components, such as a connector body, pin, and crimp sleeve, ensure that all the parts are organized and ready for assembly. Familiarize yourself with the individual components and their respective functions in the connector assembly process.
- Strip the Insulation: If the BNC connector requires the insertion of the cable’s central conductor, carefully strip the insulation from the end of the cable to expose the conductor. Use a cable stripper or precision knife to remove the insulation, taking care not to damage the conductor during the process.
- Inspect the Connector Threads: If the BNC connector features threaded components for securing the cable, inspect the threads to ensure that they are clean and undamaged. Any debris or imperfections in the threads can hinder the proper installation of the connector onto the cable.
- Clean the Connector Components: Use a gentle cleaning solution and a lint-free cloth to clean the connector components, especially the inner surfaces and contact points. This helps remove any contaminants or residues that could affect the conductivity and performance of the connector.
By meticulously preparing the BNC connector, you set the stage for a successful and durable connection with the coaxial cable. Attention to detail and thorough inspection of the connector components contribute to the overall reliability and performance of the BNC connection within the network or audio-visual system.
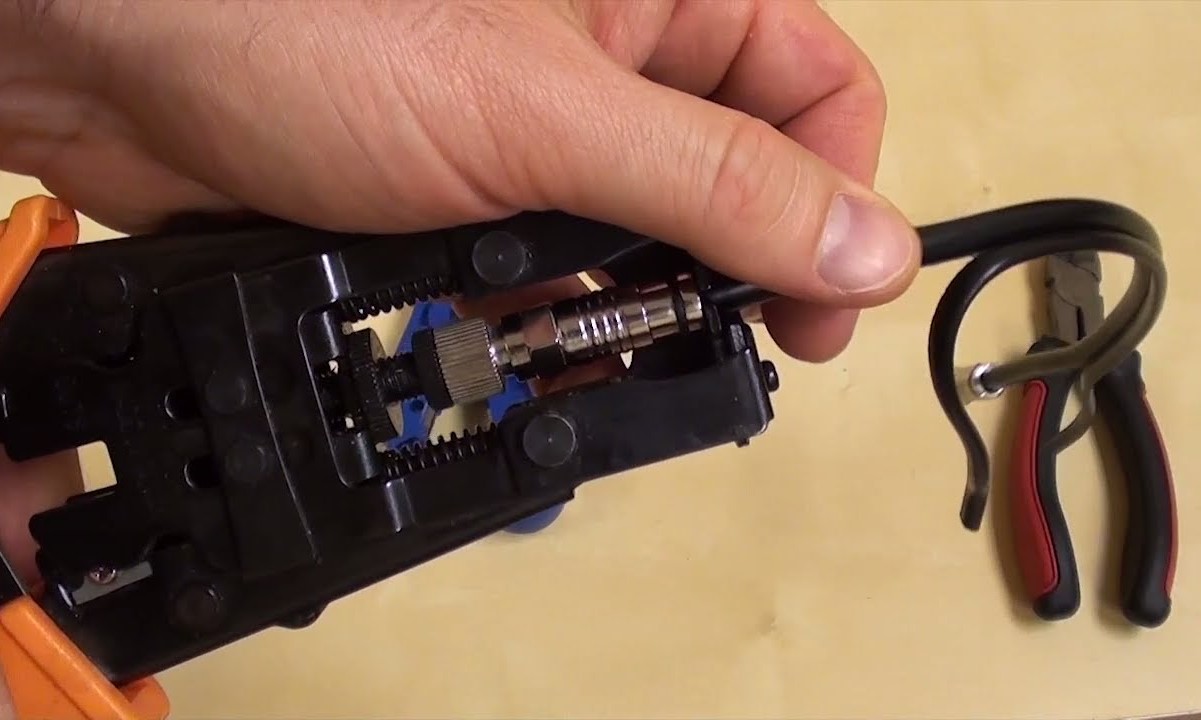
Attaching the BNC Connector
Attaching the BNC connector to the coaxial cable is a crucial step in establishing a secure and reliable connection. Proper installation ensures optimal signal transmission and minimizes the risk of signal loss or interference. Here’s a step-by-step guide to attaching the BNC connector to the cable:
- Insert the Cable: If the BNC connector requires the insertion of the cable’s central conductor, carefully insert the prepared end of the cable into the connector. Ensure that the conductor is properly aligned and fully inserted into the designated slot within the connector.
- Secure the Connector Components: If the BNC connector consists of multiple components, such as a connector body, pin, and crimp sleeve, follow the manufacturer’s instructions to assemble and secure the components onto the cable. Pay close attention to the alignment and positioning of each component to ensure a proper fit.
- Crimp the Connector: If the BNC connector features a crimp design, use a high-quality crimping tool to secure the connector onto the cable. Apply uniform pressure to the crimp sleeve to create a strong and reliable connection between the cable and the connector.
- Verify Connection Integrity: After attaching the BNC connector, carefully inspect the connection to ensure that the cable is securely fastened and that the central conductor is making proper contact within the connector. Verify that the connector components are firmly in place and that there are no visible gaps or misalignments.
- Test the Continuity: Use a multimeter to test the continuity of the connection, ensuring that there are no short circuits or open circuits. This step is crucial for verifying the integrity of the connection and identifying any potential issues that may affect signal transmission.
- Secure the Connector Onto the Device: If the BNC connector is being connected to a device or equipment, carefully secure the connector onto the designated port or interface. Ensure that the connector is properly threaded and secured to prevent any accidental disconnection.
By following these steps, you can effectively attach the BNC connector to the coaxial cable, creating a robust and dependable connection within the network or audio-visual system. Attention to detail and precision during the installation process contribute to the overall performance and reliability of the BNC connection.
Testing the Connection
After attaching the BNC connector to the coaxial cable, it’s crucial to thoroughly test the connection to ensure that it is secure, reliable, and capable of transmitting signals without interference. Testing the connection provides assurance that the network or audio-visual system will operate effectively. Here’s a step-by-step guide to testing the BNC connection:
- Visual Inspection: Begin by visually inspecting the BNC connection to ensure that the connector is securely attached to the cable and that there are no visible signs of damage or misalignment. Verify that the connector components are properly assembled and that the cable is firmly secured within the connector.
- Check for Signal Continuity: Use a multimeter to test the continuity of the connection, ensuring that there is a complete and uninterrupted path for the signal to travel from one end of the cable to the other. This test helps identify any potential breaks or interruptions in the connection that could affect signal transmission.
- Verify Signal Integrity: If the BNC connection is being used for transmitting signals, such as in video or data applications, verify the integrity of the signal using appropriate testing equipment. This may involve conducting signal strength tests or data transmission tests to ensure that the connection can reliably transmit information without distortion or degradation.
- Perform Signal Quality Tests: If the BNC connection is intended for high-frequency applications, such as in RF (radio frequency) systems, perform signal quality tests to assess factors such as signal-to-noise ratio and impedance matching. These tests help ensure that the connection can effectively handle high-frequency signals without introducing noise or signal loss.
- Test for Interference: Check for any signs of signal interference or electromagnetic interference (EMI) that could affect the performance of the connection. This may involve conducting tests in different operating conditions or environments to assess the connection’s resilience against external interference.
- Functional Testing: If the BNC connection is part of an audio-visual system or network, perform functional testing to verify that the connected devices or equipment are communicating effectively through the BNC connection. This may involve sending test signals or data through the connection to ensure proper functionality.
By meticulously testing the BNC connection, you can ensure that it meets the required performance standards and is capable of supporting the intended applications within the network or audio-visual system. Thorough testing provides confidence in the reliability and functionality of the BNC connection, ultimately contributing to the seamless operation of the connected equipment and devices.