
Checking SIM Card Compatibility
Before inserting a SIM card into your iPhone 11, it's crucial to ensure that the SIM card is compatible with your device. The iPhone 11 utilizes a nano-SIM card, which is the smallest SIM card size available. To check the compatibility of your SIM card, follow these steps:
-
Identify the SIM Card Size: The iPhone 11 requires a nano-SIM card. If your current SIM card is larger, such as a micro-SIM or standard SIM, you will need to contact your mobile service provider to obtain a compatible nano-SIM card.
-
Check Network Compatibility: Ensure that your iPhone 11 is compatible with the network provided by your SIM card. The iPhone 11 supports a wide range of network technologies, including GSM, CDMA, 3G, and 4G LTE. However, it's essential to verify that your SIM card operates on a network supported by the iPhone 11 to guarantee seamless connectivity.
-
Verify SIM Card Activation: Before inserting the SIM card, confirm that it is activated by your mobile service provider. An inactive SIM card will not provide cellular service, so it's essential to activate it before proceeding with the insertion process.
-
Ensure SIM Card Functionality: If you are using a SIM card from a previous device, ensure that it is in working condition. Check for any physical damage or signs of wear that may hinder its functionality in the iPhone 11.
By verifying the compatibility of your SIM card with the iPhone 11, you can ensure a smooth and successful insertion process, enabling you to enjoy uninterrupted cellular connectivity on your device.
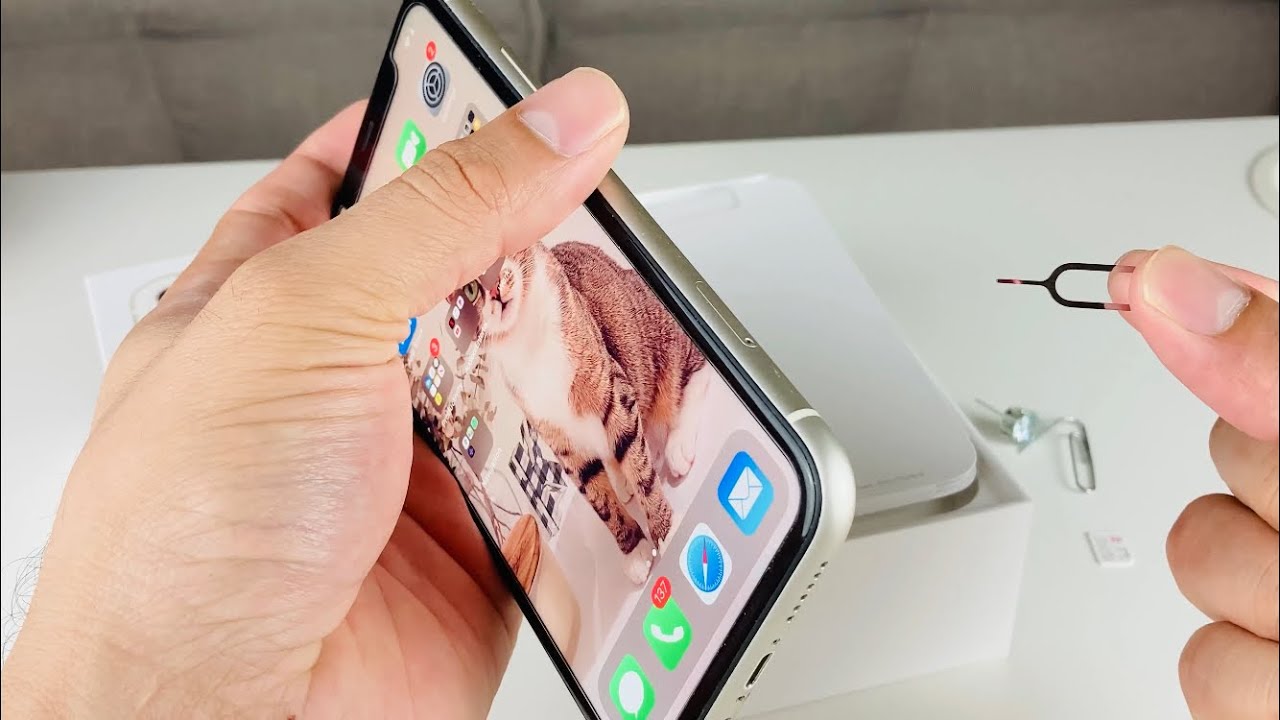
Locating the SIM Card Tray
The SIM card tray in the iPhone 11 is a crucial component that facilitates the insertion and removal of the SIM card. To locate the SIM card tray on your iPhone 11, you will need a SIM eject tool or a paperclip. Here's how to find the SIM card tray:
-
Identify the SIM Card Tray Slot: The SIM card tray slot is typically located on the right side of the iPhone 11. It is positioned along the device's edge, adjacent to the volume buttons. The slot is designed to accommodate the SIM card tray and can be easily identified by a small pinhole.
-
Prepare the SIM Eject Tool: To access the SIM card tray, you will need a SIM eject tool or a paperclip. The iPhone 11 is packaged with a SIM eject tool, which is a small, metallic pin specifically designed for this purpose. If the SIM eject tool is not available, a straightened paperclip can be used as an alternative.
-
Insert the SIM Eject Tool: Insert the SIM eject tool or the straightened paperclip into the pinhole located next to the SIM card tray slot. Apply gentle pressure to engage the internal mechanism, which will cause the SIM card tray to protrude slightly from the device.
-
Gently Remove the SIM Card Tray: Once the SIM card tray is partially ejected, carefully pull it out from the iPhone 11. The tray will slide out smoothly, allowing you to access the compartment where the SIM card will be inserted.
By following these steps, you can easily locate the SIM card tray on your iPhone 11. This essential preparatory step sets the stage for the subsequent process of inserting the SIM card, ensuring that you can seamlessly integrate the SIM card into your device and enjoy uninterrupted connectivity.
Removing the SIM Card Tray
Removing the SIM card tray from your iPhone 11 is a straightforward process that allows you to access the compartment where the SIM card is inserted. Once you have located the SIM card tray using the steps outlined in the previous section, you can proceed with removing it from your device. Here's a detailed guide on how to remove the SIM card tray from your iPhone 11:
-
Prepare the SIM Eject Tool: Before removing the SIM card tray, ensure that you have the SIM eject tool or a paperclip on hand. The SIM eject tool is specifically designed for this purpose and is included in the packaging of the iPhone 11. If the SIM eject tool is not available, a straightened paperclip can be used as an alternative.
-
Insert the SIM Eject Tool: With the SIM eject tool or paperclip in hand, carefully insert the tool into the small pinhole located next to the SIM card tray slot. Apply gentle and consistent pressure to engage the internal mechanism. As you apply pressure, you will feel a slight resistance, indicating that the internal mechanism has been activated.
-
Eject the SIM Card Tray: Once the internal mechanism is engaged, the SIM card tray will protrude slightly from the device. Gently pull the SIM card tray out of the iPhone 11, ensuring that you maintain a steady and controlled grip on the tray. The tray will slide out smoothly, allowing you to access the compartment where the SIM card is housed.
-
Handle the SIM Card Tray with Care: As you remove the SIM card tray, it's important to handle it with care to avoid any damage or misalignment. The SIM card tray is a delicate component, and any mishandling could result in damage to the tray or the internal components of the iPhone 11.
By following these steps, you can successfully remove the SIM card tray from your iPhone 11, preparing it for the insertion of a compatible nano-SIM card. This process sets the stage for seamlessly integrating the SIM card into your device, ensuring that you can enjoy uninterrupted cellular connectivity.
Inserting the SIM Card
Inserting a SIM card into your iPhone 11 is a fundamental step that enables you to harness the full potential of your device's cellular capabilities. Once you have located the SIM card tray and removed it from your iPhone 11, you can proceed with the process of inserting the SIM card. Here's a detailed guide on how to insert the SIM card into your iPhone 11:
-
Prepare the Nano-SIM Card: Before inserting the SIM card, ensure that you have a compatible nano-SIM card provided by your mobile service provider. The nano-SIM card is the smallest SIM card size available and is specifically designed for devices such as the iPhone 11. Verify that the nano-SIM card is free from any physical damage and is oriented correctly for insertion into the SIM card tray.
-
Position the SIM Card Tray: With the SIM card tray in hand, carefully position it on a flat surface. The tray features a designated compartment where the SIM card will be placed. Ensure that the tray is stable and level, providing a secure foundation for the insertion process.
-
Align the SIM Card: Take the nano-SIM card provided by your mobile service provider and position it carefully within the designated area on the SIM card tray. The SIM card has a specific orientation, and it's essential to align it correctly to ensure a proper fit within the tray. The contacts on the SIM card should align with the corresponding contacts within the tray.
-
Gently Insert the SIM Card: Once the nano-SIM card is aligned within the tray, apply gentle pressure to insert it into the compartment. Use your fingertips to ensure a smooth and controlled insertion, avoiding any abrupt or forceful movements that could potentially damage the SIM card or the tray.
-
Verify Secure Placement: After inserting the SIM card into the tray, visually inspect the alignment and positioning of the card. Ensure that it sits securely within the compartment, with no protrusions or misalignments. A properly inserted SIM card will sit flush within the tray, ready to be reinserted into the iPhone 11.
By following these steps, you can successfully insert the nano-SIM card into the SIM card tray of your iPhone 11. This pivotal process sets the stage for seamlessly integrating the SIM card into your device, allowing you to enjoy uninterrupted cellular connectivity and leverage the full range of features and services offered by your mobile network provider.
Replacing the SIM Card Tray
Once the SIM card has been successfully inserted into the SIM card tray of your iPhone 11, the final step involves replacing the tray back into the device. This process ensures that the SIM card is securely housed within the iPhone 11, allowing you to seamlessly resume cellular connectivity and utilize the full range of features offered by your mobile network provider. Here's a detailed guide on how to replace the SIM card tray in your iPhone 11:
-
Align the SIM Card Tray: Before replacing the SIM card tray, ensure that the nano-SIM card is securely positioned within the designated compartment of the tray. Verify that the SIM card sits flush and level, with no protrusions or misalignments. Proper alignment of the SIM card is essential to ensure a smooth insertion of the tray into the iPhone 11.
-
Position the SIM Card Tray: With the SIM card securely housed within the tray, carefully position the tray adjacent to the SIM card tray slot on the iPhone 11. Ensure that the tray is oriented correctly, with the metal contacts facing downward and the notch aligned with the corresponding slot in the device.
-
Gently Insert the SIM Card Tray: Once the SIM card tray is correctly positioned, gently slide it back into the SIM card tray slot on the iPhone 11. Apply steady and controlled pressure to guide the tray into the slot, ensuring that it glides in smoothly without any resistance. Avoid abrupt or forceful movements to prevent any damage to the tray or the internal components of the device.
-
Verify Secure Placement: After replacing the SIM card tray, visually inspect the device to ensure that the tray sits flush and level within the SIM card tray slot. Verify that the tray is securely inserted, with no gaps or unevenness. A properly replaced SIM card tray will seamlessly integrate with the device, ready to provide uninterrupted cellular connectivity.
By following these steps, you can successfully replace the SIM card tray in your iPhone 11, ensuring that the SIM card is securely housed within the device. This final step completes the process of inserting a SIM card into your iPhone 11, allowing you to enjoy seamless cellular connectivity and access the full range of services and features offered by your mobile network provider.