
Reasons for Screen Replacement
The screen of your Moto G Power is a vital interface that allows you to interact with your device. However, there are several reasons why you might need to consider a screen replacement:
-
Cracks and Physical Damage: Accidents happen, and a cracked or shattered screen can significantly hinder the functionality of your device. Not only does it compromise the visual appeal of your phone, but it can also affect touch sensitivity and lead to potential safety hazards from sharp edges.
-
Display Malfunctions: Over time, the display of your Moto G Power may develop issues such as dead pixels, discoloration, or unresponsive areas. These problems can be frustrating and may impair your ability to use the device effectively.
-
Water Damage: Exposure to moisture or water can cause irreparable damage to the screen, resulting in distorted visuals or complete screen failure. In such cases, a screen replacement becomes necessary to restore the functionality of your device.
-
Touch Sensitivity Problems: If you notice that your screen is not responding accurately to touch inputs or is registering phantom touches, it could indicate underlying issues with the digitizer or touch sensor. A screen replacement can address these touch sensitivity problems and restore seamless interaction with your device.
-
Scratches and Blemishes: While minor scratches and blemishes may not affect the functionality of the screen, they can detract from the overall user experience and diminish the visual clarity of the display. A screen replacement can eliminate these imperfections and provide a pristine viewing surface.
Understanding the reasons for screen replacement underscores the importance of maintaining the integrity of this crucial component. By addressing these issues through a timely and effective screen replacement, you can ensure that your Moto G Power continues to deliver a seamless and immersive user experience.
Tools and Materials Needed
When embarking on a screen replacement for your Moto G Power, it's essential to gather the necessary tools and materials to ensure a smooth and successful process. Here's a comprehensive list of items you'll need:
Tools:
- Precision Screwdriver Set: A set of precision screwdrivers with various head types is crucial for disassembling the device and accessing the screen components.
- Plastic Opening Tools: These non-conductive and flexible tools are essential for prying open the phone's housing without causing damage to the delicate components inside.
- Suction Cup: A suction cup tool facilitates the safe removal of the screen assembly by creating a secure grip for lifting the display without exerting excessive force.
- Tweezers: Fine-point tweezers are indispensable for handling small components and connectors within the device, allowing for precise maneuvering during the replacement process.
- Spudger Tool: This versatile tool assists in disconnecting cables, prying apart components, and navigating the internal structure of the device without causing damage.
Materials:
- Replacement Screen: Acquire a high-quality replacement screen specifically designed for the Moto G Power to ensure compatibility and optimal performance.
- Adhesive Strips or Liquid Adhesive: Depending on the replacement screen type, you may need adhesive strips or liquid adhesive to securely affix the new screen to the device's frame.
- Cleaning Cloth and Isopropyl Alcohol: A lint-free cleaning cloth and isopropyl alcohol are essential for meticulously cleaning the device's surfaces and removing any adhesive residue before installing the new screen.
- Heat Gun or Hair Dryer: In some cases, gentle heat application may be necessary to soften adhesive and facilitate the safe removal of the old screen assembly.
- Anti-Static Wrist Strap: To prevent static discharge that could potentially damage sensitive electronic components, an anti-static wrist strap is recommended to ground yourself during the replacement process.
By ensuring that you have these tools and materials at your disposal, you can approach the screen replacement with confidence and precision, setting the stage for a successful restoration of your Moto G Power's display functionality.
Step-by-Step Guide for Screen Replacement
-
Prepare the Workspace: Begin by setting up a clean and well-lit workspace with ample room to maneuver. Gather all the necessary tools and materials, and ensure that you have a suitable work surface to prevent accidental damage to the device or its components.
-
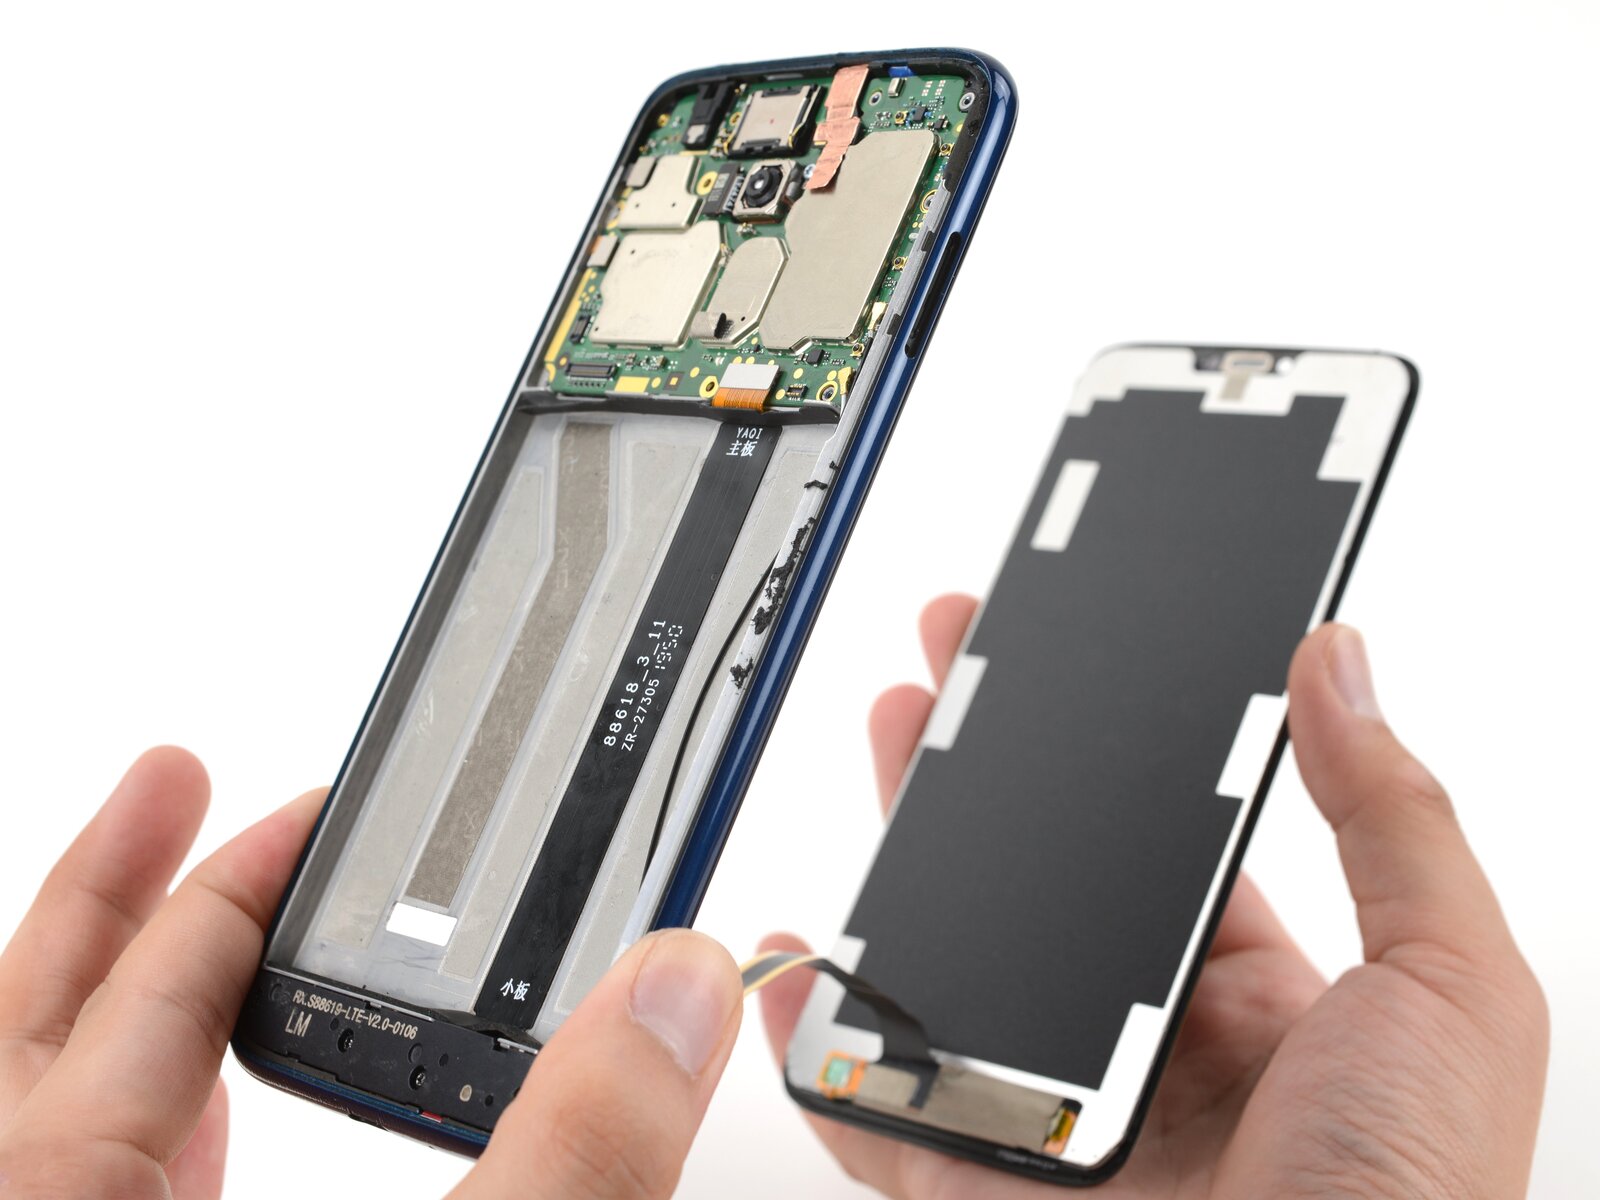
Power Off and Disassemble: Power off your Moto G Power and proceed to remove the SIM card tray. Next, using a heat gun or hair dryer, gently apply heat to the edges of the device to soften the adhesive securing the screen. Once the adhesive is sufficiently warmed, carefully insert a plastic opening tool along the edges to separate the screen assembly from the device's frame.
-
Disconnect Components: With the screen assembly partially detached, use a spudger tool to disconnect the battery connector and any other relevant cables or connectors linking the screen to the device. Exercise caution and precision to avoid damaging the delicate internal components.
-
Remove Old Screen: Once all connectors are detached, carefully lift the old screen assembly from the device, taking care not to strain or damage the attached cables. Set the old screen aside and proceed to clean any adhesive residue or debris from the device's frame using a cleaning cloth and isopropyl alcohol.
-
Prepare Replacement Screen: If the replacement screen does not come with pre-installed adhesive, carefully apply adhesive strips or liquid adhesive to the appropriate areas on the new screen. Take care to align the adhesive precisely to ensure a secure bond with the device's frame.
-
Connect New Screen: With the replacement screen prepared, carefully position it over the device's frame, aligning the connectors and ensuring a snug fit. Gently press the screen to secure the adhesive bond, taking care not to apply excessive pressure that could damage the screen or internal components.
-
Reassemble and Test: Reconnect the battery and any other relevant connectors, then carefully reassemble the device, ensuring that all components and screws are securely in place. Power on the Moto G Power and test the new screen for functionality, verifying touch responsiveness and display clarity.
-
Final Checks: Once the device is reassembled and the new screen is confirmed to be functioning correctly, perform a final inspection to ensure that all components are properly aligned and secured. Clean the device's exterior surfaces to remove any smudges or fingerprints, and insert the SIM card tray.
By following this step-by-step guide with precision and attention to detail, you can successfully replace the screen of your Moto G Power, restoring its visual clarity and touch functionality.
Tips for a Successful Replacement
Successfully replacing the screen of your Moto G Power requires meticulous attention to detail and a methodical approach. Here are essential tips to ensure a seamless and effective screen replacement process:
-
Organize and Label Components: Before disassembling the device, organize the screws and components in a segmented container or use a magnetic mat to keep track of their placement. Labeling each set of screws and components according to their respective locations can streamline the reassembly process and prevent confusion.
-
Document the Disassembly: Take photos or make notes during each step of the disassembly process. This documentation can serve as a valuable reference when reassembling the device, especially for reconnecting cables and components in the correct order.
-
Exercise Patience with Adhesive Removal: When removing the old screen, exercise patience and caution to avoid damaging the device's frame or internal components. Gentle heat application and gradual separation with plastic opening tools can help loosen the adhesive without causing unnecessary stress on the device.
-
Mindful Cable Handling: When disconnecting and reconnecting cables, handle them with care and avoid applying excessive force. Use precision tools such as tweezers and spudgers to delicately maneuver the cables, ensuring that they are properly aligned and securely connected.
-
Test the Replacement Screen Before Full Reassembly: Prior to completing the reassembly process, power on the device and test the replacement screen to verify touch responsiveness and display functionality. This preemptive testing allows for immediate identification and resolution of any potential issues before finalizing the reassembly.
-
Adhere to Manufacturer Guidelines: If the replacement screen comes with specific installation instructions from the manufacturer, adhere to these guidelines meticulously. Following the recommended procedures and adhesive application techniques can contribute to a secure and long-lasting bond between the new screen and the device's frame.
-
Maintain a Clean Work Environment: Keep the work area free of dust, debris, and other contaminants that could compromise the integrity of the device's internal components. A clean workspace minimizes the risk of foreign particles interfering with the screen replacement process.
-
Seek Professional Assistance if Uncertain: If you encounter challenges or uncertainties during the screen replacement process, consider seeking professional assistance from a reputable repair service or technician. Attempting to force a resolution without the necessary expertise may lead to further complications.
By incorporating these tips into your screen replacement endeavor, you can navigate the process with confidence and precision, ultimately achieving a successful restoration of your Moto G Power's screen functionality.
Troubleshooting Common Issues
Even with careful execution, screen replacement procedures may encounter common issues that require troubleshooting to ensure a successful outcome. By being aware of these potential challenges and their corresponding solutions, you can effectively address any complications that may arise during the screen replacement process.
1. Inconsistent Touch Responsiveness
If the newly replaced screen exhibits erratic or inconsistent touch responsiveness, it may indicate a misalignment of the digitizer or improper cable connection. To troubleshoot this issue, carefully disassemble the device and verify that the digitizer and touch sensor cables are securely connected. Additionally, ensure that the replacement screen is aligned correctly with the device's frame, allowing for seamless touch input recognition.
2. Display Abnormalities or Artifacts
Anomalies such as flickering, discoloration, or visual artifacts on the replaced screen can be attributed to loose cable connections, incompatible replacement screens, or underlying display driver issues. To address this, meticulously inspect and reseat the display and connector cables, ensuring a snug and secure connection. If the abnormalities persist, consider testing the device with a different replacement screen to rule out compatibility issues.
3. Adhesive Bonding Problems
Inadequate bonding between the replacement screen and the device's frame can lead to uneven adhesion, resulting in potential display lifting or instability. To troubleshoot this issue, carefully disassemble the device and assess the adhesive application on both the replacement screen and the device's frame. If necessary, reapply adhesive strips or liquid adhesive, ensuring comprehensive coverage and uniform bonding to mitigate any bonding irregularities.
4. Unresponsive Display After Replacement
If the device's display remains unresponsive or fails to power on after the replacement procedure, it may indicate underlying battery or power-related issues. Troubleshoot this by reconnecting the battery and verifying that it is functioning correctly. Additionally, check for any damaged power-related components and ensure that the replacement screen is compatible with the device's power requirements.
5. Touch Calibration and Sensitivity
Following a screen replacement, recalibrating the touch sensitivity and responsiveness may be necessary to optimize the user experience. Utilize the device's settings to access touch calibration options, allowing for fine-tuning of touch input accuracy and responsiveness. Additionally, ensure that the replacement screen's digitizer is compatible with the device's touch calibration parameters to achieve optimal performance.
By proactively addressing these common issues and implementing targeted troubleshooting strategies, you can navigate the screen replacement process with confidence and proficiency, ultimately ensuring a seamless restoration of your Moto G Power's screen functionality.