
Common Xbox Controller Joystick Issues
Xbox controllers are essential for an immersive gaming experience, but they are prone to various joystick issues that can hinder gameplay. Understanding these common problems is the first step towards restoring functionality and enjoying uninterrupted gaming sessions. Here are some prevalent Xbox controller joystick issues:
- Drifting Joysticks: One of the most common issues experienced by Xbox gamers is joystick drifting, where the controller’s joysticks seem to move on their own, impacting gameplay precision and control.
- Unresponsive Joysticks: Another frustrating problem is when the joysticks become unresponsive, failing to register movements or commands, leading to a disconnect between player input and on-screen actions.
- Stuck Joysticks: Stuck joysticks can impede smooth movement in games, causing characters or objects to get stuck or move erratically, disrupting the gaming experience.
These issues can significantly diminish the gaming experience and lead to frustration for players. However, with the right tools and techniques, these problems can often be resolved without the need for professional intervention, allowing gamers to restore their controllers to optimal functionality.
Tools You Will Need
Before embarking on the journey to fix Xbox controller joystick issues, it’s essential to gather the necessary tools. Having the right equipment at your disposal will streamline the troubleshooting process and enable you to address the problems effectively. Here are the tools you will need:
- Cotton Swabs: These are useful for cleaning and removing debris from around the joystick area.
- Isopropyl Alcohol: Ideal for cleaning the joystick components and removing any built-up grime or residue.
- Precision Screwdriver Set: A set of precision screwdrivers is essential for opening the controller casing to access the internal components.
- Compressed Air: This can be used to gently blow away dust and particles that may be affecting the joystick’s functionality.
- Replacement Joystick Module (if necessary): In some cases, a faulty joystick may need to be replaced, so having a replacement module on hand can be beneficial.
By ensuring you have these tools readily available, you’ll be well-prepared to tackle the joystick issues that commonly affect Xbox controllers. With a methodical approach and the right tools at your disposal, you can effectively troubleshoot and resolve the issues, restoring your controller’s functionality and enhancing your gaming experience.
Step-by-Step Guide to Fixing Drifting Joysticks
Drifting joysticks can be a major annoyance during gaming sessions, causing characters to move unintentionally and disrupting gameplay. Fortunately, addressing this issue is possible with a systematic approach. Follow these steps to rectify drifting joysticks on your Xbox controller:
- Prepare Your Workspace: Find a clean, well-lit area to work on your controller. Ensure you have all the necessary tools within reach.
- Remove the Battery: Power off the controller and remove the battery to prevent any electrical mishaps during the repair process.
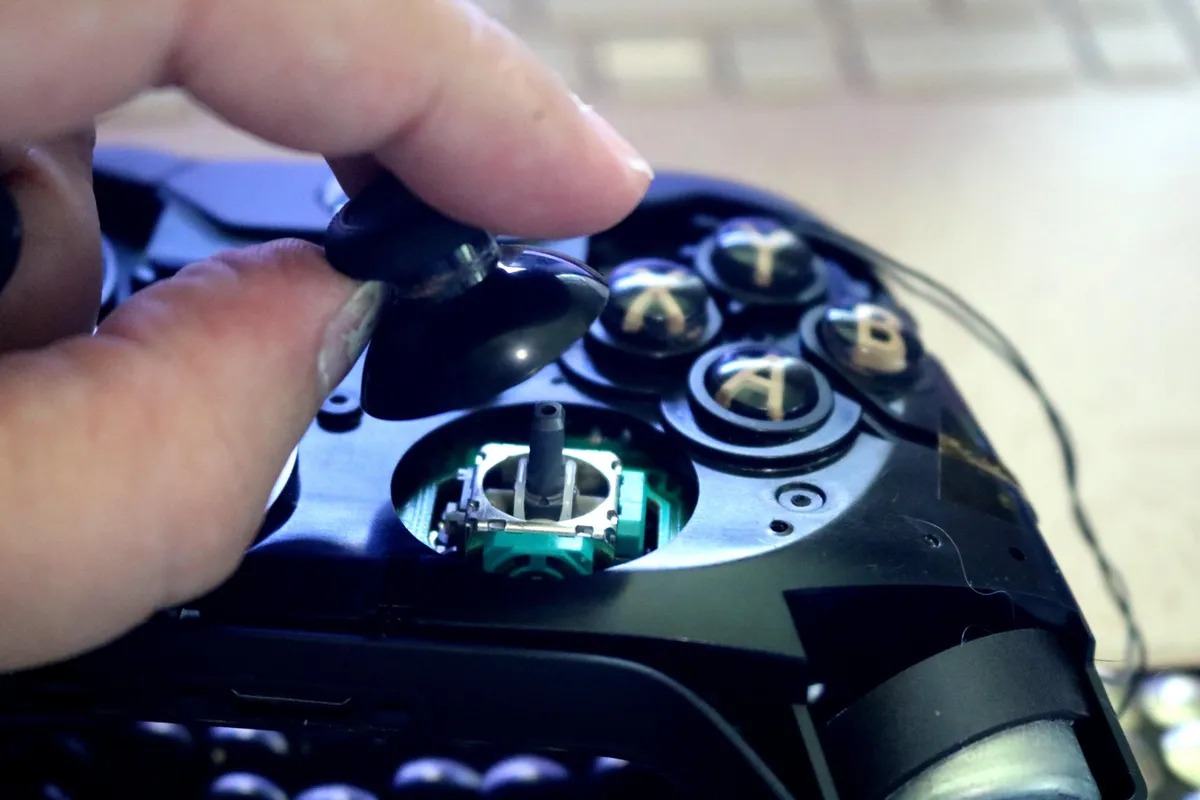
- Disassemble the Controller: Use a precision screwdriver to carefully open the controller casing, exposing the internal components, including the joysticks.
- Clean Around the Joystick: Gently use a cotton swab dipped in isopropyl alcohol to clean around the base of the drifting joystick, removing any dirt or debris that may be causing the issue.
- Inspect the Joystick Module: Examine the joystick module for any visible damage or wear. If necessary, consider replacing the module with a new one to resolve the drifting problem.
- Reassemble the Controller: Carefully put the controller back together, ensuring all components are properly aligned and secured.
- Test the Controller: Reinsert the battery, power on the controller, and test the joystick to ensure the drifting issue has been resolved.
By following these steps, you can effectively address drifting joysticks on your Xbox controller, restoring precise control and eliminating the frustration caused by involuntary movements during gameplay.
Step-by-Step Guide to Fixing Unresponsive Joysticks
Dealing with unresponsive joysticks on your Xbox controller can be exasperating, but with the right approach, you can troubleshoot and resolve this issue effectively. Here’s a step-by-step guide to fixing unresponsive joysticks:
- Prepare Your Workspace: Find a well-lit, clean area to work on your controller and gather all the necessary tools, including a precision screwdriver and cotton swabs.
- Remove the Battery: Power off the controller and remove the battery to avoid any electrical mishaps during the repair process.
- Disassemble the Controller: Use a precision screwdriver to carefully open the controller casing, exposing the internal components, including the unresponsive joystick.
- Clean the Joystick Components: Use a cotton swab dipped in isopropyl alcohol to clean the joystick’s components, including the sensors and contacts, to remove any dirt or residue that may be causing the unresponsiveness.
- Inspect for Damage: Thoroughly inspect the joystick components for any signs of damage or wear. If any components appear faulty, consider replacing them with compatible parts.
- Reassemble the Controller: Carefully reassemble the controller, ensuring all components are securely placed and aligned correctly.
- Test the Controller: Reinsert the battery, power on the controller, and test the joystick to ensure it is now responsive and accurately registers movements.
By following these steps, you can effectively address unresponsive joysticks on your Xbox controller, restoring seamless control and responsiveness for an enhanced gaming experience.
Step-by-Step Guide to Fixing Stuck Joysticks
Dealing with stuck joysticks on your Xbox controller can be frustrating, but with a systematic approach, you can effectively troubleshoot and resolve this issue. Follow these step-by-step instructions to address stuck joysticks:
- Prepare Your Workspace: Find a well-lit, clean area to work on your controller and gather the necessary tools, including a precision screwdriver and cotton swabs.
- Remove the Battery: Power off the controller and remove the battery to prevent any electrical mishaps during the repair process.
- Disassemble the Controller: Use a precision screwdriver to carefully open the controller casing, exposing the internal components, including the stuck joystick.
- Clean Around the Joystick: Use a cotton swab dipped in isopropyl alcohol to clean around the base of the stuck joystick, removing any dirt, grime, or debris that may be impeding its movement.
- Lubricate the Joystick Mechanism: Apply a small amount of joystick-safe lubricant to the mechanism to facilitate smooth movement without causing damage to the internal components.
- Inspect for Obstructions: Check for any obstructions around the joystick mechanism and remove any foreign objects that may be causing it to stick.
- Reassemble the Controller: Carefully reassemble the controller, ensuring all components are properly aligned and secured.
- Test the Controller: Reinsert the battery, power on the controller, and test the joystick to ensure it moves freely and responsively without sticking.
By following these steps, you can effectively address stuck joysticks on your Xbox controller, restoring smooth and unhindered movement for an optimal gaming experience.
Tips for Preventing Future Joystick Issues
After resolving joystick issues on your Xbox controller, it’s important to take proactive measures to prevent similar problems from recurring in the future. By implementing the following tips, you can maintain the optimal functionality of your controller’s joysticks and enjoy uninterrupted gaming experiences:
- Regular Cleaning: Periodically clean the controller’s joysticks and the surrounding areas to prevent the accumulation of dirt, dust, and debris that can impede movement and responsiveness.
- Moderate Joystick Use: Avoid exerting excessive force on the joysticks during gameplay, as this can contribute to premature wear and potential issues. Use gentle, controlled movements to navigate the game.
- Proper Storage: Store the controller in a clean, dust-free environment when not in use, and avoid subjecting it to extreme temperatures or humidity, which can affect its internal components.
- Update Firmware: Regularly check for and install firmware updates for your Xbox controller, as these updates often include improvements and bug fixes that can enhance joystick performance.
- Invest in Protective Accessories: Consider using protective accessories such as controller cases or covers to shield the device from accidental damage and environmental factors that can impact its functionality.
- Monitor Battery Levels: Keep an eye on the controller’s battery levels and ensure they are adequately charged, as low power levels can sometimes affect joystick responsiveness.
By incorporating these preventive measures into your routine maintenance of the Xbox controller, you can mitigate the risk of future joystick issues and prolong the lifespan of the controller, ensuring a consistently enjoyable gaming experience.