
What is an FM Transmitter?
An FM transmitter is a device that allows you to play audio from your phone, MP3 player, or other portable media device through a car stereo. It works by broadcasting the audio signal from the device to a nearby FM radio, which can then be tuned in by the car stereo. This enables you to listen to your favorite music, podcasts, or audiobooks through your car's sound system without the need for any physical connections.
FM transmitters are particularly useful for older car models that lack built-in Bluetooth or auxiliary input options. They offer a convenient and cost-effective way to upgrade your car's audio capabilities without having to invest in a new stereo system. Additionally, they are portable and can be used in multiple vehicles, making them a versatile solution for enjoying high-quality audio on the go.
These devices typically operate on a specific FM frequency, which can be adjusted to minimize interference from local radio stations. They are compact and easy to install, making them a popular choice for individuals seeking a simple and efficient way to connect their digital devices to their car stereos.
Whether you're on a road trip, commuting to work, or simply running errands around town, an FM transmitter can enhance your driving experience by providing access to a wide range of audio content. With the ability to wirelessly transmit audio from your device to your car stereo, FM transmitters offer a seamless and enjoyable way to stay entertained while on the road.
In the following steps, we will guide you through the process of selecting, setting up, and using an FM transmitter, allowing you to unlock the full potential of your car's audio system and enjoy your favorite media with ease.
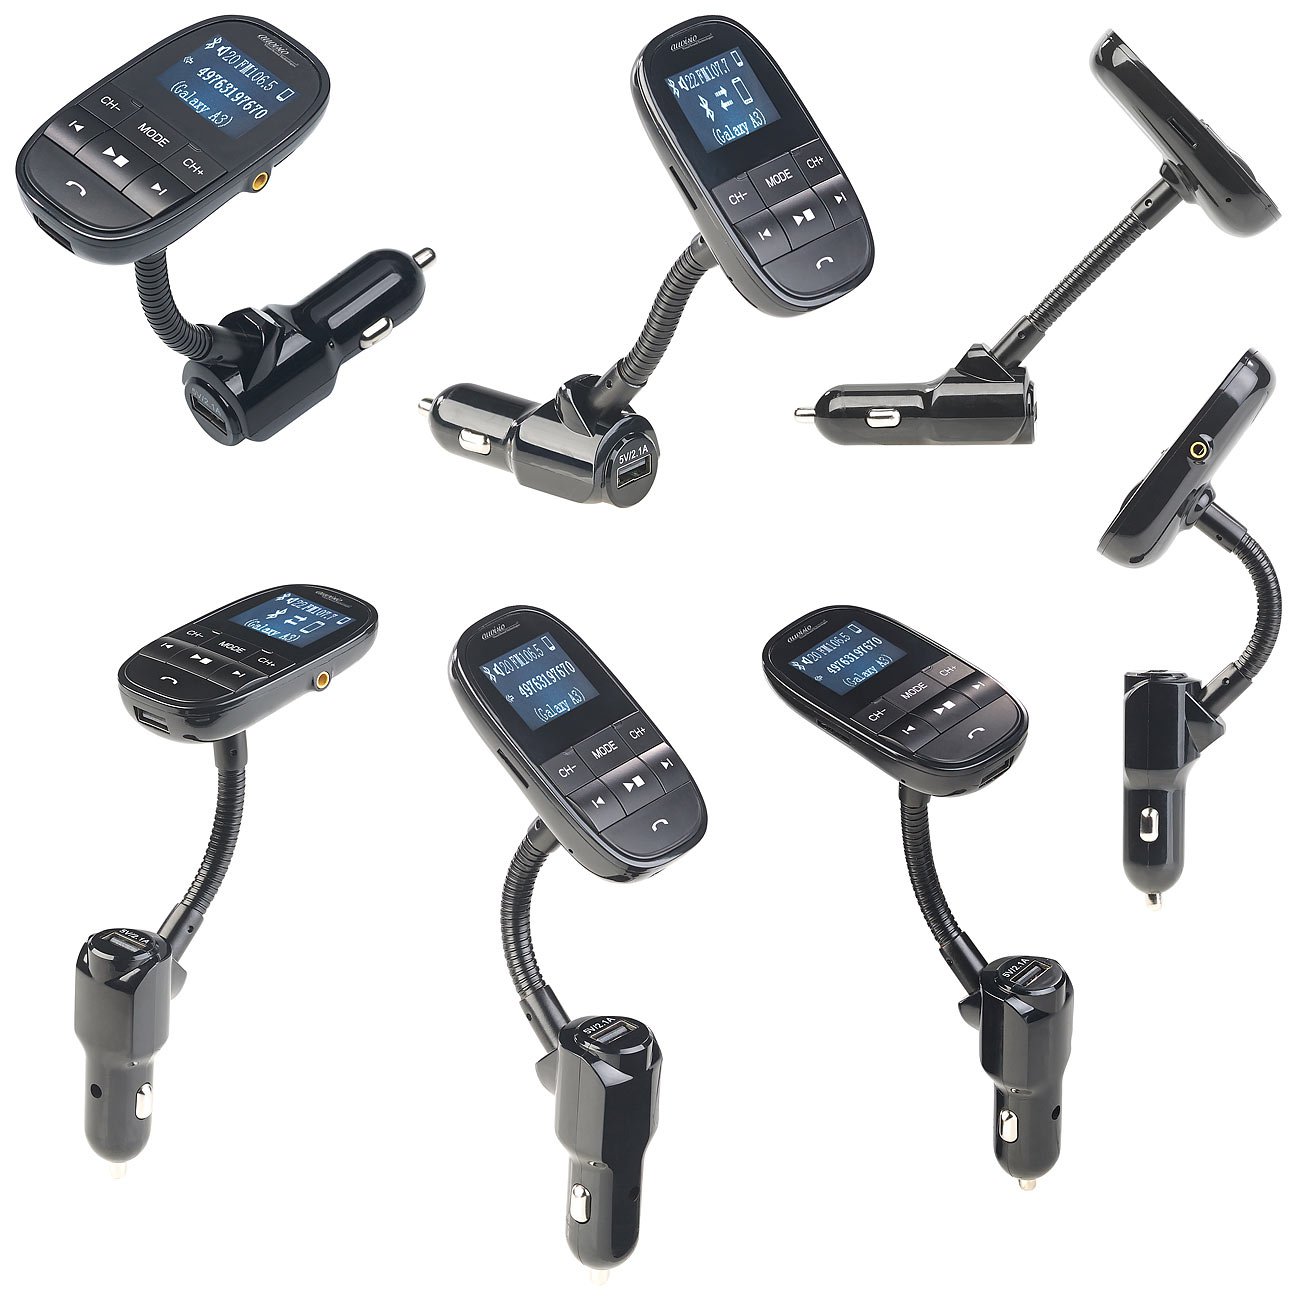
Step 1: Choose the Right FM Transmitter for Your Needs
When selecting an FM transmitter, it’s important to consider your specific requirements and preferences to ensure that you choose a device that best suits your needs. With a wide variety of FM transmitters available on the market, each offering different features and capabilities, taking the time to research and compare options can help you make an informed decision.
Here are some key factors to consider when choosing an FM transmitter:
- Compatibility: Check the compatibility of the FM transmitter with your device. Whether you have a smartphone, MP3 player, tablet, or another device, ensure that the transmitter is compatible and can easily connect to your device.
- Frequency Range: Look for an FM transmitter with a broad frequency range to provide flexibility in finding an available frequency with minimal interference from local radio stations. A wider frequency range increases the likelihood of finding a clear channel for transmission.
- Power Source: Consider the power source of the FM transmitter. Some models are powered by the vehicle’s cigarette lighter socket, while others may have a built-in rechargeable battery. Choose the option that best aligns with your preferences and usage requirements.
- Additional Features: Explore additional features such as Bluetooth connectivity, USB charging ports, hands-free calling capabilities, and display screens. These features can enhance the functionality and convenience of the FM transmitter, providing added value for your investment.
- User Reviews: Take the time to read user reviews and ratings of different FM transmitters. Real-world experiences and feedback from other users can offer valuable insights into the performance, reliability, and ease of use of various models.
By carefully evaluating these factors, you can select an FM transmitter that aligns with your specific needs and preferences, ensuring a seamless and enjoyable audio streaming experience in your vehicle.
Once you’ve chosen the right FM transmitter, you’ll be ready to proceed to the next step in the process of connecting and using this versatile device to enhance your car audio experience.
Step 2: Find an Available FM Frequency
Before using your FM transmitter, it’s essential to find an available FM frequency to ensure clear and uninterrupted audio transmission from your device to your car stereo. This process involves identifying a frequency that is not being used by a local radio station, minimizing the likelihood of interference and ensuring optimal audio quality.
Here’s a step-by-step guide to finding an available FM frequency:
- Research Local Radio Stations: Start by researching the FM radio frequencies of local stations in your area. This information can typically be found online or by using a radio frequency directory. Note down the frequencies in use to avoid interference with these stations.
- Identify Unused Frequencies: Use your car stereo to manually tune through the FM frequencies, paying attention to areas where there is only static or silence. These “dead zones” indicate unused frequencies and provide potential channels for your FM transmitter.
- Test for Interference: Once you’ve identified a candidate frequency, test it by playing audio from your device through the FM transmitter. Listen for any interference, such as faint background noise or overlapping signals. If interference is present, continue searching for an alternative frequency.
- Consider Frequency Modulation: Some FM transmitters offer the ability to adjust the frequency modulation, which can help fine-tune the transmission for optimal clarity. Experiment with different modulation settings to achieve the best audio quality.
By following these steps, you can pinpoint a clear and available FM frequency that is suitable for use with your FM transmitter. Taking the time to find an optimal frequency will contribute to a seamless and enjoyable listening experience, free from unwanted interruptions or distortions.
Once you’ve identified a suitable FM frequency, you’ll be ready to power on the FM transmitter and prepare for the next steps in the setup process, bringing you closer to enjoying your favorite audio content through your car’s sound system.
Step 3: Power On the FM Transmitter
Once you have identified an available FM frequency, the next step in setting up your FM transmitter is to power it on and prepare it for use. This straightforward process involves connecting the transmitter to a power source and ensuring that it is ready to broadcast audio from your device to your car stereo.
Here’s a simple guide to powering on your FM transmitter:
- Connect the Transmitter to a Power Source: Depending on the design of your FM transmitter, it may be powered by the vehicle’s cigarette lighter socket or have a built-in rechargeable battery. If it uses the cigarette lighter socket, insert the transmitter’s power adapter into the socket. For models with a built-in battery, ensure that it is adequately charged before use.
- Verify the Power Indicator: Many FM transmitters feature a power indicator light or display to signal that the device is receiving power. Check for this indicator to confirm that the transmitter is successfully connected to the power source and is ready for operation.
- Adjust Additional Settings: Some FM transmitters may have adjustable settings such as frequency selection, Bluetooth pairing, or volume control. Take this opportunity to configure any additional settings based on your preferences and the specific features of your transmitter.
- Position the Transmitter: Depending on the design of the transmitter, you may need to position it in a convenient location within your vehicle. Ensure that it is easily accessible and that any display or control elements are visible and within reach for adjustments.
By following these steps, you can power on your FM transmitter and prepare it for seamless integration with your car stereo. The process is designed to be user-friendly and intuitive, allowing you to quickly establish a reliable connection between your digital device and your vehicle’s audio system.
With the FM transmitter powered on and ready for use, you’re now poised to proceed to the next crucial step: connecting the transmitter to your device and initiating the transmission of audio to your car stereo, bringing you closer to enjoying your favorite music, podcasts, or audiobooks on the road.
Step 4: Connect the FM Transmitter to Your Device
With the FM transmitter powered on, the next step is to establish a connection between the transmitter and your digital device, enabling the wireless transmission of audio to your car stereo. This process involves pairing the transmitter with your device and ensuring that the audio signal is effectively transmitted for seamless playback.
Here’s a step-by-step guide to connecting the FM transmitter to your device:
- Enable Bluetooth or Auxiliary Mode: If your FM transmitter supports Bluetooth connectivity, activate the Bluetooth function on your device and enable pairing mode on the transmitter. Alternatively, if the transmitter uses an auxiliary connection, ensure that your device is equipped with a compatible auxiliary output and connect the devices using the appropriate cable.
- Pair the Devices: If using Bluetooth, search for available Bluetooth devices on your phone or media player and select the FM transmitter from the list of detected devices. Follow any on-screen prompts to complete the pairing process and establish a secure connection between the transmitter and your device.
- Confirm Connection: Once paired, verify that the FM transmitter is successfully connected to your device. Check for confirmation indicators such as a Bluetooth icon or status message on your device’s screen, as well as any corresponding indicators on the transmitter itself.
- Adjust Audio Settings: Depending on the capabilities of your FM transmitter, you may have options to adjust audio settings such as volume, equalization, or sound enhancement features. Take this opportunity to fine-tune the audio output to your preferences and optimize the listening experience.
By following these steps, you can seamlessly connect your digital device to the FM transmitter, establishing a reliable and efficient link for transmitting audio to your car stereo. This wireless connection eliminates the need for physical cables and allows for convenient playback of your favorite music, podcasts, or other audio content.
With the FM transmitter successfully connected to your device, you’re now ready to proceed to the next step in the process: tuning your car stereo to the designated FM frequency and initiating the playback of audio from your device, bringing you closer to enjoying a personalized and high-quality audio experience while on the road.
Step 5: Tune Your Car Stereo to the FM Frequency
After connecting the FM transmitter to your device, the next crucial step is to tune your car stereo to the designated FM frequency set on the transmitter. This process ensures that the audio signal transmitted from your device is received and played through your vehicle’s sound system, providing you with a seamless and personalized listening experience.
Here’s a step-by-step guide to tuning your car stereo to the FM frequency:
- Select the Designated FM Frequency: Refer to the user manual or instructions provided with your FM transmitter to identify the specific FM frequency to which it is set for transmission. This frequency will serve as the dedicated channel through which the audio from your device will be broadcast to your car stereo.
- Tune Your Car Stereo: Use your car stereo’s tuning controls to select the same FM frequency that is set on the FM transmitter. This may involve manually adjusting the frequency dial or using preset tuning options to quickly navigate to the designated channel.
- Confirm Reception: Once tuned to the designated FM frequency, verify that your car stereo has successfully received the audio signal from the FM transmitter. Listen for the audio playback from your device, ensuring that it is clear, free from interference, and seamlessly integrated with your car’s sound system.
- Optimize Sound Quality: Adjust the volume and sound settings on your car stereo to optimize the audio quality according to your preferences. Fine-tune the bass, treble, and overall volume levels to create an immersive and enjoyable listening environment.
By following these steps, you can effectively tune your car stereo to the designated FM frequency, establishing a direct link to the audio signal transmitted from your device via the FM transmitter. This process allows you to seamlessly integrate your digital media with your vehicle’s audio system, providing you with a personalized and high-quality audio experience while on the move.
With your car stereo successfully tuned to the designated FM frequency, you’re now prepared to proceed to the final step in the process: adjusting the volume and enjoying your favorite music, podcasts, or audiobooks through your car’s sound system, bringing you closer to a fully immersive and customized audio experience during your travels.
Step 6: Adjust the Volume and Enjoy Your Music
With your car stereo tuned to the designated FM frequency and the audio signal successfully transmitted from your device to your vehicle’s sound system, the final step in this process is to adjust the volume and immerse yourself in your favorite music, podcasts, or audiobooks. This step allows you to fine-tune the audio output to your preferences and fully enjoy the seamless integration of your digital media with your car’s audio environment.
Here’s a simple guide to adjusting the volume and enjoying your music through the FM transmitter:
- Gradually Increase the Volume: Begin by gradually increasing the volume on your car stereo to a comfortable listening level. Take note of the audio clarity and ensure that the sound is well-balanced across the frequency spectrum, allowing you to fully appreciate the nuances of your chosen audio content.
- Optimize Sound Settings: If your car stereo features adjustable sound settings such as equalization, balance, or fader controls, take this opportunity to customize the audio output to your liking. Fine-tune the settings to enhance the overall listening experience and tailor the sound to suit your preferences.
- Enjoy Your Favorite Content: Once the volume and sound settings are optimized, indulge in your preferred music, podcasts, or audiobooks as you embark on your journey. Take pleasure in the seamless integration of your digital media with your car’s audio system, allowing you to stay entertained and engaged while on the road.
- Ensure Safe Listening: While enjoying your audio content, be mindful of maintaining a safe listening environment within your vehicle. Avoid excessively high volume levels that may distract you from the road or compromise your awareness of surrounding traffic conditions.
By following these steps, you can adjust the volume and fully immerse yourself in the audio experience facilitated by the FM transmitter. This final stage of the process allows you to appreciate the convenience and quality of wireless audio transmission, providing you with a personalized and enjoyable soundtrack for your travels.
With the volume adjusted to your satisfaction and your favorite music, podcasts, or audiobooks at your fingertips, you can relish the seamless integration of digital media with your car’s sound system, enhancing your driving experience and ensuring that you stay entertained and engaged while on the move.