
What is Knot Craft?
Knot craft, also known as decorative knotting, is the art of creating intricate and visually appealing designs using various types of knots. This ancient practice has been employed for practical, symbolic, and decorative purposes across diverse cultures for centuries. From securing items to creating beautiful accessories, knot craft offers a wide range of creative possibilities.
One of the most popular and versatile applications of knot craft is the creation of lanyards using the snake knot. Lanyards are commonly used to hold keys, whistles, identification cards, and other small items, making them a practical and stylish accessory for everyday use. By incorporating the snake knot into lanyard design, individuals can showcase their craftsmanship and add a personal touch to their belongings.
Furthermore, knot craft serves as a form of self-expression and creativity, allowing individuals to explore different knotting techniques and patterns to produce unique and eye-catching designs. Whether it’s for practical use or artistic expression, knot craft offers a rewarding and engaging activity for people of all ages.
History of Lanyards
The history of lanyards can be traced back to ancient times, with their origins deeply rooted in practicality and functionality. The term “lanyard” is believed to have originated from the French word “lanière,” which refers to a strap or thong. Throughout history, lanyards have served a variety of purposes, evolving from their utilitarian beginnings to become a symbol of status, affiliation, and craftsmanship.
Initially, lanyards were primarily used aboard ships to secure items such as whistles, knives, and keys, providing sailors with a convenient way to keep essential tools within reach. Over time, lanyards became synonymous with nautical culture and were adorned with intricate knot designs that reflected the skill and expertise of the sailors who crafted them.
During the 19th and 20th centuries, lanyards gained prominence beyond maritime settings and became associated with military regalia and identification. Soldiers and officers used lanyards to display rank insignia, carry weapons, and distinguish themselves within their respective units. The intricate braiding and knotting techniques used in lanyard construction became a hallmark of craftsmanship and attention to detail.
In modern times, lanyards have transcended their traditional roles and have found widespread use in various industries, including corporate settings, sports events, and conventions. They serve as practical accessories for holding identification badges, keys, and electronic devices, while also providing an opportunity for personalization and self-expression.
Today, lanyards continue to be valued for their versatility and functionality, with individuals incorporating them into everyday life as practical and stylish accessories. The rich history of lanyards, steeped in maritime traditions and military symbolism, has contributed to their enduring appeal and the artistry associated with their creation.
Materials Needed
Before embarking on the craft of creating a lanyard with a snake knot, it’s essential to gather the necessary materials. The beauty of this craft lies in its simplicity and accessibility, requiring only a few basic items to get started. Here’s a list of materials needed to begin your knot craft journey:
- Paracord or Nylon Cord: Select a durable and visually appealing cord to form the body of the lanyard. Paracord, known for its strength and versatility, is a popular choice for crafting lanyards. Alternatively, nylon cord offers a smooth texture and vibrant color options.
- Scissors: A pair of sharp scissors is essential for cutting the cord to the desired length and neatly trimming the ends.
- Lighter: A lighter or a source of heat is used to seal the cut ends of the cord, preventing fraying and ensuring a clean finish.
- Clipboard or Safety Pin: A clipboard or a safety pin can be helpful for securing the cord during the knotting process, keeping the work taut and organized.
- Measuring Tape: To achieve precision in the lanyard’s length, a measuring tape or ruler is useful for accurate cord cutting.
These basic materials provide a solid foundation for creating a lanyard with a snake knot, offering both functionality and aesthetic appeal. With these items in hand, enthusiasts can delve into the art of knot craft and begin crafting their personalized lanyards with ease and creativity.
Step 1: Creating the Starting Loop
The first step in crafting a lanyard with a snake knot involves creating the starting loop, which forms the foundation for the entire project. This loop serves as the attachment point for securing the lanyard to a key ring, whistle, or any item it is intended to hold. Follow these simple yet crucial steps to begin the knotting process:
- Cut the Cord: Start by cutting a length of paracord or nylon cord, typically measuring around 18 to 24 inches, depending on the desired length of the finished lanyard. Use the scissors to make a clean, straight cut.
- Form the Loop: Take one end of the cord and create a small loop, ensuring that the ends overlap by approximately 2 inches. This overlap will serve as the starting point for the snake knot pattern.
- Create an Overhand Knot: With the loop in place, tie an overhand knot using the overlapping ends. This knot secures the loop and prevents it from unraveling as you proceed with the knotting process.
- Adjust the Loop Size: After tying the overhand knot, adjust the size of the loop to match the desired diameter for attaching the lanyard to a key ring or other items. Ensure that the loop is symmetrical and well-proportioned for a polished look.
By carefully executing these initial steps, crafters establish a sturdy and well-defined starting loop, laying the groundwork for the subsequent weaving of the snake knot. Attention to detail and precision in creating the loop are essential, as they contribute to the overall quality and functionality of the finished lanyard.
Step 2: Tying the Snake Knot
Once the starting loop is in place, the next pivotal step in crafting a lanyard with a snake knot is mastering the technique of tying the knot itself. The snake knot, characterized by its sleek and intertwined appearance, adds a touch of elegance and durability to the lanyard. Follow these steps to expertly weave the snake knot:
- Position the Loop: Hold the cord with the starting loop in one hand, ensuring that the loose ends are easily accessible for knotting. This initial positioning sets the stage for creating the first half of the snake knot.
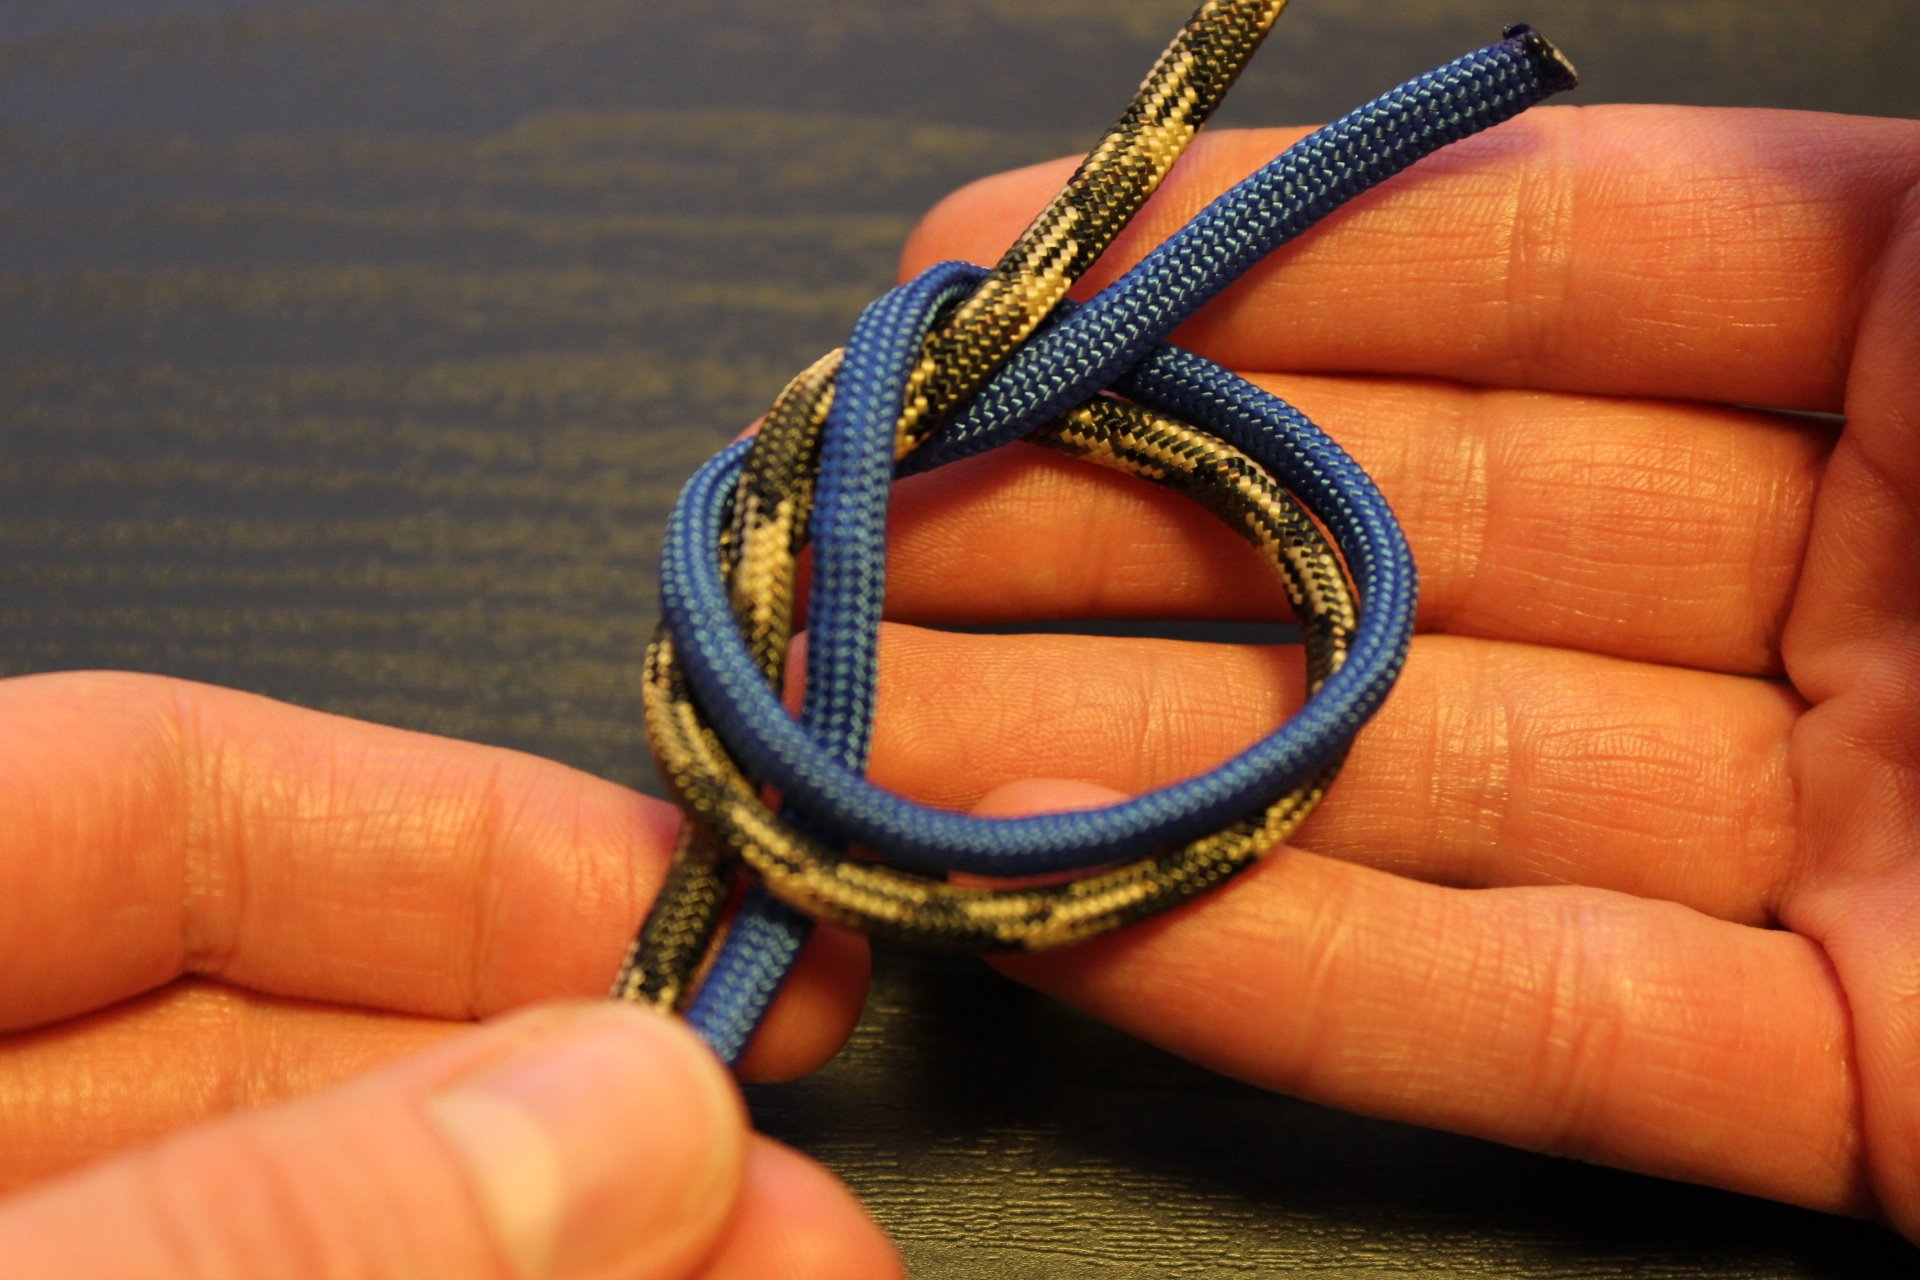
- Create the First Half Knot: Take the right loose end of the cord and cross it over the top of the cord, forming a loop on the left side. Then, bring the left loose end under the right side of the cord and through the loop created by the right end. This action completes the first half of the snake knot.
- Tighten the First Half Knot: Gently pull both loose ends to tighten the first half knot, ensuring that it rests snugly against the starting loop. This step sets the foundation for the symmetrical and uniform appearance of the snake knot.
- Create the Second Half Knot: With the first half knot secured, proceed to create the second half of the snake knot. Take the left loose end of the cord and cross it over the top of the cord, forming a loop on the right side. Then, bring the right loose end under the left side of the cord and through the loop created by the left end.
- Tighten the Second Half Knot: Similar to the first half knot, gently pull both loose ends to tighten the second half knot, ensuring that it aligns seamlessly with the first half knot. This action completes the intertwining pattern of the snake knot.
Mastering the technique of tying the snake knot is a pivotal aspect of lanyard crafting, requiring precision and attention to detail. By following these steps with care and patience, enthusiasts can achieve a beautifully woven snake knot that serves as the focal point of the lanyard’s design.
Step 3: Continuing the Snake Knot
As the snake knot takes shape, the process of continuing the knotting sequence is crucial for maintaining the lanyard’s structural integrity and aesthetic appeal. This step involves seamlessly repeating the knotting pattern to extend the snake knot along the length of the lanyard. Follow these essential steps to ensure a smooth and consistent progression of the snake knot:
- Position the Completed Knot: Once the initial snake knot is tied, position it securely near the starting loop, ensuring that it sits snugly against the loop without any slack. This positioning sets the stage for seamlessly continuing the snake knot pattern.
- Repeat the Knotting Sequence: To continue the snake knot, follow the same knotting sequence used to create the initial knot. Begin by forming the first half knot by crossing the loose ends of the cord and interweaving them to establish the characteristic intertwining pattern of the snake knot.
- Ensure Consistent Tightening: As each half knot is completed, pay close attention to consistently tightening the cord to maintain a uniform and symmetrical appearance. This meticulous approach ensures that the snake knot progresses seamlessly without any irregularities or loose sections.
- Monitor the Knot Alignment: Throughout the knotting process, regularly inspect the alignment and spacing of the individual knots to ensure a visually appealing and well-structured snake knot. Consistent spacing and tension contribute to the overall quality of the lanyard.
- Continue Knotting to Desired Length: Repeat the knotting sequence, alternating between the first and second half knots, to extend the snake knot along the length of the lanyard. Continue this process until the desired length of the lanyard is achieved, maintaining a steady and deliberate pace to ensure uniformity.
By meticulously following these steps and maintaining a focused approach, crafters can effectively continue the snake knot, resulting in a visually striking and durable lanyard that showcases the artistry and precision of knot craft.
Step 4: Finishing the Lanyard
As the lanyard nears completion, the final step involves finishing the project with care and attention to detail. This pivotal stage ensures that the lanyard is securely fastened, neatly trimmed, and ready for practical use. Follow these essential steps to expertly complete the lanyard-making process:
- Assess the Length: Before finalizing the lanyard, assess its length to ensure that it meets the desired specifications for practical use and aesthetic appeal. Make any necessary adjustments to the length of the lanyard, taking into account its intended function and the positioning of attached items.
- Secure the End of the Cord: Once the desired length is confirmed, secure the end of the cord to prevent unraveling and maintain the integrity of the lanyard. Use a lighter to carefully melt the end of the cord, creating a small, rounded tip that effectively seals the fibers and prevents fraying.
- Trim Excess Cord: After sealing the end of the cord, use the scissors to trim any excess length, ensuring a clean and precise finish. Exercise caution to achieve a neat and uniform appearance, enhancing the overall presentation of the lanyard.
- Attach a Clasp or Key Ring: To enhance the lanyard’s functionality, attach a clasp or key ring to the starting loop. This step enables the lanyard to securely hold keys, identification cards, whistles, or other items, adding practicality to its decorative appeal.
- Test the Attachment: Once the clasp or key ring is secured, test the attachment by gently tugging on it to ensure that it is firmly in place and capable of withstanding daily use. This quality check confirms the lanyard’s reliability and functionality.
By meticulously following these steps and exercising precision in the finishing process, crafters can achieve a polished and professional result, culminating in a lanyard that seamlessly combines practical utility with artistic craftsmanship.
Tips and Tricks for Perfecting Your Snake Knot
Mastering the art of creating a flawless snake knot lanyard requires attention to detail and a commitment to precision. To enhance your knot craft skills and ensure the impeccable execution of the snake knot, consider the following tips and tricks:
- Consistent Tension: Maintain consistent tension throughout the knotting process to achieve uniformity and symmetry in the snake knot pattern. Even tension ensures a visually appealing lanyard with a professional finish.
- Practice Patience: Approach the knotting process with patience and a steady pace, allowing ample time for each knot to be meticulously crafted. Rushing through the steps may result in irregularities and uneven spacing.
- Utilize Reference Guides: Refer to online tutorials, instructional videos, or knot craft guides to gain insights into advanced knotting techniques and troubleshooting common challenges. Learning from experienced practitioners can enhance your proficiency.
- Experiment with Cord Variations: Explore the use of different cord types, colors, and textures to create unique and visually captivating snake knot lanyards. Experimenting with various materials adds a personalized touch to your creations.
- Seek Precision in Loop Sizing: Pay close attention to the size and symmetry of the starting loop, ensuring that it aligns with your desired specifications for attaching the lanyard to key rings or other items.
- Embrace Creative Knot Combinations: Consider integrating additional knotting styles, such as the cobra knot or diamond knot, to complement the snake knot and add complexity to your lanyard designs.
- Regularly Inspect Knot Alignment: Periodically inspect the alignment and spacing of the individual knots to identify any inconsistencies and make necessary adjustments. This proactive approach contributes to the overall quality of the snake knot.
By incorporating these valuable tips and tricks into your knot craft endeavors, you can elevate your proficiency in creating stunning snake knot lanyards while honing your skills as a knot craft enthusiast.
Ways to Use Your Finished Lanyard
Once you have crafted a beautifully woven snake knot lanyard, you can explore a multitude of practical and creative ways to incorporate it into your daily life. The versatility of a finished lanyard extends beyond its utilitarian function, offering opportunities for personalization and expression. Consider the following ways to make the most of your completed lanyard:
- Key Holder: Utilize the lanyard as a stylish and functional key holder, ensuring that your keys are easily accessible while adding a touch of personality to your everyday carry.
- Badge or ID Holder: Attach your identification badge or work credentials to the lanyard, providing a convenient and visually appealing way to display your professional or event credentials.
- Whistle Lanyard: Secure a whistle to the lanyard, particularly useful for outdoor enthusiasts, coaches, lifeguards, and individuals who require a reliable signaling device within reach.
- Accessory Attachment: Use the lanyard to attach small accessories such as pocket knives, mini flashlights, or multitools, keeping essential items within easy reach and adding a touch of style to your gear.
- Gift Giving: Share your handcrafted lanyards with friends and family as thoughtful and personalized gifts, showcasing your knot craft skills and providing them with a practical and visually appealing accessory.
- Craft Fair or Market Sales: If you enjoy knot craft as a hobby or a small business venture, consider showcasing and selling your finished lanyards at craft fairs, markets, or online platforms, offering unique and handmade accessories to potential customers.
- Team or Group Identification: Customize lanyards with specific colors and patterns to represent team affiliations, school spirit, or group memberships, fostering a sense of unity and camaraderie among members.
By exploring these diverse applications for your finished lanyard, you can fully appreciate the craftsmanship and functionality of your creation while incorporating it into various aspects of your daily routine and personal interests.