
Choosing the Right Monopod for Your Magpul PRS Stock
When it comes to enhancing the functionality and stability of your Magpul Precision Rifle/Sniper (PRS) stock, selecting the right monopod is crucial. The monopod serves as a valuable accessory for precision shooting, providing additional support and aiding in fine adjustments to achieve optimal shooting positions. Here are some key considerations to keep in mind when choosing a monopod for your Magpul PRS stock:
- Compatibility: Ensure that the monopod is specifically designed to be compatible with the Magpul PRS stock. This will guarantee a seamless and secure fit, preventing any potential issues during installation and use.
- Adjustability: Look for a monopod that offers a wide range of height adjustments, allowing you to customize the shooting position according to your preferences and shooting conditions. The ability to make precise adjustments is essential for achieving optimal stability and accuracy.
- Build Quality: Opt for a monopod constructed from durable materials such as aluminum or high-quality polymers. A robust build will ensure that the monopod can withstand the rigors of shooting activities and maintain its functionality over time.
- Stability and Support: Consider the design features that contribute to the monopod’s stability, such as a wide base and secure locking mechanisms. A stable monopod is essential for maintaining a steady shooting platform, especially during long-range shooting scenarios.
- Portability: If you plan to transport your rifle for outdoor shooting activities, consider the portability of the monopod. Look for a design that offers convenient folding or detachable features, making it easier to stow and transport the rifle with the monopod attached.
By carefully evaluating these factors, you can select a monopod that complements your Magpul PRS stock, enhancing its capabilities and providing you with the support needed to achieve precise and consistent shooting performance.
Tools and Materials You Will Need
Before embarking on the installation of a monopod on your Magpul PRS stock, it’s essential to gather the necessary tools and materials to ensure a smooth and efficient process. Here’s a comprehensive list of what you’ll need:
- Magpul PRS Stock: The primary component of the installation process is the Magpul PRS stock itself. Ensure that it is in good condition and free from any defects that may hinder the installation of the monopod.
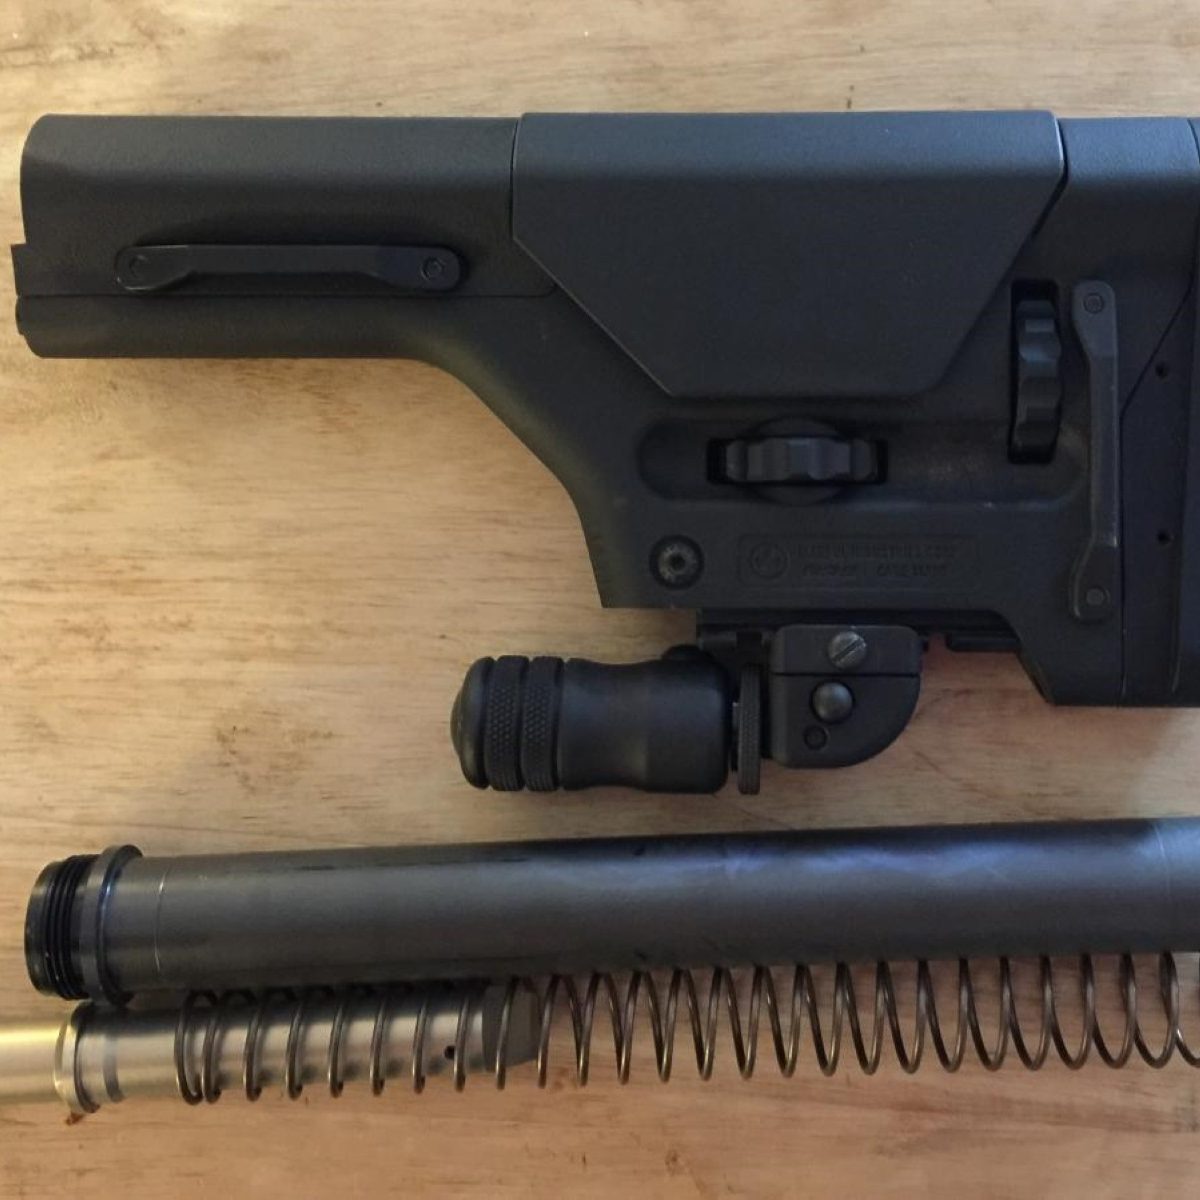
- Monopod Mounting Plate: This essential component serves as the interface between the monopod and the Magpul PRS stock. It is designed to securely attach the monopod to the stock, providing stability and support during shooting.
- Monopod Leg: The monopod leg is the adjustable support structure that extends from the mounting plate, offering height adjustability and stability during shooting activities. Ensure that the monopod leg is compatible with the mounting plate and is designed for use with the Magpul PRS stock.
- Hex Key Set: A set of hex keys of various sizes will be required to tighten and secure the mounting plate and other components during the installation process. Ensure that you have the appropriate sizes to fit the fasteners included with the monopod and mounting plate.
- Screwdriver: Depending on the specific mounting hardware included with the monopod and mounting plate, a screwdriver may be necessary to secure certain components in place. A Phillips or flat-head screwdriver, as required by the mounting hardware, should be readily available.
- Threadlocker: To ensure that the fasteners remain securely in place and to prevent loosening due to recoil and vibration, a threadlocker solution, such as Loctite, is recommended. Apply the threadlocker to the fasteners before installation to enhance the overall stability of the monopod assembly.
- Clean Cloth: Having a clean cloth or rag on hand will be useful for wiping down the Magpul PRS stock and other components, ensuring that they are free from debris and contaminants that may impede the installation process.
By gathering these tools and materials before starting the installation, you can streamline the process and ensure that you have everything required to successfully attach the monopod to your Magpul PRS stock.
Step 1: Disassembling the Magpul PRS Stock
Before you can begin the installation of a monopod on your Magpul PRS stock, it’s essential to disassemble the stock to provide access to the attachment point for the monopod mounting plate. Follow these steps to disassemble the Magpul PRS stock:
- Ensure Safety: Before handling any firearms or accessories, ensure that the rifle is unloaded and the chamber is clear. Safety should always be the top priority when working on firearms.
- Remove the Stock from the Rifle: If the Magpul PRS stock is currently attached to a rifle, carefully remove it by following the manufacturer’s instructions. This typically involves loosening and removing the fasteners that secure the stock to the rifle’s receiver or chassis.
- Identify Disassembly Points: Take note of the specific areas where the stock can be disassembled, such as the adjustment knobs and locking mechanisms. Refer to the Magpul PRS stock’s user manual for detailed guidance on disassembly.
- Unscrew Adjustment Knobs: Depending on the model of the Magpul PRS stock, there may be adjustable components such as length-of-pull and cheek riser adjustment knobs. Unscrew these knobs to release the tension and allow for disassembly.
- Separate Stock Components: Carefully separate the stock components, ensuring that any attached accessories or components, such as the cheek riser, are removed to provide access to the attachment point for the monopod mounting plate.
- Inspect for Compatibility: While disassembling the stock, inspect the attachment area to ensure that it is compatible with the monopod mounting plate. Verify that the surface is free from any obstructions or irregularities that may impede the installation process.
By meticulously disassembling the Magpul PRS stock, you will create the necessary access and preparation for attaching the monopod mounting plate, setting the stage for the subsequent steps in the installation process.
Step 2: Attaching the Monopod Mounting Plate
Once the Magpul PRS stock has been disassembled to provide access to the attachment point, the next step is to securely attach the monopod mounting plate. This critical component serves as the interface between the stock and the monopod, providing a stable foundation for the monopod assembly. Follow these steps to effectively attach the monopod mounting plate:
- Prepare the Attachment Area: Ensure that the surface of the attachment area on the Magpul PRS stock is clean and free from any debris or obstructions that may hinder the installation. Use a clean cloth to wipe down the surface and remove any contaminants.
- Position the Mounting Plate: Carefully position the monopod mounting plate on the designated attachment area of the Magpul PRS stock, aligning it with the provided fastener holes. Verify that the mounting plate is oriented correctly and sits flush against the stock.
- Secure the Mounting Plate: Using the appropriate fasteners and a hex key, begin securing the mounting plate to the stock. Start by loosely threading the fasteners into place to ensure proper alignment before fully tightening them. Follow the manufacturer’s recommendations for the specific torque or tightening sequence.
- Apply Threadlocker: To enhance the stability and security of the fasteners, apply a small amount of threadlocker to the threads before fully tightening the fasteners. This will help prevent loosening due to recoil and vibration during shooting activities.
- Verify Alignment and Tightness: After securing the mounting plate, carefully inspect the alignment and tightness of the fasteners. Ensure that the mounting plate is firmly and evenly attached to the stock, providing a solid foundation for the monopod assembly.
- Perform Functionality Check: With the mounting plate securely attached, perform a brief functionality check to ensure that the monopod mounting point is stable and free from any movement or play. This will help verify the integrity of the attachment before proceeding to the next steps.
By meticulously attaching the monopod mounting plate to the Magpul PRS stock, you establish a secure and reliable connection point for the monopod, laying the groundwork for the subsequent steps in the installation process.
Step 3: Installing the Monopod Leg
With the monopod mounting plate securely attached to the Magpul PRS stock, the next crucial step is to install the monopod leg, which provides the adjustable support necessary for precision shooting. Follow these steps to effectively install the monopod leg:
- Prepare the Monopod Leg: Before installation, ensure that the monopod leg is in the fully retracted position. This will facilitate the attachment process and prevent any interference with the stock or other components.
- Align the Monopod Leg: Position the monopod leg in alignment with the mounting plate, ensuring that the attachment point on the leg corresponds to the designated interface on the mounting plate. Verify that the leg is oriented correctly for seamless attachment.
- Engage the Attachment Mechanism: Depending on the specific design of the monopod leg, engage the attachment mechanism to securely connect it to the mounting plate. This may involve sliding the leg into position and activating a locking lever or tightening a fastener to ensure a stable connection.
- Adjustment and Locking: If the monopod leg features height adjustment capabilities, extend it to the desired position for shooting. Once adjusted, ensure that the locking mechanism is engaged to prevent unintended movement during use. Test the stability and rigidity of the extended leg to confirm its readiness for supporting the rifle.
- Verify Compatibility: As the monopod leg is installed, verify that it is compatible with the mounting plate and the Magpul PRS stock, ensuring that the interface provides a secure and stable connection without any play or movement that could compromise shooting stability.
- Functional Testing: Perform a brief functional test of the monopod leg by applying pressure and verifying its stability and support. This test will help ensure that the leg is securely attached and capable of providing the necessary support for precision shooting applications.
By meticulously installing the monopod leg and confirming its compatibility and functionality, you establish a reliable and adjustable support structure that enhances the shooting capabilities of your Magpul PRS stock.
Step 4: Adjusting and Testing the Monopod
After installing the monopod leg, the next crucial step is to adjust and test its functionality to ensure optimal performance and stability when supporting the rifle. Follow these essential steps to effectively adjust and test the monopod:
- Height Adjustment: Utilize the height adjustment feature of the monopod to customize the shooting position according to your preferences and shooting conditions. Extend or retract the monopod leg to achieve the desired height, taking into account factors such as terrain and shooting angle.
- Stability Assessment: Once the monopod is adjusted to the appropriate height, assess its stability by applying gentle pressure and verifying that it maintains a secure connection with the mounting plate. Stability is essential for maintaining a steady shooting platform, especially during precision shooting scenarios.
- Load-Bearing Test: Test the monopod’s load-bearing capabilities by gradually applying the weight of the rifle onto the monopod. Verify that the monopod leg effectively supports the weight of the rifle without any signs of instability or excessive movement. This test ensures that the monopod can withstand the demands of shooting activities.
- Repositioning and Readjustment: If necessary, make any additional adjustments to the monopod’s height or position based on the specific shooting scenario and environmental conditions. The ability to make precise adjustments is crucial for achieving optimal stability and accuracy during shooting.
- Functional Testing: Perform a series of functional tests by assuming shooting positions and simulating the shooting process with the monopod in place. Verify that the monopod effectively enhances stability and support, allowing for precise and consistent shooting performance.
- Repeatability Check: Confirm that the monopod maintains its adjusted position and stability after repeated adjustments and usage. The ability of the monopod to retain its position and stability over time is essential for consistent shooting performance.
By meticulously adjusting and testing the monopod, you ensure that it provides the necessary stability and support for precision shooting, enhancing the overall capabilities of your Magpul PRS stock for a wide range of shooting scenarios.
Step 5: Reassembling the Magpul PRS Stock
With the monopod successfully installed and tested, the final step involves reassembling the Magpul PRS stock to its original configuration, ensuring that all components are securely in place and ready for use. Follow these essential steps to effectively reassemble the Magpul PRS stock:
- Retrieve Stock Components: Gather all the components of the Magpul PRS stock, including any adjustable elements such as length-of-pull and cheek riser components, ensuring that they are ready for reassembly.
- Position Stock Components: Carefully position the stock components in alignment with the attachment points, ensuring that any adjustable features are oriented correctly for proper functionality and user comfort.
- Secure Fasteners: Using the appropriate fasteners and tools, begin securing the stock components in place, starting with the adjustable elements and followed by the main body of the stock. Ensure that the fasteners are tightened to the manufacturer’s recommended torque specifications.
- Adjustable Element Alignment: If the Magpul PRS stock features adjustable elements such as length-of-pull and cheek riser components, verify that they are aligned and positioned according to your shooting preferences and ergonomic requirements.
- Functionality Check: Perform a brief functionality check of the reassembled stock, ensuring that all components are securely attached and that any adjustable features operate smoothly and securely. This check will confirm the readiness of the stock for use in shooting activities.
- Final Inspection: Conduct a thorough visual inspection of the reassembled Magpul PRS stock, verifying that all components are correctly positioned and secured. Ensure that there are no loose fasteners or misaligned components that may affect the stock’s stability and functionality.
By meticulously reassembling the Magpul PRS stock, you restore it to its original configuration, ready for use in a wide range of shooting scenarios. The completed installation of the monopod enhances the stock’s capabilities, providing additional support and stability for precision shooting.