
Enabling the Sleep Timer Feature
Do you often find yourself falling asleep with your favorite music playing on Spotify, only to wake up in the middle of the night with the music still playing? Luckily, Spotify offers a convenient solution to prevent this from happening – the Sleep Timer feature. By enabling the Sleep Timer, you can precisely set a time limit for your music playback. Once the timer ends, Spotify will automatically stop playing, allowing you to enjoy a peaceful and uninterrupted sleep.
To start using the Sleep Timer feature on your Android device, follow the simple steps outlined below:
- Launch the Spotify app on your Android device. If you haven’t already installed the app, head to the Google Play Store to download and install it.
- Sign in to your Spotify account or create a new account if you don’t have one already.
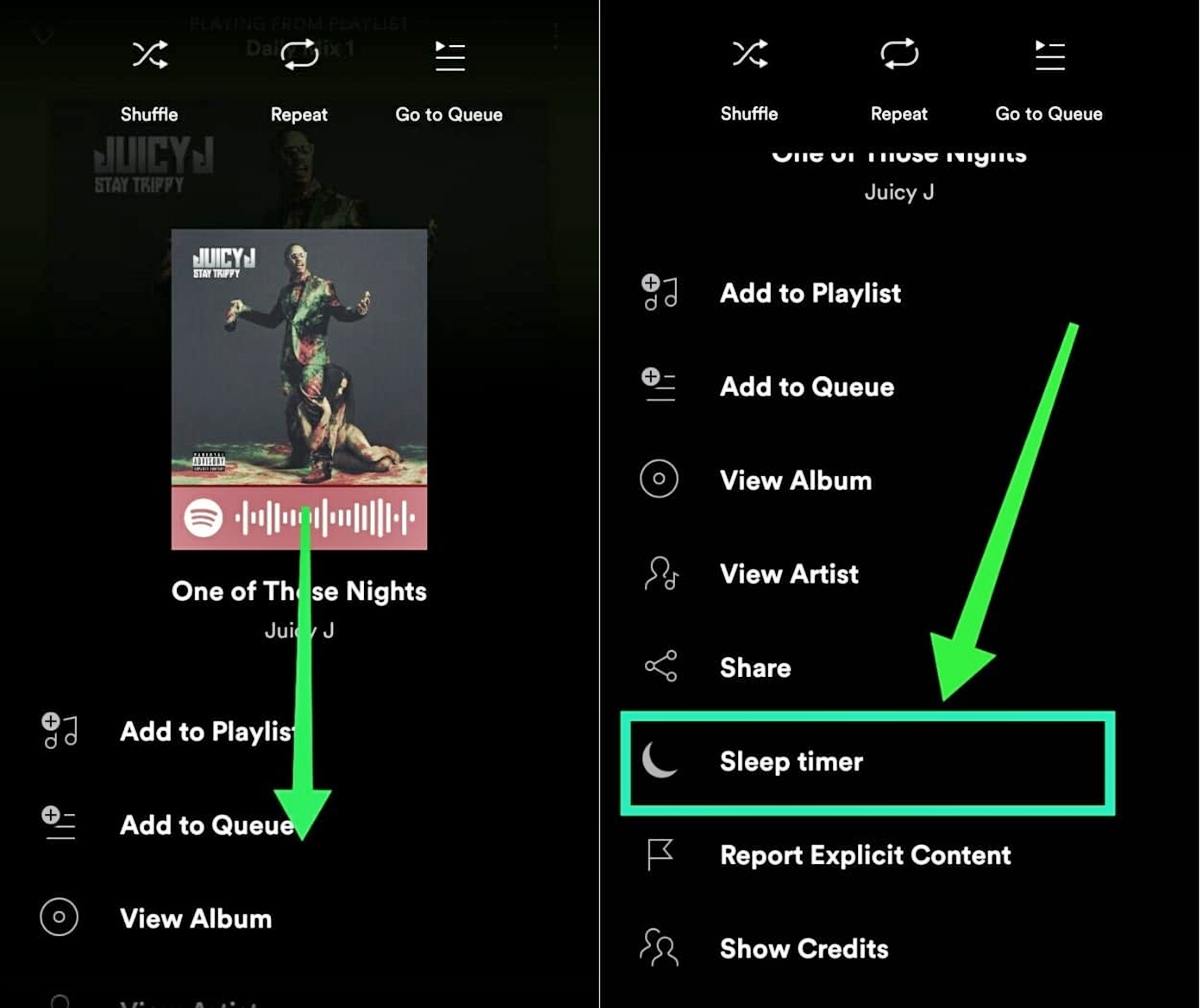
- Once you’re logged in, navigate to the song, album, playlist, or podcast episode that you want to listen to before sleeping. You can either search for it or choose from your personal library.
- Tap on the three-dot menu icon located in the top right corner of the screen. This will open a menu with various options.
- From the menu, select the “Sleep Timer” option. This will open a dialog box where you can set the sleep timer duration.
By enabling the Sleep Timer feature, you can ensure that your music will stop playing after a set period of time, saving battery life on your device and providing you with a peaceful sleep environment. It’s a great feature for those who enjoy falling asleep to music, podcasts, or ambient sounds.
Keep in mind that the Sleep Timer feature is only available for Spotify Premium subscribers. If you’re using Spotify’s free version, you won’t be able to access this feature. Additionally, the Sleep Timer feature is currently only available on Android devices.
With the Sleep Timer feature enabled, you can enjoy your favorite Spotify content without worrying about it playing throughout the night. So go ahead, give it a try and experience a more relaxing and restful sleep.
Setting a Timer for Sleep Mode
Once you’ve enabled the Sleep Timer feature on Spotify, you can now set a timer to determine how long your music will play before automatically stopping. Follow the steps below to set the timer and activate sleep mode:
- After selecting the “Sleep Timer” option from the menu, a dialog box will appear on your screen.
- In the dialog box, you’ll see a slider that allows you to adjust the duration of the sleep timer. Slide the bar to the desired time limit. You can choose between 5 minutes, 10 minutes, 15 minutes, 30 minutes, 45 minutes, or 1 hour.
- As you adjust the slider, the remaining time will be displayed below the slider.
- Once you’ve set the desired time, tap on the “Start” or “Play” button next to the slider. Your music will begin playing, and the sleep timer will start counting down.
Setting a timer for sleep mode allows you to enjoy your favorite songs, playlists, or podcasts for a specified time period without worrying about stopping it manually. This feature is especially useful when you want to fall asleep to your preferred audio content but don’t want it to continue playing all night.
Keep in mind that the sleep timer duration you set is applicable to the current playback only. If you want to use the sleep timer again in the future, you’ll need to repeat the same steps and adjust the slider according to your preferences.
It’s important to note that the sleep timer will automatically pause your music after the specified time has elapsed. If you want to continue listening, you can manually restart playback or set the sleep timer again.
Now that you know how to set a timer for sleep mode, you can enjoy a peaceful and uninterrupted sleep while still enjoying your favorite Spotify content. So go ahead, set your desired duration, and let the sleep timer take care of the rest!
Selecting the Timer Duration
When using the Sleep Timer feature on Spotify, you have the flexibility to select the duration for which your music will play before it automatically stops. The app provides several preset time intervals for you to choose from. Here’s how you can select the timer duration:
- After opening the Sleep Timer dialog box, you’ll see a slider that allows you to adjust the duration of the timer. The default setting is usually set at 30 minutes, but you can modify it based on your preferences.
- Swipe left or right on the slider to browse through the available time intervals. You can choose from options such as 5 minutes, 10 minutes, 15 minutes, 30 minutes, 45 minutes, or 1 hour.
- As you swipe the slider, the remaining time will be displayed below it, giving you a clear idea of how long your music will play before it stops.
- Once you find the desired time duration, tap on the “Start” or “Play” button to start the sleep timer and begin enjoying your music.
By allowing you to select the timer duration, Spotify lets you personalize your listening experience based on your sleep habits and preferences. Whether you prefer a shorter period of music playback or a longer time to drift off to sleep, Spotify’s sleep timer feature offers options to cater to your needs.
If you find that the preset time intervals don’t align with your desired duration, don’t worry! Spotify is continually updating its app, so there’s a possibility that additional time options will be made available in the future. Keep an eye out for any updates or enhancements to the sleep timer feature.
Remember, the timer duration you select only applies to the current playback session. If you want to use the sleep timer again with a different duration, you’ll need to adjust the slider accordingly.
Now that you know how to select the timer duration, you can tailor your listening experience to suit your bedtime routine. Experiment with different durations to find the perfect balance between enjoying your favorite music and ensuring a good night’s sleep.
Choosing What Happens After the Timer Ends
After setting a timer for the Sleep Mode feature on Spotify, you have the option to choose what happens once the timer reaches its end. This allows you to customize your listening experience and decide what occurs after your selected duration elapses. Here’s how you can choose what happens after the timer ends:
- When you open the Sleep Timer dialog box, you’ll see a section labeled “End of Timer.”
- Tap on the dropdown menu next to the “End of Timer” option to see the available choices.
- You can select from three options: “Stop Playing,” “Fade Out,” or “Pause.”
- If you choose “Stop Playing,” Spotify will completely cease playback as soon as the timer ends.
- In the case of “Fade Out,” the volume gradually decreases until the music softly fades away after the set timer duration.
- By selecting “Pause,” Spotify pauses the playback, allowing you to manually resume it when you’re ready.
Choosing what happens after the timer ends enables you to have more control over your listening experience and ensures a seamless transition to your desired audio state. Whether you prefer a gentle fade-out or an immediate stop, Spotify offers options to suit your preferences.
It’s important to note that the default setting for the sleep timer is “Stop Playing.” However, you can change this setting to either “Fade Out” or “Pause” depending on your personal preference.
Keep in mind that these settings are applicable only to the Sleep Timer feature. If you manually pause or stop the playback before the timer ends, the chosen action in the Sleep Timer settings won’t apply.
Now that you know how to choose what happens after the timer ends, you can customize your listening experience to align with your sleeping routine and personal preferences. Experiment with the different options to find the one that suits you best and enjoy uninterrupted, tailored audio enjoyment before drifting off to sleep.
Customizing Additional Options
When using the Sleep Timer feature on Spotify, you have the ability to further customize your listening experience by adjusting additional options. These options allow you to fine-tune the behavior of the sleep timer according to your preferences. Here’s how you can customize additional options:
- To access the additional options, open the Sleep Timer dialog box.
- Within the dialog box, you’ll find various settings that you can modify to customize your experience.
- One of the options you can customize is the “Crossfade” feature. Enabling this feature allows for a seamless transition between songs by fading out the current song while fading in the next.
- You can also adjust the “Volume Level” to set the desired volume for your music while using the sleep timer. This ensures that the volume is comfortable and suits your personal preferences.
- If you have a connected Bluetooth device, you can toggle the “Bluetooth Device” option to determine whether the sleep timer should disconnect the Bluetooth connection once the timer ends.
Customizing these additional options provides you with even more control over your listening experience during sleep mode. By adjusting the crossfade, volume level, and Bluetooth device settings, you can tailor the audio playback to match your preferred preferences and sleep environment.
Experiment with these options to find the ideal combination that enhances your listening experience and promotes a soothing and uninterrupted sleep.
It’s important to note that not all additional options may be available on all devices or versions of Spotify. The availability of these options may vary depending on your specific device and app version.
Now that you know how to customize additional options, take the time to personalize your sleep timer settings to create an audio experience that perfectly complements your sleep routine. With these customizable features at your disposal, you can enjoy a truly tailored and enjoyable listening experience.
Deactivating the Sleep Timer
If you no longer wish to use the Sleep Timer feature on Spotify, or if you want to stop the timer before it reaches its end, you can easily deactivate it. Here’s how you can deactivate the Sleep Timer:
- To access the Sleep Timer settings, tap on the three-dot menu icon located in the top right corner of the Spotify app.
- From the menu, select the “Sleep Timer” option. This will open the sleep timer settings dialog box.
- Within the dialog box, you’ll see the remaining time on the timer and the “Stop” button.
- To deactivate the sleep timer, simply tap on the “Stop” button. This will immediately halt the timer and prevent the music from stopping automatically.
Deactivating the Sleep Timer allows you to regain full control over your music playback and continue listening without any time restrictions. Whether you want to extend your listening session or simply pause the music temporarily, deactivating the sleep timer enables you to do so effortlessly.
If you change your mind and wish to use the Sleep Timer feature again in the future, you can activate it by following the steps outlined in the previous sections.
It’s worth mentioning that deactivating the sleep timer will not reset any of the customizations or settings you may have made. So, if you’ve adjusted the crossfade, volume level, or any other options, they will remain as you’ve set them for future use.
Now that you know how to deactivate the sleep timer, you can ensure uninterrupted music playback according to your preferences. Whether you want to stop the timer before it ends or temporarily pause the music, Spotify provides a simple and efficient way to take control of your listening experience.