
Finding the Scanner App on Your iPhone
If you’re looking to digitize documents using your iPhone, you’ll be delighted to know that you can easily accomplish this with the built-in Scanner app. This powerful tool allows you to scan physical documents like receipts, contracts, or even handwritten notes, and save them in a digital format for easy access and sharing.
Locating the Scanner app is a breeze. Simply unlock your iPhone and navigate to the home screen. Look for the icon labeled “Files,” which resembles a blue folder. Tap on this icon to open the Files app.
Once inside the Files app, locate the “Browse” section at the bottom of the screen and tap on it. You’ll be presented with a list of available file providers.
Swipe down until you locate the “Scanner” option. It should appear under the “On My iPhone” section. If you don’t see it there, it’s possible that you haven’t enabled the Scanner app. In that case, you can do so by going to the Settings app, selecting “Files,” and toggling on the “Scanner” option.
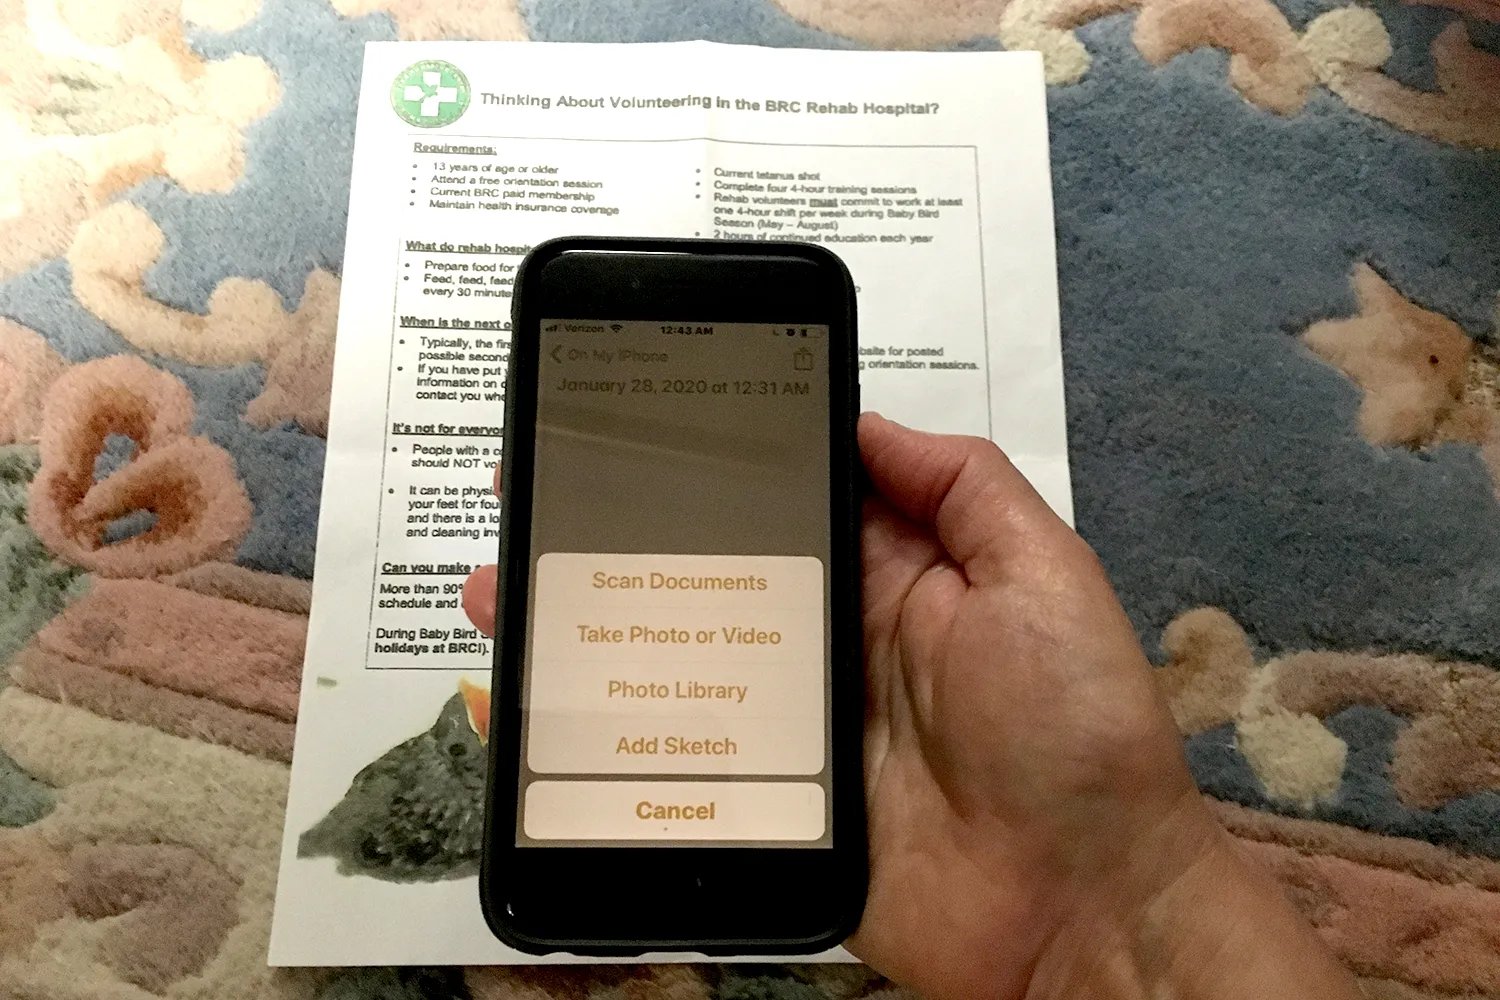
When you find the Scanner app in the Files app, tap on it to launch the scanner interface. You’re now ready to begin scanning your documents and transforming them into digital files.
Take some time to familiarize yourself with the different features and options available within the Scanner app, as this will greatly enhance your scanning experience.
Now that you know how to find the Scanner app, let’s delve into the various features and functions it offers, allowing you to efficiently scan and manage your documents with ease.
Opening the Scanner App
With the Scanner app now accessible on your iPhone, it’s time to dive into the process of opening and utilizing this powerful tool for scanning documents.
To open the Scanner app, tap on its icon within the Files app. The Scanner app interface will quickly launch, presenting you with a variety of options and settings for scanning documents.
Upon opening the app, you’ll notice a large viewfinder in the center of the screen. This is where you’ll position your document to be scanned. You can either hold your iPhone directly above the document or lay it flat on a surface for a more stable scanning process.
Beneath the viewfinder, you’ll find several buttons and controls that allow you to customize your scanning experience. These include options for selecting the scan mode, adjusting the document size, enhancing the scanned document, and more.
Depending on your specific needs, you can choose between different scan modes, such as color, grayscale, or black and white. Each mode is suited for different types of documents and can be selected by tapping on the respective button below the viewfinder.
In addition to the scan mode, you’ll also have the option to adjust the document size. This is particularly useful when dealing with documents of irregular sizes or trying to capture specific sections of a larger document. Simply tap on the “Size” button and use the handles around the document to adjust and frame it accordingly.
Once you’ve set up your desired scan mode and document size, you’re ready to capture the document. Simply tap on the large white button at the bottom of the screen, or use the volume-up button on the side of your iPhone to trigger the scanning process. The Scanner app will then capture the image of your document.
With the document successfully scanned, you can move on to enhancing it further. The Scanner app provides options for adjusting the scan’s brightness and contrast, as well as reducing any skew that may have occurred during the capture process. These features ensure that your scanned document looks clear and professional.
Now that you know how to open and navigate the Scanner app, let’s explore the various customization options available to optimize your scanning experience and produce high-quality digital documents.
Choosing the Scan Mode
One of the key elements of the Scanner app is its flexibility in allowing you to choose the appropriate scan mode for different types of documents. Understanding the different scan modes will help you capture your documents accurately and ensure the best results.
When you open the Scanner app, you’ll notice a row of buttons beneath the viewfinder. These buttons represent the different scan modes available to you.
The default scan mode is usually set to color, which captures the document in its original color scheme. This mode is ideal for scanning documents that contain color-coded information, such as charts, graphs, or illustrations.
If you’re dealing with a black and white document, such as a printed article or text-only document, selecting the black and white mode will produce a scanned image that is clear and easy to read. This mode is also useful for reducing file sizes, making it easier to share or store the scanned document.
The grayscale mode captures the document with varying levels of gray, creating a more nuanced and visually appealing image. This mode is often used for scanning photographs or documents with shaded areas, allowing for better depth and detail in the scanned image.
Choosing the appropriate scan mode is crucial to ensure the accuracy and legibility of your scanned documents. Consider the nature of the document and its intended use to determine which mode will work best for your needs.
Additionally, experimenting with different scan modes can help you identify the optimal settings for scanning specific types of documents. For example, when scanning handwritten notes or pencil drawings, adjusting the scan mode to grayscale may produce better results by preserving the subtle nuances and textures of the original document.
Remember, the Scanner app is designed to be flexible and user-friendly, providing you with a range of options to capture your documents effectively. By choosing the appropriate scan mode, you can ensure that your scanned documents accurately reflect the original content and are tailored to your specific needs.
Adjusting the Document Size
When using the Scanner app on your iPhone, you have the ability to adjust the document size before capturing the scan. This feature ensures that you can capture the specific section of a document that you need, whether it’s a small receipt or a portion of a larger contract.
To adjust the document size, start by positioning your iPhone above the document you want to scan. The viewfinder in the Scanner app will display a live preview of the document, allowing you to see exactly what will be captured.
If the entire document is already framed within the viewfinder, you can proceed with capturing the scan. However, if you need to adjust the document size, tap on the “Size” button located beneath the viewfinder.
Upon tapping the size button, you’ll notice four blue handles around the document in the preview. You can use these handles to resize and reposition the document within the frame.
To resize the document, simply tap and drag any of the corner handles inward or outward. This allows you to capture a smaller or larger section of the document as needed. Keep in mind that maintaining the aspect ratio of the document ensures that it retains its original proportions.
If you need to reposition the document within the frame, tap and drag anywhere inside the blue outline. This allows you to adjust the position of the document without changing its size.
Adjusting the document size is particularly useful when you only need to scan a specific section of a larger document, such as a particular paragraph or table. This feature allows you to focus on the relevant information while excluding any unnecessary content.
It’s worth noting that the Scanner app also provides a helpful feature called “Auto Crop.” When enabled, the app automatically detects the edges of the document and adjusts the frame accordingly. This can be a time-saving option, especially if you’re scanning multiple pages or documents in quick succession.
By using the “Size” button and the auto crop feature, you have full control over the document size when scanning with the Scanner app. This ensures that you can capture exactly what you need and create digital copies that are precise and tailored to your requirements.
Capturing the Document
Once you have adjusted the document size and positioned it correctly within the viewfinder of the Scanner app, you are ready to capture the scan. This step is crucial in transforming the physical document into a digital format that can be easily stored and shared.
To capture the document, simply tap on the large white button located at the bottom center of the screen. Alternatively, you can use the volume-up button on the side of your iPhone to trigger the scanning process.
When you tap the capture button, the Scanner app will swiftly capture the image of your document. You will see a brief animation or hear a sound indicating that the scan has been successfully taken. The captured scan will immediately appear on your screen for your review and further editing if desired.
It’s important to ensure that your iPhone remains steady during the capture process to prevent any blurriness or distortion in the scanned image. If you are holding your iPhone, try to keep it as steady as possible to capture a clear and crisp image.
If you are not satisfied with the scan, or if you accidentally capture an unwanted document, don’t worry. The Scanner app allows you to easily delete the scan and start over by tapping on the “Retake” button. This ensures that you only save the scans that meet your standards of quality and accuracy.
Remember, capturing the document is just the first step in utilizing the Scanner app. After the scan is captured, you have the ability to further enhance the quality, adjust the crop, add additional pages, and even extract text using Optical Character Recognition (OCR).
By following the simple steps to capture the document accurately, you can ensure that your scanned documents are of high quality, easy to read, and ready for further processing or sharing.
Enhancing the Scanned Document
After capturing a scan using the Scanner app on your iPhone, you have the option to enhance the scanned document to improve its quality and readability. Enhancements such as adjusting brightness, contrast, or removing any skew can make a significant difference in the appearance of the digital document.
To begin enhancing the scanned document, tap on the “Edit” button located at the bottom of the screen. This will open up a range of editing options that you can use to refine the scanned image.
One of the most common adjustments is to fine-tune the brightness and contrast. The Scanner app provides sliders that allow you to increase or decrease these settings, ensuring that the text and images in the document are clear and well-defined.
If you find that the scanned document appears skewed, you can use the “Auto” button to automatically correct the alignment. The app employs advanced algorithms to detect and straighten the document, resulting in a more professional-looking scan.
Furthermore, if there are any unwanted edges or borders in the image, you can use the cropping tool to remove them. Simply drag the edges of the cropping frame to exclude any unnecessary portions and ensure that the final scan accurately represents the content you want to capture.
When editing the scanned document, make sure to preview the changes in real-time. This allows you to assess the impact of each adjustment and make further refinements if needed.
Once you are satisfied with the enhancements you’ve made, tap on the “Done” button to save your changes. The edited version of the scan will replace the original, ensuring that the final document reflects the improvements you have made.
Enhancing the scanned documents is especially important if you plan to share or store them digitally. By optimizing the quality and appearance of the scan, you can ensure that the document is easy to read and looks professional.
Remember, the Scanner app provides a range of editing options to enhance your scanned documents. Explore these features and take the time to experiment with different adjustments to achieve the best possible results.
Cropping and Rotating the Document
After capturing a scan using the Scanner app on your iPhone, you may find that the document needs further adjustments to ensure that it is properly aligned and cropped. Cropping and rotating the document are essential steps in refining the scanned image and eliminating any unnecessary or skewed areas.
To begin cropping and rotating the document, tap on the “Edit” button located at the bottom of the Scanner app interface. This will open the editing options for the scanned document.
To rotate the document, you can use the rotation button, which typically resembles a circular arrow. Simply tap on this button to rotate the document in 90-degree increments. This is useful when dealing with documents that were not properly aligned during the capture process.
If you need more precise control over the rotation, you can also use a two-finger twisting gesture directly on the document within the viewfinder. This allows you to manually adjust the angle of the scan to achieve the desired alignment.
Cropping the document involves removing any unwanted edges or borders that may have been captured during the scanning process. To initiate the cropping process, tap on the cropping tool, which usually appears as a square or rectangle icon.
Once you have activated the cropping tool, you’ll notice handles or indicators around the edges of the document. These can be dragged and adjusted to define the boundaries of the final scan. Eliminate any unnecessary portions of the image by moving or resizing the cropping frame.
When cropping the document, make sure to preserve the important content and exclude any areas that are irrelevant or redundant. Take the time to carefully adjust the cropping frame until the scan accurately represents the intended information.
After cropping and rotating the document to your satisfaction, tap on the “Done” button to save your changes. This will finalize the adjustments and update the scanned image with the cropped and rotated version.
Cropping and rotating the document ensures that the final scan is properly aligned, eliminates any unnecessary elements, and enhances the overall presentation of the document. These adjustments are particularly useful for creating professional-looking scans that are easy to read and share.
Remember, the Scanner app provides intuitive tools for cropping and rotating your scanned documents. Take advantage of these features to refine your scans and achieve the desired result.
Adding Pages to the Document
When working with the Scanner app on your iPhone, you have the convenient option to add multiple pages to a single document. This feature allows you to combine related documents or capture multiple pages of a longer document without having to create separate files for each page.
To add pages to an existing document, start by opening the Scanner app and selecting the document you wish to add pages to. If you haven’t created a document yet, you can start a new one by capturing the first page as usual.
Once you have the desired document open in the Scanner app, look for the button that indicates the ability to add pages. This button is typically represented by a “+” or the word “Add” and is usually found at the bottom of the app interface.
Tap on the “Add” or “+” button, and the Scanner app will open the camera interface again. Now, you can capture additional pages to include in the document.
Position your iPhone above the next document page, ensuring that it is properly aligned within the viewfinder. Once you have the desired page in focus, tap the capture button to add the page to the document.
Repeat this process for each additional page you want to add. The Scanner app will automatically append the newly captured pages to the existing document, creating a multi-page file.
If you make a mistake and accidentally capture a page that you don’t want to include, don’t worry. The Scanner app allows you to easily delete individual pages from the document. Simply navigate to the document, tap on the page you want to remove, and then select the delete option.
By adding multiple pages to a single document, the Scanner app streamlines the organization and storage of related materials. This feature is particularly useful when dealing with contracts, lengthy reports, or any document that spans multiple pages.
Remember, the ability to add pages allows you to create comprehensive and consolidated documents within the Scanner app. Take advantage of this feature to keep your scanned files organized and easily accessible.
Reordering Pages in the Document
Once you have added multiple pages to a document using the Scanner app on your iPhone, you may find the need to rearrange the order of the pages. Whether it’s to ensure a logical flow of information or to create a more organized document, the option to reorder pages is a valuable feature.
To reorder pages in a document, open the Scanner app and select the document you wish to modify. You should see a thumbnail view of the pages within the document, usually represented by small previews stacked or arranged horizontally.
To begin reordering the pages, tap and hold on the thumbnail of the page you want to move. Once held, you can drag the page up or down to the desired position within the document.
Note that as you move the page, the other pages will dynamically adjust to accommodate the rearrangement. This ensures that the order of the pages remains consistent and reflects the changes you make.
Continue dragging and repositioning the pages until you have achieved the desired order. Take your time to carefully arrange the pages to ensure a cohesive and logical flow.
If you accidentally move a page to the wrong position, don’t worry. The Scanner app allows you to easily undo the change by shaking your iPhone or tapping on the undo button, typically represented by a curved arrow pointing to the left.
Reordering the pages within a document offers a significant advantage in terms of organization and readability. It allows you to structure your scanned documents in a way that makes sense to you and your audience.
This feature is particularly useful when dealing with documents that follow a specific sequence, such as financial statements or a series of instructions. By rearranging the pages, you can present the information in a logical order that enhances comprehension and efficiency.
Remember, the ability to reorder pages in a document provides you with greater control and flexibility within the Scanner app. Make use of this feature to organize your documents and create a more coherent representation of your scanned materials.
Signing Documents with Markup
One of the powerful features of the Scanner app on your iPhone is the ability to sign documents digitally using Markup. This eliminates the need for printing, signing by hand, and scanning the document again. With Markup, you can add your signature or other annotations directly to the scanned document, making it convenient and efficient to finalize agreements or contracts.
To sign a document using Markup, open the Scanner app and select the document you wish to sign. Once the document is open, look for the Markup icon, which is usually represented by a pen or pencil, and tap on it.
Markup provides a range of tools and options to work with, including the ability to draw, add text, create shapes, and more. For signing the document, select the pen or pencil tool, which allows you to draw.
Using your finger or a stylus, sign your name on the scanned document in the desired location. You can adjust the size and thickness of the pen or pencil tool to match your signature style preference.
In addition to adding your signature, you can also use Markup to include any necessary annotations or comments on the document. This is particularly useful for highlighting important sections, making corrections, or providing additional context.
Markup also provides the option to insert pre-saved signatures, which can be useful if you have a digital signature stored on your iPhone. To access these saved signatures, tap on the “+” button under the Markup tools and select the one you want to use.
Once you have added your signature or made the necessary annotations, tap on the “Done” button to save the changes made with Markup. The Scanner app will update the document with your signature, ensuring that it is included in the final digital version.
Signing documents with Markup offers a convenient, paperless approach to finalizing agreements, contracts, or any other documents that require your signature. It saves time, reduces waste, and simplifies the overall document signing process.
Remember, the Scanner app’s Markup feature provides you with the tools you need to sign documents digitally. Take advantage of this functionality to streamline your workflow and efficiently manage your scanned materials.
Saving and Sharing the Scanned Document
After scanning and processing a document using the powerful features of the Scanner app on your iPhone, it’s time to save and share your scanned document. The Scanner app offers a range of options to ensure that your scanned files are safely stored and easily accessible for future reference or sharing with others.
To save the scanned document, ensure that you are in the view where you can see the full document. Tap on the “Save” or “Done” button, typically located in the top-right corner of the app interface. The Scanner app will prompt you to choose a location to save the document.
You can save the scanned document locally on your iPhone by selecting the “On My iPhone” option or choose a cloud storage service like iCloud Drive, Dropbox, or Google Drive. Saving your documents in the cloud allows you to access them from any device with internet connectivity.
Once you have saved the document, you can easily share it with others. Tap on the “Share” button, represented by a box with an arrow pointing upward. This will present you with various sharing options, such as email, messaging apps, or other installed apps that support file sharing.
Additionally, the Scanner app allows you to export the scanned document as a PDF. PDF is a widely accepted file format that preserves the formatting and content of the document, ensuring compatibility across different devices and platforms. PDF files can be easily shared, printed, or archived for future use.
When sharing the scanned document as a PDF, you can choose to send it directly through email or messages, or save it to a cloud storage service and generate a link to share with others. This provides flexibility in sharing options, allowing you to choose the method most suitable for your needs.
With the Scanner app’s robust saving and sharing capabilities, you can confidently store your scanned documents securely and efficiently share them with colleagues, clients, or anyone else who requires access to the information.
Remember, saving and sharing your scanned documents is a crucial step in ensuring that they are easily accessible and can be shared seamlessly with others. Take advantage of the options available within the Scanner app to make the most of your scanned files.
Using OCR to Extract Text from Scanned Documents
One of the most powerful features of the Scanner app on your iPhone is its ability to utilize Optical Character Recognition (OCR) technology to extract text from your scanned documents. OCR technology converts scanned images or documents into machine-readable text, allowing you to easily search, copy, edit, and manipulate the extracted text.
To utilize OCR in the Scanner app, ensure that you have captured a document and saved it as a PDF. Open the PDF document in the Scanner app and tap on the “OCR” button, typically represented by an icon with letters and lines.
The Scanner app will process the document, analyzing the text within the scanned image. Once the OCR process is complete, you will be able to select and interact with the extracted text.
You can tap and hold on any portion of the extracted text to activate options such as copy, highlight, or annotate. This allows you to easily copy the text to other apps, share it with others, or make annotations for further reference.
OCR technology is especially helpful when dealing with large documents, printed articles, or any material that you need to analyze or reuse the content from. Instead of manually retyping the text, OCR provides a quick and accurate method to extract the text directly from the scanned document.
It’s important to note that OCR accuracy can vary depending on the quality of the scan and the legibility of the text. Clear, well-lit scans with high contrast tend to yield better results. However, even with less-than-perfect scans, OCR technology can still extract the majority of the text accurately.
By utilizing OCR within the Scanner app, you can harness the power of machine-readable text from your scanned documents. This not only saves time and effort but also allows you to efficiently work with the extracted text for various purposes, such as editing, quoting, or formatting.
Remember, OCR is a valuable tool within the Scanner app that enables you to transform your scanned documents into editable, searchable, and manipulable text. Take advantage of this feature to enhance the usability and productivity of your scanned materials.
Managing Scanned Documents in the Files App
After using the Scanner app on your iPhone to digitize your documents, you can easily manage and organize your scanned files within the Files app. The Files app offers a simple and intuitive interface for categorizing, renaming, and moving your scanned documents, making them easy to locate and access whenever needed.
To access your scanned documents in the Files app, locate the Files app icon on your iPhone’s home screen and tap on it to open the app.
Once inside the Files app, you’ll find various storage locations such as iCloud Drive, Dropbox, Google Drive, or local storage on your device. Navigate to the desired location where you saved your scanned documents.
Note: The specific location may vary depending on your settings and preferences.
Within the chosen storage location, you’ll see a list or grid view of your scanned documents. Use familiar gestures such as tapping, swiping, or pinching to navigate through the files or folders.
To manage a scanned document, tap and hold on the file’s icon to reveal a set of actions. This allows you to perform various tasks such as renaming, moving, duplicating, or deleting the document.
You can create folders to better organize your scanned documents based on categories, projects, or any other system that suits your needs. To create a folder, navigate to the desired location within the Files app, tap on the “New Folder” button (usually represented by a folder icon with a plus sign), and give the folder a name. You can then drag and drop scanned documents into their respective folders for easy organization.
In addition to managing the scanned documents within the Files app, you can also take advantage of other features offered by the app, such as the ability to tag documents, add descriptive labels, or search for specific files using keywords.
Furthermore, the Files app integrates with other apps on your iPhone, making it seamless to open and edit your scanned documents using various productivity tools. You can also share your documents directly from the Files app to emails, messaging apps, or cloud storage services.
By utilizing the management capabilities within the Files app, you can keep your scanned documents well-organized, easily accessible, and secure. This ensures that you have a centralized and efficient system for managing your digital files.
Remember, the Files app provides a user-friendly interface for managing and organizing your scanned documents on your iPhone. Leverage the app’s features to stay organized and make the most of your digital files.
Tips and Tricks for Scanning Documents Efficiently
Scanning documents with the Scanner app on your iPhone can be a quick and efficient process. By following some tips and tricks, you can further improve your scanning experience and maximize the quality of your digital documents.
1. Ensure Adequate Lighting: When scanning documents, make sure the area is well-lit to avoid shadows or glares. Natural light or a well-positioned desk lamp can help achieve optimal lighting conditions.
2. Steady Your Hand: Keep your iPhone steady while capturing the scan to minimize blurriness. Consider using a tripod or resting your iPhone on a stable surface for the best results.
3. Use Autofocus: Tap on the document within the viewfinder to activate the autofocus feature. This ensures that the scanned image is clear and sharp, even if the document is on a curved or uneven surface.
4. Experiment with Different Angles: Don’t be afraid to try different angles when scanning documents. A slight change in perspective may result in better image quality and alignment.
5. Take Advantage of Auto Crop: Enable the auto crop feature to automatically detect and remove any unnecessary edges or borders from the scanned document. This saves time and ensures a clean final result.
6. Keep Documents Flat: If possible, place the document on a flat and stable surface before scanning to prevent any distortion or warping in the image.
7. Review the Document: Take a moment to review the scanned document within the Scanner app before saving or sharing it. This allows you to ensure that all pages and content were captured accurately.
8. Use OCR for Text Extraction: If you need to extract text from your scanned documents, utilize the OCR feature within the Scanner app. It saves time and effort by converting scanned text into machine-readable format.
9. Organize Your Scanned Documents: Utilize folders within the Files app to create a logical and easily accessible structure for your scanned documents. This helps you stay organized and find specific files quickly.
10. Regularly Backup Your Scanned Documents: To ensure the safety and availability of your scanned documents, consider periodically backing them up to cloud storage services or transferring them to a computer for additional storage options.
By incorporating these tips and tricks into your scanning routine, you can enhance the efficiency and quality of your scanned documents. Practice and experimentation will help you fine-tune your scanning skills, resulting in professional-looking digital files that are easily manageable and shareable.