
How to Enable Autocorrect on Android
Autocorrect is a useful feature on Android that can help you avoid embarrassing spelling mistakes and speed up your typing. Enabling autocorrect is a simple process that can be done within the settings of your Android device. Follow the steps below to enable autocorrect on your Android:
- Go to the Settings app on your Android device. You can usually find it in your app drawer or by swiping down from the top of the screen and tapping the gear icon.
- Scroll down and tap on “System” or “System & Device”, depending on your Android version.
- Tap on “Language & input” or “Language & keyboard”.
- Select your default keyboard from the list of available keyboards. This could be either the default Android keyboard or a third-party keyboard app that you have installed.
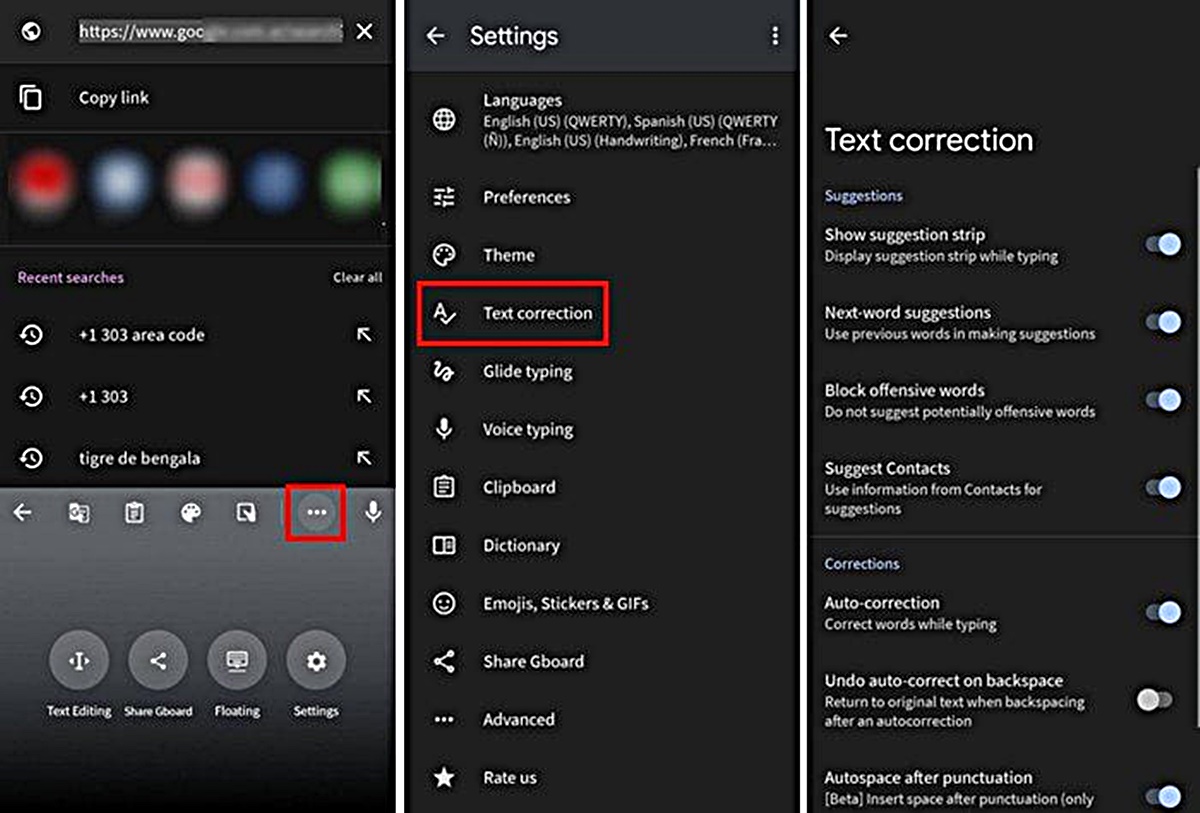
- Once you have selected your keyboard, tap on “Text correction” or “Autocorrect” to access the autocorrect settings.
- Toggle the switch next to “Autocorrect” to enable it. The switch will turn blue when autocorrect is enabled.
Once you have enabled autocorrect, it will start working immediately when you type on your Android device. It will automatically correct any spelling mistakes or offer suggestions for misspelled words as you type.
Autocorrect can be a handy tool, but it is not foolproof. It can sometimes make mistakes or offer incorrect suggestions. However, you can always manually override autocorrect by selecting the correct word from the suggested options or simply deleting the autocorrected word and typing the correct one.
Enabling autocorrect on your Android can greatly improve your typing experience and help you communicate more effectively without worrying about spelling errors. Experiment with the autocorrect settings to find the configuration that works best for you and make the most out of this helpful feature.
Adjusting Autocorrect Settings on Android
While enabling autocorrect on your Android device is the first step, you may also want to customize and adjust the autocorrect settings to suit your preferences and typing style. Android offers various options and controls to fine-tune autocorrect to better meet your needs. Follow the steps below to adjust autocorrect settings on your Android:
- Open the Settings app on your Android device.
- Navigate to “System” or “System & Device” (depending on your Android version) and tap on it.
- Select “Language & input” or “Language & keyboard”.
- Choose your default keyboard from the available options.
- Tap on “Text correction” or “Autocorrect” to access the autocorrect settings.
- Here, you can make various adjustments to the autocorrect settings, such as:
- Auto-correction sensitivity: You can adjust the sensitivity level of autocorrect to be more lenient or strict. Higher sensitivity corrects more aggressively, while lower sensitivity offers more freedom in typing with minimal suggestions.
- Personal dictionary: Android allows you to add words to your personal dictionary. This can be useful for adding proper nouns, technical terms, or custom abbreviations that are not recognized by the default dictionary.
- Block offensive words: If you prefer, you can enable the option to block offensive words, preventing them from being suggested or corrected by autocorrect.
- Phrase suggestions: Android can also suggest common phrases or complete sentences based on your typing patterns. You can enable or disable this feature as per your preference.
- Once you have made the desired adjustments, exit the settings, and the changes will take effect immediately.
By fine-tuning the autocorrect settings, you can ensure that the feature works according to your needs and reduces typing errors effectively. Each person has their own typing style and preferences, so experimenting with the settings will help you find the optimal configuration.
Remember that adjusting the autocorrect settings may require some trial and error. If you find that the changes you made are not working as expected, you can always revert to the default settings or make further adjustments until you achieve the desired results.
Adding Words to the Autocorrect Dictionary on Android
Autocorrect on Android uses a built-in dictionary to suggest corrections and improvements to your typing. However, there may be certain words or phrases that are not recognized by the default dictionary. In such cases, you can manually add these words to the autocorrect dictionary to ensure they are not flagged as misspelled. Follow the steps below to add words to the autocorrect dictionary on your Android device:
- Open any app that allows you to type, such as the Notes app or a messaging app.
- Start typing the word that you want to add to the autocorrect dictionary. It will likely be flagged as misspelled.
- Long-press on the flagged word. This will bring up a context menu with suggested corrections for the word.
- Tap on “Add to dictionary” or a similar option in the context menu. This will add the word to the autocorrect dictionary.
- Alternatively, you can go to the Settings app on your Android device and navigate to “System” or “System & Device” (depending on your Android version) and tap on it.
- Select “Language & input” or “Language & keyboard” and choose your default keyboard.
- Tap on “Text correction” or “Autocorrect” to access the autocorrect settings.
- Look for the “Personal dictionary” or a similar option and tap on it.
- Tap on the “+” icon or a similar option to add a new word to the personal dictionary.
- Type in the word you want to add and tap on “OK” or a similar confirmation button.
- Once you have added the word, it will be recognized by the autocorrect feature and will not be flagged as misspelled in the future.
By adding words to the autocorrect dictionary, you can ensure that your Android device recognizes and accepts specific terms, names, or technical jargon that may not be part of its default vocabulary. This will help prevent unnecessary corrections and improve the accuracy of your typing experience.
Keep in mind that the process of adding words to the autocorrect dictionary may vary slightly depending on the Android device and keyboard app you are using. However, the general steps outlined above should give you a good starting point to add custom words to the autocorrect dictionary on your Android device.
Removing Words from the Autocorrect Dictionary on Android
While adding words to the autocorrect dictionary on your Android device can be helpful, there may also be instances where you want to remove certain words that were mistakenly added or are no longer needed. Removing words from the autocorrect dictionary can help ensure that the autocorrect feature works accurately and doesn’t suggest unintended corrections. Follow the steps below to remove words from the autocorrect dictionary on your Android:
- Open the Settings app on your Android device.
- Navigate to “System” or “System & Device” (depending on your Android version) and tap on it.
- Select “Language & input” or “Language & keyboard”.
- Choose your default keyboard from the available options.
- Tap on “Text correction” or “Autocorrect” to access the autocorrect settings.
- Look for the “Personal dictionary” or a similar option and tap on it.
- Scroll through the list of words in the personal dictionary and find the word you want to remove.
- Tap and hold on the word you want to remove until a context menu appears.
- Select “Remove” or a similar option from the context menu.
- The selected word will be removed from the autocorrect dictionary, and it will no longer be recognized or suggested by the autocorrect feature.
Removing words from the autocorrect dictionary can help streamline your typing experience by eliminating unwanted suggestions or corrections. It is especially useful for removing words that were accidentally added or are no longer relevant to your typing needs.
Keep in mind that the process of removing words from the autocorrect dictionary may vary slightly depending on the Android device and keyboard app you are using. However, the general steps outlined above should give you a good starting point to remove unwanted words from the autocorrect dictionary on your Android device.
Using Autocorrect to Fix Common Spelling Mistakes on Android
Autocorrect is a valuable tool on Android devices that can greatly assist in fixing common spelling mistakes while typing. It automatically detects and corrects misspelled words, saving you time and ensuring your messages or documents are error-free. Here’s how you can take full advantage of autocorrect to fix common spelling mistakes on your Android:
- Ensure that autocorrect is enabled on your Android device. If not, refer to the earlier section on how to enable autocorrect.
- When typing, pay attention to the suggestions provided by autocorrect. If a word is flagged as misspelled, it will usually be underlined with a red squiggly line.
- Before pressing the space bar to complete the word, carefully check the suggested replacement word in the autocorrect bar just above the keyboard.
- If the suggested word is correct, simply press the space bar to accept the autocorrected word and move on to the next.
- If the suggested word is incorrect, tap on the suggested word to reveal a list of alternative options. Look for the correct spelling in the list and tap on it to replace the misspelled word.
- If the correct word is not listed, you can manually type in the correct spelling to replace the misspelled word.
- Repeat this process for each misspelled word as you type, allowing autocorrect to catch and fix the errors.
Autocorrect is particularly useful for fixing common spelling mistakes, such as typos or slip-ups while typing quickly. With its ability to suggest the correct spelling, autocorrect can save you time and ensure that your messages, emails, or documents are accurately written.
However, it is important to remain vigilant while using autocorrect. While it can accurately correct most spelling errors, it might occasionally suggest incorrect replacements. Always double-check the suggested word before accepting it, especially if you are unsure about its accuracy.
By utilizing the autocorrect feature on your Android device effectively, you can significantly improve your typing accuracy and create error-free written content with ease.
Using Autocorrect to Type Faster on Android
Autocorrect not only helps in fixing spelling mistakes but can also be utilized to increase your typing speed on Android devices. By taking advantage of autocorrect’s features and predictive text suggestions, you can save time and type faster. Here’s how you can use autocorrect to speed up your typing on Android:
- Ensure that autocorrect is enabled on your Android device. If not, refer to the earlier section on how to enable autocorrect.
- As you start typing, pay attention to the suggestions provided by autocorrect above the keyboard. These suggestions will appear based on the context and your typing patterns.
- Instead of typing out the entire word, try typing just the first few letters or a portion of the word accurately.
- Based on the input, autocorrect will likely display the full word as a suggestion in the autocorrect bar.
- If the suggested word matches what you intended to type, simply tap on the suggestion to replace your partial input with the full word.
- Continue typing the next word and repeat the process with autocorrect’s suggestions for subsequent words.
- If autocorrect fails to suggest the correct word, you can either type it out manually or use the alternative options suggested by autocorrect.
By relying on autocorrect’s predictive text suggestions, you can significantly reduce the time spent typing out long words or phrases. The more you use autocorrect, the better it becomes at predicting your typing patterns and suggesting the right words.
Additionally, remember to proofread your text before hitting send or finalizing any document. While autocorrect can save time, it may occasionally introduce errors or suggest unintended replacements. A quick review of your text will help ensure accuracy and clarity.
By making use of autocorrect to type faster, you can increase your productivity and efficiency on Android devices. Take advantage of its predictive capabilities and adjust your typing technique accordingly to enjoy the benefits of faster typing.
Disabling Autocorrect on Android
While autocorrect can be a helpful feature, there might be instances where you prefer to type without its assistance. Disabling autocorrect on your Android device is a straightforward process. Here’s how you can disable autocorrect and regain full control of your typing:
- Open the Settings app on your Android device.
- Navigate to “System” or “System & Device” (depending on your Android version) and tap on it.
- Select “Language & input” or “Language & keyboard”.
- Choose your default keyboard from the list of available keyboards.
- Tap on “Text correction” or “Autocorrect” to access the autocorrect settings.
- Toggle the switch next to “Autocorrect” to disable it. The switch will turn grey when autocorrect is disabled.
Once you have disabled autocorrect, your Android device will no longer automatically correct misspelled words or offer suggestions while typing. You will have full control over every word you type, allowing for more creative expression and flexibility.
Disabling autocorrect can be especially useful in situations where you are typing in a language that is not recognized by the default dictionary or when you need to input specialized terms or technical jargon that may be flagged as misspelled by autocorrect.
If you ever decide to re-enable autocorrect, simply follow the same steps outlined above and toggle the switch next to “Autocorrect” to enable it again.
Remember that every Android device and keyboard app may have slightly different settings and options to disable autocorrect. However, the general steps provided above should give you a good starting point to disable autocorrect on your Android device.