
What is a Power Supply Tester
A power supply tester is a handy tool that helps you diagnose issues with your computer’s power supply unit (PSU). It allows you to quickly and easily determine if your PSU is functioning properly or if it is the cause of any hardware problems.
Power supply testers come in various forms, but most commonly, they are compact devices that plug into the different connectors on your PSU. They provide real-time readings of the voltages being supplied by the PSU, allowing you to identify any abnormalities.
These testers can be a valuable tool for both professional technicians and casual computer users. They provide a quick and reliable method of ruling out the PSU as the source of issues such as system crashes, boot failures, or unstable performance.
By using a power supply tester, you can save yourself the hassle of unnecessarily replacing other components or spending time troubleshooting complex problems. Instead, you can focus your efforts on addressing the specific PSU-related issue at hand.
It is important to note that power supply testers are not designed to fix issues with the PSU. Their primary purpose is to help diagnose problems by providing accurate voltage readings, which can then be used to determine if a faulty PSU is the likely cause.
Moreover, power supply testers are relatively inexpensive and easy to use, making them a worthwhile addition to any computer toolkit. Whether you are a DIY enthusiast or a professional, having a power supply tester can greatly streamline the troubleshooting process and help you keep your computer running smoothly.
Why Do You Need a Power Supply Tester
A power supply tester is an essential tool for anyone who deals with computer hardware, whether you are a DIY enthusiast or a professional technician. Here are several reasons why you need a power supply tester:
1. Hardware Troubleshooting: When your computer experiences issues like random shutdowns, blue screens of death, or system instability, the power supply unit (PSU) is often the suspect. A power supply tester allows you to quickly determine if the PSU is providing the correct voltage output, helping you rule out or diagnose power-related problems without having to open up your system or replace other components unnecessarily.
2. Time and Cost Savings: With a power supply tester, you can save time and money by accurately identifying PSU issues. Instead of spending hours troubleshooting and swapping out various components, you can pinpoint the problem right away and take appropriate action.
3. Prevent Data Loss: A failing power supply can cause system crashes, leading to potential data loss. By regularly testing your PSU with a power supply tester, you can detect any problems before they escalate, protecting your important files and documents.
4. Peace of Mind: Knowing that your PSU is functioning properly provides peace of mind. Whether you are building a new system or troubleshooting an existing one, having a power supply tester ensures that you start with a reliable power source.
5. Maintenance and Upgrades: When upgrading your system or adding new hardware, it is crucial to ensure that your PSU can handle the increased power requirements. A power supply tester allows you to confirm if your current PSU is capable of supplying adequate power to the components you are adding.
6. Professional Use: For technicians working on multiple systems, a power supply tester becomes an indispensable tool for quickly diagnosing issues and providing efficient service to clients. It eliminates the need to rely solely on the trial-and-error method, streamlining the troubleshooting process.
How Does a Power Supply Tester Work
A power supply tester is designed to analyze the voltage output of different connectors on a power supply unit (PSU) and provide real-time readings. It works by simulating various loads and measuring the voltages coming from the PSU. Here’s a breakdown of how a power supply tester functions:
1. Simulating Loads: A power supply tester is equipped with a set of load resistors that simulate the electrical loads typically found in a computer system. These loads are designed to draw specific amounts of current from the power supply, allowing the tester to evaluate the voltage stability under different conditions.
2. Connectors and Readings: Power supply testers come with multiple connectors that mimic the different connectors found on a PSU, such as the 24-pin ATX connector, 4-pin CPU connector, SATA connectors, and Molex connectors. By connecting the power supply tester to these connectors, you can assess the voltage output for each one.
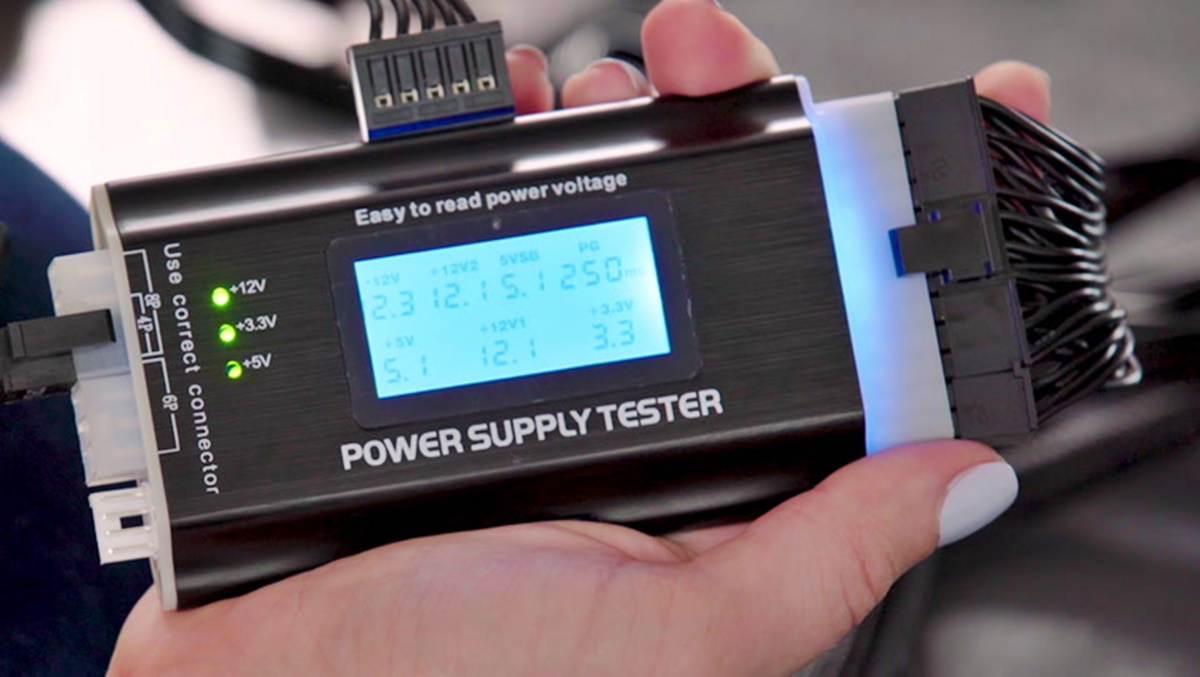
3. Voltage Readings: Once the power supply tester is connected to the appropriate connectors, it displays real-time voltage readings. Typically, these readings include +3.3V, +5V, +12V, -12V, and sometimes the +5VSB (standby) voltage. These readings help you determine if the PSU is providing the correct voltage levels required by your computer’s components.
4. LED Indicators: Many power supply testers feature LED indicators that light up to indicate the status of each voltage rail. Green LEDs typically indicate that the voltage is within the acceptable range, while red LEDs may indicate potential issues like over or under voltage conditions.
5. LCD Displays: Advanced power supply testers may have LCD displays that provide more detailed readings, including voltage ripple, power factor, and efficiency. These additional measurements can be helpful for professionals who require precise information about the PSU’s performance.
6. Audible Alarms: Some power supply testers also have audible alarm features that alert you to abnormal voltage readings. This can be particularly useful when testing multiple connectors simultaneously, as it provides a quick indication of any potential issues.
By using these techniques, a power supply tester allows you to assess the stability and reliability of your PSU. It helps you identify any voltage inconsistencies or abnormalities, enabling you to troubleshoot power-related problems and ensure the proper functioning of your computer system.
Steps to Test a PSU with a Power Supply Tester
Testing a power supply unit (PSU) using a power supply tester is a straightforward process that can help you quickly determine the health of the PSU. Here are the steps to effectively test a PSU using a power supply tester:
1. Disconnect Power: Before starting the testing process, make sure to disconnect the PSU from the power source and disconnect any power cables from your computer components.
2. Choose the Correct Connectors: Identify the connectors on your power supply tester that match the connectors on your PSU. Common connectors include the 24-pin ATX connector, 4-pin CPU connector, SATA connectors, and Molex connectors. Ensure you have the right connectors for the specific PSU you are testing.
3. Connect the Power Supply Tester: Connect the appropriate connectors from the power supply tester to their corresponding connectors on the PSU. Be careful to align the pins correctly to avoid any damage. Double-check that all connections are secure.
4. Power On the PSU: Once the connections are made, switch on the power supply using the switch on the back of the PSU or by plugging it into a power source. This will provide power to the power supply tester and allow it to start analyzing the PSU’s voltage output.
5. Monitor Voltage Readings: As the power supply tester is powered on, monitor the voltage readings displayed on the tester. Note the values of +3.3V, +5V, +12V, -12V, and any other relevant measurements provided by the tester.
6. Check LED Indicators: Many power supply testers feature LED indicators for each voltage rail. Pay attention to these indicators, which will light up in either green (indicating the voltage is within an acceptable range) or red (signaling potential issues such as over or under voltage conditions).
7. Analyze the Results: Compare the voltage readings and LED indicators with the specifications of your PSU. If the readings are within the recommended ranges and the LED indicators are mostly green, your PSU is likely functioning properly. However, if the readings are significantly off or there are red LED indicators, it may indicate a faulty PSU that needs to be replaced.
8. Disconnect and Restore Power: After completing the PSU test, switch off the power supply by either turning off the switch on the back of the PSU or disconnecting it from the power source. Unplug the power supply tester from the PSU connectors and reconnect the power cables to your computer components.
By following these steps, you can easily test the functionality of your PSU using a power supply tester. This allows you to identify potential issues with the power supply and take appropriate action to ensure the smooth operation of your computer system.
Connecting the Power Supply Tester
Connecting a power supply tester to your power supply unit (PSU) is a crucial step in the process of testing the PSU’s functionality. Follow these steps to ensure a proper connection:
1. Power Off and Unplug: Before connecting the power supply tester, ensure that your computer is powered off and unplugged from any power source. This will help prevent any accidents and ensure your safety during the process.
2. Identify Connectors: Take note of the connectors on your power supply tester. Common connectors include the 24-pin ATX connector, 4-pin CPU connector, SATA connectors, and Molex connectors. These connectors will match the corresponding connectors on your PSU.
3. Polarity Check: Ensure you have a proper understanding of the pin configurations and polarity of the connectors on the power supply tester and the PSU. Improper connections can lead to damage or inaccurate readings. Refer to the manuals or documentation provided with your PSU and power supply tester for guidance.
4. Match Connectors: Connect the corresponding connectors from the power supply tester to their respective connectors on the PSU. Be sure to align the pins correctly and push them in firmly to establish a secure connection.
5. Secure Connections: Once the connectors are inserted, double-check that all connections are secure. Loose connections may result in inaccurate readings or intermittent power supply issues.
6. Multiple Connectors: If your power supply tester is equipped with multiple connectors, such as those for SATA or Molex cables, connect them to the corresponding connectors on the PSU as well. This will allow you to test the voltage output of these additional connectors.
7. Cable Management: Pay attention to the cable management during the connection process. Ensure that the cables are neatly arranged and do not obstruct the airflow within your computer case. Accurate readings and proper cooling are crucial for an effective PSU test.
8. Inspect Visual Indicators: Some power supply testers have LED indicators or LCD displays that provide visual feedback regarding the status of each connector and voltage rail. Check if these indicators are functioning properly and whether any abnormal colors or signs are displayed.
By carefully following these steps, you can properly connect the power supply tester to your PSU. This ensures a reliable and accurate testing process, allowing you to assess the voltage output and diagnose any potential issues affecting your power supply unit.
Checking Voltage Output
Once you have connected the power supply tester to your power supply unit (PSU), the next step is to check the voltage output. Checking the voltage output of the PSU is essential in determining if it is providing the correct voltage levels required by your computer’s components. Follow these steps to check the voltage output:
1. Power On the PSU: Ensure that the power supply unit is switched on using the switch on the back of the PSU or by plugging it into a power source. This will provide power to the power supply tester and allow it to start analyzing the voltage output.
2. Monitor Voltage Readings: As the PSU is powered on, carefully monitor the voltage readings displayed on the power supply tester. The tester will provide real-time voltage measurements for each rail, including +3.3V, +5V, +12V, -12V, and sometimes the +5VSB (standby) voltage. These readings indicate the voltage being supplied by the PSU.
3. Compare with Specifications: Compare the voltage readings displayed on the power supply tester with the specifications of your PSU. These specifications can typically be found on the PSU’s label, manufacturer’s website, or the PSU’s documentation. Ensure the readings are within the recommended voltage ranges for each rail.
4. Analyze Variation: Pay attention to any significant variation in the readings. Small fluctuations within a reasonable range are generally acceptable; however, large deviations from the expected readings may indicate a problem with the PSU.
5. Consider Tolerances: Keep in mind that power supply specifications usually have tolerances, which indicate the acceptable range of values for each voltage rail. For example, a +12V rail with a tolerance of ±5% means that the actual voltage output can vary by up to 5% from the specified voltage. Take these tolerances into account when assessing the voltage readings.
6. Note Abnormalities: If any voltage reading falls significantly outside the specified range or shows consistent instability, it may suggest a faulty PSU. This could potentially lead to hardware issues, such as system crashes or unreliable performance.
7. Documentation and Support: Consult the documentation provided by the power supply tester and the PSU manufacturer for more detailed information about the voltage readings and what they mean. If you have concerns or questions about the results, it is advisable to reach out to technical support or seek professional assistance.
By following these steps and comparing the voltage readings with the PSU specifications, you can evaluate the voltage output of your PSU. This allows you to identify any abnormalities or potential issues with the power supply, ensuring that it is providing the necessary stable power to your computer’s components.
Testing the 24-pin ATX Connector
The 24-pin ATX connector is a vital component of the power supply unit (PSU) that provides power to the motherboard and various other components of your computer. Testing the 24-pin ATX connector ensures that your PSU is delivering the correct voltage levels to your motherboard. Here’s how you can test the 24-pin ATX connector:
1. Connect the Power Supply Tester: Take the appropriate 24-pin ATX connector from the power supply tester and connect it securely to the 24-pin ATX connector on the PSU. Ensure that the pins align correctly and that the connection is snug.
2. Power On the PSU: Switch on the power supply using the PSU’s power switch or by connecting it to a power source. This will provide power to the power supply tester and enable it to assess the voltage output of the 24-pin ATX connector.
3. Monitor the Voltage Readings: As the PSU powers on, carefully observe the voltage readings displayed on the power supply tester. Look for readings corresponding to the +3.3V, +5V, and +12V rails of the 24-pin ATX connector.
4. Compare with Specifications: Cross-reference the voltage readings on the power supply tester with the specifications for the 24-pin ATX connector. These specifications can usually be found in your motherboard’s documentation or the PSU manufacturer’s website. Ensure the readings are within the acceptable voltage ranges.
5. Check for Stability: Pay attention to the stability of the voltage readings over time. A stable voltage output is crucial for the proper functioning of your motherboard and other components. Fluctuations or significant deviations from the specified voltages may indicate a problem with the PSU or the 24-pin ATX connector.
6. Look for LED Indicators: Some power supply testers have LED indicators that can provide visual feedback about the status of the 24-pin ATX connector. Green LEDs usually indicate that the voltages are within the acceptable range, while red LEDs may indicate potential issues, such as over or under voltage conditions.
7. Repeat the Test: If you suspect any anomalies or want to verify the accuracy of the initial readings, you can repeat the test multiple times to ensure consistent results. This can help ensure the reliability of your PSU’s 24-pin ATX connector.
8. Document and Analyze Results: Make note of the voltage readings and any abnormalities or inconsistencies observed during the testing process. Documenting the results can help with troubleshooting if any issues arise in the future.
By performing a thorough test of the 24-pin ATX connector using a power supply tester, you can assess the voltage output and ensure that your motherboard is receiving the proper power supply. This helps maintain the stability and functionality of your computer system.
Testing the 4-pin CPU Connector
The 4-pin CPU connector is a crucial component of the power supply unit (PSU) that provides power to the central processing unit (CPU) of your computer. Testing the 4-pin CPU connector ensures that your PSU is delivering the correct voltage levels to your CPU, contributing to stable and reliable performance. Here’s how you can test the 4-pin CPU connector:
1. Connect the Power Supply Tester: Take the appropriate 4-pin CPU connector from the power supply tester and connect it securely to the 4-pin CPU connector on the PSU. Ensure that the pins align correctly and that the connection is snug.
2. Power On the PSU: Switch on the power supply using the PSU’s power switch or by connecting it to a power source. This will provide power to the power supply tester and enable it to assess the voltage output of the 4-pin CPU connector.
3. Monitor the Voltage Readings: As the PSU powers on, carefully observe the voltage readings displayed on the power supply tester. Look for readings corresponding to the +12V rail of the 4-pin CPU connector.
4. Compare with Specifications: Cross-reference the voltage reading on the power supply tester with the specifications for the 4-pin CPU connector. These specifications can usually be found in your motherboard’s documentation or the PSU manufacturer’s website. Ensure the reading is within the acceptable voltage range.
5. Check for Stability: Pay attention to the stability of the voltage reading over time. A stable voltage output is essential for the proper functioning of your CPU. Fluctuations or significant deviations from the specified voltage may indicate a problem with the PSU or the 4-pin CPU connector.
6. Look for LED Indicators: Some power supply testers have LED indicators that can provide visual feedback about the status of the 4-pin CPU connector. Green LEDs usually indicate that the voltage is within the acceptable range, while a red LED may indicate a potential issue, such as an over or under voltage condition.
7. Repeat the Test: If you suspect any anomalies or want to verify the accuracy of the initial reading, you can repeat the test multiple times to ensure consistent results. This can help ensure the reliability of your PSU’s 4-pin CPU connector.
8. Document and Analyze Results: Make note of the voltage reading and any abnormalities or inconsistencies observed during the testing process. Documenting the results can help with troubleshooting if any CPU-related issues arise in the future.
By performing a thorough test of the 4-pin CPU connector using a power supply tester, you can assess the voltage output and ensure that your CPU is receiving the proper power supply. This helps maintain the stability and performance of your computer system.
Testing the SATA/Molex Connectors
The SATA and Molex connectors are essential components of the power supply unit (PSU) that provide power to various peripherals, such as hard drives, solid-state drives, and optical drives. Testing the SATA and Molex connectors ensures that your PSU is delivering the correct voltage levels to these devices, contributing to their proper functioning. Here’s how you can test the SATA and Molex connectors:
1. Connect the Power Supply Tester: Take the appropriate SATA or Molex connector from the power supply tester and connect it securely to the corresponding connector on the PSU. Ensure that the pins align correctly and that the connection is snug.
2. Power On the PSU: Switch on the power supply using the PSU’s power switch or by connecting it to a power source. This will provide power to the power supply tester and enable it to assess the voltage output of the SATA or Molex connector.
3. Monitor the Voltage Readings: As the PSU powers on, carefully observe the voltage readings displayed on the power supply tester. Look for readings corresponding to the +12V and +5V rails of the SATA or Molex connector.
4. Compare with Specifications: Cross-reference the voltage readings on the power supply tester with the specifications for the SATA or Molex connector. These specifications can usually be found in the documentation provided by the device manufacturer or the PSU manufacturer’s website. Ensure the readings are within the acceptable voltage ranges.
5. Check for Stability: Pay attention to the stability of the voltage readings over time. A stable voltage output is crucial for the proper functioning of your peripherals. Fluctuations or significant deviations from the specified voltages may indicate a problem with the PSU or the SATA/Molex connector.
6. Look for LED Indicators: Some power supply testers have LED indicators that can provide visual feedback about the status of the SATA or Molex connector. Green LEDs usually indicate that the voltages are within the acceptable range, while a red LED may indicate a potential issue, such as an over or under voltage condition.
7. Repeat the Test: If you suspect any anomalies or want to verify the accuracy of the initial readings, you can repeat the test multiple times to ensure consistent results. This can help ensure the reliability of your PSU’s SATA/Molex connectors.
8. Document and Analyze Results: Make note of the voltage readings and any abnormalities or inconsistencies observed during the testing process. Documenting the results can help with troubleshooting if any issues arise with your peripherals in the future.
By performing a thorough test of the SATA and Molex connectors using a power supply tester, you can assess the voltage output and ensure that your peripherals are receiving the proper power supply. This helps maintain the stability and functionality of your computer system and its associated devices.
Interpreting the Results
After performing the tests using a power supply tester, it’s crucial to interpret the results accurately to assess the health and functionality of your power supply unit (PSU). Here’s how you can interpret the results:
1. Compare with Specifications: Cross-reference the voltage readings obtained from the power supply tester with the specifications provided by the PSU manufacturer. These specifications can typically be found on the PSU label, manufacturer’s website, or in the documentation. Ensure that the readings fall within the acceptable voltage ranges specified for each rail.
2. Analyze Voltage Stability: Consider the stability of the voltage readings over time. Ideally, the voltage should remain steady and consistent. Fluctuations or significant deviations from the specified voltages may indicate a problem with the PSU. Document any variations or irregularities observed during the testing process.
3. Check for Tolerances: Take into account the tolerances specified for each voltage rail in the PSU specifications. Tolerances define the acceptable range of voltage variance. If the readings fall slightly outside the specified ranges but still within the given tolerances, it may still be considered acceptable. However, significant deviations beyond the stated tolerances may indicate a faulty PSU.
4. Consider Multiple Readings: If you performed multiple tests on the same connectors, observe the consistency of the readings. Consistent results across multiple tests increase the reliability of the readings. Inconsistent results may indicate an issue with the PSU or the connectors themselves, necessitating further investigation.
5. Interpret LED Indicators: If your power supply tester features LED indicators, carefully observe their status. Green LEDs generally indicate that the voltages are within acceptable ranges, while red LEDs may indicate potential issues, such as over or under voltage conditions. Take note of any abnormal LED indicators and cross-reference them with the power supply tester’s documentation.
6. Seek Professional Advice: If you are uncertain about interpreting the results or if the readings are significantly outside the specified ranges, it is advisable to consult professional assistance. A trained technician or PSU specialist can provide expert guidance in analyzing the results and determining the appropriate course of action.
By carefully interpreting the test results, you can gain valuable insights into the health and performance of your PSU. This information allows you to address any potential issues promptly and ensure the stability and reliability of your computer system.
Troubleshooting Common Issues
While testing your power supply unit (PSU) using a power supply tester is a valuable diagnostic tool, sometimes issues may still arise. Understanding common problems that can occur and how to troubleshoot them can help you identify and resolve PSU-related issues effectively. Here are some common issues and troubleshooting steps:
1. Abnormal Voltage Readings: If you consistently receive abnormal voltage readings outside the specified ranges, it may indicate a faulty PSU. Check the connections between the PSU and power supply tester to ensure they are secure. If the problem persists, try testing the PSU with another power supply tester or consult a professional for further evaluation.
2. Inconsistent or Fluctuating Readings: If the voltage readings fluctuate or vary significantly during testing, it may be indicative of a PSU under stress or unstable power delivery. Check for loose connections and ensure that the PSU has adequate cooling and power capacity for your computer’s components. If the issue persists, consider upgrading to a higher wattage PSU to provide more stable power output.
3. Failure to Power On: If the PSU fails to power on at all or if there are no voltage readings displayed, double-check the connections between the PSU and power supply tester. Ensure that all connectors are securely plugged in. If the PSU still does not power on, it may indicate a faulty PSU that requires replacement.
4. Overheating or Fan Issues: If the PSU’s fan is not running or if the PSU becomes excessively hot during testing, it indicates potential cooling issues. Ensure that the PSU fan is clear of any obstructions. Clean out any accumulated dust that may be restricting airflow. If the problem persists, it may be necessary to replace the PSU or consult a professional for further inspection.
5. Peripheral Device Issues: If specific peripherals connected to the PSU, such as hard drives or optical drives, are not functioning correctly or experiencing intermittent issues, it may be due to insufficient power supply. Check the voltage readings for relevant connectors, such as SATA or Molex, and ensure they fall within the acceptable range. Consider upgrading to a higher wattage PSU if power demands are not being met.
6. Multiple Component Failures: If you experience consistent component failures or issues across multiple devices in your computer system, it may indicate voltage irregularities from the PSU. Review the voltage readings for all relevant connectors and compare them to the specifications. If readings are consistently outside acceptable ranges, it may be necessary to replace the PSU with a more reliable one to prevent further component damage.
7. Professional Assistance: If you encounter persistent issues or are unsure of how to proceed with troubleshooting, it is advisable to seek assistance from a professional technician or contact the manufacturer’s technical support. They can provide expert guidance, diagnose the problem accurately, and recommend appropriate solutions.
By employing these troubleshooting steps, you can effectively address common issues that may arise with your power supply unit. Remember to exercise caution and seek professional help when needed to ensure the safety and optimal performance of your computer system.