
What is a Jump Box?
A jump box, also known as a jump starter or jump pack, is a portable device that allows you to jump-start a car without the need for another vehicle. It is essentially a compact battery pack that stores enough power to provide the necessary boost to start a vehicle with a dead or weak battery. This eliminates the inconvenience and reliance on finding another vehicle to jump-start your car.
Jump boxes are equipped with heavy-duty cables and clamps that connect directly to the battery terminals of your car. They also feature built-in safety mechanisms such as reverse polarity protection and short-circuit protection to prevent any damage or hazards during the jump-start process.
One of the key advantages of a jump box is its portability. It is small, lightweight, and often comes with a convenient carrying case, making it easy to store in your trunk or glove compartment. This means that you can carry it with you wherever you go, ensuring that you have a reliable solution for jump-starting your car in case of an emergency.
The jump box also offers the advantage of being able to jump-start your car independently. You do not need to rely on the availability of another vehicle or the assistance of a passerby. This makes it especially useful in remote areas or during off-peak hours when getting assistance may be more challenging.
Additionally, jump boxes are not limited to jump-starting cars. Many models come with multiple functions and features, such as built-in USB ports for charging electronic devices, a built-in air compressor for inflating tires, and even an emergency flashlight. These added functionalities make the jump box a versatile tool that can come in handy in various situations.
Overall, a jump box is a convenient and reliable device that provides a portable solution for jump-starting your car. It offers independence, ease of use, and peace of mind, knowing that you have a backup power source readily available in case your car battery fails.
Safety Precautions
When using a jump box to jump-start a car, it is important to prioritize your safety and the well-being of your vehicle. Here are some essential safety precautions to keep in mind:
- Read the instruction manual: Before using the jump box, thoroughly read the instruction manual provided by the manufacturer. Familiarize yourself with the specific features, operations, and safety guidelines of your jump box model.
- Wear safety gear: To protect yourself from potential accidents or battery explosions, wear safety goggles and gloves while connecting the jump box to your car’s battery. This will minimize the risk of acid splashes or electrical shocks.
- Ensure a stable surface: Park both vehicles on a flat, stable surface and engage the parking brakes. This will prevent any accidental movement during the jump-start process.
- Turn off electrical devices: Before connecting the jump box, ensure that all electrical devices in the car, including lights, radio, and air conditioning, are turned off. This will prevent any power surge or damage to the jump box or the vehicle’s electrical system.
- Check for damages: Inspect the jump box and its cables for any visible signs of damage, including frayed wires or exposed metal. Do not use a jump box that appears damaged, as it can pose a safety risk.
- Follow the correct order: When connecting the jump box, always start by attaching the positive (+) cable to the positive terminal of your car’s battery, then connect the negative (-) cable to a metal surface away from the battery. This will help avoid any sparks or potential explosions.
- Avoid touching metal surfaces: Once the jump box is connected, avoid touching any metal surfaces or the clamps, as they can carry electrical current. This minimizes the risk of electrical shocks.
- Allow the car to run: Once the car has been successfully jump-started, let it run for a few minutes to allow the alternator to recharge the battery. This will ensure that the battery regains its full charge and prevents future battery failures.
- Properly store the jump box: After use, carefully disconnect the jump box and store it in a cool, dry place away from direct sunlight. Follow the manufacturer’s guidelines for proper storage to maintain the longevity and performance of the device.
By following these safety precautions, you can ensure a smooth and safe jump-starting process while minimizing any potential risks or damage to yourself, your vehicle, or the jump box.
Checking the Battery
Before using a jump box to jump-start your car, it is crucial to assess the condition of the battery to determine if it is the main cause of the vehicle’s failure to start. Here are the steps to follow when checking the battery:
- Inspect the battery: Open the car’s hood and locate the battery. Check for any visible signs of damage, such as corrosion, leakage, or loose connections. If you notice any significant damage or if the battery is severely corroded, it may need to be replaced.
- Perform a voltage test: Using a multimeter set to DCV (direct current voltage), connect the positive (red) lead to the positive terminal on the battery and the negative (black) lead to the negative terminal. Check the voltage reading. A charged battery should show a voltage reading between 12.4V to 12.7V. If the reading is significantly lower, it indicates a weak or discharged battery.
- Inspect the battery terminals: Check the battery terminals for any signs of corrosion or buildup. Corrosion can hinder the flow of electricity and prevent proper contact. If corrosion is present, clean the terminals using a battery terminal cleaner and a wire brush. Ensure that the connections are tight and secure.
- Check the battery age: Batteries have a limited lifespan, typically ranging from 3 to 5 years. If you are unsure of the age of your battery, check for a label or code that indicates the manufacturing date. If your battery is older than its expected lifespan, it may be time to replace it.
These steps will help you determine the condition of your car battery before using a jump box. It is important to note that while a jump box can provide a temporary solution for starting a vehicle with a weak battery, it may not fix the underlying issues causing the battery to fail. If you experience recurring battery problems, it is advisable to have your vehicle inspected by a professional mechanic.
Preparing the Jump Box
Before using a jump box to jump-start your car, it is important to properly prepare the jump box to ensure a successful and safe jump-start. Here are the steps to follow when preparing the jump box:
- Read the instruction manual: Familiarize yourself with the specific instructions and guidelines provided by the manufacturer for your jump box model. Different models may have different preparation requirements.
- Charge the jump box: Ensure that the jump box is fully charged before attempting to use it. Most jump boxes come with indicator lights or a battery level display to indicate the current charge level. If the jump box has been sitting unused for an extended period, it is recommended to recharge it to ensure optimal performance.
- Inspect the jump box: Thoroughly examine the jump box for any signs of damage, such as cracks, broken cables, or loose connections. If you notice any significant damage, do not use the jump box, as it can pose a safety risk. Instead, have it inspected and repaired by a professional.
- Ensure proper cable connection: Check that the jumper cable clamps are securely attached to the jump box. Verify that the positive (+) and negative (-) clamps are clearly labeled and properly positioned.
- Prepare the jump box accessories: If your jump box comes with additional features, such as a built-in air compressor or USB ports, ensure that any necessary accessories are properly connected and ready for use. For example, if you intend to use the air compressor, ensure that a suitable nozzle is attached.
By following these preparation steps, you can ensure that your jump box is in optimal condition and ready to provide the necessary power to jump-start your car. Proper preparation increases the chances of a successful jump-start and minimizes the risk of any accidents or issues during the process.
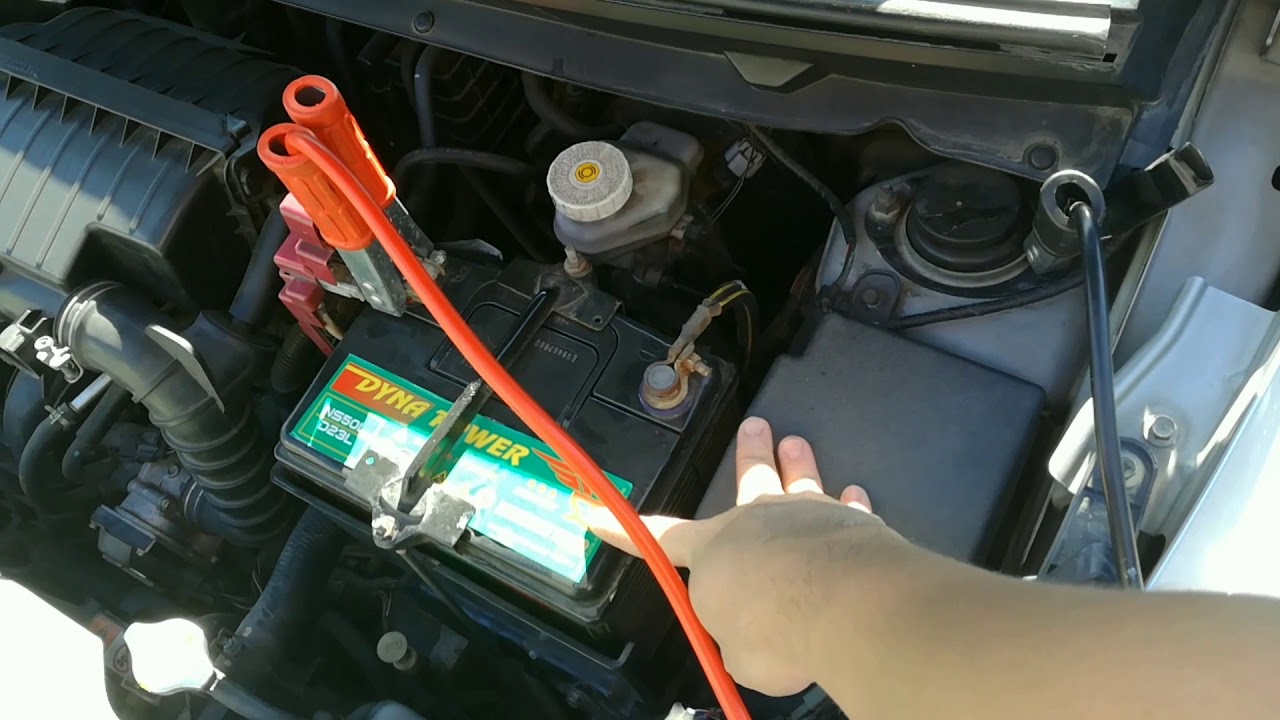
Connecting the Jump Box
Once you have prepared the jump box, it’s time to connect it to your car’s battery. Follow these steps to ensure a proper and safe connection:
- Position the jump box: Place the jump box in a stable position near your car’s battery. Make sure there is enough space to access the battery terminals.
- Identify the positive and negative terminals: Locate the positive (+) and negative (-) terminals on your car’s battery. The positive terminal is usually marked with a “+” symbol or the letters “POS,” while the negative terminal is marked with a “-” symbol or the letters “NEG.”
- Connect the jumper cables: Attach the red or positive (+) jumper cable clamp to the positive terminal of your car’s battery. Ensure a secure connection by clamping it tightly onto the terminal. Be cautious not to touch any metal surfaces with the clamp.
- Connect the black or negative (-) jumper cable clamp: Connect the black or negative (-) jumper cable clamp to a metal surface on your vehicle’s engine block, away from the battery. Good grounding points include metal brackets or unpainted engine components. Take care to avoid moving parts or any areas that may have a fuel leak or other potential hazards.
- Verify the connections: Double-check the cable connections to ensure they are secure and properly attached. Ensure that the cables are clear of any moving parts, such as fans or belts.
It is essential to connect the jumper cables in the correct order as described above. This order prevents any sparking or potential electrical hazards during the jump-start process.
It is worth noting that some jump box models may have specific instructions for connecting the cables. Always refer to the instruction manual provided by the manufacturer for your specific jump box model to ensure the correct procedure.
Once you have successfully connected the jump box to your car’s battery, you are ready to start the car and complete the jump-start process. Proceed to the next section for instructions on starting the car.
Starting the Car
After connecting the jump box to your car’s battery, it’s time to start the vehicle. Follow these steps to safely start your car using the jump box:
- Ensure all electrical devices are off: Double-check that all electrical devices, such as lights, radio, and air conditioning, are turned off in your car. This minimizes the strain on the jump box and helps ensure a successful jump-start.
- Start the car: Turn the ignition key or press the start button to attempt starting the car. Be patient as it may take a few seconds for the jump box to provide the necessary power to start the car.
- Monitor the battery status: Keep an eye on the jump box’s indicator lights or battery level display. If the jump box’s voltage drops rapidly or the indicator lights show a low charge, it may indicate that the car’s battery is severely depleted, and additional measures may be required.
- Keep the car running: If the car successfully starts, let it run for a few minutes to allow the alternator to recharge the car’s battery. This will ensure that the battery regains its full charge and can prevent future starting issues.
If the car does not start initially, do not continuously crank the engine for an extended period. Instead, wait a few minutes and attempt to start the car again. If the car still does not start after multiple attempts, you may need to seek additional help or have your vehicle’s battery or electrical system inspected by a professional.
Remember, the jump box provides a temporary solution to start your car, but it is essential to address the underlying issue causing the battery to fail. Consider having your battery tested and charging system inspected to identify and fix any potential problems.
Once the car is running smoothly and the battery has a chance to recharge, you are ready to disconnect the jump box. Move on to the next section for instructions on safely disconnecting the jump box.
Disconnecting the Jump Box
After successfully jump-starting your car using a jump box, it is crucial to disconnect the jump box properly. Follow these steps to safely disconnect the jump box:
- Turn off the car: Once your car is running smoothly, turn off the engine. This will ensure that there is no current flowing through the electrical system during the disconnection process.
- Remove the clamps: Begin by removing the black or negative (-) clamp from the metal surface where it was connected. Take care not to touch any metal surfaces with the clamp to prevent any electrical shock.
- Remove the red or positive (+) clamp: Next, remove the red or positive (+) clamp from the positive terminal of your car’s battery. Again, ensure that you do not touch any other metal surfaces with the clamp.
- Inspect the jump box and cables: After disconnecting the jump box, inspect it and the cables for any signs of damage or wear. Address any issues immediately to ensure the jump box remains in good working condition for future use.
It is important to follow the correct order when disconnecting the jump box to avoid any potential electrical shocks or accidents. By removing the negative clamp first, you reduce the risk of accidentally short-circuiting the battery.
Once the jump box is disconnected, it is advisable to drive your car for at least 20 minutes to allow the battery to fully charge. This will help ensure that the battery regains optimal power and capacity.
Remember to properly store the jump box in a cool, dry place away from direct sunlight when you no longer require its services. Refer to the manufacturer’s guidelines for the recommended storage instructions to maintain the jump box’s performance and longevity.
By carefully and safely disconnecting the jump box, you can conclude the jump-starting process and continue with your journey. It is essential to address any ongoing battery or electrical issues to prevent future incidents and ensure your car’s reliable starting capabilities.