
Why Upload Multiple Photos to Facebook?
Facebook is one of the most popular online platforms for sharing photos and memories with friends, family, and the wider online community. While uploading a single photo can be quick and straightforward, there are several compelling reasons why you might want to upload multiple photos to Facebook.
Firstly, uploading multiple photos allows you to share a collection or album of images all at once, rather than individually. This makes it easier for your audience to view and interact with your photos, as they can browse through them in a single album. Whether it’s a series of vacation snapshots, event photos, or a portfolio of your work, uploading multiple photos can help you tell a more comprehensive and engaging visual story.
In addition, uploading multiple photos on Facebook allows you to save time and effort. Instead of uploading each photo separately, which can be time-consuming, you can select multiple photos all at once and upload them together. This is especially useful when you have a large number of photos to share and want to streamline the process.
Another advantage of uploading multiple photos is that it enables you to create albums and organize your photos in a coherent and easily accessible way. With albums, you can categorize your photos based on specific events, themes, or time periods. This not only helps you stay organized but also allows your friends and followers to navigate through your photos more efficiently.
Multiphoto uploads on Facebook also provide an opportunity for collaboration and interaction with others. For example, if you attended a group event or gathering, uploading multiple photos allows others who were present to tag themselves and share their own memories from the same event. This fosters a sense of community and encourages engagement among your social circle.
Lastly, uploading multiple photos to Facebook can help you showcase your creativity and talent. Whether you’re a photographer, artist, or simply someone who loves capturing beautiful moments, displaying a series of photos can create a more impactful and visually appealing gallery for your audience to enjoy.
Preparing Your Photos for Upload
Before you upload multiple photos to Facebook, it’s important to ensure that your images are optimized and ready for the best viewing experience. Follow these steps to prepare your photos:
- Organize and select your photos: Take some time to organize your photos into a separate folder on your computer or mobile device. This will make it easier to locate and select the photos you want to upload. Consider selecting only the best and most relevant photos to maintain the quality of your album.
- Resize and compress: To ensure faster uploads and optimize the display of your photos on Facebook, resize them to an appropriate dimension. Avoid uploading extremely large files, as they may take longer to load for viewers. You can also compress your photos to reduce file size without compromising too much on image quality. There are various online tools and software available for resizing and compressing images.
- Edit and enhance: If needed, make minor adjustments to your photos to enhance their overall quality. You can use photo editing software or online platforms to crop images, adjust brightness and contrast, and apply filters. However, be careful not to overdo it, as excessively edited photos may look unrealistic or unnatural.
- Consider the aspect ratio: Keep in mind the aspect ratio of your photos, especially if you plan to print them or display them in a specific format. Facebook supports various aspect ratios, but square or landscape-oriented photos tend to display better in the news feed and album view.
- Check for sensitive content: Before uploading, review your photos to ensure they adhere to Facebook’s guidelines and don’t contain any sensitive or inappropriate content. Respect the privacy and consent of individuals depicted in the photos, and remove any images that may violate Facebook’s community standards.
By taking the time to organize, resize, edit, and review your photos, you can ensure that your Facebook album looks professional, visually appealing, and is easily accessible to your audience. Remember, the preparation process may vary depending on your individual preferences, but these general guidelines will help you get started.
Method 1: Uploading Photos Using the Facebook Website
If you prefer using the Facebook website for uploading multiple photos, follow these simple steps:
- Log in to your Facebook account: Open your preferred web browser and navigate to the Facebook website. Enter your credentials to log in to your account.
- Go to your profile or page: Once logged in, click on your profile picture or navigate to the page where you want to upload the photos.
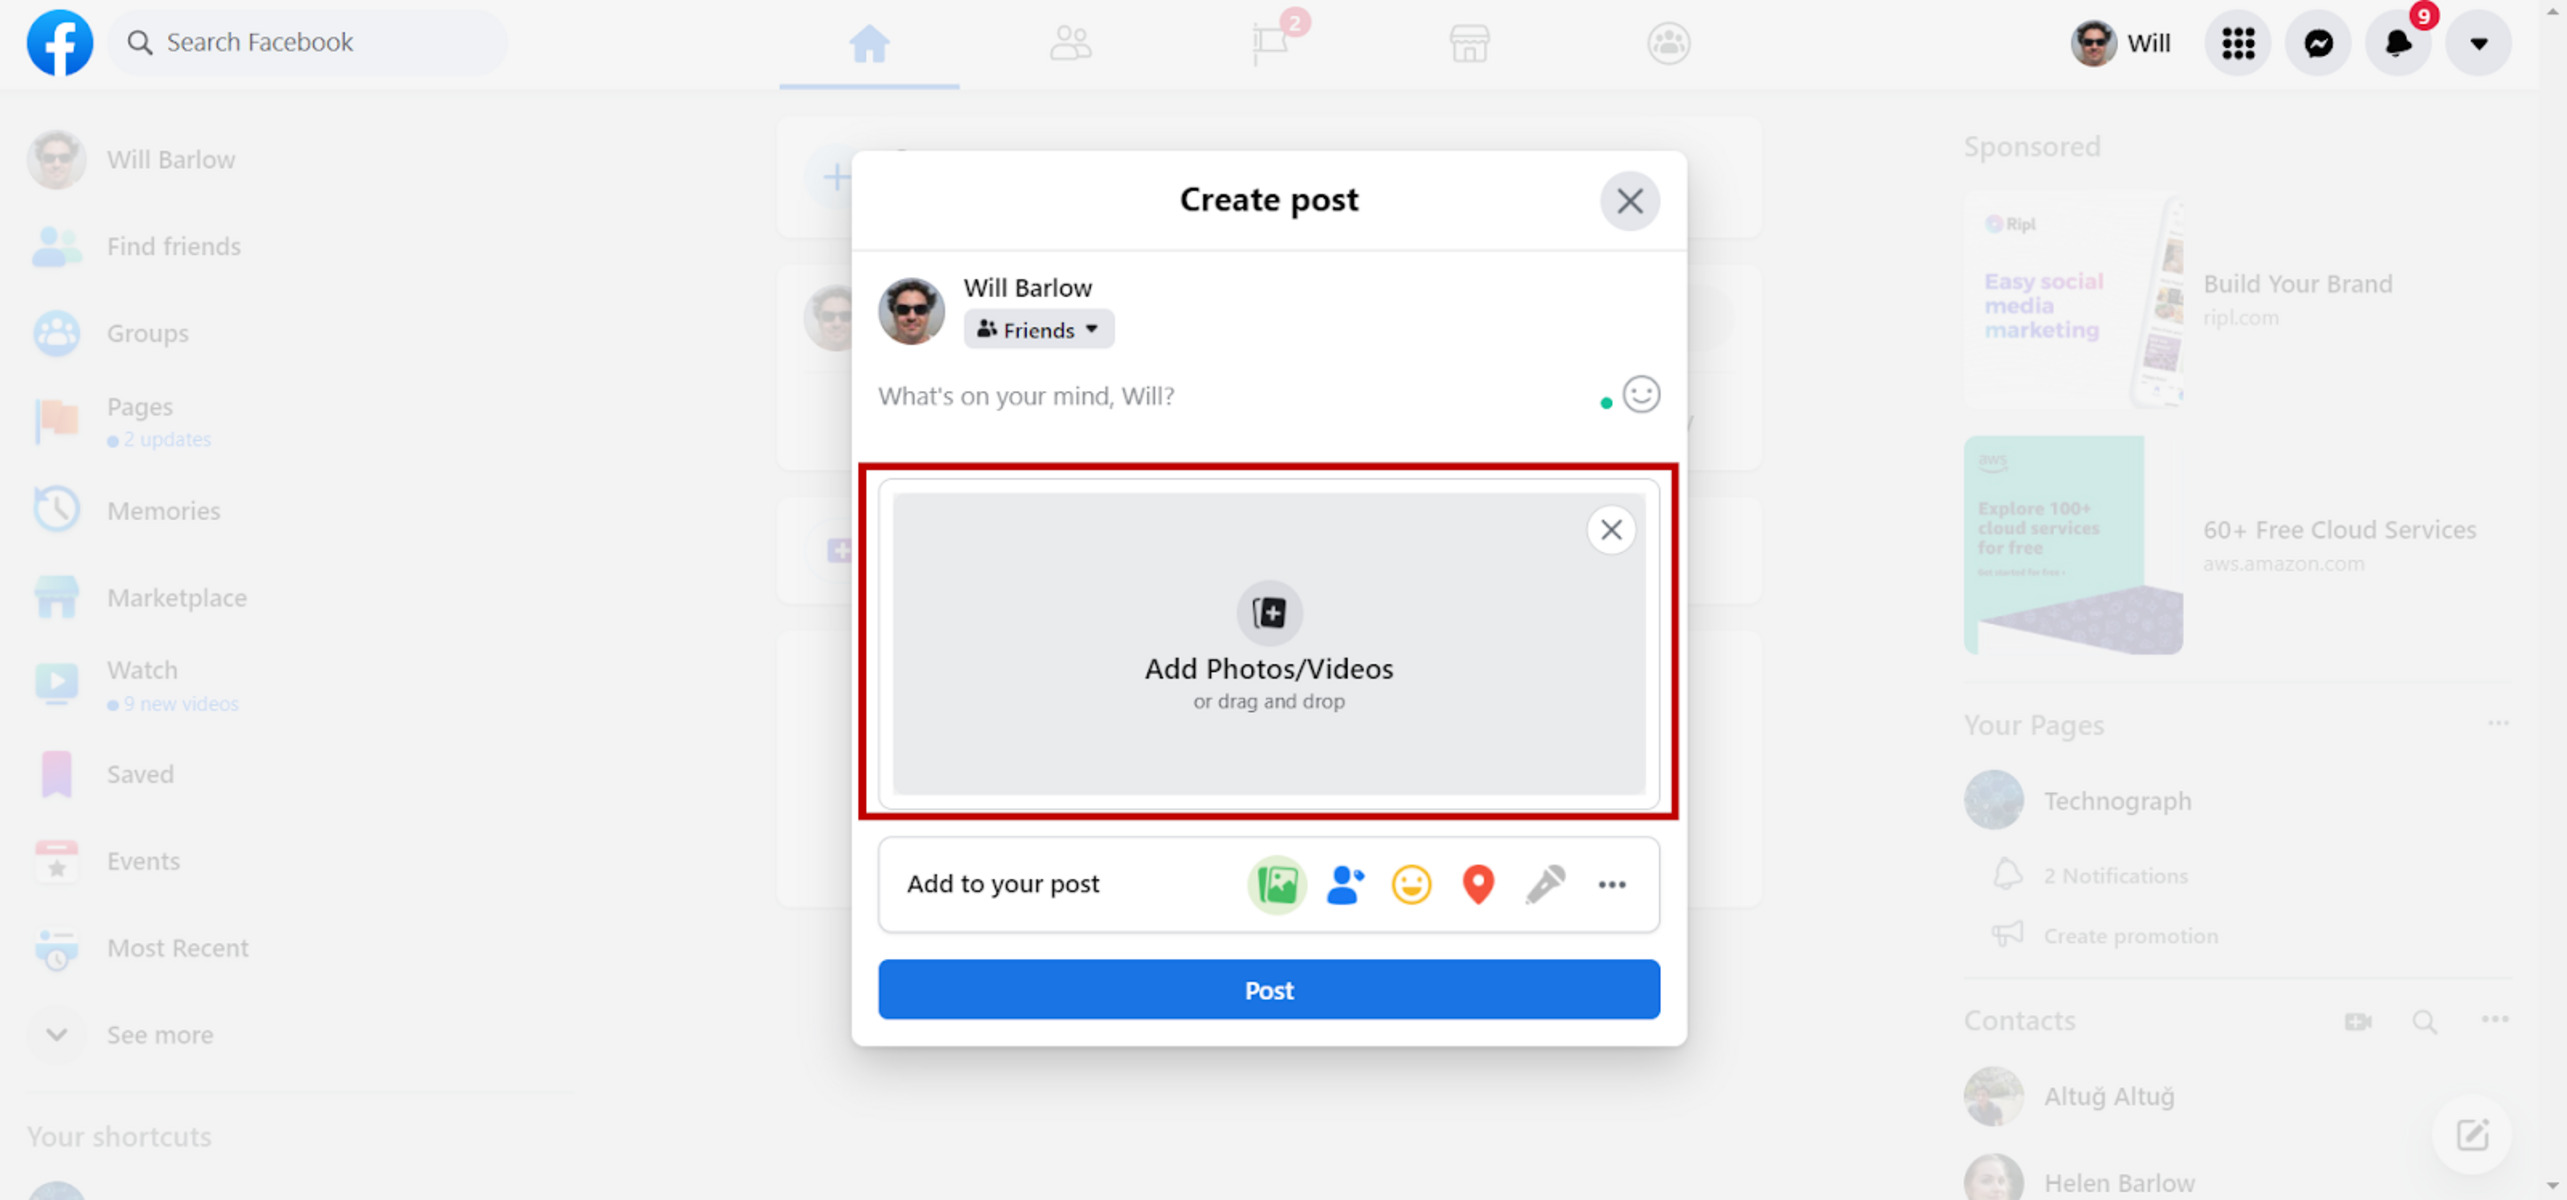
- Select the “Photo/Video” option: Look for the “Photo/Video” button located above the text box where you normally make posts. Click on it to start the upload process.
- Choose the photos to upload: A file explorer window will open, allowing you to browse your computer or connected storage device for the photos you want to upload. Select multiple photos by holding down the Ctrl or Command key while clicking on each photo.
- Add captions and tags: Once you have selected your photos, you can add captions and tags to each individual photo or to the album as a whole. Captions can provide additional context or descriptions for your photos, while tags allow you to mention and connect with specific people.
- Click “Post” to upload: Review your selections and captions, then click on the “Post” button to begin the upload process. Depending on the size and number of photos, it may take a few moments for the upload to complete.
- Organize and customize your album: After the photos have finished uploading, you can organize them into an album by clicking on the “Create Album” button. Give your album a name, add a description if desired, and choose the appropriate privacy settings.
- Tag friends and edit settings: To tag friends in the photos, simply click on each image and start typing their name. You can also edit the privacy settings for individual photos within the album or adjust the overall album’s privacy settings.
Using the Facebook website provides a comprehensive and straightforward method for uploading multiple photos. You have the flexibility to customize captions, organize albums, and tag friends for a more personalized and engaging experience.
Method 2: Using the Facebook Mobile App
If you prefer to upload multiple photos using the convenience of your mobile device, the Facebook mobile app offers a simple and efficient method. Here’s how you can do it:
- Open the Facebook app: Locate and tap on the Facebook app icon on your mobile device’s home screen to launch it. If you don’t have the app installed, download it from your device’s app store.
- Log in to your account: Enter your login credentials, such as your email or phone number and password, to access your Facebook account.
- Navigate to your profile or page: Once logged in, tap on your profile picture or go to the page where you want to upload the photos.
- Select the “Photo” option: On the top section of your profile or page, you’ll find a “Photo” button. Tap on this button to start the photo upload process.
- Choose photos from your mobile device: The Facebook app will prompt you to select the photos you want to upload. Tap on the images you wish to upload, and they will be added to your selection queue.
- Add captions and tags: After selecting your photos, you can add captions to each photo individually or provide a general description for the entire album. You can also tag friends by tapping on the “Tag People” option.
- Tap “Post” to upload: Verify that your photos and captions are as desired, then tap on the “Post” button to initiate the upload process. The speed of the upload may depend on your internet connection and the size of the photos.
- Organize and customize your album: Once the upload is complete, you can organize your photos into an album by tapping on the “Create Album” option. Give your album a name, add a description if desired, and choose the privacy settings.
- Tag friends and adjust settings: To tag friends in your photos, tap on each image and search for their names. You can also make privacy adjustments for individual pictures or the entire album.
The Facebook mobile app offers a convenient way to upload multiple photos on the go. With just a few taps, you can share your favorite moments with friends and followers, add captions, organize albums, and tag individuals for a more interactive and enjoyable photo sharing experience.
Method 3: Using the Facebook Messenger App
If you prefer using the Facebook Messenger app to upload multiple photos, you can easily share your images with friends and groups. Here’s how you can do it:
- Open the Facebook Messenger app: Locate and tap on the Facebook Messenger app icon on your mobile device’s home screen to launch it. If you don’t have the app installed, download it from your device’s app store.
- Log in to your account: Enter your login credentials, such as your Facebook email or phone number and password, to access your Messenger account.
- Create a new conversation: Tap on the “New Message” button, usually represented by a pencil and paper icon. Select the recipient or group with whom you want to share the photos.
- Tap the gallery icon: Look for the gallery icon or the image icon with three squares to access your device’s photo gallery within the Messenger app.
- Select multiple photos: You can now browse through your photo gallery and tap on the photos you want to upload. Select multiple photos by tapping on the images one by one or using the gallery’s multi-select feature.
- Customize your photos: Before sending the photos, you have the option to add captions, stickers, filters, or any other desired customization features offered by the Messenger app.
- Tap “Send” to upload: Once you are satisfied with your selected photos and any associated customizations, tap on the “Send” button to initiate the upload process. The photos will be sent to the selected recipient or group.
- Continue the conversation: After the upload is complete, you can engage in further conversation about the shared photos. Participants can react, comment, tag others, or simply enjoy viewing the images.
Using the Facebook Messenger app for uploading multiple photos offers a more private and direct way of sharing moments with specific individuals or groups. It allows for instant feedback and interaction, enhancing the overall experience of photo sharing through real-time conversation.
Tips and Tricks for Uploading Multiple Photos
Here are some helpful tips and tricks to optimize your experience when uploading multiple photos to Facebook:
- Organize and create albums: Before uploading, consider organizing your photos into albums based on events, themes, or categories. This will make it easier for your audience to navigate and enjoy your photo collections.
- Select the best photos: Quality over quantity matters. Choose the best and most visually appealing photos to upload. This will ensure that your album tells a compelling story and captures the attention of your viewers.
- Consider the order: If you want to tell a chronological or narrative story with your photos, carefully select the order in which you upload them. This will enhance the viewing experience and flow of your album.
- Add captions and descriptions: Captions can provide context and enhance the storytelling aspect of your photos. Consider adding captions or descriptions that provide additional information or insights for your viewers.
- Tag others: If your photos include friends, family, or colleagues, consider tagging them in the images. This can promote engagement and encourage them to interact with your album.
- Utilize photo editing tools: Facebook offers basic photo editing features. Take advantage of these tools to enhance the look of your images. Adjustments like brightness, contrast, and cropping can make a significant difference.
- Share memories with groups: If you have a specific group of people you want to share your photos with, consider creating a private or closed group. This allows for a more intimate and personalized photo sharing experience.
- Respect privacy and gain consent: Before uploading photos of others, especially if they are in intimate or candid moments, seek their consent and respect their privacy. Not everyone may feel comfortable having their images shared publicly.
- Engage with comments and reactions: Once your photos are uploaded, be proactive in responding to comments and reactions from your friends or followers. This helps foster engagement and keeps the conversation going around your photo collection.
- Keep an eye on privacy settings: Before finalizing the upload, double-check the privacy settings of your album or individual photos. Ensure that you are comfortable with the visibility and audience who can access your images.
By following these tips and tricks, you can make the most of uploading multiple photos on Facebook. The key is to showcase your creativity, tell a compelling story, and engage with your audience in a meaningful way.
Troubleshooting Common Issues
While uploading multiple photos to Facebook is generally a smooth process, you may encounter some common issues. Here are a few troubleshooting tips to help you overcome them:
- Slow upload speeds: If you’re experiencing slow upload speeds, check your internet connection. Ensure you have a stable and strong signal. Consider uploading during non-peak hours or switching to a faster internet connection if available.
- Unsupported file formats: Facebook supports various file formats for photos, such as JPEG and PNG. If you’re encountering issues while uploading, check that your photos are saved in a supported format. If necessary, convert them to a compatible format before uploading.
- Size limitations: Facebook imposes size limitations on individual photos and albums. If your photos exceed these limits, you may need to resize or compress them before uploading. Refer to Facebook’s guidelines for the maximum file size and dimensions allowed.
- Photo orientation issues: If your photos appear rotated or oriented incorrectly after uploading, the issue may lie with the metadata embedded in the image. Before uploading, use photo editing software to rotate and save the images with the correct orientation.
- Privacy settings: Ensure that your privacy settings are properly configured when uploading photos. Double-check the audience selector tool to choose who can view your uploaded album or individual photos. Adjust the settings according to your preferences.
- Failed uploads: If an upload fails, try refreshing the page or app and attempt the upload again. Additionally, check your internet connection and file sizes to ensure they meet the requirements. Alternatively, try uploading the photos in smaller batches instead of all at once.
- Permissions and tags: If you’ve tagged friends in your photos and they are unable to view or interact with them, it may be due to their privacy settings. Ensure that they have granted you permission to tag them in their settings. Communicate with them to troubleshoot any issues they may be experiencing.
- Mobile app issues: If you’re using the Facebook mobile app and experiencing issues with uploading photos, try closing and relaunching the app. If the problem persists, consider checking for app updates or reinstalling the app to ensure you have the latest version.
If you continue to encounter problems with uploading multiple photos on Facebook, consider reaching out to Facebook’s support or community forums for further assistance. They may be able to provide specific solutions based on your unique situation.