
Check for Updates
The first step to update your iOS wirelessly on your iPhone is to check for available updates. Apple regularly releases new versions of iOS to introduce new features, improve security, and fix any bugs or issues. Follow the steps below to check for updates:
- Open the Settings app on your iPhone.
- Scroll down and tap on “General”.
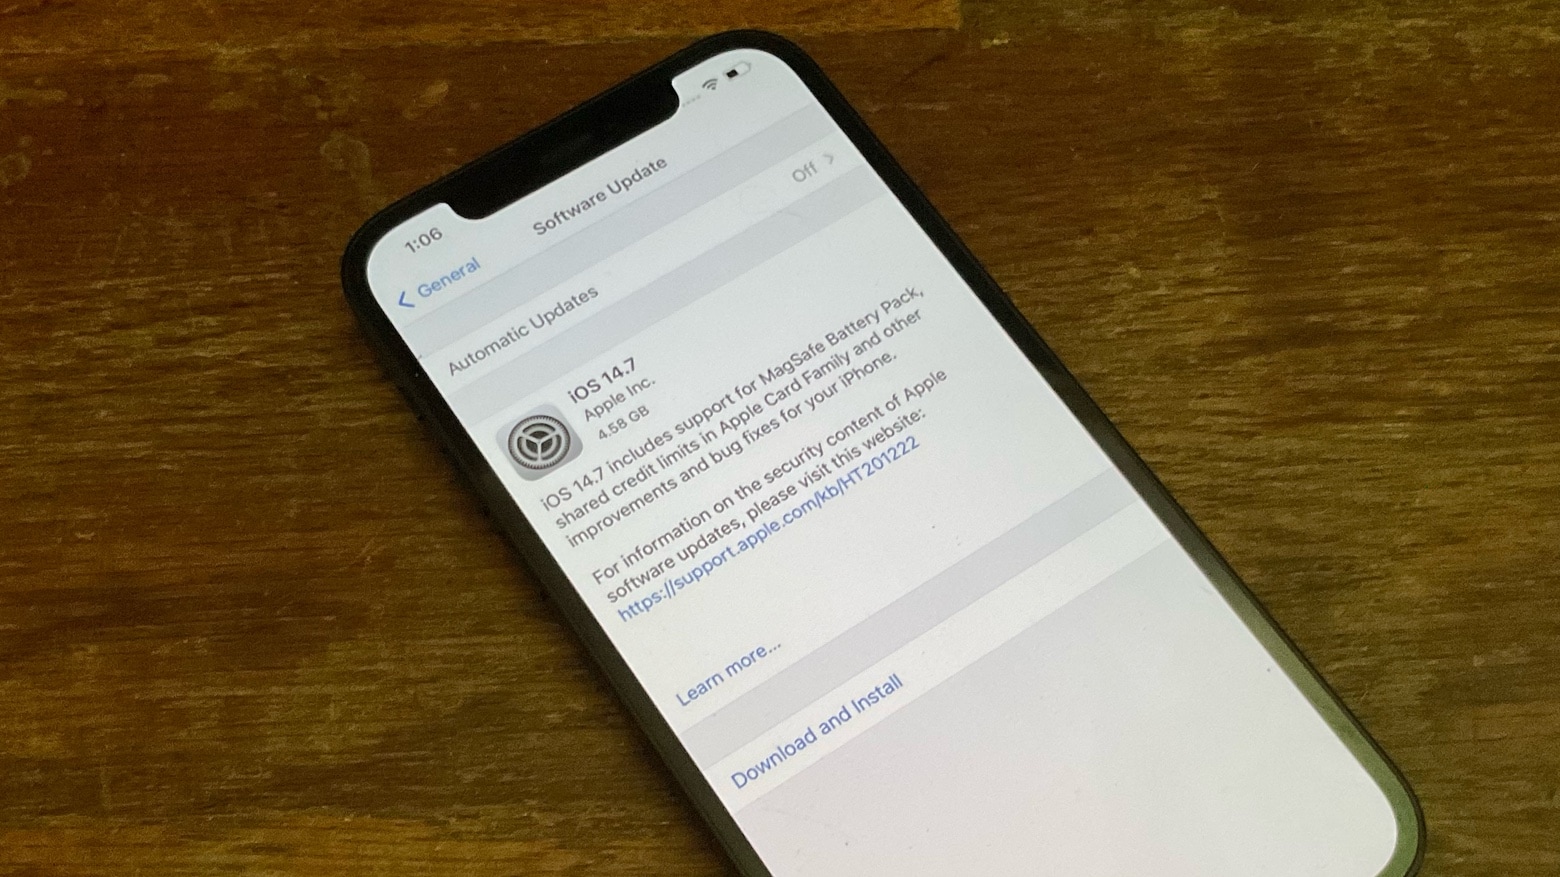
- Tap on “Software Update”.
- Your iPhone will now check for any available updates. If an update is available, you will see a message indicating its availability.
It is recommended to connect your iPhone to a Wi-Fi network before checking for updates, as downloading the update files requires an internet connection. Additionally, ensure that your iPhone has sufficient battery or is connected to a power source to prevent any interruptions during the update process.
If an update is available, tap on “Download and Install” to begin the update process. Your iPhone will start downloading the update files, and once the download is complete, it will proceed to install the update. The installation process may take some time, so it is advisable to keep your iPhone connected to a power source and refrain from using it during the update.
If there are no updates available, your iPhone is already running the latest version of iOS. However, it is good practice to regularly check for updates as Apple releases new iOS versions periodically to enhance the user experience and address any software vulnerabilities.
By regularly updating your iOS wirelessly, you ensure that your iPhone has the latest features, security enhancements, and bug fixes to provide a smooth and optimized user experience. Now that you know how to check for updates, let’s move on to the next steps to update your iPhone wirelessly.
Charge Your iPhone
Before proceeding with the wireless update of your iOS on the iPhone, it is crucial to ensure that your device has sufficient battery power. The update process can consume a significant amount of power, and it is important to avoid interruptions during the update process. To charge your iPhone, follow these steps:
- Plug your iPhone charger into an electrical outlet.
- Connect the Lightning cable to your iPhone.
- Ensure that the charging symbol appears on the iPhone’s screen, indicating that it is charging.
- Allow your iPhone to charge until it reaches at least 50% battery power.
Note: It is recommended to let your iPhone charge fully, if possible, to ensure a seamless update process without any battery-related issues. Charging your iPhone while updating the iOS wirelessly is a precautionary step that can prevent any unexpected shutdown during the update process.
If you are unable to charge your iPhone using a power outlet, you can also connect it to a computer via USB. Ensure that the computer is turned on and that the USB port is functioning properly. The update process will charge your iPhone using the computer’s power.
Once your iPhone has sufficient battery power, you can proceed with the update process. It is important to keep your device connected to a power source throughout the update process to avoid any interruptions or sudden power loss.
By charging your iPhone before updating the iOS wirelessly, you ensure a smooth and uninterrupted update process. Now that your iPhone is charged, let’s move on to the next step: connecting to a Wi-Fi network.
Connect to Wi-Fi
In order to update your iOS wirelessly on the iPhone, you need to have a stable internet connection. Connecting to a Wi-Fi network ensures fast and reliable data transfer during the update process. To connect to Wi-Fi, follow these steps:
- Open the Settings app on your iPhone.
- Tap on “Wi-Fi”.
- Toggle the Wi-Fi switch to the “On” position if it is currently off.
- A list of available Wi-Fi networks will appear. Select the network you want to join by tapping on its name.
- If the network has a password, you will be prompted to enter it. Enter the password and tap “Join”.
- Your iPhone will attempt to connect to the selected Wi-Fi network. Once connected, you will see a checkmark next to the network name.
- If prompted, you can choose to enable the “Auto-Join” option for this network. This will automatically connect your iPhone to the network whenever it is available.
It is recommended to connect to a secure and trusted Wi-Fi network while updating your iOS. Public Wi-Fi networks, such as those found in cafes or airports, may have limited bandwidth or security issues, which can cause problems during the update process.
By connecting to Wi-Fi, you ensure a smooth and uninterrupted update of your iOS. The update files can be large, and using cellular data for the update process may result in excessive data charges. Therefore, a Wi-Fi network is the preferred option for updating your iPhone wirelessly.
Now that your iPhone is connected to Wi-Fi, let’s move on to the next step: backing up your iPhone to ensure the safety of your data.
Back Up Your iPhone
Before updating your iOS wirelessly on the iPhone, it is crucial to create a backup of your device to safeguard your data. Backing up your iPhone ensures that you can restore your settings, apps, and personal information in case anything goes wrong during the update process. Follow these steps to back up your iPhone:
- Connect your iPhone to a Wi-Fi network.
- Open the Settings app on your iPhone.
- Tap on your Apple ID at the top of the screen.
- Scroll down and tap on “iCloud”.
- Scroll down again and tap on “iCloud Backup”.
- Toggle the “iCloud Backup” switch to the “On” position if it is currently off.
- Tap on “Back Up Now” to initiate an immediate backup. Ensure that you have enough iCloud storage available for the backup.
Alternatively, you can back up your iPhone using your computer. Connect your iPhone to your computer via a USB cable, open iTunes, and click on the iPhone icon. Select “Back Up Now” to initiate the backup process.
It is recommended to encrypt your backup to ensure the security of your sensitive data. By encrypting your backup, you can include sensitive information such as passwords and health data in the backup, which will be encrypted and protected by a password.
Regularly backing up your iPhone is essential to prevent any data loss during the update process. Although rare, issues can occur during the update that may result in data corruption or loss. By having a backup, you can easily restore your device to its previous state without losing any important data.
Now that you have successfully backed up your iPhone, let’s proceed to the final step: updating your iPhone wirelessly.
Update Your iPhone
Once you have completed the previous steps of checking for updates, charging your iPhone, connecting to Wi-Fi, and backing up your device, you are ready to update your iOS wirelessly. Follow these steps to update your iPhone:
- Open the Settings app on your iPhone.
- Tap on “General”.
- Tap on “Software Update”.
- If an update is available, you will see a message indicating its availability. Tap on “Download and Install” to begin the update process.
- Your iPhone will start downloading the update files. The download time will vary depending on the size of the update and your internet connection speed.
- Once the download is complete, tap on “Install Now” to begin the installation process.
- The installation process will take some time, during which your iPhone may restart multiple times. It is important to keep your device connected to a power source and avoid using it during the update.
- After the installation is complete, your iPhone will restart, and you will be greeted with the “Hello” screen.
- Follow the on-screen instructions to set up your iPhone, including signing in with your Apple ID and restoring your data from the backup you created earlier.
It is important to note that updating your iPhone wirelessly requires a stable internet connection and sufficient battery power. If the update process is interrupted or your iPhone runs out of battery during the installation, it can lead to potential issues with your device.
Once your iPhone has been updated, you can enjoy the latest features, performance improvements, and bug fixes that come with the new iOS version. It is good practice to regularly check for updates and keep your device up to date to ensure optimal performance and security.
Now that you have successfully updated your iPhone wirelessly, you can start exploring the new features and enhancements. Enjoy your updated iOS experience!