Before You Uninstall Webroot
Before you proceed with uninstalling Webroot from your Mac or PC, it’s important to understand a few things to ensure a smooth process. Here are some key considerations to keep in mind:
- Backup your data: Uninstalling Webroot may require removing certain files and settings from your computer. It is always a good practice to back up your important files and data before making any changes.
- Disable real-time protection: If you’re uninstalling Webroot because you want to switch to a different antivirus software, make sure to disable its real-time protection feature first. This will prevent any conflicts between antivirus programs during the uninstallation process.
- Close all programs: Before uninstalling Webroot, close any open programs or applications running on your computer. This will ensure that there are no conflicts or interruptions during the uninstallation process.
- Disconnect from the internet: To avoid any unwanted updates or interruptions, disconnect your computer from the internet temporarily. This will prevent Webroot from trying to update itself during the uninstallation process.
- Follow the official guidelines: Consult the official Webroot documentation or support resources for specific instructions on uninstallation. Different versions and operating systems may have slightly different uninstallation procedures.
By following these preliminary steps, you can ensure a smoother and more efficient uninstallation process for Webroot. Now let’s explore the step-by-step procedures to uninstall Webroot from both Mac and PC systems.
Uninstalling Webroot on a Mac
If you’re using a Mac and need to uninstall Webroot, there are a few different methods you can try. Here are three commonly used approaches:
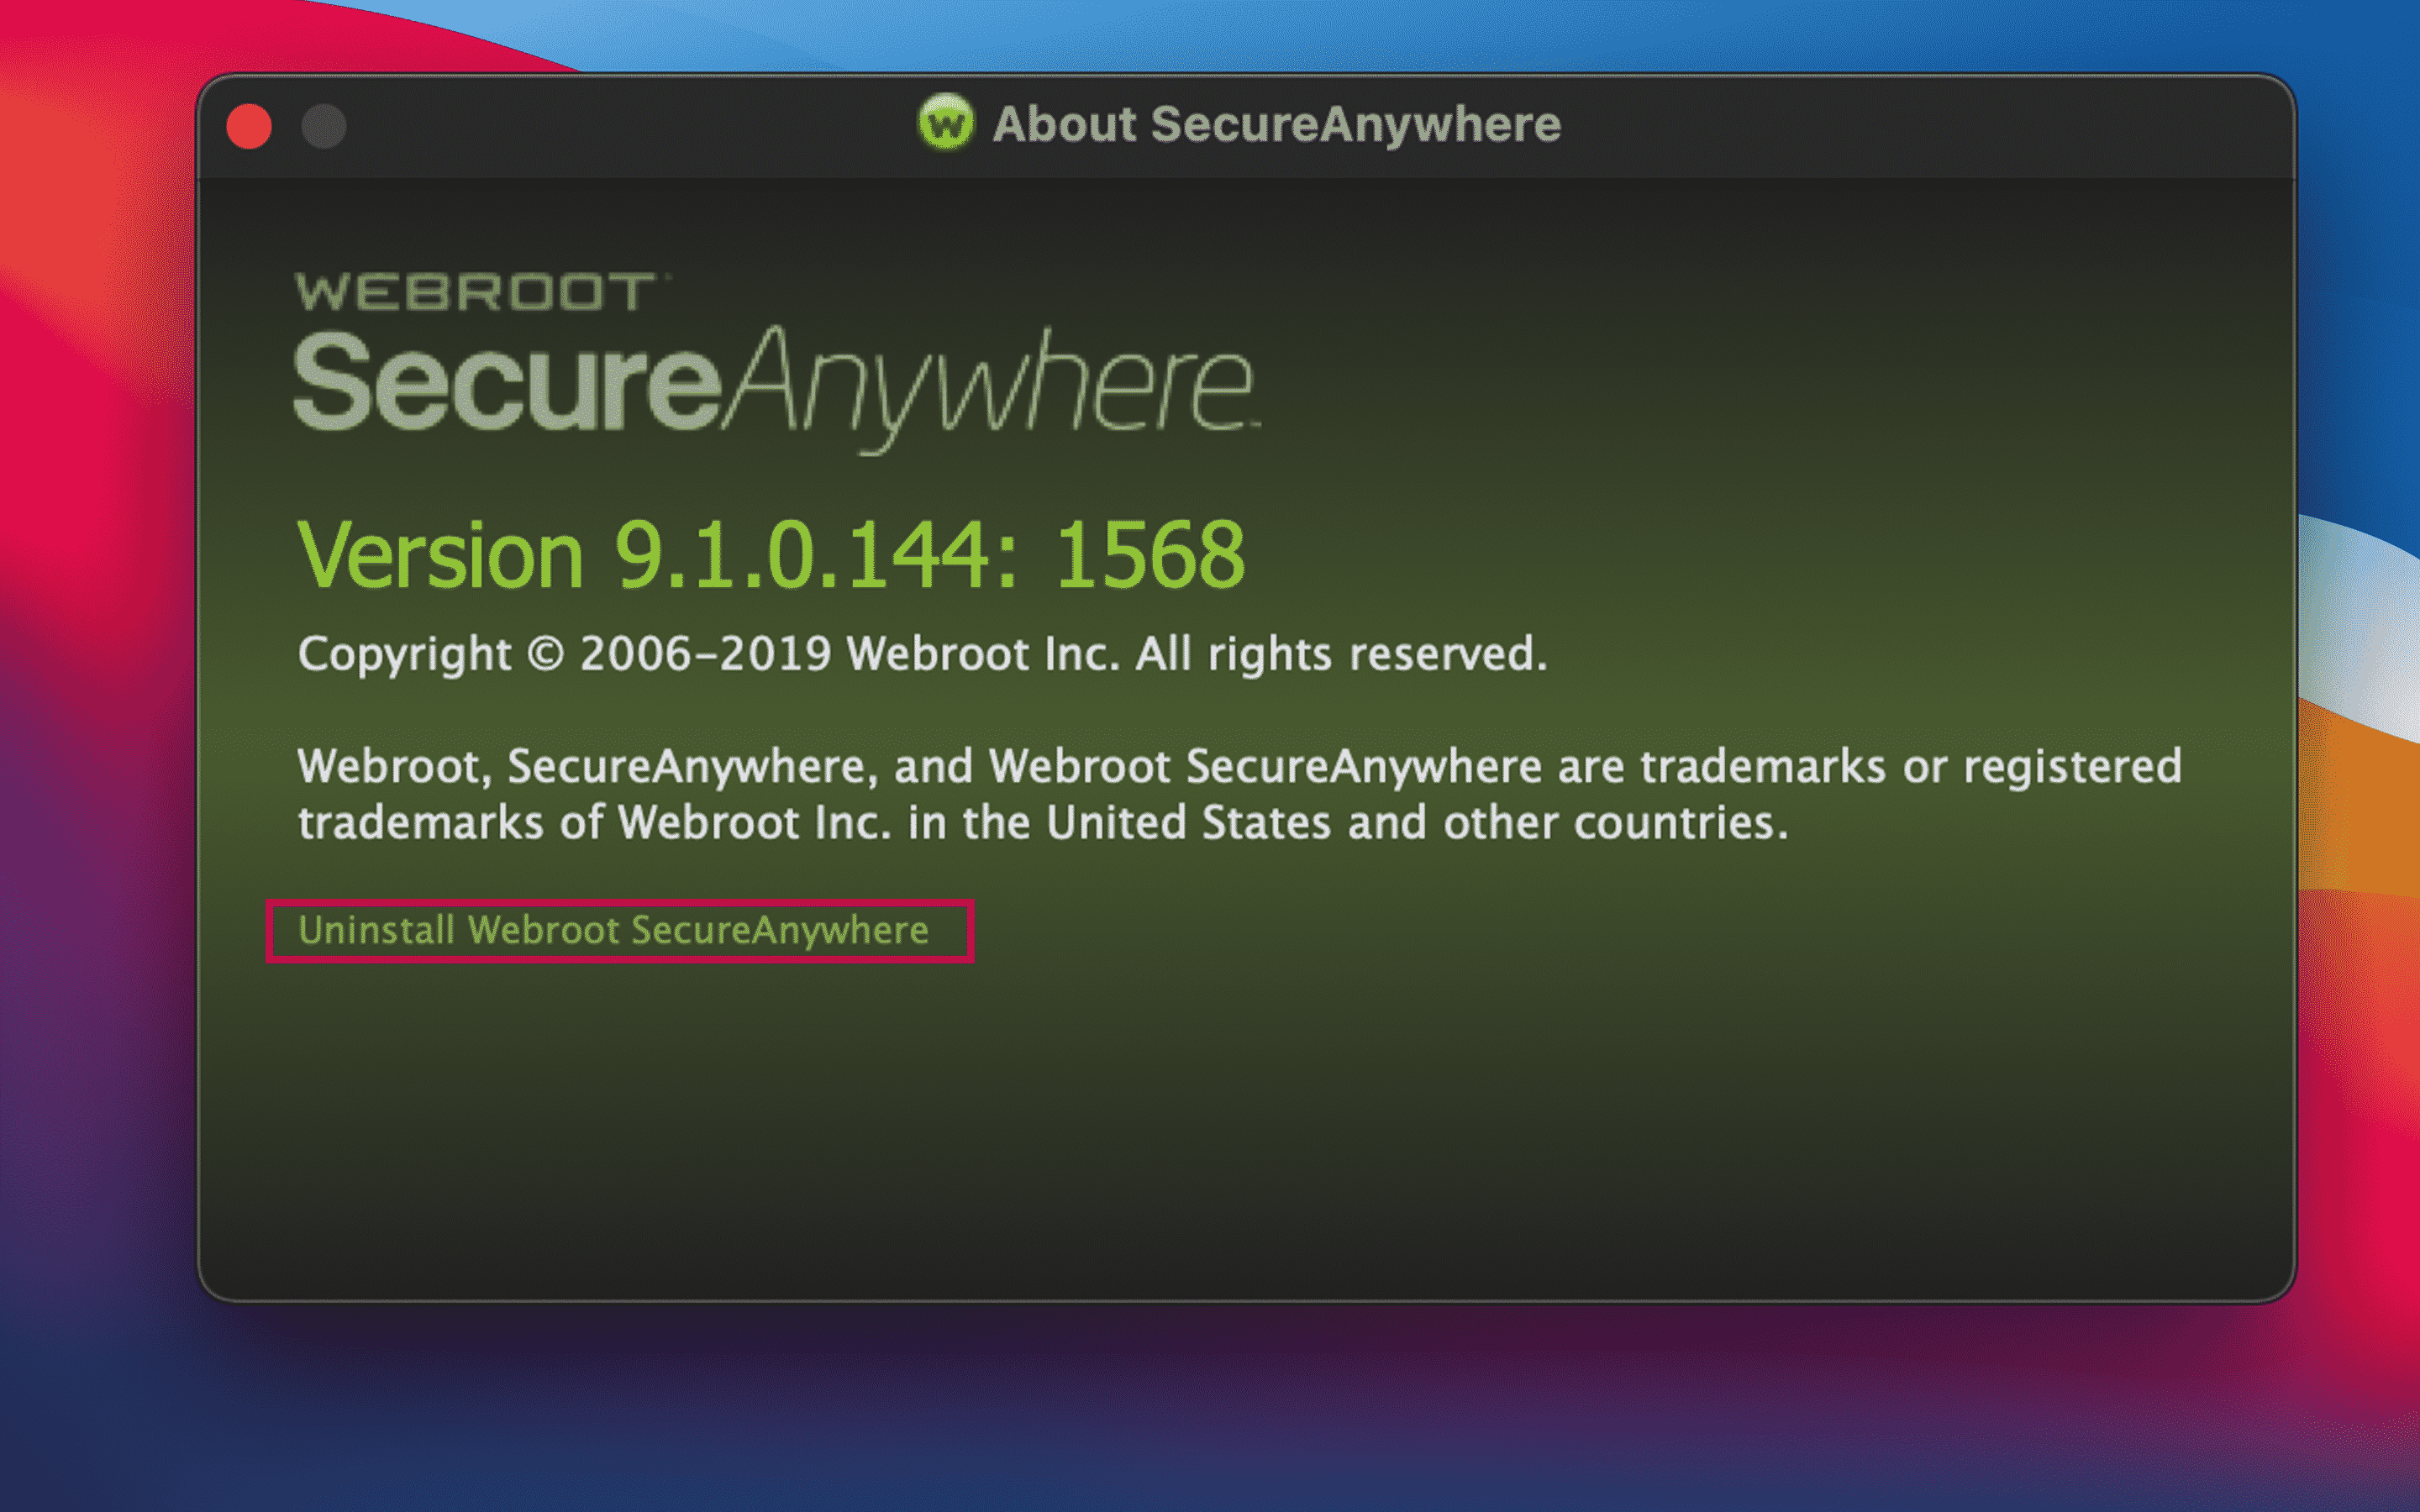
- Uninstalling Webroot using the Webroot SecureAnywhere Interface: First, open the Webroot SecureAnywhere application on your Mac. Go to the “Webroot SecureAnywhere” menu at the top of the screen, select “Uninstall,” and follow the prompts to complete the uninstallation process. This method ensures a thorough removal of the Webroot software.
- Uninstalling Webroot using the Finder: Access your Mac’s Finder by clicking on the Finder icon in the dock or selecting it from the Applications folder. In the Finder window, navigate to the “Applications” folder and locate the Webroot SecureAnywhere app. Drag the app to the Trash bin icon in the dock or right-click and select “Move to Trash.” Finally, right-click the Trash icon and select “Empty Trash” to permanently remove Webroot from your Mac.
- Uninstalling Webroot using the Command Line: Open a Terminal window on your Mac by going to the Applications folder, then Utilities, and selecting Terminal. In the Terminal, type the command “sudo rm -rf /Applications/WebrootSecureAnywhere.app” and press Enter. You will be asked to enter your administrator password. Once entered, Terminal will delete the Webroot application from your Mac.
These methods should cover most scenarios for uninstalling Webroot on a Mac. However, if you encounter any issues or need further assistance, refer to the official Webroot documentation or contact their support team for personalized guidance.
Uninstalling Webroot on a PC
If you’re using a PC and want to uninstall Webroot, there are a few different methods you can try. Here are three commonly used approaches:
- Uninstalling Webroot using the Webroot SecureAnywhere Interface: Start by opening the Webroot SecureAnywhere application on your PC. In the main interface, click on the gear icon for the settings menu, then select “My Account.” Next, click on the “Uninstall” button and follow the on-screen prompts to complete the uninstallation process. This method ensures a thorough removal of the Webroot software.
- Uninstalling Webroot using the Control Panel: Go to the Control Panel on your PC by searching for it in the Start menu. Once in the Control Panel, select “Programs” and then “Uninstall a program.” Locate Webroot in the list of installed programs, right-click on it, and choose “Uninstall.” Follow the prompts provided by the uninstaller wizard to remove Webroot from your PC.
- Uninstalling Webroot using the Command Prompt: Open the Command Prompt by searching for it in the Start menu or by pressing Windows Key + R and typing “cmd.” In the Command Prompt window, type the command “msiexec /x {GUID}” (replace “{GUID}” with the specific Webroot product code) and press Enter. The product code for Webroot can usually be found in the uninstall registry key. This method allows for a manual uninstallation of Webroot using the Windows installer.
These methods should cover most scenarios for uninstalling Webroot on a PC. If you encounter any issues or require further guidance, consult the official Webroot documentation or reach out to their support team for assistance tailored to your specific situation.
Uninstalling Webroot using the Webroot SecureAnywhere Interface
One of the easiest ways to uninstall Webroot from your computer is by using the Webroot SecureAnywhere interface. Here’s a step-by-step guide on how to do it:
- Open the Webroot SecureAnywhere application on your computer. You can usually find it in the system tray or by searching for it in the Start menu.
- In the main interface of Webroot, click on the gear icon to access the settings menu.
- From the menu, select “My Account.”
- On the “My Account” page, locate the “Uninstall” button and click on it.
- A confirmation prompt will appear, asking if you are sure you want to uninstall Webroot. Click “Yes” or “Uninstall” to proceed.
- Follow the on-screen prompts provided by the Webroot uninstaller to complete the uninstallation process.
- Once the uninstallation is complete, restart your computer to ensure that all Webroot components have been removed.
By following these steps, you should be able to uninstall Webroot using the Webroot SecureAnywhere interface without any issues. However, if you encounter any difficulties or errors during the process, consult the official Webroot support resources or contact their customer support for further assistance.
Uninstalling Webroot using the Control Panel (Windows)
If you’re using a Windows PC and need to uninstall Webroot, you can do so through the Control Panel. Follow these simple steps:
- Click on the “Start” button on your taskbar and select “Control Panel” from the menu.
- In the Control Panel window, locate the “Programs” or “Programs and Features” option and click on it.
- A list of installed programs will appear. Scroll through the list and find “Webroot” or “Webroot SecureAnywhere.”
- Click on Webroot to highlight it, then click on the “Uninstall” or “Remove” button at the top of the list.
- Follow the prompts provided by the Webroot uninstaller wizard to proceed with the uninstallation process.
- Once the uninstallation is complete, restart your computer to ensure all Webroot components are removed.
When you restart your PC, Webroot should no longer be present on your system. If you encounter any issues or error messages during the uninstallation process, refer to the official Webroot documentation or reach out to their support team for specific guidance.
Uninstalling Webroot using the Finder (Mac)
If you’re using a Mac and need to uninstall Webroot, you can do it easily using the Finder. Here’s a step-by-step guide:
- Open a Finder window on your Mac by clicking on the Finder icon in the dock or selecting it from the Applications folder.
- In the Finder window, navigate to the “Applications” folder.
- Locate the “Webroot SecureAnywhere” app in the Applications folder.
- Drag the Webroot app to the Trash bin icon in the dock.
- Alternatively, you can right-click on the Webroot app and select “Move to Trash.”
- To complete the uninstallation process, right-click on the Trash icon in the dock and select “Empty Trash.”
- Confirm the action by clicking on “Empty Trash” in the dialog box that appears.
After emptying the Trash, Webroot should be completely uninstalled from your Mac. It’s a good practice to restart your computer to ensure all components are properly removed. If you encounter any difficulties or receive error messages during the process, refer to the official Webroot documentation or reach out to their support team for further assistance.
Uninstalling Webroot using the Command Line (Mac)
If you prefer using the command line on your Mac, you can uninstall Webroot by following these steps:
- Open a Terminal window on your Mac. You can do this by going to the Applications folder, then Utilities, and selecting Terminal.
- In the Terminal window, type the command
sudo rm -rf /Applications/WebrootSecureAnywhere.appand press Enter. - You will be prompted to enter your administrator password. Type your password (you won’t see it as you type) and press Enter to confirm.
- The Terminal will proceed to delete the Webroot SecureAnywhere application from your Mac.
- Once the process is complete, you can close the Terminal window.
By using the command line, you can uninstall Webroot more quickly and efficiently. However, it’s important to exercise caution when using the command line, as entering commands incorrectly or deleting the wrong file can have unintended consequences. Always double-check the command before executing it.
If you encounter any difficulties or have any questions, consult the official Webroot documentation or contact their support team for further assistance tailored to your specific situation.
Uninstalling Webroot using the Command Prompt (Windows)
If you prefer using the Command Prompt on your Windows PC, you can uninstall Webroot by following these simple steps:
- Click on the “Start” button on your taskbar and search for “Command Prompt.”
- Right-click on the Command Prompt app and select “Run as administrator.” This will open the Command Prompt with administrative privileges.
- In the Command Prompt window, type the command
msiexec /x {GUID}and press Enter. - Note: Replace “{GUID}” with the specific Webroot product code. You can usually find the product code in the uninstall registry key.
- The Command Prompt will begin the uninstallation process for Webroot using the Windows installer.
- Follow any on-screen prompts or instructions provided by the uninstaller to proceed with the removal.
- Once the uninstallation is complete, you can close the Command Prompt window.
By using the Command Prompt, you can efficiently uninstall Webroot from your Windows PC. However, please exercise caution when using the command line, as entering commands incorrectly or executing the wrong command can lead to unintended consequences. Always double-check the command before proceeding.
If you encounter any difficulties or have any questions, consult the official Webroot documentation or contact their support team for further assistance tailored to your specific situation.
Troubleshooting Uninstall Issues
If you encounter any difficulties while uninstalling Webroot from your computer, here are a few troubleshooting steps you can try:
- Restart your computer: Sometimes, a simple restart can resolve minor issues and clear any processes that may be interfering with the uninstallation process. After restarting, attempt to uninstall Webroot again.
- Use an uninstaller tool: If the standard uninstallation methods do not work, you can consider using a third-party uninstaller tool. These tools are designed to thoroughly remove software, including all associated files and registry entries. Research reputable uninstaller tools and follow their instructions for removing Webroot from your computer.
- Clean up remaining files: In some cases, remnants of the Webroot software may still exist on your computer even after the uninstallation. Manually search for any remaining Webroot files or folders and delete them. Use caution and only delete files you are certain are related to Webroot.
- Disable antivirus protection: Antivirus software, including Webroot, can sometimes interfere with the uninstallation process. Temporarily disable any other antivirus software on your computer and try uninstalling Webroot again.
- Seek assistance from Webroot support: If none of the above steps resolve the uninstallation issues, it’s best to reach out to Webroot support for further assistance. Their technical support team can provide guidance specific to your situation and help you resolve any uninstallation problems.
Remember to always exercise caution when making changes to your computer, especially when modifying or deleting files. Make sure to carefully follow instructions and backup important data before attempting any troubleshooting steps.
By troubleshooting any uninstall issues effectively, you can ensure the complete removal of Webroot from your computer.


