
Check System Requirements
Before proceeding with the uninstallation process, it is essential to ensure that your Mac meets the necessary system requirements for running Dropbox. By doing so, you can avoid any potential conflicts or compatibility issues that may arise during the uninstallation process.
Here are the minimum system requirements for running Dropbox on a Mac:
- Operating System: Mac OS X 10.10 Yosemite or later
- Processor: Intel Core 2 Duo or higher
- Memory (RAM): At least 2GB
- Hard Disk Space: 250MB of free space
If your Mac meets these requirements, you can proceed with the uninstallation process without any concerns. However, if your system does not meet these requirements, it is advisable to upgrade your hardware or operating system before uninstalling Dropbox.
Additionally, it is essential to ensure that you have a stable and uninterrupted internet connection while uninstalling Dropbox, as the process may require downloading necessary files or syncing data. Having a reliable internet connection will help avoid any interruptions or errors during the uninstallation process.
Remember, checking the system requirements beforehand will help ensure a smooth and successful uninstallation process, minimizing the risk of encountering any unexpected issues or errors. With this step out of the way, you can now proceed to the next steps to uninstall Dropbox on your Mac.
Sign Out of Dropbox
Before uninstalling Dropbox from your Mac, it is crucial to sign out of your Dropbox account to ensure that all your data is properly synced and saved. By signing out, you will prevent any potential loss of files or changes once the application is removed from your system.
To sign out of Dropbox, follow these simple steps:
- Open the Dropbox application on your Mac.
- In the menu bar, click on the Dropbox icon.
- From the dropdown menu, click on your profile picture or initials.
- Select “Preferences” from the list of options.
- In the Preferences window, click on the “Account” tab.
- Click on the “Sign out” button.
- A confirmation dialog box will appear. Click “Sign out” again to confirm.
Once you have signed out of your Dropbox account, you can proceed with the uninstallation process without worrying about any unsynced data or changes.
It is important to note that signing out of Dropbox does not delete any of your files or folders. Your files will still be accessible on the Dropbox website or other devices where you have the application installed. Signing out simply disconnects your Mac from your Dropbox account.
If you have multiple Dropbox accounts linked to your Mac, make sure to sign out from all the accounts to avoid any confusion during the uninstallation process.
Signing out of Dropbox ensures that your data is safe and synced before you uninstall the application from your Mac. Once you have completed this step, you can move on to the next section to stop Dropbox from running on your system.
Stop Dropbox from Running
Before uninstalling Dropbox from your Mac, it is important to ensure that the application is not running in the background. By stopping Dropbox from running, you can prevent any potential conflicts or issues during the uninstallation process.
Here are the steps to stop Dropbox from running on your Mac:
- Click on the Dropbox icon in the menu bar at the top right corner of your screen.
- In the dropdown menu, click on the gear icon.
- From the options that appear, select “Quit Dropbox”.
- Alternatively, you can also right-click on the Dropbox icon and select “Quit Dropbox” from the context menu.
Once you have quit Dropbox, it is recommended to wait a few moments to ensure that the application fully shuts down before proceeding with the uninstallation process. You can check if Dropbox has completely stopped running by opening the Activity Monitor on your Mac and ensuring that there are no Dropbox-related processes running.
Stopping Dropbox from running prevents any active syncing or file operations that could occur while the uninstallation process is underway. This avoids any potential conflicts or interruptions and ensures a smooth uninstallation experience.
Now that you have successfully stopped Dropbox from running on your Mac, you can proceed to the next section to uninstall the Dropbox application from your system.
Uninstall Dropbox Application
Now that you have signed out of Dropbox and stopped the application from running, it’s time to uninstall Dropbox from your Mac. There are a few different methods you can use to uninstall the Dropbox application, depending on your preference:
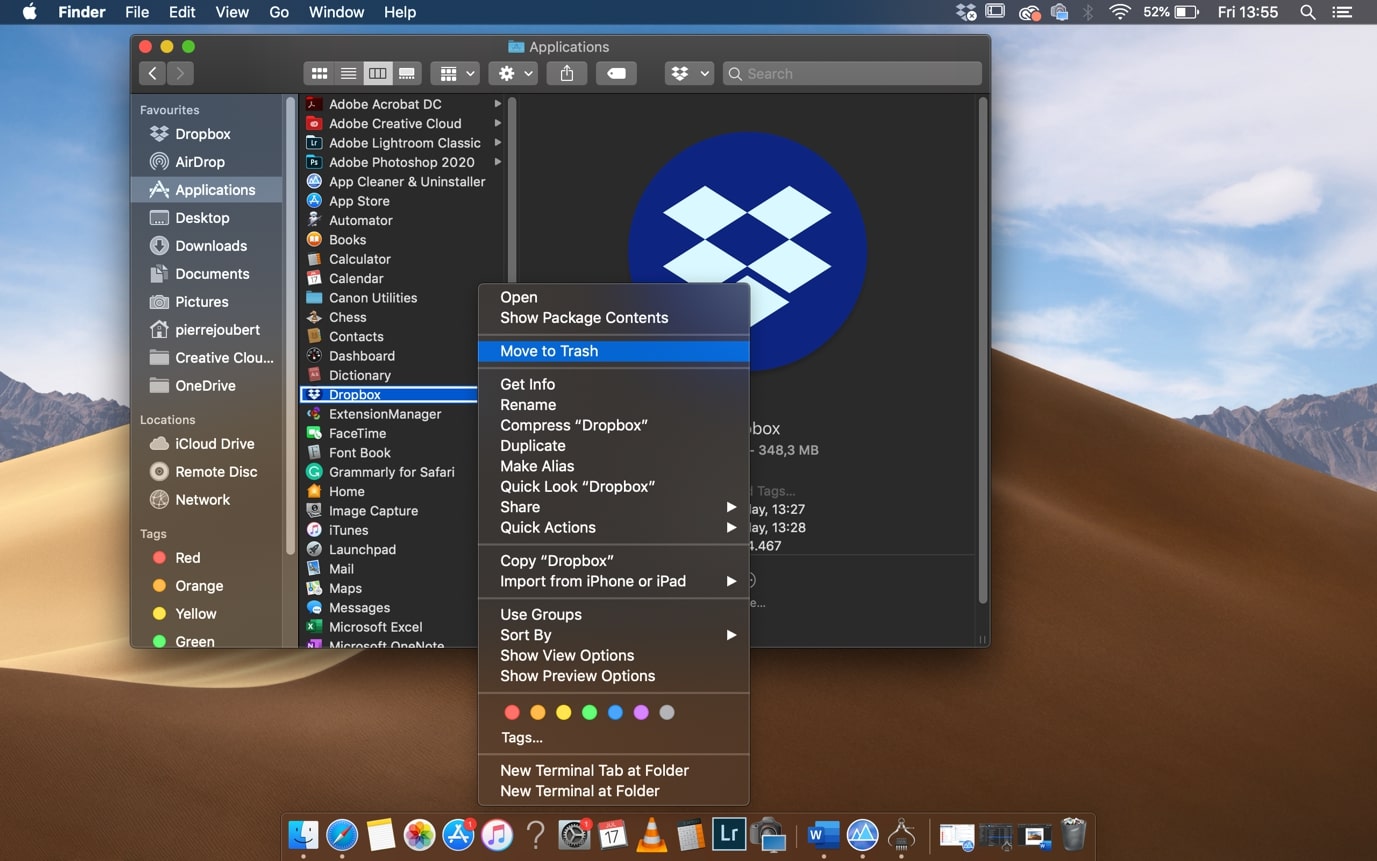
- Drag and Drop Method: Locate the Dropbox application in your Applications folder. Click and hold the application icon, then drag it to the Trash bin on your Dock. Alternatively, you can right-click on the Dropbox icon and select “Move to Trash”. Once in the Trash bin, right-click on the Trash bin icon and select “Empty Trash” to permanently delete Dropbox from your Mac.
- Uninstaller Utility: Some applications, including Dropbox, come with their own uninstaller utility. To use the Dropbox uninstaller, open your Applications folder, locate the Dropbox application, and double-click on the uninstaller file. Follow the prompts to uninstall Dropbox from your Mac.
- Third-Party Uninstaller: If you prefer a more comprehensive uninstallation process, you can use third-party uninstaller applications such as AppCleaner or CleanMyMac. These utilities scan your system for all associated files and folders and remove them along with the application.
Regardless of the method you choose, make sure to follow the prompts and confirm the uninstallation process to remove Dropbox from your Mac completely.
Uninstalling Dropbox will remove the application itself, but keep in mind that your files and folders stored in Dropbox will still be accessible through the Dropbox website or other devices where the application is installed. Uninstalling Dropbox does not delete your cloud-stored data.
Once you have successfully uninstalled Dropbox from your Mac, you can move on to the next section to remove any remaining Dropbox files and folders from your system.
Remove Dropbox Files and Folders
After uninstalling the Dropbox application from your Mac, there may still be residual files and folders associated with Dropbox that you may want to remove to free up disk space. These files can include cached data, preferences, and other remnants from the Dropbox application.
Here are the steps to remove Dropbox files and folders from your Mac:
- Open Finder on your Mac.
- Click on the “Go” option in the menu bar and select “Go to Folder”.
- In the “Go to Folder” window, type “~/Library” (without quotes) and press Enter.
- In the Library folder, locate and open the “Application Support” folder.
- Find the Dropbox folder, right-click on it, and select “Move to Trash”.
- Go back to the Library folder and open the “Caches” folder.
- Locate the com.dropbox.DropboxCache folder, right-click on it, and select “Move to Trash”.
- Finally, go to the Library folder once again and open the “Preferences” folder.
- Find any files that start with “com.dropbox” and move them to Trash.
Once you have transferred all the necessary Dropbox files and folders to Trash, right-click on the Trash bin icon in your Dock and select “Empty Trash” to permanently delete them from your Mac.
Removing these residual files ensures that no traces of Dropbox are left on your system and helps reclaim precious disk space.
With the Dropbox files and folders successfully removed, you are one step closer to completing the uninstallation process. Next, we will explore how to remove Dropbox from the startup items on your Mac.
Remove Dropbox from Startup Items
When you uninstall Dropbox from your Mac, it’s important to remove it from the startup items as well. By removing Dropbox from the startup items, you prevent it from automatically launching when you boot up your computer.
Here’s how to remove Dropbox from the startup items on your Mac:
- Click on the Apple menu in the top-left corner of your screen and select “System Preferences”.
- In the System Preferences window, click on “Users & Groups”.
- Make sure the user account you want to modify is selected in the sidebar.
- Switch to the “Login Items” tab.
- In the Login Items list, locate Dropbox.
- Select Dropbox and click on the “-” (minus) button below the list to remove it from the startup items.
By removing Dropbox from the startup items, you ensure that it won’t launch automatically when you start your Mac, giving you more control over your computer’s resources and startup processes.
Once you have removed Dropbox from the startup items, you can move on to the next section to clear the Dropbox cache from your Mac.
Clear Dropbox Cache
When using Dropbox, the application stores cache files on your Mac to improve performance and provide quicker access to your files. However, after uninstalling Dropbox, you may want to clear the cache to free up disk space and ensure that no unnecessary files remain on your system.
Clearing the Dropbox cache is a straightforward process. Here’s how you can do it:
- Open Finder on your Mac.
- Click on the “Go” option in the menu bar and select “Go to Folder”.
- In the “Go to Folder” window, type “~/Library” (without quotes) and press Enter.
- In the Library folder, locate and open the “Caches” folder.
- Find the folder named “com.dropbox.DropboxMacUpdate” and move it to Trash.
Clearing the Dropbox cache helps remove any temporary files that were stored by the application, reducing the amount of occupied disk space on your Mac. This step ensures a more thorough uninstallation process and leaves your system cleaner and more optimized.
Once you have cleared the Dropbox cache, you can proceed to the final section to delete the Dropbox preferences from your Mac.
Delete Dropbox Preferences
Even after uninstalling Dropbox from your Mac and clearing the cache, there may still be preference files remaining on your system. These preference files store user-specific settings and configurations for the Dropbox application. To ensure a clean uninstallation, it is recommended to delete these preferences from your Mac.
Here’s how you can delete Dropbox preferences:
- Open Finder on your Mac.
- Click on the “Go” option in the menu bar and select “Go to Folder”.
- In the “Go to Folder” window, type “~/Library” (without quotes) and press Enter.
- In the Library folder, locate and open the “Preferences” folder.
- Find any files that start with “com.dropbox” and move them to Trash.
Deleting the Dropbox preferences removes any leftover configuration files from your Mac, ensuring that all traces of Dropbox are removed from your system.
Once you have deleted the Dropbox preferences, you have successfully completed the uninstallation process. Your Mac is now free from the Dropbox application and its associated files.
It’s worth noting that deleting the Dropbox preferences does not affect your cloud-stored files or account. You can still access your files through the Dropbox website or other devices where you have the Dropbox application installed.
Congratulations! You have successfully uninstalled Dropbox and removed all related files from your Mac. If you ever decide to reinstall Dropbox in the future, you can start with a fresh installation.
Restart Your Mac
After completing the uninstallation process and removing all traces of Dropbox from your Mac, it is highly recommended to restart your computer. Restarting your Mac can help ensure that any residual processes or temporary files are cleared, providing a fresh start and optimizing your system’s performance.
To restart your Mac, follow these simple steps:
- Click on the Apple menu in the top-left corner of your screen.
- From the dropdown menu, select “Restart”.
- A confirmation dialog will appear. Click “Restart” to proceed.
During the restart process, your Mac will shut down and then power back on. This brief shutdown period allows the system to reset and initialize any changes you have made, including the removal of Dropbox.
Restarting your Mac after uninstalling Dropbox is essential, as it ensures that any background processes related to the application are terminated, and your system starts fresh without any remnants of Dropbox affecting its performance.
After your Mac has restarted, you can proceed to use it as usual, knowing that Dropbox has been completely uninstalled and removed from your system.
By following these steps, you have successfully uninstalled Dropbox from your Mac and eliminated all associated files and preferences. Your Mac is now free from Dropbox, allowing you to reclaim disk space and optimize your system’s performance.
Should you ever decide to reinstall Dropbox in the future, you can follow the official installation instructions provided by Dropbox to start using the application again.
Remember, uninstalling Dropbox is a reversible process, and you can always choose to reinstall it if you find the need to do so in the future.